
Related Manuals for Futurepump SF2


Summary of Contents for Futurepump SF2
- Page 1 Futurepump SF2/ SF2H Installation Manual Manuel d’installation Manual de instalación v. 2 06/22...
- Page 2 Contents: 1 x Futurepump SF2/SF2H pump 2 x panels, hinge and panel stand system 1 x Suction hose (6m) - 1 1/4” (32mm) - with filter/strainer 1 x Box of spare parts and tools: • 3 x spare flywheel belts •...
- Page 3 Conecte el panel a la caja de interruptores Switch on the pump!..................18 Mettre en marche la pompe! ¡Encienda la bomba! Make sure you have registered your 10 year warranty..20 Assurez-vous d’avoir enregistré votre garantie de 10 ans Asegúrese de haber registrado su garantía de 10 años warranty.futurepump.com...
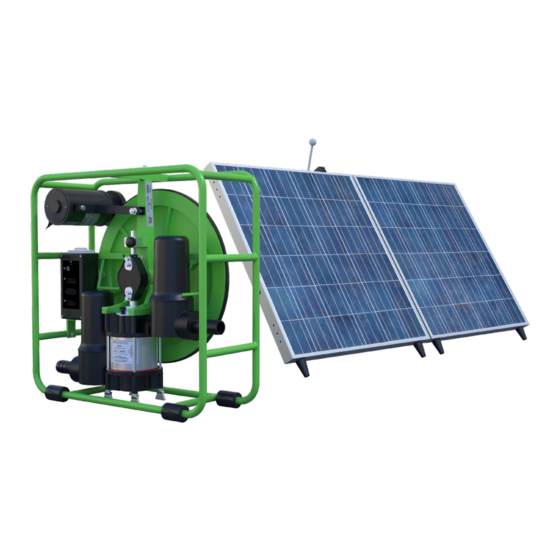
- Page 5 The parts Les composantes Las partes Solar panel / Panneau solaire / Panel solar Panel support / Support du panneau / Soporte del panel Piston rod & yoke / Tige du piston & bielle / Vástago de pistón y yugo Pump chamber / Corps de la pompe / Cámara de bombeo Inlet / Entrée / Succión Outlet / Sortie / Descarga...
- Page 6 Identify installation location Identifier l’emplacement de l’installation Identificar lugar para la instalación Near water source A proximité d’une source d’eau Cerca del suministro de agua In full sunlight En plein soleil Orientado al sol As near as possible to irrigated plot Plus proche possible de la parcelle à...
- Page 7 Measure total head (SF2) Mesurer la hauteur monométrique totale Medir altura total Discharge Lift Ascenseur de decharge Elevacion de discharga Total Head Hauteur manométrique totale Altura total Suction Lift Hauteur d’aspiration Max 15m Elevacion de succion (50ft) Max 7m (22ft) Measure the total head that the pump will need to lift the water.
- Page 8 Measure total head (SF2H) Mesurer la tête totale Medir cabeza total Discharge Lift Hauteur de décharge Elevacion de discharga Total Head Hauteur manométrique totale Altura total Max 45m (148ft) Suction Lift Hauteur d’aspiration Elevacion de succion Max 7m (22ft)
- Page 9 Unpack Pump Déballez la pompe Desempaque la bomba Remove the panel stand from the cage. Cut the plastic strapping and lower the motor onto the flywheel. Remove the bolts and black spacers holding the flywheel so the wheel moves freely. Retirez le support de panneau de la cage.
-
Page 10: Initial Checks
Initial checks Vérifications initiales Controles iniciales Rotate the flywheel clockwise by hand. Check that the pulley is touching the flywheel and is straight and that the wheel can move freely. Tournez le volant dans le sens des aiguilles d’une montre à la main. - Page 11 Check pulley Vérifier la poulie Compruebe la polea Small Pulley/ Petite poulie/ Polea Pequeña Large pulley/ Grande poulie/ Polea grande The pulley has two settings. Select the correct on, based on the total pressure to the pump and the radidation available. La poulie a deux réglages.
- Page 12 Check pulley continued Compruebe la polea Vérifier la poulie a continué To adjust the pulley, unscrew the front knob on the motor shaft, remove the pulley from the motor and turn the pulley around. Re-mount the pulley onto the motor shaft and replace the front knob.
- Page 13 Stand up panel Panneau debout Panel de pie Open the hinges on the panel stand and unscrew the mounting screws. Stand up panels with wire facing up. Ouvrez les charnières du support du panneau et dévissez les vis de montage. Tenez les panneaux avec le fil vers le haut.
- Page 14 Stand up panel Panneau debout Panel de pie Clamp hinges onto the panel, make sure the wire is not trapped. Tighten the mounting screws. Loop the cable through the clips as shown. Fixez les charnières sur le panneau, assurez-vous que le fil n’est pas coincé.
- Page 15 Stand up panel Panneau debout Panel de pie Unscrew the knob to insert the prop bar and tighten to secure. To angle the panel to the sun, loosen the knob to slide the panel down or up on the stand. Tighten the knob to secure. Dévissez le bouton pour insérer la barre d'appui et serrez-le pour le fixer.
-
Page 16: Connect Inlet Hose
Connect inlet hose Connectez le tuyau d’admission Conecte la manguera de entrada Connect the inlet hose to the inlet side on the pump (the lower hose nipple). The recommended hose size: 1 1/4” (32mm) Connectez le tuyau d’aspiration à la prise d’entrée de la pompe (embout de tuyau inférieur). - Page 17 Using the tapered Note hose nipple Embout conique du tuyau Boquilla cónica de la manguera Attach the hose to the pump by pushing it into the air vessel and turning it one way until it is secure. To remove, twist the hose nipple in the opposite direction to insertion then pull.
-
Page 18: Prime Pump
Prime pump Amorcer de la pompe Llenar la bomba Fill the pump chamber with water. Remplissez le corps de la pompe avec de l’eau. Llene la cámara de la bomba con agua. - Page 19 Connect outlet hose Raccordez le tuyau de sortie Conecte la manguera de salida Recommended hose size / Taille de tayau recommandée / Tamaño de manguera recomendado: 1 1/4” (32mm) Connect the outlet hose to the tapered hose nipple, then attach this to the outlet side of the pump. *The SF2H comes with an additional threaded hose collar for securing the connection.
-
Page 20: Plug In Panel
Plug in panel Connecter le panneau Panel enchufable Plug the panel into the switch box socket, ensuring plug grooves align. Branchez le panneau dans la prise du boîtier de commutation, en veillant à aligner les rainures de la fiche. Conecte el panel en el enchufe de la caja del interruptor, asegurándose de que las ranuras del enchufe estén alineadas. -
Page 21: Start The Pump
Start the pump Démarrer la pompe Poner en marcha la bomba Flip the switch to the on position. Congratulations, you now have a fully operational pump! Basculez l’interrupteur en position marche. Félicitations, maintenant vous avez une pompe totalement opérationnelle! Mueva el interruptor a la posición de encendido. ¡Felicidades, ahora tiene una bomba completamente operativa! - Page 22 Optimum hose sizes Diamètres optimales des tuyaux SF2 Diámetros óptimos de manguera SF2 Total head Hauteur totale Elevación total (m) Pipe size/ Diamètre du 0 to 2 2 to 4 4 to 8 8 to 12 12 to 15 tuyau/ Diámetro de...
- Page 23 Optimum hose sizes SF2H Diamètres optimales des tuyaux SF2H Diámetros óptimos de manguera SF2H Total head Hauteur totale Elevación total (m) Pipe size/ Diamètre du tuyau/ Flexible hose Rigid PVC pipe Diámetro de 15 to 20 20 to 45 15 to 20 20 to 45 manguera Length of...
- Page 24 Enregistrement de votre garantie Registro de su garantía To register your warranty is easy: 1. Log on to warranty.futurepump.com 2. Enter your pump serial number and your details 3. Click register You will now receive 10 years warranty on all spare parts and labour.
- Page 25 2. Equipos de Futurepump que han sido modificados sin aprobación previa; 3. Reparaciones realizadas por personal no autorizado por Futurepump. 4. Daños causados por el uso de equipos que no se proveen por Futurepump; 5. Casos de fuerza mayor; 6. Daños incidentales o consecuentes, como romper el panel solar o la bomba a través del...
- Page 26 Avoid extreme back pressure on the pump: optimal hose size is greater than 1-inch, avoid kinks in the pipe, if using sprinklers connect max 4 (SF2) or 2 (SF2H) Do not leave the pump outside in the elements -...
- Page 27 à 1 pouce, évitez les déformations du tuyau, si vous utilisez des arroseurs, connectez-les max 4 (SF2) ou 2 (SF2H). Ne laissez pas la pompe à l’extérieur dans les éléments - si vous ne l’utilisez pas, stockez-la à l’intérieur ou recouvrez-la Ne pas essayer d’alimenter la pompe avec autre chose...
- Page 28 óptimo de la manguera es mayor a 1 pulgada, evite torceduras en la tubería, si usa rociadores, conecte max 4 (SF2) o 2 (SF2H) No deje la bomba afuera en los elementos; cuando no esté en uso, guárdela dentro o cúbrala No intente alimentar la bomba con nada más que...
- Page 29 Have you registered your warranty? Visit warranty.futurepump.com to register for your 10 year warranty Problem with your pump? Please reach out to the shop where you purchased your pump or visit support.futurepump.com Avez-vous rempli votre garantie ? Visitez warranty.futurepump.com pour vous inscrire à...
- Page 30 DC Motor: Make: Adroit Systems, Pune - 411048. India Sr.No.: Test Applied Current Total Lift Discharge NOTES: Parameters Volts Drawn SF2 is tested under 6 meters (physical) of total Units (meters) (lph) (4.5 meters suction + 1.5 meters discharge) head. Specified SF2 63 max 1.5 max 1900 min...
Need help?
Do you have a question about the SF2 and is the answer not in the manual?
Questions and answers