Table of Contents
Advertisement
Quick Links
Please give us a chance to make it right and do better !
Contact our friendly customer service department for help first.
Replacements for missing or damaged parts will be shipped ASAP !
US office: Fontana
UK office: Ipswich
DE office: Hamburg
FR office: Saint Vigor d'Ymonville
Contact Us!
Do NOT return this item.
AU office: Truganina
PL office: Gdańsk
US:cs.us@costway.com
UK:cs.uk@costway.com
AU:cs.au@costway.com
THIS INSTRUCTION BOOKLET CONTAINS IMPORTANT SAFETY INFORMATION. PLEASE READ AND KEEP FOR FUTURE REFERENCE.
USER'S MANUAL
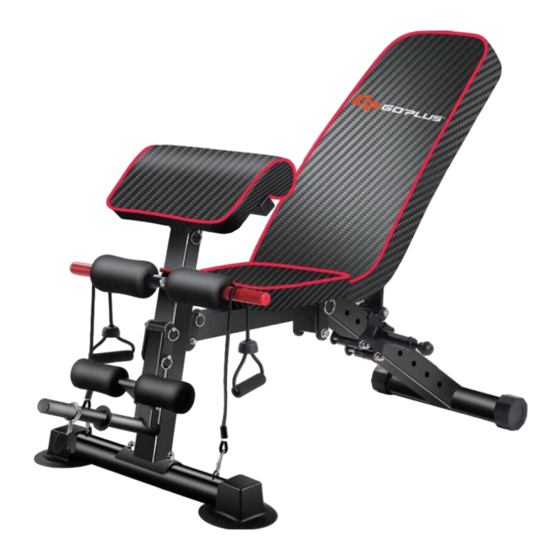
Weight Bench
FH10014DK
Advertisement
Table of Contents

Related Manuals for Costway GOPLUS FH10014DK


Summary of Contents for Costway GOPLUS FH10014DK
- Page 1 DE office: Hamburg FR office: Saint Vigor d'Ymonville PL office: Gdańsk USER’S MANUAL Contact Us! Weight Bench FH10014DK US:cs.us@costway.com Do NOT return this item. UK:cs.uk@costway.com AU:cs.au@costway.com THIS INSTRUCTION BOOKLET CONTAINS IMPORTANT SAFETY INFORMATION. PLEASE READ AND KEEP FOR FUTURE REFERENCE.
- Page 2 First, matters needing attention in safe use One .Safety & Warnings 1) Please read the instructions and warnings carefully before using and installing the product. 2) Please consult your doctor before exercising and be sure to use this product correctly. If you have abnormal feeling of vertigo, chest tightness, physical Before You Start discomfort, abnormal pain, etc., please stop using the unit...
- Page 3 10) Please do not exercise for 40 minutes after meals. Three .The Installation Diagram 11) Please ensure that the space between the equipment and Step one: Open the package to confirm the product obstacles should not be less than 0.6 meters. components 12) When using this equipment, minors should be under adult supervision and strictly follow the instruction manual.
- Page 4 Step three: Install foot cover and front foot pipe 13 Hold hands 14 Cremorne bolt 15 The dumbbell leather cushion (m8x66)(one pieces) retaining clip 8 Carriage screw 2 foot tube 5 Front foot cover M8 × 55 (two pieces) Step two: Install the main frame 9 cremorne bolt 1 body frame (m8x72)(two pieces)
- Page 5 Step four: Install the rear foot cover Step five: Install support pipe 6 Rear foot cover 14 Cremorne bolt 13 Hold hands leather cushion (m8x66)(one pieces)
- Page 6 Step six: Install the foot rest pipe Step seven: Install the foot rest pipe 3 Put your foot on the pipe (with handrails) 11 Outer hexagonal screw m8x55 (one piece) 4 Lower foot tube...
- Page 7 Step eight: Install a dumbbell rack Step nine:Adjust dumbbell bench gear After the black plug is sold to the outside, adjust the proper gear, and release it. 9 cremorne bolt (m8x72)
Need help?
Do you have a question about the GOPLUS FH10014DK and is the answer not in the manual?
Questions and answers