
Subscribe to Our Youtube Channel
Related Manuals for Simpro DUMPMASTER DM0700


Summary of Contents for Simpro DUMPMASTER DM0700
- Page 1 USER MANUAL User Manual | Simpro Dumpmaster® Original Instructions // English // v119.0 // October 2022...
- Page 2 Copyright © 2022 Simpro Handling Equipment Ltd. No part of this document may be reproduced or transmitted in any form or by any means, electronic, mechanical, photocopying, recording, or otherwise, without the written permission of Simpro Handling Equipment Ltd. For the purposes of standards compliance and international conformity, this document uses Système International (SI) units.
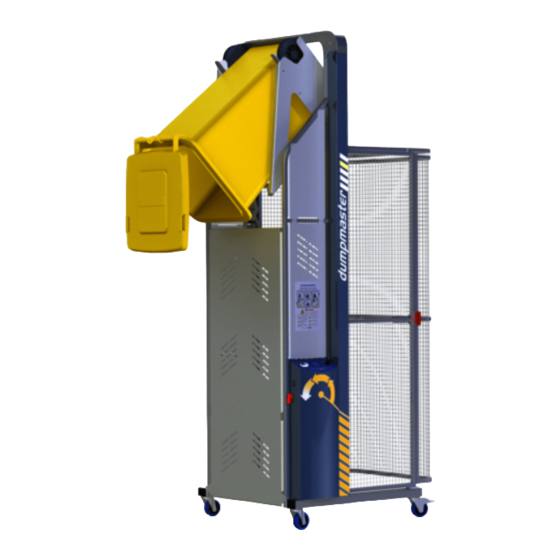
- Page 3 Generic Dumpmaster layout and dimensions User Manual // Simpro Dumpmaster® Original Instructions // English // v119.0 // October 2022 // Page...
-
Page 4: Table Of Contents
C ont ent s Product Overview ......................... 5 Key features ............................5 Construction ............................5 Mechanism ............................6 Safe Working Load ..........................6 Duty cycle ............................6 Service life ............................7 Noise emissions ............................ 7 Environmental restrictions ........................7 Ingress protection ..........................7 1.10 Notes .............................. - Page 5 Hazard and Risk Assessment Guide ....................43 OSH Compliance Specification Guide ................... 48 Spare Parts ........................... 51 Warranty ............................53 EC Declaration of Conformity ....................55 Notes ............................. 56 User Manual // Simpro Dumpmaster® Original Instructions // English // v119.0 // October 2022 // Page...
-
Page 6: Product Overview
1 . P ro duct O ve rvie w Congratulations on your purchase of a Simpro Dumpmaster bin-tipping machine. Dumpmaster is probably the safest and most reliable bin tipper on the market, having been in continuous production for more than thirty years. -
Page 7: Mechanism
*2x 12V/20Ah batteries in series; default from 2015 **Subject to weather, latitude, and panel orientation; see §3.4.9 ***Deprecated since 2019 Power supply specifications can be found on the machine’s rating plate. User Manual // Simpro Dumpmaster® Original Instructions // English // v119.0 // October 2022 // Page... -
Page 8: Service Life
1.6 Service life The nominal service life of the Dumpmaster is as follows: Average Gross Bin Weight Nominal service life < 100kg 200,000 cycles 100kg – 200kg 150,000 cycles 200kg – 250kg 100,000 cycles 250kg – 300kg 75,000 cycles > 300kg 50,000 cycles 1.7 Noise emissions The noise emissions of the Dumpmaster do not typically exceed ~60 dB(A) at the operator’s... -
Page 9: Notes
4. If the machine is to be leased, sold, or otherwise transferred, then this manual shall accompany the machine. 5. This is a generic manual. Simpro reserves the right to change the design of our products at any time. In cases where a discrepancy exists between the manual and the actual product, the manual is to be used as a reference only. -
Page 10: Operating Instructions
2 . O p e rat i n g Instru ct io n s Before the machine is used for the first time, a site-specific Hazard and Risk Assessment should be completed as per §5.3. 2.1 Before operation Before operating a Dumpmaster, check the following points to ensure that the machine is stable and safe to use: 1. - Page 11 Food processing DIN9797 - 200L §2.2.6 applications Eurobins (DIN9797) - 300L BRUTE® Bins Type-X Custom 205L Drums §2.2.7 applications Plastic Tubs (Custom) Customs Bins User Manual // Simpro Dumpmaster® Original Instructions // English // v119.0 // October 2022 // Page...
-
Page 12: Type-E Cradle
2.2.2 Type-E Cradle 2.2.2.1 Emplacing bins Open the door and place the wheelie bin onto the cradle. For full-size 240L bins, both wheels should be positioned into a catch (on either side of the cradle). For smaller bins such as 60L, 80L, 120L and 140L, only the left-hand wheel needs be positioned into a catch. -
Page 13: Type-A Cradle With Base
2.2.7.2 Removing bins Open the door, and holding the upper lip of the bin, drum, or container, remove it from the cradle. User Manual // Simpro Dumpmaster® Original Instructions // English // v119.0 // October 2022 // Page... -
Page 14: Operation Of Controls
2.3 Operation of controls The Dumpmaster controls are designed to allow safe, intuitive operation of the machine. It is important to understand how to use the controls correctly. Improper operation may result in a safety hazard, or damage to the machine. 2.3.1 Control Panel identification The Dumpmaster may be fitted with a variety of different controls, depending on the operational and safety requirements of the machine. -
Page 15: Standard Control Panel
2. Open the door and place the full bin onto the cradle, taking care that it is properly positioned as per §2.2, then shut the door. 3. Turn the mode-selector switch to MANUAL. User Manual // Simpro Dumpmaster® Original Instructions // English // v119.0 // October 2022 // Page... -
Page 16: Vsd Control Panel
4. Press and hold the RAISE button until the bin reaches the inverted position, then release. Wait for the contents of the bin to empty. Release the RAISE/LOWER button or press the EMERGENCY STOP button to stop the cradle at any time. 5. - Page 17 Once the cradle has lowered, the door is automatically unlocked for about 15 seconds. If the door re-locks, press the LOWER button to unlock it at any time. User Manual // Simpro Dumpmaster® Original Instructions // English // v119.0 // October 2022 // Page...
-
Page 18: Safety Norms
2.4 Safety Norms The following safety norms must be observed for the safe use of a Dumpmaster bin lifter. Only trained and authorised personnel may use the machine. Operators must read and obey all instructions displayed on the machine. Never operate the machine on soft ground, or ground with a slope ratio greater than 1:12. - Page 19 The manufacturer cannot be held liable for the consequences of an inadequate earthing system. User Manual // Simpro Dumpmaster® Original Instructions // English // v119.0 // October 2022 // Page...
-
Page 20: Care And Maintenance
Contact your agent in the first instance if repair or service work is required. All repair and service work must be carried out by qualified personnel. Replacement parts must be supplied by Simpro or an authorized Simpro agent, and must be of the same design and specification as the original parts. -
Page 21: Cleaning
IP ratings of the machine and major subcomponents. If it is necessary to clean underneath the cradle, the control system can be modified to allow this while maintaining operator safety – contact your Simpro agent for assistance. 3.3 Cradle jams Occasionally the cradle may become jammed at some point in the tipping cycle. -
Page 22: Cradle Jams While Lowering
3.3.2 Cradle jams while lowering There are three types of problem which can prevent the cradle from lowering when the LOWER button is pressed: hydraulic, electrical, and mechanical faults. The cradle is not powered down – it is lowered by gravity alone. §3.7.6 for a schematic diagram of the hydraulic system. - Page 23 6. Re-enable the safety door interlock as per §3.8.3.1, close the door and run the machine through several complete tipping cycles with no bin in the cradle, to ensure the problem has been properly resolved. User Manual // Simpro Dumpmaster® Original Instructions // English // v119.0 // October 2022 // Page...
-
Page 24: Electrical System (Battery)
3.4 Electrical System (battery) If you do not operate a battery-powered machine, please disregard this section. Battery Dumpmasters are supplied with two 12V/20Ah VRLA deep-cycle Gel batteries connected in series, a digital smart charger, and a series-wound 800W/24VDC motor. The control voltage is 24VDC. -
Page 25: Batteries
Machines produced prior to 2020 were fitted with an 60A automotive blade-fuse instead 0790050101 of a circuit breaker. Fuses are available from Simpro or any auto-parts store. User Manual // Simpro Dumpmaster®... -
Page 26: Solar Panel
3.4.9 Solar panel Complete Kit 0090040077 Panel 0250050530 Controller 0250050462 If you do not operate a machine with a solar panel, please disregard this section. The Dumpmaster can be fitted with a solar panel kit for use in off-grid locations. The 80W monocrystalline solar panel (dimensions 930x673x35mm) is mounted on an adjustable steel bracket at the top of the mast, and charges the battery via a 12V/24V digital regulator. -
Page 27: Electrical System (3-Phase Mains)
The Dumpmaster is fitted with a transformer to supply 24VDC current to the control systems. The input voltage and frequency are specified to suit standard 3-phase mains power in the intended country of use. User Manual // Simpro Dumpmaster® Original Instructions // English // v119.0 // October 2022 // Page... -
Page 28: Electrical System (1-Phase Mains)
3.6 Electrical System (1-phase mains) If you do not operate a 1-phase mains machine, please disregard this section. Dumpmasters powered by 1-phase mains electricity are generally the same as other models, but use a Variable Speed Drive (VSD) to drive a 3-phase 2-pole electric motor, which drives the hydraulic pump. -
Page 29: Hydraulic System
Ensure the cradle is completely lowered before replacing the hydraulic fluid. The hydraulic reservoir has markings showing the recommended fill level. Do not fill beyond this level unless specifically instructed by the manufacturer. User Manual // Simpro Dumpmaster® Original Instructions // English // v119.0 // October 2022 // Page... -
Page 30: Maintenance
3.7.5 Maintenance After every 12 months of operation the hydraulic fluid should be drained and replaced, as per specifications in §3.7.4. The intake suction-filter and the lowering valve should also be removed and cleaned at this time. §3.10 for other preventative maintenance inspection procedures. 3.7.6 Hydraulic system schematic... -
Page 31: Safety Door And Interlock
This work should only be carried out by a qualified technician. The interlock Override Key should be stored in a location only accessible to supervisors and technical staff. User Manual // Simpro Dumpmaster® Original Instructions // English // v119.0 // October 2022 // Page... - Page 32 All routine cleaning and maintenance on the Dumpmaster should be conducted with the cradle in the lowered position. If for any reason the interior of the safety cage needs to be accessed while the cradle is raised, the interlock(s) can be manually disabled by carrying out the following procedure: 1.
- Page 33 Interlock specifications A summary of the interlock specifications is included below. The complete Idec user manual can be downloaded from the following link: https://goo.gl/iafPoI. User Manual // Simpro Dumpmaster® Original Instructions // English // v119.0 // October 2022 // Page...
-
Page 34: Safety-Monitoring System (Cat3/Cat4 Only)
3.9 Safety-Monitoring System (CAT3/CAT4 only) If you do not operate a machine with a CAT3 or CAT4 safety monitoring system please disregard this section. Machines with CAT3 or CAT4 safety architecture are supplied with a Rockwell CR-30 Safety 0960050027 Relay to monitor the safety functions. -
Page 35: Troubleshooting
The CR30 has a USB interface for connection to a personal computer for configuration. Use a standard USB A Male to B Male cable for connecting to the relay. User Manual // Simpro Dumpmaster® Original Instructions // English // v119.0 // October 2022 // Page... -
Page 36: Preventative Maintenance Inspections
3.10 Preventative Maintenance Inspections Regular preventative maintenance inspections (PMIs) should be carried out on the Dumpmaster. This helps ensure operator safety and extend the service life of the machine. The Dumpmaster PMI schedule is divided into three parts: weekly, monthly and annual inspections. - Page 37 Service Checks Notes on repairs or Parts and Date Location Person complete maintenance required materials used User Manual // Simpro Dumpmaster® Original Instructions // English // v119.0 // October 2022 // Page...
-
Page 38: Monthly Inspection
3.10.3 Monthly inspection The following inspection should be carried out every month, and the results recorded in the log on the following page. Monthly Inspection Checklist Category Item Check Conduct a complete tipping cycle and check General Entire machine for any faults or abnormal behaviour. Hydraulic ram Check there are no oil leaks. - Page 39 Service Checks Notes on repairs or Parts and Date Location Person complete maintenance required materials used User Manual // Simpro Dumpmaster® Original Instructions // English // v119.0 // October 2022 // Page...
-
Page 40: Annual Inspection
3.10.4 Annual inspection The following inspection should be carried out every 12 months, and the results recorded in the log on the following page. Annual Inspection Checklist Category Item Check Conduct a complete tipping cycle and check General Entire machine for any faults or abnormal behaviour. - Page 41 Service Checks Notes on repairs or Parts and Date Location Person complete maintenance required materials used User Manual // Simpro Dumpmaster® Original Instructions // English // v119.0 // October 2022 // Page...
-
Page 42: Assembly, Handling And Storage
On a hard, flat surface, the Dumpmaster can be moved by a force of approximately 70 Newtons at a height of 1.6 metres. An accessory is available from Simpro which enables a directional lock on the castor wheels. This can make the machine easier to manoeuvre on sloping ground. - Page 43 4. Charge the batteries (if fitted) and lubricate the electrical contacts. 5. Turn the isolator switch OFF. 6. Remove the key and store it in a safe place. User Manual // Simpro Dumpmaster® Original Instructions // English // v119.0 // October 2022 // Page...
-
Page 44: Safety Assessment
5. S af ety A sse ssme nt The Dumpmaster has been designed to be as safe as possible without restricting the ease-of- use and versatility of the machine. Before the machine is used for the first time, a site-specific Hazard and Risk Assessment should be completed as per §5.3. - Page 45 Risks evaluated as Very High, Extreme or Unacceptable are likely to require additional or uprated safety functions, as per §5.4.4. These must be specified at the time of order. User Manual // Simpro Dumpmaster® Original Instructions // English // v119.0 // October 2022 // Page...
- Page 46 5.3.2 Identified Hazards The following hazards have been identified that are intrinsic to the Dumpmaster design. For each hazard a full Risk Evaluation has been completed and control measures described. Blank template spaces are provided at the end for machinery owners to identify, assess and control additional application-specific hazards.
- Page 47 Other persons As above. Control All personnel must wear appropriate PPE when working in extreme measures environmental conditions. Comments §1.8 for Dumpmaster environmental restrictions. User Manual // Simpro Dumpmaster® Original Instructions // English // v119.0 // October 2022 // Page...
- Page 48 Site-specific hazard: DPH: Risk Factor: Operator DPH: Risk Factor: Other persons Control measures Comments Site-specific hazard: DPH: Risk Factor: Operator DPH: Risk Factor: Other persons Control measures Comments Site-specific hazard: DPH: Risk Factor: Operator DPH: Risk Factor: Other persons Control measures Comments Site-specific hazard:...
-
Page 49: Osh Compliance Specification Guide
– an indicator called Performance Level (PL). The standard defines five Performance Levels, ranging from PLa (lowest performance) to PLe (highest performance). User Manual // Simpro Dumpmaster® Original Instructions // English // v119.0 // October 2022 // Page... - Page 50 The standard also defines the Performance Level that a given safety function must achieve to reduce the risk to an acceptable level – a value called Performance Level required (PLr). 5.4.2 Identifying the required safety functions To identify the safety functions required for a given machine, a site-specific hazard and risk assessment must first be completed as per §5.3.
- Page 51 In any of these cases, information about the hazard and risk assessment, required safety function and performance level should be provided to Simpro before placing an order. Simpro can then specify and quote additional or uprated safety functions, such as:...
-
Page 52: Spare Parts
6. S par e Parts The following table includes only the most common Dumpmaster spare parts as at the time of publication. Additional parts, accessories and prices may be viewed at the following web address: simpro.world/dumpmaster-spare-parts Ref Partcode Description Qty* BSK †... - Page 53 User Manual // Simpro Dumpmaster® Original Instructions // English // v119.0 // October 2022 // Page...
-
Page 54: Warranty
“Agent” means a person or company authorized by Simpro to sell a Product. “Service Agent” means a person or company authorized by Simpro to repair a Product. “End User” means the first purchaser of a Product from a Sales Agent authorised by Simpro to sell the Product. - Page 55 Parts requiring replacement will be supplied by Simpro free of charge; in some cases, it may be necessary to source Parts locally if needed urgently, but Simpro must authorize this if the cost of the item exceeds $50.00 and is to be charged to Simpro.
-
Page 56: Ec Declaration Of Conformity
8 . E C D ec l arat io n of C onf o rm it y DECLARATION OF CONFORMITY ORIGINAL Business Name and Full Address of Manufacturer Simpro Handling Equipment Ltd 66 Rangi Road, Takanini 2105 Auckland, New Zealand Name and Address of Authorised Representative... -
Page 57: Notes
9. N ote s User Manual // Simpro Dumpmaster® Original Instructions // English // v119.0 // October 2022 // Page... - Page 59 User Manual // Simpro Dumpmaster® Original Instructions // English // v119.0 // October 2022 // Page...
- Page 60 +64 9 634 7445 Takanini 2105 sales@simpro.world Auckland, New Zealand shop.simpro.world PO Box 74 @simpro.world Takanini 2245 Auckland, New Zealand @SimproWorld_Lifters User Manual // Simpro Dumpmaster® Original Version // English // v119.0 // October 2022 // ©2022 Simpro Handling Equipment Ltd...
Need help?
Do you have a question about the DUMPMASTER DM0700 and is the answer not in the manual?
Questions and answers