GE Profile PP9830 Owner's Manual
Hide thumbs
Also See for Profile PP9830:
- Owners manual and installation manual (57 pages) ,
- Owner's manual & installation instructions (56 pages) ,
- Owner's manual & installation instructions (56 pages)
Table of Contents
Advertisement
Available languages
Available languages
Quick Links
USING THE COOKTOP
Cooktop Features . . . . . . . . . . . . . . . . . . . . . . . . .6
Surface Burners . . . . . . . . . . . . . . . . . . . . . . . . . . 7
Glass Cooktop . . . . . . . . . . . . . . . . . . . . . . . . . 10
CARE AND CLEANING
Cleaning the Cooktop . . . . . . . . . . . . . . . . . . . . 11
Cleaning the Glass Cooktop . . . . . . . . . . . . . . . 12
Before You Begin . . . . . . . . . . . . . . . . . . . . . . . . 14
Unpacking the Cooktop . . . . . . . . . . . . . . . . . . 16
Installation Preparation . . . . . . . . . . . . . . . . . . . 17
Cooktop Installation . . . . . . . . . . . . . . . . . . . . 20
Write the model and serial
numbers here:
Model # _________________
Serial # _________________
Find these numbers on a label
under the cooktop.
GE is a trademark of the General Electric Company. Manufactured under trademark license.
. . . . . . . . . . . . 3
. . 14
. . . . . . . . .25
. . . . . . . . . . . . . .26
. . . . . . . . . . . . . . . . . . . . . .27
. . . . . . . . . . . . .28
OWNER'S MANUAL AND
INSTALLATION INSTRUCTIONS
PP9830
ENGLISH
ESPAÑOL
Para consultar una version en
español de este manual de
instrucciones, visite nuestro sitio de
internet GEAppliances.com.
49-2001160 Rev. 0 09-22 GEA
Advertisement
Chapters
Table of Contents

Related Manuals for GE Profile PP9830


Summary of Contents for GE Profile PP9830
-
Page 1: Table Of Contents
Model # _________________ instrucciones, visite nuestro sitio de internet GEAppliances.com. Serial # _________________ Find these numbers on a label under the cooktop. GE is a trademark of the General Electric Company. Manufactured under trademark license. 49-2001160 Rev. 0 09-22 GEA... - Page 2 THANK YOU FOR MAKING GE APPLIANCES A PART OF YOUR HOME. Whether you grew up with GE Appliances, or this is your first, we’re happy to have you in the family. We take pride in the craftsmanship, innovation and design that goes into every GE Appliances product, and we think you will too.
-
Page 3: Safety Information
IMPORTANT SAFETY INFORMATION READ ALL INSTRUCTIONS BEFORE USING THE APPLIANCE Read all safety instructions before using the product. Failure to follow these instructions may result WARNING in fire, electrical shock, serious injury or death. WARNING GENERAL SAFETY INSTRUCTIONS described in this Owner’s Manual. rangetop. - Page 4 IMPORTANT SAFETY INFORMATION READ ALL INSTRUCTIONS BEFORE USING THE APPLIANCE WARNING RADIANT COOKTOP SAFETY INSTRUCTIONS WARNING NEVER operate the top surface the fan on. cooking section of this appliance unattended. surface of the cooktop will retain heat after the may catch on fire. Failure to follow this warning controls have been turned off.
- Page 5 IMPORTANT SAFETY INFORMATION READ ALL INSTRUCTIONS BEFORE USING THE APPLIANCE WARNING COOK MEAT AND POULTRY THOROUGHLY Cook food thoroughly to help protect against foodborne illness. Minimum safe food temperature recommendations can be found at IsItDoneYet.gov and fsis.usda.gov temperatures and check several locations. How to Remove Protective Shipping Film and Packaging Tape Carefully grasp a corner of the protective shipping film packaging tape on new appliances is an application of...
-
Page 6: Cooktop Features
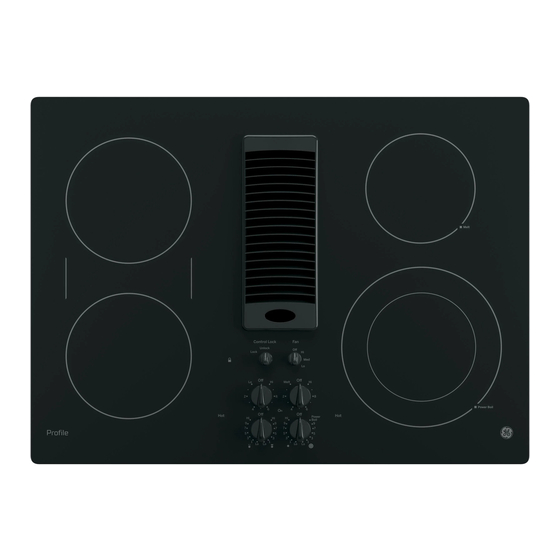
Cooktop Features Throughout this manual, features and appearance may vary from your model. Feature Index (Features and appearance may vary) 4. Vent Grille 5. Vent Filter (below the vent grille) 8. Model and Serial Number Label (under the cooktop) 11. Left Side Hot Surface Indicator Lights (one for each surface unit) 12. -
Page 7: Surface Burners
Surface Burners Radiant Surface Units The control for the radiant surface unit can be set The surface unit ON indicator anywhere between LO and HI for an unlimited number light will glow when any of heat settings. With the infinite switch the surface surface unit is on. - Page 8 Surface Burners (Cont.) Dual Surface Unit The right front surface unit has 2 cooking sizes to select To use the small (6-inch) from so you can match the size of the unit to the size of surface unit, turn the knob the cookware you are using.
- Page 9 Surface Burners (Cont.) Control Lock-Out for Surface Units To activate control lock-out, turn the Control Lock knob to LOCK. This will prevent surface units from heating. An indicator light will glow to show that they are locked. The downdraft fan will remain operable with control lockout engaged.
-
Page 10: Cookware For Radiant
Cookware for Radiant Glass Cooktop The following information will help you choose cookware which will give good performance on glass cooktops. Stainless Steel: Porcelain Enamel on Recommended. Steel: Not recommended. Aluminum: Check pans for flat bottoms Heating empty pans can cause Heavy weight recommended. -
Page 11: Cleaning The Cooktop
Cleaning the Cooktop Vent Grille blower is turned off. They will damage the vent grille’s finish. To clean the vent grille, remove it from the cooktop by lifting it up and off. Wipe with a damp cloth. If necessary, the vent grille can be washed in the sink. the dishwasher. -
Page 12: Cleaning The Glass Cooktop
Cleaning the Glass Cooktop Glass Cooktop To maintain and protect the surface of your glass cooktop, follow these steps: residue. No need to rinse. NOTE: with a ceramic glass cooktop cleaner. This helps cooktop until it has been cleaned thoroughly. protect the top and makes cleanup easier. - Page 13 Cleaning the Glass Cooktop (Cont.) Metal Marks and Scratches This should be removed immediately before heating cooktop. It will leave metal markings on the cooktop again or the discoloration may be permanent. surface. NOTE: Carefully check the bottom of pans for roughness These marks are removable using a ceramic cooktop that would scratch the cooktop.
-
Page 14: Installation Instructions
Installation Radiant Downdraft Cooktop Instructions PP9830 If you have questions, call 800.GE.CARES or visit our website at: GEAppliances.com. TOOLS YOU WILL NEED WARNING • Safety Glasses • Adjustable wrench switch power off at the service panel and lock the • Saw or socket set ( ”... - Page 15 Installation Instructions IMPORTANT SAFETY INSTRUCTIONS The cooktop has been design certified by WARNING EXHAUST BLOWER SAFETY WARNING appliance generating heat, there are certain safety precautions you should follow. Sufficient air is needed for proper combustion and • exhausting of gases through the flue (chimney) of qualified installer or service technician.
- Page 16 Installation Instructions UNPACKING YOUR COOKTOP Check to be sure that all packing materials and tape have been removed. This will include tape on control knobs (if applicable), adhesive tape, wire ties, cardboard and protective plastic. Failure to remove these materials could result in damage to the appliance once the appliance has been turned on and surfaces have heated.
-
Page 17: Installation Preparation
Installation Instructions INSTALLATION PREPARATION 1. PREPARING FOR INSTALLATION 2. PREPARING THE BASE CABINET This cooktop is designed to fit easily into a variety Positioning the cooktop of cabinets. However, the combined installation The cooktop is designed to look best when centered of a downdraft vent and a cooktop require careful in a cabinet at least 30"... - Page 18 Installation Instructions INSTALLATION PREPARATION (Cont.) 3. ROUGH PREPARATION OF 4. PREPARING THE COUNTERTOP (CONT.) JUNCTION BOX For island installation, maintain 1 7/8” minimum CAUTION FOR PERSONAL SAFETY, from cutout to front edge; 2 3/8” minimum from REMOVE HOUSE FUSE OR OPEN CIRCUIT cutout to back edge;...
- Page 19 Installation Instructions INSTALLATION PREPARATION (Cont.) 6. BLOWER TO DUCTWORK ALIGNMENT In general, the use of flexible ducting is discouraged because it can cause severely restricted airflow. 6" Max. However, if the blower outlet and the floor or wall Centerline duct location do NOT align well, then flexible Centerline METAL ducting can be used to adapt to an offset.
-
Page 20: Cooktop Installation
Installation Instructions INSTALLATION PREPARATION (Cont.) 8. INSTALLING THE FOAM 8. INSTALLING THE FOAM GASKET GASKET (Cont.) it is installed or it will not stay in place. without installing the foam gasket as shown. It protects the bottom edge of the glass from the flanges. - Page 21 Further secure the plenum to the cooktop, from the Alternate Installation: top side, using the two screws (2) provided. You can order an alternate installation kit 800.GE.CARES. See diagram for instructions. 12. INSTALLING THE BLOWER TO THE PLENUM To install optional installation brackets: Remove 2 screws on both sides under cooktop.
- Page 22 Installation Instructions COOKTOP INSTALLATION (Cont.) 13. ATTACHING A BLOWER 15. BLOWER ELECTRICAL TRANSITION DUCT CONNECTIONS (CONT.) • Fold all wires into the electrical enclosure. Secure duct installations to connect to 6” round standard the enclosure with the screws removed earlier, making sure that no wires are trapped.
- Page 23 Installation Instructions COOKTOP INSTALLATION (Cont.) 17. BEFORE MAKING 18. MAKING ELECTRICAL ELECTRICAL CONNECTIONS CONNECTIONS Note to Electrician: The power leads supplied with WARNING Switch power off at the service panel and lock the service disconnecting means large gauge household wiring. to prevent power from being switched on The insulation of these leads is rated at accidentally.
- Page 24 Installation Instructions COOKTOP INSTALLATION (Cont.) 18. MAKING ELECTRICAL 20. INSTALL DOWNDRAFT FILTER CONNECTIONS (Cont.) AND VENT GRILLE 4-Conductor Branch Circuit When connecting the cooktop to a 4-conductor • Place the filter diagonally through the vent circuit, connect the red leads of the cooktop and the opening.
-
Page 25: Troubleshooting Tips
Troubleshooting Tips ... Save time and money! Review the charts on the following pages first and you may not need to call for service. Check out self-help videos and FAQ at GEAppliances.com/support. Problem Possible Cause What To Do Water won’t boil Cover pan with a lid. -
Page 26: Limited Warranty
GE Appliances with information on your appliance. If you do not want your appliance data to be sent to GE Appliances, please advise your technician not to submit the data to GE Appliances at the time of service. -
Page 27: Accessories
Accessories Looking For Something More? GE Appliances offers a variety of accessories to improve your cooking and maintenance experiences! Refer to the Consumer Support page for phone numbers and website information. The following products and more are available: Accessories Alternate Installation Kit Cleaning Supplies CitruShine™... -
Page 28: Consumer Support
Have a question or need assistance with your appliance? Try the GE Appliances Website 24 hours a day, any day of the year! You can also shop for more great GE Appliances products and take advantage of all our on-line support GEAppliances.com... - Page 29 Escriba el modelo y los números de serie a continuación: Modelo No: _____________ Serie No: _______________ Encuentre estos números en una etiqueta debajo de la estufa. GE es una marca registrada de General Electric Company. Fabricado bajo licencia de marca. 49-2001160 Rev. 0 09-22 GEA...
- Page 30 GRACIAS POR HACER QUE GE APPLIANCES SEA PARTE DE SU HOGAR. Ya sea que haya crecido usando GE Appliances, o que ésta es su primera vez, nos complace tenerlo en la familia. Sentimos orgullo por el nivel de arte, innovación y diseño de cada uno de los electrodomésticos de GE Appliances, y creemos que usted también.
- Page 31 INFORMACIÓN IMPORTANTE DE SEGURIDAD LEA TODAS LAS INSTRUCCIONES ANTES DE USAR ESTE ELECTRODOMÉSTICO ADVERTENCIA puede generar un incendio, una descarga eléctrica, lesiones corporales o la muerte. ADVERTENCIA INSTRUCCIONES GENERALES DE SEGURIDAD creado,como se describe en este Manual del Propietario húmedas sobre superficies calientes podrán producir agarraderas tengan contacto con los elementos de de cocción y que la conecte a tierra correctamente, de unidades calientes de la superficie ni con los elementos...
- Page 32 INFORMACIÓN IMPORTANTE DE SEGURIDAD LEA TODAS LAS INSTRUCCIONES ANTES DE USAR ESTE ELECTRODOMÉSTICO ADVERTENCIA INSTRUCCIONES DE SEGURIDAD DE LA ESTUFA RADIANTE ADVERTENCIA ventilador. sección de cocción de la superficie superior de este electrodoméstico mientras esté en uso. Los hervores de la estufa retendrá calor después de que los controles excesivos causan vapores y derrames de grasa que se hayan apagado.
- Page 33 INFORMACIÓN IMPORTANTE DE SEGURIDAD LEA TODAS LAS INSTRUCCIONES ANTES DE USAR ESTE ELECTRODOMÉSTICO ADVERTENCIA COCINE BIEN LAS CARNES Y LAS CARNES DE AVE Cocine la comida completamente para evitar que se produzcan enfermedades a partir de la comida. Podrá encontrar recomendaciones sobre temperatura mínima segura de la comida en IsItDoneYet.gov y en fsis.usda.gov.
-
Page 34: Funciones De La Placa De Cocción
Funciones de la Placa de Cocción Es posible que las funciones y apariencias varíen con relación a su modelo a lo largo del manual. Índice de características 1. Unidad de superficie posterior izquierda 2. Unidad de superficie de puente 3. Unidad de superficie frontal izquierda 4. -
Page 35: Quemadores
Quemadores Unidades de superficie radiantes El control de la unidad de superficie radiante puede colocarse La luz indicadora de la unidad de superficie brillará cuando de selecciones de calentamiento ilimitado. Con el interruptor cualquiera de las unidades de infinito el embobinado hace ciclo entre encendido y apagado para mantener control de su selección. - Page 36 Quemadores (Cont.) Unidad de superficie doble La unidad de superficie frontal derecha tiene dos tamaños Para usar la unidad de para cocinar entre los que usted puede escoger y así podrá combinar el tamaño correcto de la sartén que se encuentre gire el botón en dirección usando con la unidad de superficie apropiada.
- Page 37 Quemadores (Cont.) Bloqueo de control de las unidades de superficie Para activar el bloqueo de control, gire la perilla Control Lock LOCK se encenderá para demostrar que están bloqueadas. El ventilador de corriente descendente permanecerá operable con el bloqueo de control activado. En la posición bloqueada, la estufa producirá...
-
Page 38: Utensilio Para Placa De Cocción Para Vidrio Radiante
Utensilio para Placa de Cocción para Vidrio Radiante La siguiente información lo ayudará a elegir los recipientes de cocción que brindan un buen desempeño en estufas de vidrio. Acero inoxidable: Esmalte de porcelana Recomendado sobre acero: Aluminio: Calentar recipientes vacíos puede Verifique que los recipientes Se recomienda de capa gruesa tengan bases planas... -
Page 39: Limpieza De La Placa De Cocción
Limpieza de la Placa de Cocción Rejilla de ventilación Antes de limpiar la rejilla de ventilación, asegúrese de que el ventilador de salida esté apagado. Dañarán el acabado de la rejilla de ventilación. Para limpiar la rejilla de ventilación, quítela de la estufa levantándola hacia arriba y afuera. -
Page 40: Cómo Limpiar La Estufa De Vidrio
Cómo Limpiar la Estufa de Vidrio Superficie de Cocción de vidrio Para mantener y proteger la superficie de su estufa de vidrio, 1. Antes de usar la estufa por primera vez, límpiela con el NOTA: limpiador de estufas cerámicas. Esto ayuda a proteger la que la haya limpiado por completo. - Page 41 Cómo Limpiar la Estufa de Vidrio (Cont.) Marcas de metal y rayones 1. Tenga cuidado de no deslizar ollas y sartenes a través de Esto debe quitarse de inmediato antes de calentar de su estufa. Dejará marcas de metal sobre la superficie de la nuevo o la decoloración puede llegar a ser permanente.
-
Page 42: Instrucciones De Instalación
Instrucciones Estufa radiante de ventilación descendente PP9830 de Instalación Si tiene alguna pregunta, llame al 800.GE.CARES o visite nuestro sitio Web en: GEAppliances.com HERRAMIENTAS QUE NECESITARÁ ADVERTENCIA Antes de comenzar la • Gafas de Seguridad • Llave ajustable o juego instalación, desconecte el interruptor de suministro... - Page 43 Instrucciones de Instalación INSTRUCCIONES DE SEGURIDAD IMPORTANTES La estufa es un diseño que ha sido certificado por la • Asegúrese de que los recubrimientos de las paredes que están alrededor de la estufa resistan el calor generado por con cualquier aparato que genere calor, hay ciertas precauciones de seguridad que debe seguir.
- Page 44 Instrucciones de Instalación REQUISITOS ELÉCTRICOS instalación de estufas eléctricas, deben seguirse. ADVERTENCIA Para su seguridad personal, retire el fusible del hogar o abra el disyuntor antes de comenzar la instalación. Si esto no se cumple, se podrán sufrir lesiones graves o la muerte. Quincy, MA 02260 Este electrodoméstico debe suplirse con el voltaje y Code requiere que las construcciones nuevas, pero no...
-
Page 45: Desempacando Su Estufa
Instrucciones de Instalación DESEMPACANDO SU ESTUFA Asegúrese que todos los materiales de empaque y cintas se hayan retirado. Esto incluye cintas sobre las perillas de cartón y plástico protector. Si estos materiales no se retiran se puede producir como resultado un daño sobre el electrodoméstico, una vez que el mismo fue encendido y las superficies se calientan. -
Page 46: Preparación De La Instalación
Instrucciones de Instalación PREPARACIÓN DE LA INSTALACIÓN 1. PREPARACIÓN PARA LA 2. PREPARACIÓN DEL GABINETE DE LA BASE INSTALACIÓN Esta estufa está diseñada para ajustar fácilmente en Posicionamiento de la superficie de una variedad de gabinetes. Sin embargo, la instalación cocción combinada de una estufa y ventilación descendente La estufa está... - Page 47 Instrucciones de Instalación PREPARACIÓN DE LA INSTALACIÓN (Cont.) 3. PREPARACIÓN RÁPIDA DE UNA 4. PREPARANDO LA ENCIMERA (Cont.) CAJA DE UNIÓN Con cuidado corte la abertura de la encimera de acuerdo PRECAUCIÓN con las dimensiones mostradas en la ilustración. PARA SEGURIDAD PERSONAL, Cerciórese de que la abertura es cortada derecha, con REMUEVA EL FUSIBLE DE LA CASA O ABRA EL los lados paralelos entre sí...
- Page 48 Instrucciones de Instalación PREPARACIÓN DE LA INSTALACIÓN (Cont.) 6. ALINEACIÓN DE LOS CONDUCTOS DEL SOPLADOR En general, no instamos al uso de conductos flexibles 6" Máximas desde la porque éste puede causar severas restricciones del línea central flujo de aire. Sin embargo, si la salida del soplador y la hasta localización en la pared o en el piso representa un problema la línea...
-
Page 49: Cómo Instalar La Estufa
Instrucciones de Instalación PREPARACIÓN DE LA INSTALACIÓN (Cont.) 8. CÓMO INSTALAR LA JUNTA DE 8. CÓMO INSTALAR LA JUNTA DE ESPUMA ESPUMA (Cont.) espuma mientras la instala o no permanecerá en su la junta de espuma como se muestra. Esta protege el lugar. - Page 50 Asegure la cámara al fondo de la estufa, en cada lado, Instalación Alternativa: asegure la cámara a la estufa, a partir del lado superior, al 800.GE.CARES. Consulte el diagrama para acceder a instrucciones. 12. CÓMO INSTALAR LA CÁMARA DEL SOPLADOR Quite los 2 tornillos a ambos lados bajo la estufa.
- Page 51 Instrucciones de Instalación CÓMO INSTALAR LA ESTUFA (Cont.) 13. CÓMO PEGAR UNA 15. CONEXIONES ELÉCTRICAS TRANSICIÓN DE SOPLADOR DEL SOPLADOR (CONT.) • Doble todos los alambres en el alojamiento eléctrico. instalaciones de conductos de flujo de aire descendente Asegure el alojamiento con los tornillos removidos anteriormente, cerciorándose de que no quedaron alambres atrapados.
- Page 52 Instrucciones de Instalación CÓMO INSTALAR LA ESTUFA (Cont.) 17. ANTES DE HACER 18. CÓMO HACER LAS CONEXIONES ELÉCTRICAS CONEXIONES ELÉCTRICAS Nota al electricista: Los conductores proporcionados ADVERTENCIA Apague el interruptor del panel del servicio y bloquee el medio de conexión para conexiones eléctricas residenciales de calibres del servicio para evitar que la corriente se active en altos.
- Page 53 Instrucciones de Instalación CÓMO INSTALAR LA ESTUFA (Cont.) 18. CÓMO HACER LAS 19. CÓMO INSTALAR EL FILTRO CONEXIONES ELÉCTRICAS DE FLUJO DOWNDRAFT Y LA (Cont.) PARRILLA DE VENTILACIÓN Circuito de ramal de 4 conductores Cuando conecte la estufa a un circuito de cuatro •...
-
Page 54: Consejos Para La Solución De Problemas
Consejos para la Solución de Problemas... Antes de solicitar el servicio técnico ¡Ahorre tiempo y dinero! Primero revise los cuadros que aparecen en las siguientes páginas y es posible que no necesite solicitar reparaciones. GEAppliances.com/support. Problema Causa Posible Qué Hacer El agua no hierve OFF) hasta que el agua comience a hervir. - Page 55 Notas 49-2001160 Rev. 0...
- Page 56 Para realizar el servicio técnico de su electrodoméstico, se podrá requerir el uso de datos del puerto de abordaje para su diagnóstico. Esto da al técnico del servicio de fábrica de GE Appliances la habilidad de diagnosticar de forma rápida cualquier problema con su electrodoméstico, y de ayudar a GE Appliances a mejorar sus productos al brindarle a GE Appliances la información sobre su...
-
Page 57: Accesorios
Accesorios ¿Busca Algo Más? ¡GE Appliances ofrece una variedad de accesorios para mejorar sus experiencias de cocción y mantenimiento! Para acceder a números telefónicos e información de sitios Web, consulte la página de Soporte para el Consumidor. Accesorios Kit de Instalación Alternativa... -
Page 58: Soporte Para El Consumidor
También puede enviar una carta en la tarjeta de inscripción preimpresa que se incluye con el material embalado. GEAppliances.com/register Servicio Programado El servicio de reparación de expertos de GE Appliances está a sólo un paso de su puerta. Conéctese a través de Internet y programe GEAppliances.com/service o comuníquese al 800.432.2737 durante el horario de atención comercial.
Need help?
Do you have a question about the Profile PP9830 and is the answer not in the manual?
Questions and answers