Table of Contents
Advertisement
Advertisement
Table of Contents

Related Manuals for Express Water RO5DX


Summary of Contents for Express Water RO5DX
- Page 1 INSTALLATION MANUAL...
- Page 2 CONNECTION POINTS For installation videos go to youtube.com/expresswatervideo (See page 16 for more information.) A to B Connect the RED Tubing to the Feed Water Adapter Valve (A), then to the connection marked as “IN” on the Leak Stop Valve (B). C to D Connect the WHITE Tubing to the connection marked as “OUT”...
-
Page 3: Table Of Contents
How to Sanitize your RO System P. 17 Filter Change Instructions P. 18-19 P. 19 Restarting The System FAQs P. 20 Troubleshooting P. 21 Express Water Upgrades & Accessories P. 22 P. 23 Warranty Replacement Filters / Replacements Table P. 24... -
Page 4: Performance Data Sheet / Technical Specifications
5-38°C Express Water RO5DX and RO10DX have been tested according to NSF/ANSI 58 for reduction of the substances listed below. The concentration of the indicated substances in water entering the system was reduced to a concentration less than or equal to the permissible limit for water leaving the system, as specified in NSF/ANSI 58. -
Page 5: Conditions
Copyright © 2022 by Express Water Inc. All rights reserved. No part of this publication may be reproduced, distributed, or transmitted in any form or by any means, including photocopying,... -
Page 6: Installation Notes & Components List
Your new Reverse Osmosis Water System should include the following items. If any item is missing please contact • Phillips-Head Screwdriver • Teflon Tape Express Water. Please take a few moments to check all • Adjustable Wrench • Box Cutter the following components: Color Coded Tube ¼”... -
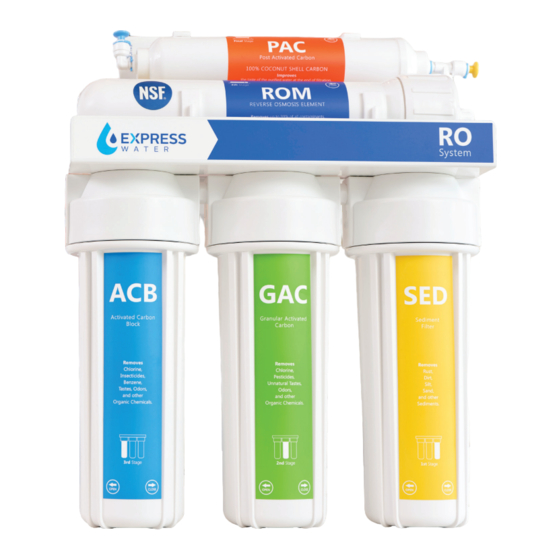
Page 7: System Components
Deionization SYSTEM COMPONENTS Optional Upgrade Filters Alkaline (See right) 1. Feed Water Adapter Valve 14. Tank Stand PRTFAV3812 2. Leak Stop Valve 15. Stem Elbow PRTLKS14Q PRTFITSE14Q 3. Filter Housing 16. QC Faucet Connector PRTHSF10DB14 PRTFA14Q Alkaline & UV 4. Male Elbow ¼” 17. -
Page 8: Tubing Quick Connect Guide
TUBING QUICK CONNECT GUIDE Plug Locking Collet Clip Fitting Make sure to remove any plugs NOTE! before attempting to insert tubing. The tubing in your RO System uses a Quick Connect locking mechanism to lock the Color Coded Tubing in place. Be careful not to damage your tubing as you unpack it. -
Page 9: Feed Water Adapter Valve
FEED WATER CAUTION! CAUTION! The water supply to the unit MUST be from the COLD ADAPTER VALVE WATER LINE. Using HOT WATER will severely damage your RO System. If your Cold Water Valve is too old or weak to connect to directly NOTE! Option A you can connect at the top of the line where the faucet connects Option B (if applicable, some sinks do not have this connection point). -
Page 10: Ro Faucet
RO FAUCET The RO Faucet may be installed on any flat surface. Check the underside of your install location for interference by making sure that drilling a hole will not damage any pipes or wiring underneath the counter top or sink. Check to be sure there is enough room for the Threaded Faucet Stem. - Page 11 COMPONENTS Under (Deluxe Only) (Deluxe Only) (Deluxe Only) (Modern Only) Rubber Washer Base Plate Rubber Washer Base Plate & Rubber (Small) (Large) Washer (Pre-Assembled) Plastic Washer Lock Washer Hex Nut Insert Sleeve Compression Nut Deluxe Modern RO Faucet RO Faucet Rubber Washer (Small) Base Plate &...
-
Page 12: Drain Saddle
DRAIN SADDLE The Drain Saddle is used to the Foam Gasket (the foam connect the Black Drain Line to circle at the center of the Gasket the drain pipe under the sink, is disposable). Make sure to align the Foam Gasket hole with to allow the system to flush contaminants down the drain. -
Page 13: Housing Assembly
HOUSING ASSEMBLY Top Part Of The Unit Prepare Prefilters Leave the filters wrapped until Filter you need them. When installing be careful not to touch the filter portion with your hands. Housing Remove the plastic wrap from the O-Rings 3 Filter Housings and stand them upright. -
Page 14: Gauge Installation
GAUGE Not all RO Systems include a Pressure Gauge. If NOTE! NOTE! INSTALLATION your system does include a Gauge we will install it now. 1. Put the end of 2. Put the small the Pressure Gauge bottom end of into one of the top the Stem Tee arms of the Stem into the Male... -
Page 15: Leak Stop Valve
LEAK STOP Helps detect water leaks if coming from the RO System - if textile pad is activated by a VALVE leak, incoming water is shut off, preventing any additional water entering the system. 1. Position the RO System in the desired permanent location. -
Page 16: System Connections
SYSTEM SYSTEM CONNECTIONS STARTUP You may have already completed some or all of these Do not send water through your NOTE! fridge until flushing is complete, carbon connections in previous steps. Make sure to remove any particles flushed during startup will clog plugs before installing Tubing. -
Page 17: System Maintenance
SYSTEM These recommendations are intended for MAINTENANCE maximum efficiency of your RO System. Filter and RO Membrane Storage position, page 9) to open the water supply to the system (for UV Systems, plug the power cord back into the power outlet). •... -
Page 18: Filter Change Instructions
FILTER CHANGE This RO System contains Filters that must be replaced at regular intervals INSTRUCTIONS to maintain proper performance. Use only authentic Express Water filters. Prefilters (ACB, GAC, SED) RO Membrane Change about every 6 months Change about every 12 months 1. -
Page 19: Restarting The System
Ultraviolet Alkaline Deionization Inline PAC Change about every 6-12 months Change about every 6 months Change about every 6 months Change about every 12 months Make sure you have Make sure you have Make sure you have Make sure you have NOTE! NOTE! NOTE! -
Page 20: Faqs
Demand Delivery Pump. Contact Refrigerator Kit to do so. In some cases, your to release any extra carbon before the water Express Water and we’ll help you find your situation may require a separate tank or is safe to drink. -
Page 21: Troubleshooting
TROUBLESHOOTING Turn off the system before servicing or inspecting. NOTE! NOTE! PROBLEM POSSIBLE REASON SOLUTIONS 1. Milky colored water Air in system Air in the system is a normal occurrence with RO System startup. 2. Air bubbles in water This milky look will disappear during normal use within 1-2 weeks. 3. -
Page 22: Express Water Upgrades & Accessories
UPGRADES & Add additional stages or features to your RO System. ACCESSORIES Visit expresswater.com for more information. Water Chiller Pressure Regulator Pressure Gauge PRTPR80Q PC2000 PRTG1402 If your water pressure is too high The easy to install compact Power A Quick Connect optimized 160 for the RO System, the Pressure Chiller allows you to have cold PSI Pressure Gauge for monitoring... -
Page 23: Warranty
Be sure to have a copy of your purchase confirmation email or receipt. Our support will verify that the product and problem are under warranty and help you arrange to send your defective part back to Express Water with your receipt and contact information (name, address, phone number, email address). -
Page 24: Replacement Filters / Replacements Table
Replacement Filters: Express Water offers replacement filters for both 50 GPD and 100 GPD RO Systems. For purchasing information, please visit us at www.expresswater.com. INSTALLATION DATE: Inline PAC Filter Filter Filter Membrane Filter Filter Filter Filter Filters FLTMEME50 (50 GPD)
Need help?
Do you have a question about the RO5DX and is the answer not in the manual?
Questions and answers
What size hole should I cut in my sink to put the spout in?