ACN IRIS 3000 User Manual
Digital video phone
Hide thumbs
Also See for IRIS 3000:
- User manual (34 pages) ,
- Quick start manual (12 pages) ,
- Quick installation manual (2 pages)
Table of Contents
Advertisement
Quick Links
Advertisement
Table of Contents

Related Manuals for ACN IRIS 3000


Summary of Contents for ACN IRIS 3000
- Page 1 IRIS 3000 ® DIGITAL VIDEO PHONE IRIS 3000® DIGITAL VIDEO PHONE USER MANUAL...
-
Page 2: Table Of Contents
Contents Safety Instructions ..............3 4-4-1-4. Delete Contact ................ 14 4-4-2. Search Contact................ 14 Installing the IRIS 3000® Digital Video Phone ... 3 1-1. IRIS 3000® Digital Video Phone Components ....3 4-4-2-1. Search by Name ..............15 1-2. Connecting Your IRIS 3000® Digital Video Phone ..4 4-4-2-2. -
Page 3: Safety Instructions
Warning Do not install the unit in a location where it can be affected by dust or gas. Do not disassemble or modify the IRIS 3000® Digital Video Phone or power adapter. The warranty will not cover any defect that occurs due to such mishandling. To avoid damage, overheating or shock, do not install in a humid location. -
Page 4: Connecting Your Iris 3000® Digital Video Phone
NOTE: The IRIS 3000® Digital Video Phone’s first boot up may take up to 15 minutes. The system will perform an initial software update and provision the IRIS 3000® Digital Video Phone as part of this boot up process. Please allow ample time for the first boot up. The IRIS 3000® Digital Video Phone’s LCD screen will display a status as it moves through the process. -
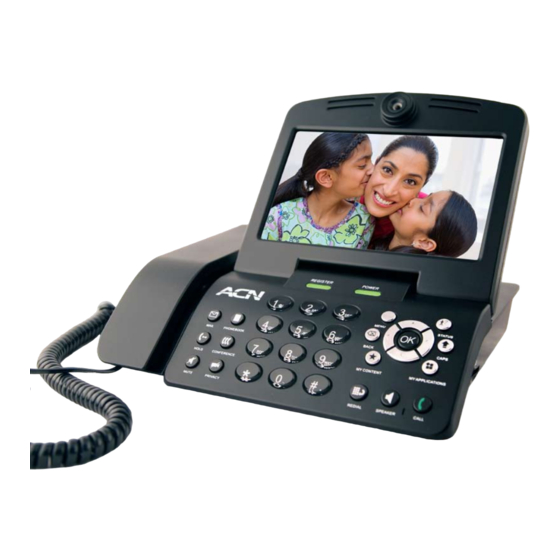
Page 5: Keys And Shortcuts
Keys and Shortcuts The green LED light is lit when the digital video phone is connected to the IRIS 3000® Digital Phone Service 1. REGISTER Indicates if the digital video phone is switched on and the power cord is connected 2. - Page 6 *Key Exit voice mail Call Waiting While on the digital video phone, a tone alerts you of another incoming For more information on your IRIS 3000® Digital Video call. Phone, please refer to the User Manual located on • To accept the incoming call, press HOLD (the current call will be placed on hold) www.wgatesupport.com.
-
Page 7: Digital Video Phone
IRIS 3000® DIGITAL VIDEO PHONE USER MANUAL 3. USING BASIC FUNCTIONS OF YOUR DIGITAL VIDEO PHONE 3.1 Making a Call 3-1-1. Making a call in dial pad mode 3-1-2. Making a call in standby mode (when LCD screen is off) Pick up the handset or press the SPEAKER button Enter the first digit of the phone number •... -
Page 8: Receiving A Call
IRIS 3000® DIGITAL VIDEO PHONE USER MANUAL 3.2 Receiving a Call The digital video phone begins ringing and the LCD screen will show the person calling or the name and phone number of the person calling. Pick up the handset or press the SPEAKER button to answer the call. If there is a picture associated with a contact, it will be displayed. -
Page 9: Viewing The Status
IRIS 3000® DIGITAL VIDEO PHONE USER MANUAL 3.6 Viewing the Status Press the STATUS button to view information about your digital video phone. Press the back button or highlight the box in the bottom right-hand corner of your screen and press OK to exit the Status Menu. -
Page 10: Conference Call
IRIS 3000® DIGITAL VIDEO PHONE USER MANUAL 3-7-6. Conference Call If you wish to conference another party into an existing phone call, press HOLD during the call. This places the existing caller on HOLD. Caller screen Hold Person called screen On Hold Dial the number of the third person and press CALL. -
Page 11: Using Keypad In Set-Up
IRIS 3000® DIGITAL VIDEO PHONE USER MANUAL Main Menu Selections Phonebook • Store contact names and phone numbers for frequently called numbers • Search for phone numbers by name and number • Place a call directly from this menu Call Log • View recent calls including total calls, answered, dialed and missed calls •... -
Page 12: Entering Numbers
IRIS 3000® DIGITAL VIDEO PHONE USER MANUAL English Mode Numeric Small Capital 1 Key : @ / : @ / 2 Key 3 Key 4 Key 5 Key 6 Key 7 Key pqrs PQRS 8 Key 9 Key wxyz WXYZ 0 Key - . _ - . _ * Key # Key... -
Page 13: Add New Entry
IRIS 3000® DIGITAL VIDEO PHONE USER MANUAL 4-4-1-1. Add New Entry You can add new contact information (such as name or phone number), set up a corresponding ring tone or post a picture of the contact. Once you enter the information, select “Save” to save the data in the Phonebook. If you don’t want to save the information, select “Cancel”. -
Page 14: Edit Contact
IRIS 3000® DIGITAL VIDEO PHONE USER MANUAL 4-4-1-3. Edit Contact You can edit information such as phone number, name, ring tone and the picture of the contact. Once you have edited the information, select “Save” to save the data. If you don’t want to save, select “Cancel”. -
Page 15: Search By Name
IRIS 3000® DIGITAL VIDEO PHONE USER MANUAL 4-4-2-1. Search by Name You can search for a contact by name in the Phonebook by selecting “Search by name”. Select “Phonebook” Select “Search” in the Select “Search by name” in the Enter the name that you wish to find... -
Page 16: Call Log
IRIS 3000® DIGITAL VIDEO PHONE USER MANUAL 4.5 Call Log The user can see all of the calls answered, dialed or missed by the digital video phone. A call can be placed by selecting a number from the “Call Log” or selected entries can be saved or deleted from the Phonebook. -
Page 17: Dialed Calls
IRIS 3000® DIGITAL VIDEO PHONE USER MANUAL 4-5-3. Dialed Calls You can see all the numbers of recently dialed calls, make a call by the number selected and save the number in Phonebook. Select “Call Log” Select “Dialed” in the Call Log Menu Select the number or contact name Select “Make A Call”... -
Page 18: Settings
IRIS 3000® DIGITAL VIDEO PHONE USER MANUAL Saving a Phone Number from the Call Log Menu Select “Call Log” from the Main Select “Save This Number” in the Select the type of call from the Call Select the desired number from the Menu and Press OK... -
Page 19: System Settings
IRIS 3000® DIGITAL VIDEO PHONE USER MANUAL 4-6-1. System Settings You can set up the network and control the sound and display settings for your digital video phone here. Select “Settings” in the Main Menu Select “System Settings” in the System Setting Menu... -
Page 20: Sound
IRIS 3000® DIGITAL VIDEO PHONE USER MANUAL 4-6-1-3. Sound You can select the sound settings for ring tones, sound effects and volume controls. Select “Settings” in the Main Menu Select “Systems Settings” in the Select “Sound” in the System Use the Navigation buttons to choose... -
Page 21: Video Output
IRIS 3000® DIGITAL VIDEO PHONE USER MANUAL 4-6-1-5. Video Output 4-6-1-6. LCD Brightness 4-6-1-7. Picture Capture 4-6-1-8. Self View Select the “Video Output” choosing Use Navigation buttons to adjust the Select the device where the pictures Select “On” if you want to enable the between “LCD”, “TV Out (PAL)” and “TV “LCD Brightness”. -
Page 22: Digital Photo Frame On/Off
4-6-2-4. Upload Bandwidth Upload Bandwidth is the capacity at which the digital video phone can upload data over your Internet connection. The IRIS 3000® Digital Video Phone comes with pre-set optimal factory settings. If the video image you are sending is not as clear as you would like, you can adjust the upload bandwidth speed of your video phone. -
Page 23: Screen Size
4-6-2-7. Video Codec Video Codec represents the video compression on your phone. The IRIS 3000® Digital Video Phone uses two video codecs: H.263 and H.264. The Video Codec will automatically adjust to the appropriate setting based on the upload bandwidth and frame rate selected. -
Page 24: Upgrade
IRIS 3000® DIGITAL VIDEO PHONE USER MANUAL Time Zone Settings (GMT –10:00) Hawaii (GMT –06:00) Central Time (GMT –09:00) Alaska (GMT –05:00) Eastern Time (GMT –08:00) Pacific Time Note: Additional Time Zone Settings outside of the U.S. are available. (GMT –07:00) Mountain Time 4-6-3. -
Page 25: Information
IRIS 3000® DIGITAL VIDEO PHONE USER MANUAL Digital Photo Frame On/Off Digital Photo Frame Delay Note: If you are displaying large photos (more than 3 mega pixels), set the delay to 20 seconds to allow time for each photo to load. -
Page 26: Troubleshooting Guide
IRIS 3000® DIGITAL VIDEO PHONE USER MANUAL TROUBLESHOOTING GUIDE Problem Troubleshooting I cannot turn on the power. • Verify the power cable is connected correctly. • Press top part of power switch on back of phone to verify it is down. - Page 27 IRIS 3000® DIGITAL VIDEO PHONE USER MANUAL Alternate Phone connected to IRIS 3000® Digital • Verify that digital video phone is functioning properly without the alternate phone connected Video Phone FXS, port does not ring. to digital video phone “Phone” (FXS) port.
-
Page 28: Warning Messages
Extension In Use FXS phone is in use. Call Transfer Transferring call from IRIS 3000® Digital Video Phone to FXS. You do not have a storage device No storage device detected (SD Card or USB device) Connecting to a ADSL Server… Network Connection to an ADSL service is being made.
Need help?
Do you have a question about the IRIS 3000 and is the answer not in the manual?
Questions and answers