Advertisement
Table of Contents
- 1 Table of Contents
- 2 Panel Descriptions
- 3 Connecting External Pedals
- 4 Selecting Various Ways of Outputting the Effect Sound (OUTPUT MODE)
- 5 Assigning Functions to a Footswitch (CTL FUNCTION)
- 6 Controlling the Knobs Using an Expression Pedal (EXP FUNCTION)
- 7 Controlling the Output Level Using an Expression Pedal
- 8 Controlling this Unit from an External MIDI Device
- 9 Setting the MIDI Receive Channel
- 10 Restoring the Factory Settings (Factory Reset)
- 11 Changing the Battery
- 12 Main Specifications
- 13 Important Notes
- 14 Intellectual Property Right
- Download this manual
Advertisement
Table of Contents

Subscribe to Our Youtube Channel
Related Manuals for Boss Slicer SL-2


Summary of Contents for Boss Slicer SL-2
- Page 1 Slicer SL-2 Owner’s Manual...
-
Page 2: Table Of Contents
Table of contents Table of contents Panel Descriptions ........................................ 3 Connecting External Pedals ....................................5 Selecting Various Ways of Outputting the Effect Sound (OUTPUT MODE) ..................6 Assigning Functions to a Footswitch (CTL FUNCTION) .......................... 7 Controlling the Knobs Using an Expression Pedal (EXP FUNCTION) ....................8 Controlling the Output Level Using an Expression Pedal ........................ -
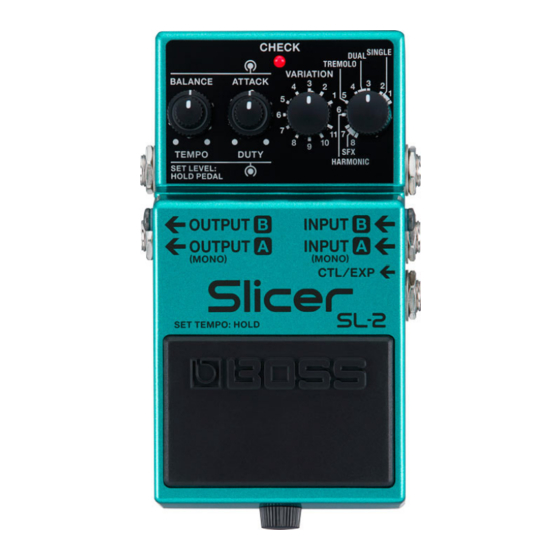
Page 3: Panel Descriptions
Panel Descriptions Panel Descriptions Name Function DC IN jack Accepts connection of an AC Adaptor (PSA series; sold separately). * Use only the specified AC adaptor (PSA series; sold separately), and connect it to an AC outlet of the correct voltage. * If the AC adaptor is connected while power is on, the power supply is drawn from the AC adaptor. - Page 4 Connect your computer to the SL-2 with a USB cable. You can swap slice patterns by using the dedicated app, “BOSS TONE STUDIO for SL-2”. For details, refer to “Using BOSS TONE STUDIO for SL-2”. * Do not use connection cables that contain a built-in resistor.
-
Page 5: Connecting External Pedals
Panel Descriptions Connecting External Pedals Use only the specified expression pedal. By connecting any other expression pedals, you risk causing malfunction and/or damage to the unit. -
Page 6: Selecting Various Ways Of Outputting The Effect Sound (Output Mode)
Selecting Various Ways of Outputting the Effect Sound (OUTPUT MODE) Selecting Various Ways of Outputting the Effect Sound (OUTPUT MODE) Here’s how to select how the effect sound is output. Turn the type knob to “SFX (8)”. Turn the other knobs besides the type knob all the way clockwise. While holding down the pedal switch, turn on the power by inserting a plug into the INPUT A (MONO) jack. -
Page 7: Assigning Functions To A Footswitch (Ctl Function)
Assigning Functions to a Footswitch (CTL FUNCTION) Assigning Functions to a Footswitch (CTL FUNCTION) Here’s how to assign functions to a footswitch that’s connected to this device. Turn the type knob to “SFX (7)”. Turn the other knobs besides the type knob all the way clockwise. While pressing this device’s pedal switch, turn on the power by inserting a plug into the INPUT A (MONO) jack. -
Page 8: Controlling The Knobs Using An Expression Pedal (Exp Function)
Controlling the Knobs Using an Expression Pedal (EXP FUNCTION) Controlling the Knobs Using an Expression Pedal (EXP FUNCTION) If an expression pedal is connected, you can use it to externally control the knobs on the SL-2. Use the following settings to select the knob (parameter) that’s controlled by the expression pedal. Turn the type knob to “HARMONIC (6)”. -
Page 9: Controlling The Output Level Using An Expression Pedal
Controlling the Output Level Using an Expression Pedal Controlling the Output Level Using an Expression Pedal You can use an expression pedal to control the level of the effect sound that’s output from the OUTPUT A (MONO) jack. Turn the type knob to “TREMOLO (5)”. Turn the other knobs besides the type knob all the way clockwise. -
Page 10: Controlling This Unit From An External Midi Device
Controlling This Unit from an External MIDI Device Controlling This Unit from an External MIDI Device You can send MIDI messages to control the SL-2 from an external device. You can also make the tempo of the SL-2 match that of the external device, so that the slice patterns on the SL-2 play back in sync with the external device. -
Page 11: Setting The Midi Receive Channel
Setting the MIDI Receive Channel Setting the MIDI Receive Channel Here’s how to set the channel used for receiving MIDI messages from a MIDI device. Turn the type knob to “DUAL (4)”. Turn the other knobs besides the type knob all the way clockwise. While holding down the pedal switch, turn on the power by inserting a plug into the INPUT A (MONO) jack. -
Page 12: Restoring The Factory Settings (Factory Reset)
Restoring the Factory Settings (Factory Reset) Restoring the Factory Settings (Factory Reset) This shows you how to return the SL-2 to its factory settings. Turn the type knob to “DUAL (3)”. Turn the other knobs besides the type knob all the way clockwise. While holding down the pedal switch, turn on the power by inserting a plug into the INPUT A (MONO) jack. -
Page 13: Changing The Battery
Changing the Battery Changing the Battery When operating on battery power only, the CHECK indicator gets dimmer when battery power gets too low. Replace the battery as soon as possible. * Batteries should always be installed or replaced before connecting any other devices. This way, you can prevent malfunction and damage. -
Page 14: Main Specifications
Main Specifications Main Specifications Nominal Input Level INPUT A (MONO), INPUT B jacks -20 dBu Maximum Input Level INPUT A (MONO), INPUT B jacks +7 dBu Input Impedance INPUT A (MONO), INPUT B jacks 1 MΩ Nominal Output Level OUTPUT A (MONO), OUTPUT B jacks -20 dBu Maximum Output Level OUTPUT A (MONO), OUTPUT B jacks... -
Page 15: Important Notes
Main Specifications IMPORTANT NOTES ● Even if batteries are installed, the unit will turn off if you connect or disconnect the power cord from the AC outlet while the unit is turned on, or if you connect or disconnect the AC adaptor from the unit. You must turn off the power before you connect or disconnect the power cord or AC adaptor. -
Page 16: Intellectual Property Right
You may obtain a copy of the License at http://www.apache.org/licenses/LICENSE-2.0 ● Roland, BOSS, SLICER are either registered trademarks or trademarks of Roland Corporation in the United States and/or other countries. ● Company names and product names appearing in this document are registered trademarks or trademarks of their... - Page 17 Main Specifications SL-2 Owner’s Manual ©2022 Roland Corporation...
Need help?
Do you have a question about the Slicer SL-2 and is the answer not in the manual?
Questions and answers