Table of Contents
Advertisement
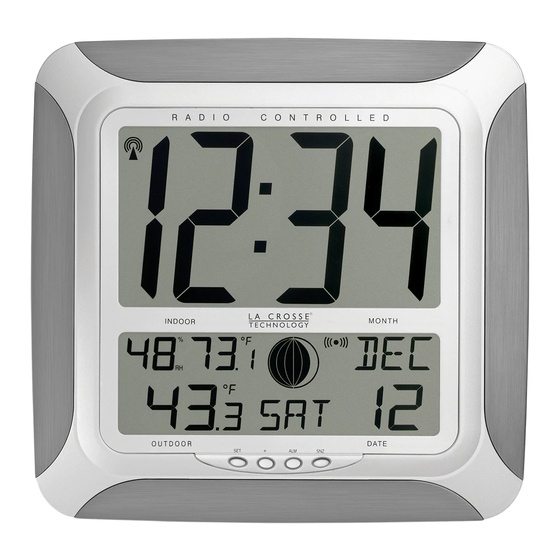
ATOMIC CLOCK WITH INDOOR TEMP/HUMIDITY AND OUTDOOR
FEATURES:
ATOMIC CLOCK:
LCD1
display
LCD2
display
Function keys
•
WWVB Radio controlled time with manual time setting
•
Time display: hour, minute, second
•
Alarm setting with snooze function
•
Complete calendar display
•
Weekday display (3 languages to choose from: English, French and Spanish)
•
Time zone setting
•
Daylight savings time ON/OFF option (DST)
•
ºF or ºC temperature display selectable
•
Indoor temperature and humidity display
•
Outdoor temperature display via 433MHz transmission
•
Wall mount or freestanding
•
Current moon phase display
WS-8248U
TEMPERATURE
Instruction Manual
1
Hanging holes
Battery cover
Foldable stands
Advertisement
Table of Contents

Related Manuals for La Crosse Technology WS-8248U-CH


Summary of Contents for La Crosse Technology WS-8248U-CH
- Page 1 ATOMIC CLOCK WITH INDOOR TEMP/HUMIDITY AND OUTDOOR FEATURES: ATOMIC CLOCK: LCD1 display LCD2 display Function keys • WWVB Radio controlled time with manual time setting • Time display: hour, minute, second • Alarm setting with snooze function • Complete calendar display •...
-
Page 2: To Install And Replace Batteries In The Temperature Transmitter
OUTDOOR TEMPERATURE TRANSMITTER: Mounting Bracket TO INSTALL AND REPLACE BATTERIES IN THE TEMPERATURE TRANSMITTER The transmitter uses 2 x AA,1.5V batteries. To install and replace the batteries, please follow the steps below: Remove the cover. Insert the batteries, observing the correct polarity (see marking inside battery compartment). Replace the battery cover on the unit. -
Page 3: Setting Up
After 15 minutes both the Indoor and Outdoor areas on your clock should have a temperature showing. If not, remove both sets of batteries, wait 15 minutes and repeat step one. After the clock receives the outdoor temperature the WWVB time code reception will automatically start. -
Page 4: Manual Settings
ATOMIC CLOCK LCD SCREEN DESCRIPTIONS The atomic clock's LCD is divided into 2 sections and once the batteries are inserted, all the segments will light up briefly before displaying the information for time, date, indoor and outdoor temperatures and indoor humidity. Radio reception icon WWVB time Indoor humidity and... -
Page 5: Lcd Contrast Setting
• Time zone setting • DST ON/OFF • Radio-controlled time ON/OFF • Language display setting • Manual time setting (Hour then Minute) • Year setting • Month setting • Date setting LCD CONTRAST SETTING After entering the manual setting mode as described above, the LCD contrast can be set between 0 and 7. -
Page 6: Radio-Controlled Time Setting
Note: The time zones from –4 to –10 hours will be displayed with 3 characters abbreviations: • -4 ATL (Atlantic time), • -5 EST (Eastern time; default time zone), • -6 CST (Central time), • -7 MST (Mountain time), • -8 PST (Pacific time), •... -
Page 7: Language Setting
Note: Turn off the radio-controlled time feature only if you DO NOT want the clock to automatically update itself. LANGUAGE SETTING The weekdays can be displayed in LCD2 with the pre-set languages: US English (ENG), French (FRA) and Spanish (ESP). LAN will be displayed in the lower LCD along with one of the three letter language abbreviations. -
Page 8: Year Setting
WWVB time reception takes place from 12:00 am through 6:00 am each day (attempts WWVB reception every full hour within this time frame). When the time signal is received for example at 1:00 am, the atomic clock will not attempt to receive the WWVB signal for the remaining hours until 6:00 am. -
Page 9: Alarm Setting
ALARM SETTING To enter into the alarm setting mode: Hold the ALM key for 5 seconds. The hour digits start flashing. Press and release the + key to set the hour. Press and release the ALM key to continue to the minutessetting. The minute digits start flashing. -
Page 10: Changing The Display Mode
433MHz RECEPTION CHECK FOR OUTDOOR TEMPERATURE TRANSMITTER The atomic clock will receive the temperature data within 4 minutes. If the temperature data has not been received 4 minutes after setting up (the display shows “- - -”), then please check the following points: The distance of the atomic clock or outdoor temperature transmitter should be at least 6 feet (2 meters) away from any interfering sources such as computer monitors or TV sets. -
Page 11: Wwvb Radio Controlled Time
2. Press and release the + key a second time. The display will now show the indoor humidity, seconds and outdoor temperature. 3. Press and release the + key a third time. The display will now show the indoor humidity, indoor temperature and seconds. -
Page 12: Moon Phase
If the tower icon flashes, but does not set the time or the WWVB tower does not appear at all, then please take note of the following: • Recommended distance to any interfering sources like computer monitors or TV sets is a minimum of 6 feet (2 meters). -
Page 13: Positioning The Atomic Clock
readings for the next 12 to 24 hours. These changes will require a 12 to 24 hour wait before obtaining reliable data. To achieve a true temperature reading, avoid mounting where direct sunlight can reach the outdoor temperature transmitter. It is recommended to mount the outdoor temperature transmitter on a North-facing wall or in any well shaded area. - Page 14 WALL MOUNTING 1) Using a straight edge, horizontally space at 2-3/4 of an inch (70 mm) three screw positions on a wall. 2) Install three mounting screws (not included) into a wall —leaving approximately 3/16 of an inch (5mm) extended from the wall. 3) Place the atomic clock onto the screws, using the hanging holes on the backside.
-
Page 15: Troubleshooting
3) Remove the protective strip from the other side of the tape. Position the outdoor temperature transmitter in the desired location, ensuring that the atomic clock can receive the signal. TROUBLESHOOTING Problem: The LCD is faint. Solution: 1) Replace the batteries. No reception of WWVB signal Problem: Solution:... -
Page 16: Care And Maintenance
CARE AND MAINTENANCE: • Avoid placing the units in areas prone to vibration and shock as these may cause damage. • Avoid areas where the units can be exposed to sudden changes in temperature, i.e. direct sunlight, extreme cold and wet/moist conditions as these will lead to rapid changes which reduces the accuracy of readings. -
Page 17: Liability Disclaimer
Transmitter: 5.04“ x 1.57“ x 0.9“ / 128 x 40 x 23 mm LIABILITY DISCLAIMER: • The manufacturer and supplier cannot accept any responsibility for any incorrect readings and any consequences that occur should an inaccurate reading take place. • This product is only designed for use in the home or office. •... - Page 18 examined which is not in need or repair, you will be charged for the repairs or examination. The owner must pay any shipping charges incurred in getting your La Crosse Technology, Ltd product to a La Crosse Technology, Ltd authorized service center. La Crosse Technology, Ltd will pay reasonable return shipping charges to the owner of the product.
- Page 19 sales@lacrossetechnology.com (information on other products) web: www.lacrossetechnology.com Questions ? Please see instruction video at www.lacrossetechnology.info/8248 All rights reserved. This handbook must not be reproduced in any form, even in excerpts, or duplicated or processed using electronic, mechanical or chemical procedures without written permission of the publisher.
Need help?
Do you have a question about the WS-8248U-CH and is the answer not in the manual?
Questions and answers
Cómo cambiar grados Fahrenheit a grados centígrados
The La Crosse Technology WS-8248U-CH allows switching between Fahrenheit (°F) and Celsius (°C) for temperature display. To change the temperature unit, use the selectable option provided in the settings. The exact steps are not detailed in the provided context, but typically, this setting can be adjusted using the function keys on the device.
This answer is automatically generated