
Related Manuals for ACIST CVi Contrast Delivery System


Summary of Contents for ACIST CVi Contrast Delivery System
- Page 1 ACIST | CVi® Contrast Delivery System User’s Guide Bracco Group 901479-002,01 2019-08 English, OUS...
-
Page 2: Proprietary Information Notice
Copyright ©2019 ACIST Medical Systems, Inc. All rights reserved. The written and graphic product descriptions in this manual were effective at the time of printing. ACIST Medical Systems, Inc. reserves the right to change specifications and designs without prior notification. -
Page 3: Table Of Contents
Flush Saline ........39 Connect and Calibrate the AngioTouch® Hand Controller ....40 ACIST | CVi Contrast Delivery System User's Guide | 3 901479-002,01 2019-08... - Page 4 Keep Vessel Open (KVO) Injection (Optional)......59 4 | ACIST | CVi Contrast Delivery System User's Guide 901479-002,01 2019-08...
- Page 5 Collect Separately ........79 10 EMC Tables 11 Limited Warranty ACIST | CVi Contrast Delivery System User's Guide | 5 901479-002,01 2019-08...
- Page 6 This page intentionally left blank. 6 | ACIST | CVi Contrast Delivery System User's Guide 901479-002,01 2019-08...
-
Page 7: Introduction
The ACIST | CVi Contrast Delivery System is not intended for use as a long- Contraindications term infusion pump. The system is not intended to be used to inject any agents other than contrast media. -
Page 8: About This User's Guide
Proper support equipment (for example, a defibrillation unit) is on site for immediate response to patient distress. This User’s Guide provides instructions for setting up and using the About This User’s ACIST | CVi Contrast Delivery System. It includes the following sections: Guide Section Purpose... -
Page 9: Manual Conventions
Cautions alert the user to a possible hazard that may result in equipment damage or personal injury. WARNING Warnings alert the user to a possible hazard that cause serious injury or death. ACIST | CVi Contrast Delivery System User's Guide | 9 901479-002,01 2019-08... - Page 10 This page intentionally left blank. 10 | ACIST | CVi Contrast Delivery System User's Guide 901479-002,01 2019-08...
-
Page 11: Warnings, Cautions, And Symbol Definitions
Air Column Detect Sensor The ACIST System is equipped with an air column detect sensor. The air column detect sensor cannot detect air in the patient catheter, the stopcock, or the high-pressure tubing past the sensor. This sensor is designed to aid the... - Page 12 Be sure to plug each cable only into the connector designed for it. To avoid the risk of electric shock, never touch the pins on the connector or cable. Do not use the ACIST System if any worn or damaged cords, cables, or connectors are detected. For replacement information, contact an ACIST representative.
- Page 13 • No modification of equipment is allowed. • The ACIST | CVi Contrast Delivery System may only be interfaced with X-ray equipment that is certified to be in compliance with IEC 60601- 1, second or third edition. ACIST | CVi Contrast Delivery System User's Guide | 13...
-
Page 14: Cautions
Accessories For proper operation and to ensure equipment compatibility, use only accessories and options provided or specified by ACIST Medical Systems for use with the CVi System. Bed Rail Mount Failure to securely clamp the CVi System components to the bed rail may result in serious injury or equipment damage. - Page 15 Make sure that the safety latch knob is tightened fully clockwise, and that the unit is secure on the cart. • Make sure that the power supply is secured to the mounting bracket during transport. ACIST | CVi Contrast Delivery System User's Guide | 15 901479-002,01 2019-08...
- Page 16 To avoid damaging X-ray imaging equipment, make sure the connector on the X-ray imaging device is properly configured before the input cable is connected to the CVi System. 16 | ACIST | CVi Contrast Delivery System User's Guide 901479-002,01 2019-08...
-
Page 17: Symbol Definitions
Consult the instructions for use for important cautionary information Do not reuse Keep dry Humidity limitation Pressure limitation Temperature limitation Fragile, handle with care Non-pyrogenic Manufacturer, Date of manufacture Date of manufacture ACIST | CVi Contrast Delivery System User's Guide | 17 901479-002,01 2019-08... - Page 18 IEC 60601-1, second and third editions. Complies with European Directive 93/42/EEC, Medical Device Directive. Do not use if packaging is damaged Sterilized using ethylene oxide Sterilized using irradiation 18 | ACIST | CVi Contrast Delivery System User's Guide 901479-002,01 2019-08...
- Page 19 Warnings, Cautions, and Symbol Definitions Symbol Definitions Symbol Definition (continued) Contains DEHP DEHP Environmental enclosure rating, protected against objects greater than 12 mm and protected against dripping water, injector head General warning ACIST | CVi Contrast Delivery System User's Guide | 19 901479-002,01 2019-08...
- Page 20 This page intentionally left blank. 20 | ACIST | CVi Contrast Delivery System User's Guide 901479-002,01 2019-08...
-
Page 21: System Description
The CVi System is able to synchronize with certain X-ray imaging systems from Siemens, Toshiba, GE, and Philips. Synchronization is only possible provided the proper X-ray interface cable is also purchased and installed. ACIST | CVi Contrast Delivery System User's Guide | 21 901479-002,01 2019-08... -
Page 22: System Hardware
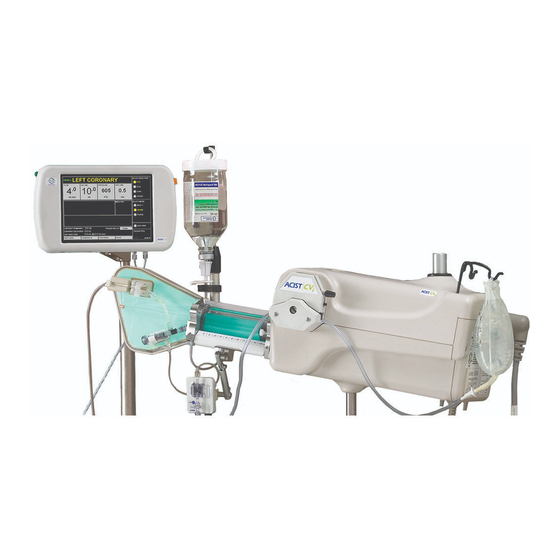
System hardware also includes the following components: • Power and communication cables • X-ray synchronization cable (optional) • Pedestal cart (optional) Control panel Injector head Cables Pedestal cart Power supply 22 | ACIST | CVi Contrast Delivery System User's Guide 901479-002,01 2019-08... -
Page 23: Power Supply
On a movable pedestal cart, with the control panel mounted onto the injector head. • On a bed rail, with the control panel mounted onto the injector head. • On a bed rail, with the control panel mounted separately. ACIST | CVi Contrast Delivery System User's Guide | 23 901479-002,01 2019-08... -
Page 24: Control Panel
The speaker on the control panel produces audible indicators to signal certain events, as follows: Event Audible Indicator Pressing a button on the touchscreen Click Filling the syringe Series of tones Alert message Beep Injecting contrast Repeating beep 24 | ACIST | CVi Contrast Delivery System User's Guide 901479-002,01 2019-08... -
Page 25: Touchscreen Functions
Allows setting the pressure parameter, which is the maximum allowable injection pressure. If the injection pressure approaches this limit, the CVi System will either adjust the flow rate or stop the injection. ACIST | CVi Contrast Delivery System User's Guide | 25 901479-002,01 2019-08... - Page 26 Starts the end-of-case procedure for changing out single-use components and, if desired, shutting down the system. System Messages Area System messages and alerts are displayed in this area of the screen. 26 | ACIST | CVi Contrast Delivery System User's Guide 901479-002,01 2019-08...
-
Page 27: Consumable Patient Kits
Multi-Use Syringe Kit Up to five cases A2000V Consumable kit availability varies by world area. Some locally-approved kits may not be listed above. Contact a local ACIST representative for more information. Note Product availability may vary in different global markets. - Page 28 Multi-use Syringe Kit (A2000 or A2000V) The kit includes a 100 ml syringe, a contrast spike, contrast tubing, and a slide clamp. 28 | ACIST | CVi Contrast Delivery System User's Guide 901479-002,01 2019-08...
-
Page 29: Angiotouch Hand Controller
C, initiates and controls the flow rate of the contrast injection. The bottom button, marked with an S, starts and stops a saline flush. Contrast (C) button Saline (S) button ACIST | CVi Contrast Delivery System User's Guide | 29 901479-002,01 2019-08... - Page 30 This page intentionally left blank. 30 | ACIST | CVi Contrast Delivery System User's Guide 901479-002,01 2019-08...
-
Page 31: Setup
C. High-pressure tubing Syringe chamber D. Air column detect sensor K. Saline tubing E. Manifold L. Contrast supply hanger Pressure transducer M. Saline bag hanger G. Saline pump ACIST | CVi Contrast Delivery System User's Guide | 31 901479-002,01 2019-08... -
Page 32: Setup Overview
Heart-related procedures X-ray system integration not available Peripheral Non-heart related X-ray system integration procedures available After selecting the procedure type, the CVi System will perform a 60-second calibration routine. 32 | ACIST | CVi Contrast Delivery System User's Guide 901479-002,01 2019-08... -
Page 33: Load Contrast
1. Open the Automated Manifold Kit and remove all the end caps. Load Contrast 2. Connect the manifold to the syringe. Tighten by turning the syringe side of the luer connection. ACIST | CVi Contrast Delivery System User's Guide | 33 901479-002,01 2019-08... - Page 34 Insert the contrast spike into the stopper/closure of the contrast supply container. To avoid spilling contrast, hold the contrast supply container with the stopper/closure facing up, as shown. 34 | ACIST | CVi Contrast Delivery System User's Guide 901479-002,01 2019-08...
- Page 35 If the contrast spike tubing is not properly secured in the contrast sensor, the system may produce an error. ACIST | CVi Contrast Delivery System User's Guide | 35 901479-002,01 2019-08...
-
Page 36: Load Saline
Slide clamp 8. Press DONE 1. Remove the white protective cover from the BT2000 pressure transducer Load Saline and connect the transducer cartridge to the transducer backplate sensor. 36 | ACIST | CVi Contrast Delivery System User's Guide 901479-002,01 2019-08... - Page 37 5. Open the saline pump and place the saline tubing inside. Center the tubing in the pump so that equal amounts of tubing remain on either side of the pump. ACIST | CVi Contrast Delivery System User's Guide | 37 901479-002,01 2019-08...
- Page 38 Move rear tubing guide downward Note The rear tubing guide should not restrict the flow of saline through the tubing. 10. Press DONE 38 | ACIST | CVi Contrast Delivery System User's Guide 901479-002,01 2019-08...
-
Page 39: Purge Contrast
5. Open the stopcock and position it over a waste receptacle to catch the saline overflow. 6. Press . The CVi System will automatically stop the saline flush after FLUSH 10 seconds. ACIST | CVi Contrast Delivery System User's Guide | 39 901479-002,01 2019-08... -
Page 40: Connect And Calibrate The Angiotouch® Hand Controller
AngioTouch® Hand Controller 2. Press DONE 3. Press to start the hand controller calibration. 4. Fully depress the contrast (C) button on the hand controller within 4 seconds. 40 | ACIST | CVi Contrast Delivery System User's Guide 901479-002,01 2019-08... -
Page 41: Connect The Patient Catheter
3. When no further purging is required, press CANCEL Important Make sure that the connection between the high-pressure tubing and the catheter is purged of air. ACIST | CVi Contrast Delivery System User's Guide | 41 901479-002,01 2019-08... -
Page 42: Zero The Pressure Transducer
2. Hold the stopcock and pressure transducer at midaxillary. Before recording pressure waveforms, flush saline through the high-pressure tubing. Contrast in the high-pressure tubing will damp the pressure signal. 42 | ACIST | CVi Contrast Delivery System User's Guide 901479-002,01 2019-08... -
Page 43: Perform An Injection
3. Press , and on the control panel to FLOW VOLUME PRESSURE RISE TIME modify each parameter according to physician preference. See page 25. ACIST | CVi Contrast Delivery System User's Guide | 43 901479-002,01 2019-08... -
Page 44: Arm The Injector
Press and hold the contrast (C) button on the hand controller to inject Inject Contrast contrast. Refer to page 43 for information about the behavior of the C button in fixed rate mode and variable rate mode. 44 | ACIST | CVi Contrast Delivery System User's Guide 901479-002,01 2019-08... -
Page 45: Purge Air From Contrast Components
Press and hold PURGE The system purges air as long as the button is held, to a PURGE maximum of 10 seconds. Press to return to normal operation. CANCEL ACIST | CVi Contrast Delivery System User's Guide | 45 901479-002,01 2019-08... -
Page 46: Flush Saline
Standby button again and then press on the control panel touch screen. When the CVi System is in Standby mode, all functions are paused. Standby button 46 | ACIST | CVi Contrast Delivery System User's Guide 901479-002,01 2019-08... -
Page 47: End A Case
Press to replace the syringe. Start a new case with a new syringe. Start a new case with the current syringe. CANCEL Do not end the case. ACIST | CVi Contrast Delivery System User's Guide | 47 901479-002,01 2019-08... -
Page 48: Remove Single-Use Consumables
1. Wait until the syringe plunger has disengaged. 2. Open the syringe chamber. 3. Remove all consumables used. 4. Turn off the power switch on the power supply. 48 | ACIST | CVi Contrast Delivery System User's Guide 901479-002,01 2019-08... -
Page 49: Supplementary Procedures
Supplementary Procedures Decon tamination If the CVi System needs to be cleaned of biohazards (such as blood), ACIST recommends using a non-alkaline cleaner. Wear protective gloves. Apply the solution to a soft cloth and wipe down the system. Discard all materials used to decontaminate the system in accordance with all local, state, and federal regulations, codes, and directives. - Page 50 To remove the backlight cover, pull gently around the edges of the cover and lift it over the air column detect sensor and manifold valve sensor. 50 | ACIST | CVi Contrast Delivery System User's Guide 901479-002,01 2019-08...
-
Page 51: Monthly Inspection
When storing a cart-mounted system, wrap or attach the power cord to the Storage of Cart- cart to avoid accidents caused by loose cords. Lock the wheels to prevent Mounted Systems unintentional movement of the system. ACIST | CVi Contrast Delivery System User's Guide | 51 901479-002,01 2019-08... -
Page 52: Transfer The Injector Head To/From A Pedestal Cart
(bed rail or pedestal cart). 4. Tighten the lock knob. Make sure the system is locked and secure. 52 | ACIST | CVi Contrast Delivery System User's Guide 901479-002,01 2019-08... -
Page 53: Cabling
Connect the other end of the control panel cable to the bottom of the injector head. Tighten the cable screws at both ends. Control panel cable Control panel cable connected to control panel connected to injector head ACIST | CVi Contrast Delivery System User's Guide | 53 901479-002,01 2019-08... - Page 54 To avoid damaging the X-ray imaging equipment, make sure that the connector on the X-ray imaging device is properly configured before the input cable is connected to the CVi System. 54 | ACIST | CVi Contrast Delivery System User's Guide 901479-002,01 2019-08...
- Page 55 • For systems connected to a Philips or Siemens X-ray imaging system, a separate power cord is not required. Power is supplied from the imaging system connection. ACIST | CVi Contrast Delivery System User's Guide | 55 901479-002,01 2019-08...
-
Page 56: Mount The Power Supply On A Cart (Optional)
1. Loosen the power supply clamp on the pedestal cart. Supply on a Cart 2. Place the power supply in the clamp at an angle. (Optional) 3. Rotate the power supply into the clamp. 56 | ACIST | CVi Contrast Delivery System User's Guide 901479-002,01 2019-08... -
Page 57: Change The Display Language And Pressure Units
Change the Display button next to the desired language. If no language selection is made within 5 Language and seconds, the system defaults to the last selected language. Pressure Units ACIST | CVi Contrast Delivery System User's Guide | 57 901479-002,01 2019-08... -
Page 58: Resume An Interrupted Case
PATIENT WEIGHT Patient Weight Recalibrate Control While the ACIST logo is being displayed during system startup, touch the control panel screen. When directed, touch each of the three points on the Panel Screen screen. It is important to touch the three calibration points with precision for an accurate calibration. -
Page 59: Change Color Scheme
The default flow rate for KVO injections is 1.0 ml/min. Press KVO RATE select a different flow rate for the KVO function. The available range is 0.1– 10 ml/min. ACIST | CVi Contrast Delivery System User's Guide | 59 901479-002,01 2019-08... - Page 60 This page intentionally left blank. 60 | ACIST | CVi Contrast Delivery System User's Guide 901479-002,01 2019-08...
-
Page 61: Troubleshooting
Contrast is leaking from the syringe or contrast spike. Why? • Close the white slide clamp before changing a patient kit. • Press the Standby button and check the connection of the contrast spike. ACIST | CVi Contrast Delivery System User's Guide | 61 901479-002,01 2019-08... - Page 62 The control panel is picking up button presses in the wrong location. Why? The touch screen on the control panel needs to be recalibrated. See page 58. 62 | ACIST | CVi Contrast Delivery System User's Guide 901479-002,01 2019-08...
-
Page 63: Troubleshooting Cvi System Issues
The contrast (C) button on the hand controller must be pressed within 4 seconds of starting the hand controller calibration. • Insufficient pressure may have been applied to the contrast (C) button during calibration. ACIST | CVi Contrast Delivery System User's Guide | 63 901479-002,01 2019-08... - Page 64 The manifold valve failed to close at some point during the last procedure. Select either when prompted to replace the syringe and the contrast. Replace the syringe and contrast supply container. Continue using the current syringe and contrast. 64 | ACIST | CVi Contrast Delivery System User's Guide 901479-002,01 2019-08...
-
Page 65: Troubleshooting Hemodynamic Issues
After a large injection, use a hand syringe filled with saline to flush contrast from the patient catheter. Then re-zero the transducer. – Re-zero the transducer before performing critical measurements. – Be sure to zero at midaxillary. ACIST | CVi Contrast Delivery System User's Guide | 65 901479-002,01 2019-08... - Page 66 Check the transducer for damage or dislodgement. If the transducer needs to be replaced, disconnect from the patient, replace the manifold/transducer kit, remove all air from the system, and resume the case. 66 | ACIST | CVi Contrast Delivery System User's Guide 901479-002,01 2019-08...
- Page 67 Flushing the patient catheter with saline may help. – High-viscosity contrast in the catheter may damp the waveform. Flush the patient catheter with saline. ACIST | CVi Contrast Delivery System User's Guide | 67 901479-002,01 2019-08...
-
Page 68: System Messages
ON again and press RESUME...OR Press manifold sensor. To start a new case, OK to allow removal of syringe from remove all components. chamber 68 | ACIST | CVi Contrast Delivery System User's Guide 901479-002,01 2019-08... - Page 69 Consult the X-ray imaging system's instructions to determine how to correct the problem. DOS unable to stop injection motor The system has experienced a error! hardware problem. Contact a service representative. ACIST | CVi Contrast Delivery System User's Guide | 69 901479-002,01 2019-08...
- Page 70 If there are no flow restrictions and the error persists, contact a service representative. Interprocessor Ping Error Try cycling power to the system. 70 | ACIST | CVi Contrast Delivery System User's Guide 901479-002,01 2019-08...
- Page 71 Press the Standby button to relieve back-pressure on the manifold. • Try purging the tubing. • Replace the patient kit. Motor Speed Incorrect Try cycling power to the system. ACIST | CVi Contrast Delivery System User's Guide | 71 901479-002,01 2019-08...
- Page 72 Standby button to allow system pressure to relieve back-pressure on the manifold. Release Trigger for New Injection Release the contrast (C) button on the hand controller to begin a new injection. 72 | ACIST | CVi Contrast Delivery System User's Guide 901479-002,01 2019-08...
- Page 73 If this alert occurs during setup, the syringe may be faulty and may need to be replaced. This alert can also occur if the syringe valve sensor needs to be cleaned. ACIST | CVi Contrast Delivery System User's Guide | 73 901479-002,01 2019-08...
- Page 74 There is a 20 minute limit for KVO The system automatically stops the KVO function after 20 consecutive minutes as a safety feature. Values Out of Range Try cycling power to the system. 74 | ACIST | CVi Contrast Delivery System User's Guide 901479-002,01 2019-08...
-
Page 75: Specifications
> 20ml/sec. When using 4Fr catheters, flow rate reduction may occur with > 12ml/sec flow rate settings and Pressure Limit may occur with flow rate settings > 15ml/sec. ACIST | CVi Contrast Delivery System User's Guide | 75 901479-002,01 2019-08... -
Page 76: Pedestal Cart Dimensions
The dimensions of the pedestal cart are as follows: Pedestal Cart Dimensions Item Dimensions Wheelbase footprint 21 x 25 in (53.3 x 63.5 cm) Height 36 in (91.4 cm) 76 | ACIST | CVi Contrast Delivery System User's Guide 901479-002,01 2019-08... -
Page 77: Weight
Power cord: 12 ft (3.7 m) Electrical Leakage Less than 10 µA for patient connection Less than 100 µA for chassis Complies with EN/IEC 60601-1, second and third editions. ACIST | CVi Contrast Delivery System User's Guide | 77 901479-002,01 2019-08... -
Page 78: Hemodynamic Transducer
<5 µA at 115 VAC, 60 Hz Overpressure withstand –400 to +4000 mmHg Defibrillation capacity 5 discharges in 5 min at 360 J 15% pressure transducer bandwidth >200 Hz 78 | ACIST | CVi Contrast Delivery System User's Guide 901479-002,01 2019-08... - Page 79 9600, 9800, and 9900 Philips Allura Xper FD10 Allura Xper FD20 Integris Allura Series Toshiba Infinix Infinix i-series Shimadzu Bransist Safire Series Digitex Safire Series Heart Speed Series ACIST | CVi Contrast Delivery System User's Guide | 79 901479-002,01 2019-08...
-
Page 80: Ul Approval
In accordance with Directive 2002/96/EC Waste Electrical and Electronic Equipment, residents of the European Union must follow specific disposal or recycling instructions for this product. ACIST Europe BV is fully responsible for the coordination, logistics, and costs of the WEEE process. -
Page 81: Emc Tables
Requirements • The use of accessories, transducers, or cables other than those specified and provided by ACIST Medical may result in increased electromagnetic emissions or decreased electromagnetic immunity of the CVi system. • The CVi system should not be used adjacent to or stacked with other equipment. If adjacent or stacked use is necessary, the system should be observed prior to patient use to verify normal operation in the configuration in which it will be used. - Page 82 Criterion A Power frequency magnetic 50/60 Hz fields should be that of a typical commercial or hospital Magnetic Field environment. EN/IEC 61000-4-8 per IEC 60601-1-2:2014 and EN 60601-1-2:2015 4th Edition 82 | ACIST | CVi Contrast Delivery System User's Guide 901479-002,01 2019-08...
- Page 83 Criterion D - Loss of function or degradation of performance which is not recoverable, owing to damage to hardware or software, or loss of data. ACIST | CVi Contrast Delivery System User's Guide | 83 901479-002,01 2019-08...
- Page 84 CDMA 850, LTE band 5 GSM 1800, CDMA 1900, GSM 1900, 1 700 – 1 990 DECT, LTE band 1, 3, 4, 25 UMTS Bluetooth, WLAN 802.11 b/g/n 2 400 – 2 570 RFID 2450, LTE band 7 WLAN 802.11 a/n 5 100 – 5 800 84 | ACIST | CVi Contrast Delivery System User's Guide 901479-002,01 2019-08...
- Page 85 ACIST product. The foregoing is the sole warranty of ACIST. Any part or component of the ACIST | CVi® System that is judged to be covered under this warranty by ACIST during the warranty period will be repaired or replaced by ACIST at its option and its expense.
- Page 86 COMPANY DOES NOT WARRANT EITHER A GOOD EFFECT OR AGAINST ILL EFFECT FOLLOWING THE USE OF THE ACIST PRODUCT AND ACIST MAKES NO WARRANTY AS TO WHETHER OR NOT ANY PARTICULAR OR DESIRED RESULT IS OBTAINABLE BY APPLICATION OR USE OF THE ACIST PRODUCT.
- Page 88 ACIST Medical Systems, Inc. 7905 Fuller Road Eden Prairie, MN 55344 USA Authorized European Representative: Medical Product Service GmbH Borngasse 20 2797 35619 Braunfels, Germany 901479-002,01 2019-08...
Need help?
Do you have a question about the CVi Contrast Delivery System and is the answer not in the manual?
Questions and answers