Advertisement
Available languages
Available languages
Quick Links
EUROLITE KLS-10 Kompakt-Lichtset
Set bestehend aus
4 x 42000410 PAR-56 Lite Spot
1 x 59006996 EUROLITE STV-40S Stativ,Stahl
1 x 9410027A Farbfolienset 19x19cm
1 x 70064435 EUROLITE DTB-403/short
4 x 88125005 OMNILUX PAR-56 230V/300W
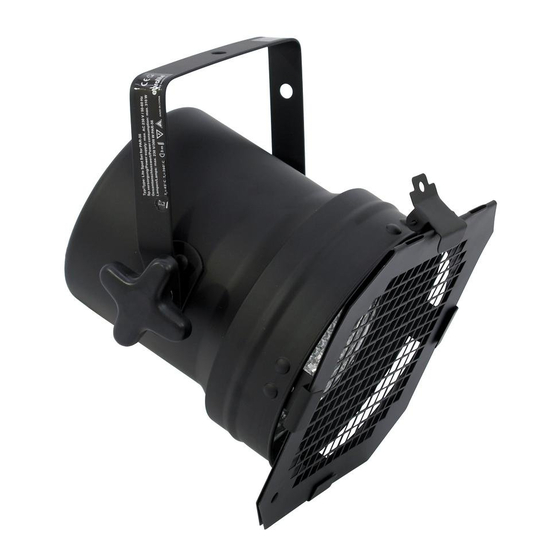
PAR-56 Lite Spot:
Spannungsversorgung:
Gesamtanschlusswert:
Maße (LxBxH):
Gewicht:
Passende Lampe:
Zubehör:
STV-40S:
Max. Traglast: 18 kg
Mind.höhe: 1,5 m
Max. Höhe: 3,4 m
Höchsthub: 1,5 m
Gewicht: 6 kg
SB-46:
Spannungsversorgung:
Max. Gesamtleistung:
Max. Gesamtstrom:
Max. Nennleistung/Kanal:
Max. Nennstrom/Kanal:
(No.: 42109500)
max. AC 230 V/50-60 Hz
310 W
240 x 215 x 235 mm
1,3 kg
GE PAR-56 230V/300W NSP 2000h
Bestell-Nr. 88125000
OMNILUX PAR-56 230V/300W NSP 1000h
Bestell-Nr. 88125005
GE PAR-56 230V/300W MFL 2000h
Bestell-Nr. 88125100
GE PAR-56 230V/300W WFL 2000h
Bestell-Nr. 88125200
Ersatzfilterrahmen
Bestell-Nr. 42000480
230 V AC, 50 Hz ~
4600 W
20 A
1150 W
5 A
Wo kaufen?
Mehr Bilder
Vergrößern
Advertisement
Chapters

Related Manuals for EuroLite PAR-56 Lite Spot


Summary of Contents for EuroLite PAR-56 Lite Spot
- Page 1 EUROLITE KLS-10 Kompakt-Lichtset (No.: 42109500) Wo kaufen? Set bestehend aus 4 x 42000410 PAR-56 Lite Spot 1 x 59006996 EUROLITE STV-40S Stativ,Stahl 1 x 9410027A Farbfolienset 19x19cm 1 x 70064435 EUROLITE DTB-403/short 4 x 88125005 OMNILUX PAR-56 230V/300W Mehr Bilder Vergrößern...
- Page 2 Maße (LxBxH): 240 x 115 x 80 mm Eigengewicht: 3,7 kg...
- Page 3 BEDIENUNGSANLEITUNG USER MANUAL MODE D'EMPLOI MANUAL DEL USUARIO PAR-56 Lite Spot © Für weiteren Gebrauch aufbewahren! Copyright Keep this manual for future needs! Nachdruck verboten! Gardez ce mode d’emploi pour des Reproduction prohibited! utilisations ultérieures! Réproduction interdit! Guarde este manual para posteriores usos. Prohibida toda reproducción.
-
Page 4: Table Of Contents
MULTI-LANGUAGE-INSTRUCTIONS Inhaltsverzeichnis Table of contents Sommaire Contenido EINFÜHRUNG..............................4 SICHERHEITSHINWEISE..........................4 BESTIMMUNGSGEMÄßE VERWENDUNG..................... 5 GERÄTEÜBERSICHT............................6 INSTALLATION ..............................6 Lampeninstallation/Lampenwechsel ......................6 Überkopfmontage............................7 BEDIENUNG ..............................9 REINIGUNG UND WARTUNG.......................... 9 TECHNISCHE DATEN ............................ 10 INTRODUCTION ............................. 11 SAFETY INSTRUCTIONS ..........................11 OPERATING DETERMINATIONS........................ - Page 5 You can find the latest update of this user manual in the Internet under: Vous pouvez trouvez la dernière version de ce mode d'emploi dans l'Internet sous: Vd. puede encontrar la versión más reciente de este manual en el Internet bajo: www.eurolite.de 3/31 42000410_V_1_0_4946.DOC...
-
Page 6: Einführung
- sicherstellen, dass gegebenenfalls jede erhaltene Ergänzung in die Anleitung einzuführen ist EINFÜHRUNG Wir freuen uns, dass Sie sich für einen EUROLITE PAR-56 LITE SPOT entschieden haben. Sie haben hiermit ein leistungsstarkes und vielseitiges Gerät erworben. Nehmen Sie den PAR-56 LITE SPOT aus der Verpackung. -
Page 7: Bestimmungsgemäße Verwendung
Das Gerät darf nicht in Betrieb genommen werden, nachdem es von einem kalten in einen warmen Raum gebracht wurde. Das dabei entstehende Kondenswasser kann unter Umständen Ihr Gerät zerstören. Lassen Sie das Gerät solange uneingeschaltet, bis es Zimmertemperatur erreicht hat! Der Aufbau entspricht der Schutzklasse I. -
Page 8: Geräteübersicht
Der Projektor und der Farbfilterrahmen sind immer mit einem geeigneten Sicherheitsfangseil zu sichern. Die maximale Umgebungstemperatur t = 45° C darf niemals überschritten werden. Nehmen Sie das Gerät erst in Betrieb, nachdem Sie sich mit seinen Funktionen vertraut gemacht haben. Lassen Sie das Gerät nicht von Personen bedienen, die sich nicht mit dem Gerät auskennen. -
Page 9: Überkopfmontage
ACHTUNG! Die Lampe muss gewechselt werden, wenn diese beschädigt ist oder sich durch Wärme verformt hat! Vor dem Wechseln der Lampe diese unbedingt erst abkühlen lassen (ca. 5 Minuten) und das Gerät allpolig von der Netzspannung trennen (Netzstecker ziehen). Vermeiden Sie es, den Glaskörper mit bloßen Händen zu berühren. Beachten Sie auch unbedingt die Hin- weise des Lampenherstellers. - Page 10 Der Unternehmer hat dafür zu sorgen, dass sicherheitstechnische und maschinentechnische Einrichtungen vor der ersten Inbetriebnahme und nach wesentlichen Änderungen vor der Wiederinbetriebnahme durch Sachverständige geprüft werden. Der Unternehmer hat dafür zu sorgen, dass sicherheitstechnische und maschinentechnische Einrichtungen mindestens alle vier Jahre durch einen Sachverständigen im Umfang der Abnahmeprüfung geprüft werden. Der Unternehmer hat dafür zu sorgen, dass sicherheitstechnische und maschinentechnische Einrichtungen mindestens einmal jährlich durch einen Sachkundigen geprüft werden.
-
Page 11: Bedienung
Stellen Sie den Neigungswinkel über den Hängebügel ein und ziehen Sie die Feststellschrauben gut fest. Schließen Sie das Gerät über den Netzstecker ans Netz an. Die Belegung der Anschlussleitungen ist wie folgt: Leitung International Braun Außenleiter Blau Neutralleiter Gelb/Grün Schutzleiter Der Schutzleiter muss unbedingt angeschlossen werden! Wenn das Gerät direkt an das örtliche Stromnetz angeschlossen wird, muss eine Trennvorrichtung mit mindestens 3 mm Kontaktöffnung an jedem Pol in die festverlegte elektrische Installation eingebaut werden. -
Page 12: Technische Daten
LEBENSGEFAHR! Vor Wartungsarbeiten unbedingt allpolig vom Netz trennen! Das Gerät sollte regelmäßig von Verunreinigungen wie Staub usw. gereinigt werden. Verwenden Sie zur Reinigung ein fusselfreies, angefeuchtetes Tuch. Auf keinen Fall Alkohol oder irgendwelche Lösungsmittel zur Reinigung verwenden! Reinigen Sie das Innere des Projektors mindestens einmal im Jahr mit einem Staubsauger oder einer Luftbürste. -
Page 13: Introduction
- pass this manual on to every further owner or user of the product - include every supplementay update with the original manual INTRODUCTION Thank you for having chosen a EUROLITE PAR-56 LITE SPOT. You will see you have acquired a powerful and versatile device. Unpack your PAR-56 LITE SPOT. -
Page 14: Operating Determinations
If the device has been exposed to drastic temperature fluctuation (e.g. after transportation), do not switch it on immediately. The arising condensation water might damage your device. Leave the device switched off until it has reached room temperature. This device falls under protection-class I. Therefore it is essential that the yellow/green conductor gets connected to earth. -
Page 15: Overview
The maximum ambient temperature t = 45° C must never be exceeded. Operate the device only after having become familiar with its functions. Do not permit operation by persons not qualified for operating the device. Most damages are the result of unprofessional operation! Please use the original packaging if the device is to be transported. -
Page 16: Overhead Rigging
CAUTION! The lamp has to be replaced when it is damaged or deformed due to the heat! Before replacing the lamp, unplug mains lead and let the lamp cool down (approx. 5 minutes). During the installation do not touch the glass-bulbs bare-handed! Please follow the lamp manufacturer's notes! Do not install lamps with a higher wattage! Lamps with a higher wattage generate temperatures the device was not designed for. - Page 17 Procedure: The device should be installed outside areas where persons may walk by or be seated. IMPORTANT! OVERHEAD RIGGING REQUIRES EXTENSIVE EXPERIENCE, including (but not limited to) calculating working load limits, installation material being used, and periodic safety inspection of all installation material and the device.
-
Page 18: Operation
The earth has to be connected! If the device will be directly connected with the local power supply network, a disconnection switch with a minimum opening of 3 mm at every pole has to be included in the permanent electrical installation. DANGER TO LIFE! Before taking into operation for the first time, the installation has to be approved by an expert! OPERATION... -
Page 19: Technical Specifications
TECHNICAL SPECIFICATIONS Power supply: max. 230 V AC, 50-60 Hz ~ Power consumption: 310 W Dimensions (LxWxH): 240 x 215 x 235 mm Weight: 1,3 kg Fitting lamp: Article number: OMNILUX PAR-56 230V/300W NSP 88125005 GE PAR-56 230V/300W NSP 88125000 OMNILUX PAR-56 230V/300W MFL 88125105 GE PAR-56 230V/300W MFL... -
Page 20: Introduction
- s'assurer qu'en cas de besoin, chaque modification obtenue soit ajoutée au mode d'emploi. INTRODUCTION Nous vous remercions d'avoir choisi un EUROLITE PAR-56 LITE SPOT. Vous êtes en possession d'un effet lumineux puissant aux possibilités multiples. Sortez le PAR-56 LITE SPOT de son emballage. -
Page 21: Emploi Selon Les Prescriptions
L'appareil ne devrait pas être mis en service lorsqu'il à été transporté d'un endroit froid à un endroit chaud. Il se forme de la condensation qui pourrait endommager l'appareil. Laissez celui-ci atteindre la température ambiante avant de le mettre en service. La construction de l'appareil est conforme aux normes de sécurité... -
Page 22: Aperçue Des Parties
Il faut toujours fixer le projecteur et le porte-filtre avec une élingue de sécurité appropriée. La maximale température ambiante t = 45° C ne doit pas être dépassée. N'utilisez l'appareil qu'après avoir pris connaissance de ses fonctions et possibilités. Ne laissez pas des personnes incompétentes utiliser cet appareil. -
Page 23: Montage Par Dessus De La Tête
ATTENTION! La lampe doit être remplacée lorsqu'elle a été endommagée ou déformée par la chaleur! Avant le remplacement de l'ampoule, toujours laisser refroidir (env. 5 minutes) celle-ci et débrancher l'appareil. Ne jamais manipuler l'ampoule directement avec les doigts. Veuillez respecter les instructions du fabricant. Ne pas utiliser des ampoules d’une puissance supérieure, la température dègagée par celles-ci étant trop haute pour cet appareil. - Page 24 Procédure: Dans le cas idéal, l'appareil devrait être installé en dehors du secteur de présence de personnes. IMPORTANT! LE MONTAGE PAR DESSUS DE LA TETE EXIGE UN HAUT NIVEAU D‘EXPERIENCE. Ceci comprend (mais n’est pas limitée seulement) des calculations pour la définition de la capacité de charge, le matériel d’installation utilisé...
-
Page 25: Maniement
L'occupation des câbles de connection est: Câble International Brun Phase Bleu Neutre Jaune/Vert Terre La terre doit être connecteé! Quand vous connectez l'appareil directement au secteur local, vous deviez installer un interrupteur du secteur avec une aperture de 3 mm au minimum sur chaque pôle. DANGER DE MORT! Avant la première mise en marche, l’installation doit être contrôlé... -
Page 26: Caractéristiques Techniques
Quand le câble secteur de cet appareil est endommagé, il doit être remplacé par un installateur agrée pour éviter des dangers. Pour tout renseignement complémentaire, votre revendeur se tient à votre entière disposition. CARACTÉRISTIQUES TECHNIQUES Alimentation: max. 230 V AC, 50-60 Hz ~ Puissance de rendement: 310 W Dimensions (LxlxH):... -
Page 27: Introducción
-pasar el manual a cada sucesivo poseedor o usuario del producto -asegurar que inserte cada suplemento del manual INTRODUCCIÓN Gracias por haber elegido un EUROLITE PAR-56 LITE SPOT. Verá que ha adquirido un aparato potente y versátil. Desembale su PAR-56 LITE SPOT. -
Page 28: Instrucciones De Manejo
Si el aparato ha estado expuesto a grandes cambios de temperatura (p.e. tras el transporte), no lo enchufe inmediatamente. La condensación de agua producida podría dañar su aparato. Deje el aparato desconec- tado hasta que llegue a la temperatura ambiente. Este aparato pertenece a la clase de protección I. -
Page 29: Descripción De Las Partes
La máxima temperatura ambiente t = 45° C nunca debe ser excedido. Maneje el aparato sólo después de familiarizarse con sus funciones. No permita el manejo a personas que no conocen el aparato lo suficientemente bien. La mayoría de los daños son causados por manejo inadecuado de inexpertos. -
Page 30: Montaje Por Encima De La Cabeza
¡PRECAUCION! ¡La lámpara debe ser reemplazada cuando esté deteriorada o deformada debido al calor! Antes de reemplazar la lámpara, desenchufe-lo de la corriente y deje que la lámpara se enfrie. ¡Durante la instalación no toque las bombillas de cristal con las manos sin protección! ¡Por favor siga las indicaciones del fabricante de las lámparas! No instalar una lámpara con más vatios. - Page 31 El empresario debe asegurar que instalaciones de seguridad y de máquinas son inspeccionados por un baquiano una vez por año. Procedimiento: El proyector debe ser instalado fuera de áreas dónde personas pueden entretenerse. IMPORTANTE! UNA MONTAJE POR ENCIMA DE LA CABEZA REQUIERA MUCHA EXPERIENCIA. Ésto incluye (pero no es limitadoa) calculaciones de la capacidad de carga, material de instalación usado y inspecciones regulares del material usado y del proyector.
-
Page 32: Operación
La ocupación de los cables de conexión es: Cable Internacional Marrón Fase Azul Neutro Amarillo/Verde Tierra La tierra debe ser conectada. Cuando Vd. quire instalar el aparato directamente a la red local, Vd. debe instalar un interruptor de la red con una apertura de 3 mm por mínimo en cada polo. -
Page 33: Especificaciones Técnicas
Si tiene alguna pregunta más, póngase en contacto con su distribuidor. ESPECIFICACIONES TÉCNICAS Alimentación: max. 230 V AC, 50-60 Hz ~ Consumo: 310 W Dimensiones (An.xPr.xAl.): 240 x 215 x 235 mm Peso: 1,3 kg Lámpara: Referencia: OMNILUX PAR-56 230V/300W NSP 88125005 GE PAR-56 230V/300W NSP 88125000... - Page 34 BEDIENUNGSANLEITUNG USER MANUAL STV-40S Lighting Stand Für weiteren Gebrauch aufbewahren! Keep this manual for further needs! © COPYRIGHT Nachdruck verboten! All rights reserved!
- Page 35 - diese Bedienungsanleitung genau beachten. EINFÜHRUNG Wir freuen uns, dass Sie sich für ein EUROLITE Leuchten-Stativ entschieden haben. Nehmen Sie den Ständer aus der Verpackung. Prüfen Sie zuerst, ob Transportschäden vorliegen. In diesem Fall nehmen Sie das Gerät nicht in Betrieb und setzen sich bitte mit Ihrem Fachhändler in Verbindung.
- Page 36 Vor dem Aus- und Einfahren des Teleskoprohrs muss immer ein Sicherheitsbereich um den Ständer herum abgesperrt werden. Dieser Sicherheitsbereich muss einen Durchmesser haben, der der 1,5 fachen maximalen Auszugshöhe entspricht. Ausgefahrene Teleskoprohre müssen immer mit einer zweiten Sicherung gesichert werden! Alle an einem Ständer angebrachten Geräte müssen zusätzlich mit einer zweiten Sicherung versehen werden.
- Page 37 Soll das Gerät transportiert werden, verwenden Sie bitte die Originalverpackung, um Transportschäden zu vermeiden. Beachten Sie bitte, dass eigenmächtige Veränderungen an dem Gerät aus Sicherheitsgründen verboten sind. Der Serienbarcode darf niemals vom Gerät entfernt werden, da ansonsten der Garantieanspruch erlischt. Wird das Gerät anders verwendet als in dieser Bedienungsanleitung beschrieben, kann dies zu Schäden am Produkt führen und der Garantieanspruch erlischt.
- Page 38 INSTALLATION LEBENSGEFAHR! Bei der Installation sind insbesondere die Bestimmungen der BGV C1 (vormals VBG 70) und DIN 15560-27 zu beachten! Die Installation darf nur vom autorisierten Fachhan- del ausgeführt werden! Während des Auf-, Um- und Abbaus ist der unnötige Aufenthalt im Bereich von Bewegungsflächen, auf Beleuchterbrücken, unter hochgelegenen Arbeitsplätzen sowie an sonstigen Gefahrbereichen verboten.
- Page 39 LEBENSGEFAHR! Vor der ersten Inbetriebnahme muss die Einrichtung durch einen Sachverständigen geprüft werden! REINIGUNG UND WARTUNG Der Unternehmer hat dafür zu sorgen, dass sicherheitstechnische und maschinentechnische Einrichtungen mindestens alle vier Jahre durch einen Sachverständigen im Umfang der Abnahmeprüfung geprüft werden. Der Unternehmer hat dafür zu sorgen, dass sicherheitstechnische und maschinentechnische Einrichtungen mindestens einmal jährlich durch einen Sachkundigen geprüft werden.
- Page 40 - be qualilfied - follow the instructions of this manual INTRODUCTION Thank you for having chosen a EUROLITE STV-40S lighting stand. Unpack your stand. Before you initially start-up, please make sure that there is no damage caused by transportation. Should there be any, consult your dealer and do not use the device.
- Page 41 Before taking into operation, every stand has to be checked upon possible damages. If one part of a stand is defective, the stand must not be taken into operation. Keep away children and amateurs! OPERATING DETERMINATIONS This device is a lighting stand for installing e.g. PAR spots with the enclosed crossbeam. The carrying capacity of the stand must not exceed 18 kg.
- Page 42 DELIVERY INCLUDES 1 stand with 2 telescopic tubes with endstop 2 safety bolts with steel rope and safety splint 1 crossbeam with 4 screws for fastening the spots 1 user manual OVERVIEW OF THE ELEMENTS Nut M10 x 70 Crossbeam 2 x Washer Nut M10 Butterfly nut...
- Page 43 The operator has to make sure that safety-relating and machine-technical installations are approved by an expert before taking into operation for the first time and after changes before taking into operation another time. The operator has to make sure that safety-relating and machine-technical installations are approved by an expert after every four year in the course of an acceptance test.
- Page 44 2) The standing stability of the stand has to be checked. 3) All carrying parts have to be inspected on damages or material fatigue. 4) All screws used for installing the devices or parts of the device have to be tighly connected and must not be corroded.
- Page 45 Farbfolienset 19x19cm, vier Farben (No.: 9410027A) Wo kaufen? Hochwertige Farbfolien Extrem hitzebeständig Werden in Farbfilterrahmen vor Halogenscheinwerfern eingesetzt Große Auswahl an Farben Maße 19 x 19 cm Mehr Bilder Passend geschnitten für PAR 56 Spot Vergrößern...
- Page 46 Max. Nutzungsdauer/Max. service life: 10 y the device. Maintenance and service operations Baujahr/Year of construction: 2002 only by authorized dealers. Use safety-ropes for loads and for device itself! Respect all warnings eurolite ® when rigging the luminaires! MADE IN CHINA ©...
- Page 47 8. TECHNISCHE DATEN ..........................11 1. EINFÜHRUNG Wir freuen uns, dass Sie sich für eine EUROLITE DTB-403 Dimmer Bar entschieden haben. Sie haben hiermit ein leistungsstarkes und vielseitiges Gerät erworben. Wenn Sie nachfolgende Hinweise beachten, sind wir sicher, dass Sie lange Zeit Freude an Ihrem Kauf haben werden.
-
Page 48: Sicherheitshinweise
2. SICHERHEITSHINWEISE ACHTUNG! Seien Sie besonders vorsichtig beim Umgang mit gefährlicher Netzspannung. Bei die- ser Spannung können Sie einen lebensgefährlichen elektrischen Schlag erhalten! Dieses Gerät hat das Werk in sicherheitstechnisch einwandfreiem Zustand verlassen. Um diesen Zustand zu erhalten und einen gefahrlosen Betrieb sicherzustellen, muss der Anwender die Sicherheitshinweise und die Warnvermerke unbedingt beachten, die in dieser Bedienungsanleitung enthalten sind. -
Page 49: Bestimmungsgemässe Verwendung
Alle an der Dimmer Bar angebrachten Geräte, Lichteffekte und Traversen müssen immer zusätzlich mit einem geeigneten Sicherheitsfangseil versehen werden. Das Stativ ist vor der Benutzung auf evtl. Beschädigungen zu prüfen. Bei Beschädigungen an einem Stativteil darf das Stativ nicht mehr eingesetzt werden. Kinder und Laien vom Gerät fern halten! 3. -
Page 50: Gerätebeschreibung
Max. Nutzungsdauer/Max. service life: 10 y the device. Maintenance and service operations Baujahr/Year of construction: 2002 only by authorized dealers. Use safety-ropes for loads and for device itself! Respect all warnings eurolite ® when rigging the luminaires! MADE IN CHINA (1) Last-Aufnahmepunkt... -
Page 51: Unterseite
4.2.2 Unterseite (6) Netzanschluss (7) Footswitch-Buchse (8) Link-Ausgangsbuchse (9) Link-Eingangsbuchse 5. INSTALLATION LEBENSGEFAHR! Bei der Installation sind insbesondere die Bestimmungen der BGV C1 (vormals VBG 70) und DIN 15560 zu beachten! Die Installation darf nur vom autorisierten Fachhandel ausgeführt werden! Die Aufhängevorrichtungen für den Leuchtenhänger muss so gebaut und bemessen sein, dass sie 1 Stunde lang ohne dauernde schädliche Deformierung das 10-fache der Nutzlast aushalten kann. - Page 52 Max. Nutzungsdauer/Max. service life: 10 y the device. Maintenance and service operations Baujahr/Year of construction: 2002 only by authorized dealers. Use safety-ropes for loads and for device itself! Respect all warnings eurolite ® when rigging the luminaires! MADE IN CHINA 4 kg...
-
Page 53: Montage
Maintenance and service operations Baujahr/Year of construction: 2002 only by authorized dealers. Use safety-ropes for loads and for device itself! Respect all warnings eurolite ® when rigging the luminaires! MADE IN CHINA Befestigen Sie den Leuchtenhänger am oberen Stativende und ziehen Sie die Feststellschraube fest. -
Page 54: Anschlüsse
LEBENSGEFAHR! Vor der ersten Inbetriebnahme muss die Einrichtung durch einen Sachverständigen geprüft werden! 5.2 Anschlüsse 5.2.1 Musiksteuerung Das Musiksignal wird über das eingebaute Kondensatormikrofon aufgenommen und es ist somit keine weitere Verbindung zur Signalquelle erforderlich. 5.2.2 Anschluss ans Netz Stecken Sie den Netzstecker in Ihre Schutzkontaktsteckdose ein. ANSCHLÜSSE Die Belegung der Anschlussleitungen ist wie folgt: Netzanschluss... -
Page 55: Bedienung
6. BEDIENUNG Wenn Sie das Gerät an die Spannungsversorgung angeschlossen haben, ist das DTB-403 einsatzbereit. Die Lauflichtsteuerung schaltet die 4 Kanäle automatisch über das eingebaute Mikrofon. Die Chasergeschwindigkeit können Sie über die Speed-Tasten einstellen. Geschwindigkeitsregelung Wird die Soundsteuerung abgeschaltet, d. h. die Audio/Chase-Taste ungedrückt ist (LED aus), können Sie die Geschwindigkeit über die Speed-Tasten stufenlos einstellen. -
Page 56: Sicherungswechsel
7.1 Sicherungswechsel Wenn die Feinsicherung des Gerätes defekt ist, darf diese nur durch eine Sicherung gleichen Typs ersetzt werden. Vor dem Sicherungswechsel ist das Gerät allpolig von der Netzspannung zu trennen (Netzstecker ziehen). Vorgehensweise: Schritt 1: Drehen Sie den Sicherungshalter an der Geräterückseite mit einem passenden Schraubendre- her aus dem Gehäuse (gegen den Uhrzeigersinn). - Page 57 7.1 Replacing the fuse ..........................19 8. TECHNICAL SPECIFICATIONS......................... 20 1. INTRODUCTION Thank you for having chosen a EUROLITE DTB-403. You will see you acquired a powerful and versatile device. Unpack your DTB-403. Before you initial start-up, please make sure that there is no damage caused by transportation. Should there...
-
Page 58: Safety Instructions
2. SAFETY INSTRUCTIONS CAUTION! Be careful with your operations. With a dangerous voltage you can suffer a dangerous electric shock when touching the wires! This device has left our premises in absolutely perfect condition. In order to maintain this condition and to ensure a safe operation, it is absolutely necessary for the user to follow the safety instructions and warning notes written in this user manual. -
Page 59: Operating Determinations
If one part of a stand is defective, the stand must not be taken into operation. Keep away children and amateurs! 3. OPERATING DETERMINATIONS This device is a fundamental part for installing e.g. spotlights or lighting effects. This product is only allowed to be operated with an alternating voltage of 230 V, 50 Hz and was designed for indoor use only. -
Page 60: Description
Max. Nutzungsdauer/Max. service life: 10 y the device. Maintenance and service operations Baujahr/Year of construction: 2002 only by authorized dealers. Use safety-ropes for loads and for device itself! Respect all warnings eurolite ® when rigging the luminaires! MADE IN CHINA (1) Fixation point... -
Page 61: Installation
Max. Nutzungsdauer/Max. service life: 10 y the device. Maintenance and service operations Baujahr/Year of construction: 2002 only by authorized dealers. Use safety-ropes for loads and for device itself! Respect all warnings eurolite ® when rigging the luminaires! MADE IN CHINA 4 kg... - Page 62 Maintenance and service operations Baujahr/Year of construction: 2002 only by authorized dealers. Use safety-ropes for loads and for device itself! Respect all warnings eurolite ® when rigging the luminaires! MADE IN CHINA Install the fundamental part at the top of the stand and tighten the screw.
-
Page 63: Connections
5.2 Connections 5.2.1 Sound control The sound signal is picked up via the integrated condensor microphone. This is why not extra connection to the sound source is necessary. 5.2.2 Connection with the mains Connect the device to the mains with the power-plug. The occupation of the connection-cables is as follows: Cable International... -
Page 64: Cleaning And Maintenance
Display The four LEDs provide steady control over the outputs. Full on & stand by Press FULL ON to activate full on function of whole channel output. Press STAND BY to turn off whole channel. 7. CLEANING AND MAINTENANCE The operator has to make sure that safety-relating and machine-technical installations are inspected by an expert after every four years in the course of an acceptance test. -
Page 65: Technical Specifications
8. TECHNICAL SPECIFICATIONS Power supply: 230 V AC, 50 Hz ~ Max. power output: 3680 W Max. total current: 16 A Max. output/channel: 1150 W Max. current/channel: Fuse: F 6.3 A, 250 V Max. load per fixation point: 4 kg Max. - Page 66 OMNILUX PAR-56 230V/300W NSP Lampe Alle Personen, die mit der Installation, Inbetriebnahme, Bedienung, Wartung und Instandhaltung dieser Lampe zu tun haben, müssen - entsprechend qualifiziert sein - diese Bedienungsanleitung genau beachten. Sicherheitshinweise / Bestimmungsgemäße Verwendung Diese Lampe hat das Werk in sicherheitstechnisch einwandfreiem Zustand verlassen. Um diesen Zustand zu erhalten und einen gefahrlosen Betrieb sicherzustellen, muss der Anwender die folgenden Sicherheits- hinweise und die Warnvermerke unbedingt beachten.
- Page 67 OMNILUX PAR-56 230V/300W NSP lamp Every person involved with the installation, operation and maintenance of this lamp have to: - be qualilfied - follow the instructions of this manual Safety instructions / Operating determinations This lamp has left our premises in absolutely perfect condition. In order to maintain this condition and to ensure a safe operation, it is absolutely necessary for the user to follow the safety instructions and warning notes mentioned below.
- Page 68 OMNILUX Lampe PAR-56 230V/300W NSP Toute personne ayant à faire avec le montage. la mise en marche. le maniement et l’entretien de cet appareil doit - être suffisamment qualifiée - suivre strictement les instructions de service suivantes. Instructions de sécurité / Emploi selon les prescriptions Cette lampe a quittée les ateliers dans un état irréprochable.
- Page 69 OMNILUX Lámpara PAR-56 230V/300W NSP Toda persona implicada en la instalación, manejo y mantenimiento de este aparato tiene que: -estar cualificada -seguir las instrucciones de este manual Instrucciones de seguridad / Instrucciones de manejo Esta lámpara ha salido de nuestro establecimiento en absolutas perfectas condiciones. Para mantener esta condición y asegurar un manejo seguro, es absolutamente necesario para el usuario seguir las instrucciones de seguridad y notas de advertencia escritas aquí.
Need help?
Do you have a question about the PAR-56 Lite Spot and is the answer not in the manual?
Questions and answers