
Related Manuals for NEXIQ Technologies USB-Link 3 Wireless


Summary of Contents for NEXIQ Technologies USB-Link 3 Wireless
- Page 1 USB-Link™ 3 Installation and Setup Manual Wireless Edition Wired Edition PN 121052 PN 121054...
- Page 2 IDSC Holdings LLC. NEXIQ Technologies and USB-Link are trademarks of IDSC Holdings LLC. ©2022 IDSC Holdings LLC. All rights reserved. All other marks are trademarks or registered trademarks of the respective holders.
-
Page 3: Table Of Contents
Table of Contents Chapter 1: Using this Manual Manual Overview Conventions Special Messages Note Important Caution Warning Troubleshooting Specialized Text Chapter 2: Introducing the USB-Link™ 3 Component Checklist Product Specifications System Requirements Device Features Communication Options: Wired vs Wireless Wired USB Connection Wireless Bluetooth Connection Wireless Wi-Fi Connection Mini Access Point Mode (Peer-to-Peer) - Page 4 Table of Contents Chapter 3: Installing the Drivers and Setting Up the Device Installation Process Outline Step 1: Install the Drivers Step 2: Connect the USB-Link™ 3 to a Vehicle Making a Wired USB Connection Making a Wireless Bluetooth Connection Pair the Device Making a Wireless Wi-Fi Connection Mini Access Point Mode...
-
Page 5: Chapter 1: Using This Manual
Chapter 1: Using this Manual Manual Overview (pg. 2) Conventions (pg. 3) Special Messages (pg. 3) Note (pg. 3) Important (pg. 3) Caution (pg. 3) Warning (pg. 4) Troubleshooting (pg. 4) Specialized Text (pg. 4) This chapter provides an overview of this manual’s organization and the conventions used throughout. NOTE: Images used throughout this manual are for illustrative purposes only. -
Page 6: Manual Overview
Chapter 1: Using this Manual Manual Overview This manual provides information to support you during installation and setup of the USB-Link™ 3 Wireless Edition and Wired Edition. This manual is composed of the following sections: • Chapter 1: Using this Manual—provides an overview of this user manual. •... -
Page 7: Conventions
Chapter 1: Using this Manual Conventions This section provides descriptions of the conventions used throughout this guide. Special Messages Note NOTE provides an explanation, comment, or tip related to the subject matter that is being discussed. Example: NOTE: Refer to the page number indicated for further details on the described component. Important IMPORTANT indicates a situation which may damage the test equipment or vehicle. -
Page 8: Warning
Chapter 1: Using this Manual Warning WARNING indicates a potentially hazardous situation which could result in serious injury or death to the operator or bystanders. Example: WARNING: All RP1210 adapters must be disconnected before proceeding with installation. Troubleshooting Information intended to help you to address or anticipate potential issues are presented in the following manner: If NEXIQ WVL2 drivers are installed, the WVL2 Explorer Utility must be exited before proceeding with installation. -
Page 9: Chapter 2: Introducing The Usb-Link
Chapter 2: Introducing the USB-Link ™ Component Checklist (pg. 6) Product Specifications (pg. 7) System Requirements (pg. 8) Device Features (pg. 9) Communication Options: Wired vs Wireless (pg. 12) Wired USB Connection (pg. 12) Wireless Bluetooth Connection (pg. 13) ® Wireless Wi-Fi Connection (pg. -
Page 10: Component Checklist
Chapter 2: Introducing the USB-Link™ 3 Component Checklist The following components are included with your USB-Link™ 3. Confirm you have all of these items before using the device: • USB-Link™ 3 • Latching USB Cable (see Figure 2.2) • 9-pin Deutsch Adapter, 1 Meter •... - Page 11 Chapter 2: Introducing the USB-Link™ 3 Product Specifications The USB-Link™ 3 is configured with the following specifications: Feature Data Physical Dimensions 6.75” x 3.75” x 1.06” (171 mm x 95 mm x 27 mm) Weight 8 oz. (0.22 kg) Power Requirements 6 - 32 VDC @ 350 mA maximum Operating Temperature 0 to +50 °C...
- Page 12 Chapter 2: Introducing the USB-Link™ 3 System Requirements Confirm your PC meets the following system requirements: Component Requirement IBM PC-compatible computer • 1GHz processor or more • RAM: 256MB or more (512MB recommended) • USB port, version 2.0 or higher •...
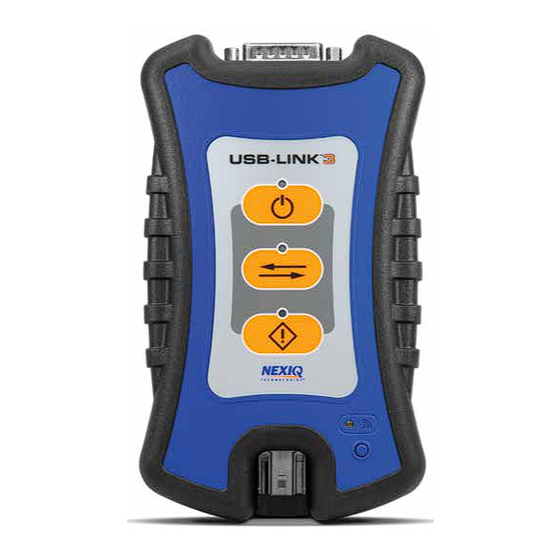
- Page 13 Chapter 2: Introducing the USB-Link™ 3 Device Features The images below detail the features of the USB-Link™ 3 Wireless Edition and Wired Edition. Wireless Wired Figure 2.1 USB-Link™ 3 Wireless and Wired Edition Legend A – Vehicle Port E – Wireless Comm LED B –...
- Page 14 Chapter 2: Introducing the USB-Link™ 3 Device Features These features perform the same whether in Bluetooth or Wi-Fi mode: ® Feature What It Does Vehicle Port Connects the USB-Link™ 3 to a vehicle/engine for power and data. Power LED Illuminates when the device receives power. Vehicle Data LED Illuminates when the device is receiving data from the vehicle.
- Page 15 Chapter 2: Introducing the USB-Link™ 3 Device Features Feature What It Does Wireless Comm LED: Infrastructure Mode: Wi-Fi—Infrastructure Mode • Stays off when not associated with a network Access Point. • Blinks every second when associated with an access point, but no IP address assigned. •...
-
Page 16: Communication Options: Wired Vs Wireless
Chapter 2: Introducing the USB-Link™ 3 Communication Options: Wired vs Wireless Prior to using the USB-Link™ 3, choose how you want the unit to communicate with your PC. There are three options: • Wired, USB Connection (pg. 12) • Wireless, Bluetooth Connection (pg. -
Page 17: Wireless Bluetooth Connection
Chapter 2: Introducing the USB-Link™ 3 Wireless Bluetooth Connection The USB-Link™ 3 can be configured to use Bluetooth wireless technology to provide communication ® between the USB-Link™ 3 and your PC. When two Bluetooth devices are paired, a persistent link ®... -
Page 18: Wireless Wi-Fi Connection
Chapter 2: Introducing the USB-Link™ 3 Wireless Wi-Fi Connection The USB-Link™ 3 can be configured to use Wi-Fi to provide wireless communication between the USB-Link™ 3 and your PC. There are two network options: • Mini Access Point Mode (pg. 15) •... -
Page 19: Mini Access Point Mode (Peer-To-Peer)
Chapter 2: Introducing the USB-Link™ 3 Mini Access Point Mode (Peer-to-Peer) The easiest and quickest way to connect your USB-Link™ 3 to your PC is with the Mini Access Point mode. In Mini Access Point mode (also known as Access Point Emulation mode), the PC communicates directly with the device. -
Page 20: Infrastructure Mode (Connecting To Your Company's Network)
Chapter 2: Introducing the USB-Link™ 3 Infrastructure Mode (Connecting to your Company’s Network) In Infrastructure mode, your PC communicates with your company’s computer network through a Wireless Access Point (not included), which acts as a bridge between the wireless network and the wired network. -
Page 21: Chapter 3: Installing The Drivers And Setting Up The Device
Chapter 3: Installing the Drivers and Setting Up the Device Installation Process Outline (pg. 18) Step 1: Install the Drivers (pg. 19) Step 2: Connect the USB-Link™ 3 to a Vehicle (pg. 27) Making a Wired USB Connection (pg. 28) Making a Wireless Bluetooth Connection (pg. -
Page 22: Installation Process Outline
Chapter 3: Installing the Drivers and Setting Up the Device Installation Process Outline Step 1: Install the USB-Link™ 3 drivers (pg. 19). Step 2: Connect the USB-Link™ 3 to the vehicle (pg. 27). Connect to your PC using one of the following options: •... -
Page 23: Step 1: Install The Drivers
Chapter 3: Installing the Drivers and Setting Up the Device Step 1: Install the Drivers Prior to using the USB-Link™ 3, you will need to install the necessary USB-Link™ 3 drivers. The USB-Link™ 3 drivers are compatible with Microsoft , Windows 10, and Windows ®... - Page 24 Chapter 3: Installing the Drivers and Setting Up the Device 4 Click Open to open the downloaded file. The Welcome to USB-Link™ 3 Setup screen is displayed. Figure 3.2 Welcome to USB-Link™ 3 Setup Screen 5 Carefully read the information displayed on the screen and follow the recommendations. 6 Click Next.
- Page 25 Chapter 3: Installing the Drivers and Setting Up the Device The License Agreement screen is displayed. Figure 3.3 License Agreement Screen 7 Read all the information on this screen, then click I Agree. NOTE: If you do not agree to the terms, click Cancel. A message is displayed prompting you to quit the USB-Link™...
- Page 26 Chapter 3: Installing the Drivers and Setting Up the Device The following warning message is displayed. Figure 3.4 Warning Message 8 Carefully read the warning message. Disconnect all RP1210 adapters connected to your laptop or PC prior to proceeding with the installation. 9 Once you have complied with the requirements of the warning message, click OK.
- Page 27 Chapter 3: Installing the Drivers and Setting Up the Device When the installation begins, the following screen is displayed. Figure 3.5 Installation Screen 10 Click Install to continue. 11 Wait briefly while the installation continues. USB-Link™ 3 Installation and Setup Manual...
- Page 28 Chapter 3: Installing the Drivers and Setting Up the Device The Installation Complete screen is displayed. Figure 3.6 Installation Complete Screen 12 Click Next. USB-Link™ 3 Installation and Setup Manual...
- Page 29 Chapter 3: Installing the Drivers and Setting Up the Device The following completion screen is displayed. Figure 3.7 Completion Screen 13 Click Finish. USB-Link™ 3 Installation and Setup Manual...
- Page 30 Chapter 3: Installing the Drivers and Setting Up the Device The USB-Link™ 3 Explorer utility opens. Figure 3.8 USB-Link™ 3 Explorer Utility NOTE: For information on using the USB-Link™ 3 Explorer, see Using the USB-Link™ 3 Explorer Utility on page 40 of this manual. 14 Proceed to Step 2: Connect the USB-Link™...
-
Page 31: Step 2: Connect The Usb-Link™ 3 To A Vehicle
Chapter 3: Installing the Drivers and Setting Up the Device Step 2: Connect the USB-Link™ 3 to a Vehicle Once you have installed the USB-Link™ 3 drivers, you are ready to connect the USB-Link™ 3 to a vehicle using an adapter cable. The following adapters are included in the USB-Link™ 3 kit: •... -
Page 32: Making A Wired Usb Connection
Chapter 3: Installing the Drivers and Setting Up the Device Making a Wired USB Connection To connect the USB-Link™ 3 to your PC using a USB cable: 1 Connect the USB cable (i.e., an automotive A to Mini-B USB cable) to the USB port of the PC or laptop. 2 Connect the other end of the cable to the port on the bottom of the USB-Link™... -
Page 33: Making A Wireless Bluetooth Connection
Chapter 3: Installing the Drivers and Setting Up the Device Making a Wireless Bluetooth Connection – Wireless Edition only When two Bluetooth devices are paired, a persistent link is created between the two devices. After the devices are paired, future connections are authenticated automatically. To connect via Bluetooth: 1 Connect the DB26 female end of the appropriate adapter cable to the USB-Link™... -
Page 34: Pair The Device
Chapter 3: Installing the Drivers and Setting Up the Device Pair the Device Use the Windows utility to pair the device (i.e., the USB-Link™ 3 with your PC). ® To pair the device: 1 Click on the Show Hidden Icons arrow in your PC’s System Tray. The hidden icons are displayed. - Page 35 Chapter 3: Installing the Drivers and Setting Up the Device Pair the Device 5 Click Connect. 6 Click Done. 7 Proceed to Step 3: Test the Connection (pg. 36) USB-Link™ 3 Installation and Setup Manual...
-
Page 36: Making A Wireless Wi-Fi Connection
Chapter 3: Installing the Drivers and Setting Up the Device Making a Wireless Wi-Fi Connection – Wireless Edition only When using Wi-Fi, the USB-Link™ 3 can be configured for either of the following modes: • Mini Access Point, the Wi-Fi default (pg. 32) •... - Page 37 Chapter 3: Installing the Drivers and Setting Up the Device To connect the USB-Link™ 3 to your PC using Mini Access Point Mode: 1 Connect the DB26 female end of the appropriate adapter cable to the connector on the top of the USB-Link™...
- Page 38 Chapter 3: Installing the Drivers and Setting Up the Device The Network Selection screen is displayed. Figure 3.13 Network Selection Screen 5 Select USBL3_xxxxxx from the list (xxxxxx represents the serial number of the USB-Link™ 3). NOTE: If USBL3_xxxxxx is not displayed, make sure you are connected to the vehicle and are within range (i.e., within 50 ft.).
-
Page 39: Infrastructure Mode
Chapter 3: Installing the Drivers and Setting Up the Device Infrastructure Mode In Infrastructure mode, your PC communicates with your company’s computer network through a Wireless Access Point (not included), which acts as a bridge between the wireless network and the wired network. -
Page 40: Step 3: Test The Connection
Chapter 3: Installing the Drivers and Setting Up the Device Step 3: Test the Connection Use the Device Tester to test the connection between the USB-Link™ 3 and the vehicle. At startup, the Device Tester checks for any USB-Link™ 3 drivers installed on the PC. To test the connection between the USB-Link™... - Page 41 Chapter 3: Installing the Drivers and Setting Up the Device 4 Use the button in the Protocol box to select the appropriate protocol (e.g., J1939, CAN, ISO 15365, J1708). - The Protocol box lists only the protocols supported by the device selected in the Device box. 5 Press the Start Test button.
- Page 42 Chapter 3: Installing the Drivers and Setting Up the Device If the Connection Indicator button is red (i.e., Not Connected), do one of the following: For a wireless connection: • In the Device list, make sure that the appropriate device is selected, for example: - USB-Link3, Bluetooth or - USB-Link3, WiFi •...
- Page 43 Chapter 3: Installing the Drivers and Setting Up the Device The Component Information window is displayed. Figure 3.17 Component Information Window NOTE: Component Information for Engines and Brakes is available only during a J1708 connection. 7 When you are finished viewing the information, click the Close button in the upper right corner of the window.
-
Page 44: Using The Usb-Link™ 3 Explorer Utility
Chapter 3: Installing the Drivers and Setting Up the Device Using the USB-Link™ 3 Explorer Utility The USB-Link™ 3 Explorer utility opened automatically when you installed the USB-Link™ 3 drivers and utilities (see Figure 3.8, on page 26). To re-open the USB-Link™ 3 Explorer once it has been closed, click on the Show Hidden Icons arrow in your PC’s System Tray. - Page 45 Chapter 3: Installing the Drivers and Setting Up the Device The USB-Link™ 3 Explorer opens. Figure 3.19 USB-Link™ 3 Explorer The following menu options are provided: • File (pg. 45) • Tools (pg. 46) • Help (pg. 49) Each menu option includes a number of features. Menu options are discussed in the following sub-sections.
-
Page 46: The Configuration Tab
Chapter 3: Installing the Drivers and Setting Up the Device The Configuration Tab The Configuration tab provides the following information: • Device - Name - MAC Address • Wireless Settings • Internet Protocol (TCP/IP) Settings This information can be useful when troubleshooting network connection problems. Use the Configuration tab when switching between Mini Access Point and Infrastructure. -
Page 47: Switching Modes: Mini Access Point And Infrastructure
Chapter 3: Installing the Drivers and Setting Up the Device Switching Modes: Mini Access Point and Infrastructure From the USB-Link™ 3 Explorer Configuration tab, use the Mode drop-down menu under Wireless Settings to switch between Mini Access Point and Infrastructure modes. NOTE: For a graphic depiction of a typical Infrastructure Mode setup, see Figure 3.14 (pg. - Page 48 Chapter 3: Installing the Drivers and Setting Up the Device The following Wireless Settings fields are available: • Network Name • Security (WPA/WPA2) • Password NOTE: The settings for connecting to your company network may differ from one installation to another. To ensure network security, your Information Technology (IT) administrator will need to oversee the installation and specify the appropriate configuration parameters.
-
Page 49: The File Menu
Chapter 3: Installing the Drivers and Setting Up the Device The File Menu The File menu has one feature, Exit. Use the Exit feature to close the USB-Link™ 3 Explorer. To exit the USB-Link™ 3 Explorer: 1 Select File from the USB-Link™ 3 Explorer menu bar. Figure 3.22 Exit Selected 2 Select Exit. -
Page 50: The Tools Menu
Chapter 3: Installing the Drivers and Setting Up the Device The Tools Menu The Tools menu provides the following features: • Ping • Options Ping The Ping feature uses the PING command to check for the presence of a device on the network. To check for a device: 1 Select Tools from the USB-Link™... -
Page 51: Options
Chapter 3: Installing the Drivers and Setting Up the Device Options The Options feature provides the following features which are presented as check boxes: • Start USB-Link™ 3 Explorer when Windows starts (pg. 47) • Show New USB-Link™ 3 Notification (pg. 48) Start USB-Link™... - Page 52 Chapter 3: Installing the Drivers and Setting Up the Device Show New USB-Link™ 3 Notification Use this feature to set when the New USB-Link 3 notification message box displays. Figure 3.25 Notification Box The default is set to display the notification message box whenever a new USB-Link™ 3 is detected. Figure 3.26 Options Menu To change the default, click the box to remove the check mark.
-
Page 53: The Help Menu
Chapter 3: Installing the Drivers and Setting Up the Device The Help Menu The Help menu has one feature, About. Use the About feature to display information about the USB-Link™ 3 Explorer. To access the Help menu: 1 Select Help from the USB-Link™ 3 Explorer menu bar. 2 Select About.
Need help?
Do you have a question about the USB-Link 3 Wireless and is the answer not in the manual?
Questions and answers