Miele K 31222 Ui Operating And Installation Instructions
Hide thumbs
Also See for K 31222 Ui:
- Operating and installation instructions (72 pages) ,
- Manual (11 pages) ,
- Operating and installation instructions (68 pages)
Table of Contents

Related Manuals for Miele K 31222 Ui


Summary of Contents for Miele K 31222 Ui
- Page 1 Operating and installation instructions Refrigerators To avoid the risk of accidents or damage to the appliance it is essen- tial to read these instructions before it is installed and used for the first time. en-GB M.-Nr. 10 838 150...
-
Page 2: Table Of Contents
Contents Warning and Safety instructions..............Caring for the environment ................14 Saving energy ....................15 Guide to the appliance ..................17 Control panel ....................... 17 Accessories ......................19 Accessories supplied ..................19 Optional accessories..................19 Switching on and off ..................21 Before using for the first time ................ - Page 3 Contents Freezing and storing food (depending on model) .......... 33 Using the freezer compartment................33 Freezing fresh food....................33 Storing frozen food....................33 Home freezing ..................... 34 Before placing food in the appliance ............. 35 Placing frozen goods in the freezer ..............35 Approx.
- Page 4 Contents Building-in dimensions ..................57 Installation dimensions................... 57 Changing the door hinging.................. 59 Adjusting the appliance door hinges..............62 Limiting the opening angle of the appliance door..........62 Installing the appliance..................63 To install the appliance, you will need the following tools:......63 Parts required for installation .................
-
Page 5: Warning And Safety Instructions
Miele cannot be held liable for injury or damage caused by non- compliance with these instructions. Keep these operating and installation instructions in a safe place and pass them on to any future owner. - Page 6 The refrigeration appli- ance is also not suitable for use in areas where there is a risk of ex- plosion. Miele cannot be held liable for damage caused by improper or incor- rect use or operation of the appliance. ...
- Page 7 - Ventilate the room where the refrigeration appliance is located for several minutes. - Contact the Miele Customer Service Department. The more coolant there is in a refrigeration appliance, the larger the room it should be installed in. In the event of a leakage, if the ap- pliance is in a small room, there is the danger of a combustible gas/ air mixture building up.
- Page 8 If the electrical connection cable is faulty it must only be replaced by a Miele authorised service technician to protect the user from danger. Do not connect the appliance to the mains electrical supply by a multi-socket adapter or extension lead.
- Page 9 Faulty components must only be replaced with genuine Miele ori- ginal spare parts. Miele can only guarantee the safety standards of the appliance when Miele replacement parts are used. This refrigeration appliance is supplied with a special lamp to cope with particular conditions (e.g.
- Page 10 Warning and Safety instructions Correct use This refrigeration appliance is designed for use within specific am- bient temperatures (climate range). Do not use in ambient temperat- ures for which it is not designed. The climate range is stated on the data plate in the interior cabinet of the refrigeration appliance.
- Page 11 Using accessories or spare parts from other manu- facturers will invalidate the warranty, and Miele cannot accept liabil- ity. Miele will guarantee to supply functional spare parts for a min- imum of 10 years and up to 15 years following the discontinuation of your refrigeration appliance.
- Page 12 Warning and Safety instructions Cleaning and care Do not use any oils or grease on the door seals, as these will cause the seals to deteriorate and become porous with time. Do not use a steam cleaning appliance to clean or defrost this ap- pliance.
- Page 13 Warning and Safety instructions Disposal of your old appliance If your old refrigeration appliance has a door lock, destroy it. This will prevent the risk of children playing accidentally locking them- selves in and endangering their lives. Splashes of coolant can damage the eyes. Be careful not to dam- age any part of the pipework whilst awaiting disposal, e.g.
-
Page 14: Caring For The Environment
Miele. By law, you are solely re- sponsible for deleting any personal data from the appliance prior to disposal. Take care not to damage your refrigera- tion appliance’s pipework before or dur-... -
Page 15: Saving Energy
Saving energy Normal energy consump- Increased energy con- tion sumption Installation / In a ventilated room. In an enclosed, unventilated Maintenance room. Protected from direct sun- In direct sunlight. light. Not near to a heat source Near to a heat source (radi- (radiator, oven). - Page 16 Saving energy Normal energy consump- Increased energy con- tion sumption Drawers and shelves ar- ranged as they were when the appliance was delivered. Only open the door when Frequent opening of doors necessary and for as short a for long periods will cause a time as possible.
-
Page 17: Guide To The Appliance
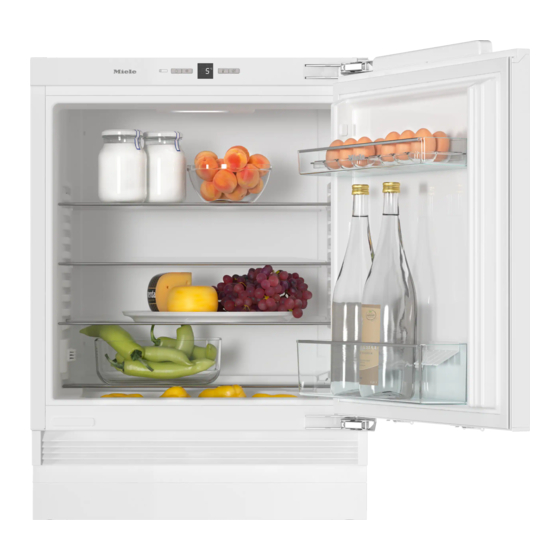
Guide to the appliance Control panel a Button for switching the refrigeration appliance on/off b Button for switching the SuperCool function on/off c Display with temperature indicator d Menu symbol (Settings mode: for switching the safety lock on/off) e SuperCool symbol f Lock symbol g Temperature display h Button for setting the temperature... - Page 18 Guide to the appliance a Control panel with display b Egg tray/door shelf c Freezer compartment (depending on model) d Interior lighting e Adjustable shelf f Condensate channel and drain hole g Fruit and vegetable drawer h Bottle shelf with bottle holder i Ventilation grille...
-
Page 19: Accessories
Guide to the appliance Optional accessories Accessories A range of useful Miele accessories and Accessories supplied care products are available for your ap- pliance. Bottle holder Accessories are available to order via the Miele Webshop, from Miele dir- ectly (see back cover for contact de- tails) or from your Miele dealer. - Page 20 Guide to the appliance KKF-FF charcoal filter with holder Multi-purpose microfibre cloth (Active AirClean) The microfibre cloth is suitable for re- Charcoal filters neutralise unpleasant moving fingerprints and light soiling odours in the fridge zone for improved from surfaces such as stainless steel, air quality.
-
Page 21: Switching On And Off
Switching on and off Before using for the first time Switching the appliance on To enable the temperature to get suffi- Packaging material ciently cold inside the appliance, allow Remove all packaging material from the appliance to run for some time be- the inside of the appliance. -
Page 22: Switching Off For Longer Periods Of Time
Switching on and off Switching off for longer peri- ods of time If, during a long absence, the refri- geration appliance is switched off but not cleaned and the door(s) left shut, there is a risk of mould forming inside the appliance. It is essential to clean the refrigera- tion appliance. -
Page 23: The Correct Temperature
The correct temperature It is very important to set the correct ... in the refrigerator section temperature for storing food in the ap- We recommend a temperature of 4 °C pliance. Bacteria will cause food which in the refrigerator section. is not stored at the correct temperature to deteriorate rapidly. -
Page 24: Temperature Display
The correct temperature Press the button repeatedly until Temperature display the temperature you want is shown in In normal operation the temperature the temperature display. display shows the required temperat- The first time you press the button the ure. -
Page 25: Using Super Cool
Using Super cool Switching off SuperCool SuperCool function The SuperCool function will switch itself The SuperCool function can be used to off automatically after approx. 12 hours. rapidly reduce the temperature in the The SuperCool symbol will go out fridge zone and the freezer compart- and the refrigeration appliance will run ment (depending on the model) to its at normal power again. -
Page 26: Door Alarm
Door alarm The appliance is fitted with a warning system to avoid increased energy con- sumption if the door is left open. Door alarm An alarm will sound if the appliance door has been left open for longer than 60 seconds. It will stop as soon as the door is closed. -
Page 27: Selecting Further Settings
Selecting further settings – To deactivate the lock Settings mode Press the button for approx. The alarm can be activated or deactiv- 5 seconds. ated in settings mode. The lock symbol and the Menu sym- Activating or deactivating the bol ... -
Page 28: Storing Food In The Refrigerator Section
Storing food in the refrigerator section Different storage zones Risk of explosion due to flam- mable mixes of gases. Due to natural air circulation, there are Electrical components can cause different temperature zones in the refri- flammable mixes of gases to ignite. gerator section. -
Page 29: Food Which Is Not Suitable For Storage In The Refrigerator Section
Storing food in the refrigerator section Warmest area Food which is not suitable for storage in the refrigerator sec- The warmest area in the refrigerator section is at the top in the front area tion and in the door. Use this for storing but- Not all food is suitable for refrigeration ter and cheese. -
Page 30: Notes On Buying Food
Storing food in the refrigerator section Notes on buying food The freshness of the food when it is first placed in the appliance is the most im- portant factor for how long it stays fresh. Take into account the use-by date and the correct storage temperature. -
Page 31: Adjusting The Interior Fittings
Adjusting the interior fittings Adjusting the door shelf/bottle Adjusting the bottle holder shelf Tip: Only move door shelves/bottle shelves in the appliance door when they are empty. Push the door shelf/bottle shelf up- wards, then remove it by pulling it for- wards. -
Page 32: Moving The Charcoal Filters
Adjusting the interior fittings Moving the charcoal filters Charcoal filters and a KKF-FF (Active AirClean) holder are available as op- tional accessories (see “Accessories - optional accessories”). When storing very strong smelling food (e.g. very ripe cheese): - Place the holder with the charcoal fil- ters on the shelf where this food is kept. -
Page 33: Freezing And Storing Food (Depending On Model)
Freezing and storing food (depending on model) Using the freezer compartment Storing frozen food Use the freezer compartment to: Never re-freeze partially or fully de- frosted food. Defrosted food may - store frozen food, only be re-frozen after it has been - make ice cubes, cooked. -
Page 34: Home Freezing
Freezing and storing food (depending on model) - Placing hot foods or drinks in the Home freezing freezer causes food that is already Only freeze fresh food which is in a frozen to partially thaw and increases good condition. energy consumption. Allow hot foods and drinks to cool down before pla- Hints on home freezing cing them in the freezer. -
Page 35: Before Placing Food In The Appliance
Freezing and storing food (depending on model) Before placing food in the appliance Storage time for frozen food Set the temperature to 4 °C or colder The storage life of food is very variable, for approx. 4 hours before placing even at a constant temperature of food in the freezer compartment and -18 °C. -
Page 36: Defrosting Frozen Goods
Freezing and storing food (depending on model) Defrosting frozen goods When cooling drinks quickly in the freezer compartment, make sure Never re-freeze partially or fully de- bottles are not left in for more than frosted food. Defrosted food may only one hour;... -
Page 37: Defrosting
Defrosting erly. Too thick a layer of ice also re- Refrigerator section duces cooling performance and thus in- The refrigerator section defrosts auto- creases energy consumption. matically. The freezer compartment should be Condensate and frost can build up on defrosted from time to time. -
Page 38: To Defrost
Defrosting Use a sponge or towel to soak up the To defrost defrosted water as often as neces- The longer the frozen goods are sary. left out at room temperature, the After defrosting faster they deteriorate. Carry out the defrosting procedure ... -
Page 39: Cleaning And Care
Cleaning and care Cleaning agents Do not let water get into the elec- tronic module or the lighting. Cleaning and conditioning agents used inside the appliance must be Risk of damage due to moisture food safe. ingress. The steam from a steam cleaner can To avoid damaging all the surfaces of damage plastic and and electrical your appliance, do not use:... -
Page 40: Preparing The Refrigeration Appliance For Cleaning
Cleaning and care Dismantling an adjustable shelf Preparing the refrigeration ap- pliance for cleaning Place the shelf on a worktop covered with a soft material (e.g. a tea towel). Switch the refrigeration appliance off. The display goes out and the cooling function is switched off. -
Page 41: Cleaning The Interior And Accessories
Cleaning and care Cleaning the interior and ac- Risk of damage as a result of ex- cessories cessively high dishwasher temperat- ures. The refrigeration appliance should be Parts of the refrigeration appliance cleaned regularly (at least once a may become unusable, e.g. deform, month). -
Page 42: Cleaning The Door Seal
A build-up of dust will increase the en- ergy consumption of the appliance. The ventilation gaps should be cleaned on a regular basis with a brush or vacuum cleaner (you could use a Miele vacuum cleaner dusting brush, for example). -
Page 43: Replacing The Charcoal Filters
6 months. Remove both charcoal filters and Replacement KKF-RF charcoal filters place the new filters with the sur- can be obtained from the Miele Cus- rounding edge pointing downwards in tomer Service Department, from your the holder. retailer or from Miele's website. -
Page 44: Problem Solving Guide
Check whether the mains fuse has tripped. There could be a fault with the appliance, the household electrical wiring or another electrical appliance. Contact a qualified electrician or Miele. The compressor is The ventilation gaps have been covered or become switching on more fre- too dusty. - Page 45 Problem solving guide Problem Cause and remedy After a while, the temperature will return to normal by itself. If a thick layer of ice has already formed, this will af- fect cooling and increase energy consumption. Defrost the freezer compartment and clean it. The ambient room temperature is too high.
- Page 46 5 seconds. the refrigeration appli- A fault has occurred. ance at the bottom near Call the Miele Customer Service Department. the compressor (de- The indicator light flashes regularly every pending on model). 15 seconds. The electronic unit for Not a fault.
- Page 47 Do not activate although the controls this setting for domestic use. and the interior lighting Contact the Miele Service Department for informa- are working. tion on deactivating Demo mode. “F0 to F9” appears in There is a fault.
- Page 48 When removing the lighting cover, there is a risk of coming into contact with live electrical compon- ents. Do not remove the lighting cover. The LED lighting may only be repaired or replaced by the Miele Customer Service Department. Risk of injury from LED lighting.
- Page 49 Problem solving guide Other problems Problem Cause and remedy The floor of the refriger- The condensate drain hole is blocked. ator section is wet. Clean the condensate channel and drain hole. Food has frozen to- The food packaging was not dry when placed in the gether.
-
Page 50: Noises
Noises Normal What causes them noises Brrrrr ... A humming noise is made by the motor (compressor). This noise can get louder for brief periods when the motor switches on. Blubb, A gurgling noise can be heard when coolant is circulating blubb ... -
Page 51: Service
In the event of any faults which you From 1 March 2021, information on en- cannot remedy yourself, please contact ergy labelling and ecodesign require- your Miele dealer or the Miele Customer ments will be available in the European Service Department. Product Database (EPREL). You can... -
Page 52: Installation
*INSTALLATION* Installation Your refrigeration appliance must not be Installation installed “side-by-side” because it is Danger of damage and injury not equipped with built-in heating units due to the refrigeration appliance tip- in the side panels. ping over. This refrigeration appliance can, how- This refrigeration appliance is very ever, be installed next to certain models heavy and can tip forwards when the... -
Page 53: Location
*INSTALLATION* Installation Location Climate range This appliance should be installed in a This refrigeration appliance is designed dry, well-ventilated room. for use within specific ambient temper- atures (climate range). Do not use in When deciding where to install your re- ambient temperatures for which it is not frigeration appliance please bear in designed. -
Page 54: Ventilation
*INSTALLATION* Installation Ventilation Furniture door panel – Gap Risk of fire and damage due to insufficient ventilation. Depending on the style of kitchen fur- If the refrigeration appliance is not niture, the thickness and edge radius of ventilated sufficiently, the com- the furniture door and the gap that runs pressor will run more frequently and around the door, vertically and horizont-... - Page 55 Before fitting a furniture door, ensure that the weight of the door does not ex- ceed the maximum permitted: Appliance Maximum weight of furniture door in K 31222 Ui 10 kg K 31242 UiF 10 kg Adjoining kitchen furniture front A = Furniture front thickness B = Edge radius...
-
Page 56: Before Installing The Appliance
*INSTALLATION* Installation Before installing the appliance Take the accessory pack which in- cludes installation parts and other ac- cessories out of the appliance. Remove the cable clip from the back of the appliance. Open the appliance door and remove the red safety catch ... -
Page 57: Building-In Dimensions
*INSTALLATION* Installation Building-in dimensions Installation dimensions Appliance dimensions... - Page 58 *INSTALLATION* Installation Dimensions for ventilation...
-
Page 59: Changing The Door Hinging
*INSTALLATION* Installation Preparing to change the door hinging Changing the door hinging The refrigeration appliance is supplied To change the door hinging, you will with hinges on the right. If left-hand need the following tools: hinging is required, the hinges must be changed. - Page 60 *INSTALLATION* Installation Refitting the door Place the appliance door with the outer side upwards on a stable sur- face. Danger of injury from folding door hinges. The hinges can snap closed. Leave them open. Slightly loosen screws and on ...
- Page 61 *INSTALLATION* Installation Hang the appliance door onto the pre-fitted screws and , and se- curely tighten the screws and . Replace the covers: , and .
-
Page 62: Adjusting The Appliance Door Hinges
*INSTALLATION* Installation Adjusting the appliance door Limiting the opening angle of hinges the appliance door If you would like the appliance door to The door hinges are set ex works to en- be cushioned so that it opens more able the appliance door to be opened softly, the spring tension on the appli- wide. -
Page 63: Installing The Appliance
*INSTALLATION* Installation Preparing the appliance Installing the appliance Position the refrigeration appliance in To install the appliance, you will need front of the niche. the following tools: Hold the plinth facing at the side and pull it forwards and off. You have a choice of two different ways of securing your appliance: 1. - Page 64 *INSTALLATION* Installation 1. Secured at the top 2. Secured at the side Fit the bracket in the aperture in the Both ends of the bracket must be appliance lid. bent. Bend the bracket at the perforated Fit the bracket in the aperture in the position.
-
Page 65: Positioning The Refrigeration Appliance
*INSTALLATION* Installation Positioning the refrigeration appli- If the refrigeration appliance is ance pushed too far into the niche, the ap- pliance door may not close properly Risk of damaging the power once the furniture panel has been fit- cable. ted. -
Page 66: Aligning The Refrigeration Appliance
*INSTALLATION* Installation Aligning the refrigeration appliance On furniture with door fittings (e.g. stubs, seals, etc.), the dimension of When securing the refrigeration appli- these must be taken into account to ance in the niche at the top, it should ensure there is a gap all round of sit lightly tensioned between the floor 42 mm. -
Page 67: Fitting A Continuous Furniture Plinth Facing
*INSTALLATION* Installation Fitting a continuous furniture plinth The foam ensures the airflow is facing separated to prevent malfunctioning of the appliance. Ventilation takes place through a ventilation grille in the appliance plinth. The ventilation grille must never be obstructed. If a continuous plinth facing is to be fitted, a suitable ventilation gap will need to be made in it for the ventila- tion grille of the appliance:... -
Page 68: Securing The Appliance In The Niche
*INSTALLATION* Installation Securing the appliance in the niche Fitting the furniture door If fitted in a run of units make sure that the top edge of the furniture door is at the same height as neighbouring unit doors. The furniture door must be fitted cor- rectly and not under tension. - Page 69 *INSTALLATION* Installation Tip: Push up the fitting aids with the furniture front until they are the same height as the doors of adjacent kitchen units. Using a pencil, lightly mark a line down the centre of the inside of the furniture door .
- Page 70 *INSTALLATION* Installation Open the appliance door. Fit the side cover to the fixing bracket on the opposite side of the hinge. Turn the furniture door over and at- tach the handle (if required). Hang the furniture door onto the ad- justing bolts .
- Page 71 *INSTALLATION* Installation Whilst counterholding adjusting bolts with a screwdriver, tighten nuts on the appliance door with screwdriver. Attach the appliance door and the furniture door using screws through fixing brackets : - Drill holes in the furniture door (mark the position of the holes first).
- Page 72 *INSTALLATION* Installation Fit the cover in position. To make sure the appliance is cor- rectly fitted: - The door must close properly. - The door must not touch the housing unit. - The seal at the top edge of the handle side must fit properly.
-
Page 73: Electrical Connection
*INSTALLATION* Installation Do not connect the appliance to the Electrical connection mains electricity supply by an extension The appliance is supplied with a mains lead. Extension leads do not guarantee cable and moulded plug ready for con- the required safety of the appliance nection to an AC single-phase 220–... - Page 75 United Kingdom Miele Co. Ltd., Fairacres, Marcham Road, Abingdon, Oxon, OX14 1TW Tel: 0330 160 6600, Internet: www.miele.co.uk/service, E-mail: info@miele.co.uk Australia Ireland South Africa Miele Australia Pty. Ltd. Miele Ireland Ltd. Miele (Pty) Ltd. ACN 005 635 398 2024 Bianconi Avenue...
- Page 76 K 31222 Ui, K 31242 UiF en-GB M.-Nr. 10 838 150 / 03...
Need help?
Do you have a question about the K 31222 Ui and is the answer not in the manual?
Questions and answers