Table of Contents
Advertisement
Available languages
Available languages
RECUPERATORE DI CALORE - Manuale installazione
HEAT RECOVERY UNIT - Installation Manual
RECUPERATEUR DE CHALEUR - Manuel d'installation
WÄRMERÜCKGEWINNER - Installationsanleitung
RECUPERADOR DE CALOR - Manual de instalación
RePuro 100
RePuro 170
IT
GB
FR
pag.2
pag.19
pag.36
RePuro 250
RePuro 350
DE
ES
pag.53
pag.70
E
P
r
2015
RePuro 450
RePuro 550
RePuro 650
IREPLJ - 1302 - 4238060_02
Advertisement
Chapters
Table of Contents

Related Manuals for AERMEC RePuro 100


Summary of Contents for AERMEC RePuro 100
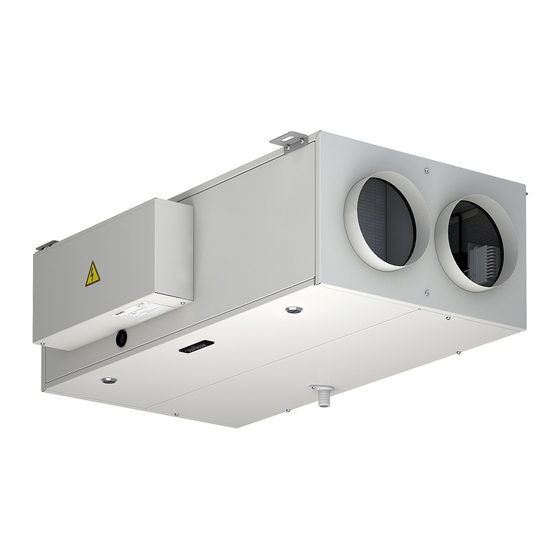
- Page 1 RECUPERATORE DI CALORE - Manuale installazione HEAT RECOVERY UNIT - Installation Manual RECUPERATEUR DE CHALEUR - Manuel d’installation WÄRMERÜCKGEWINNER - Installationsanleitung RECUPERADOR DE CALOR - Manual de instalación RePuro 100 RePuro 250 RePuro 450 RePuro 170 RePuro 350 RePuro 550 RePuro 650 pag.2...
- Page 2 RePuro 100 RePuro 250 RePuro 450 RePuro 650 RePuro 170 RePuro 350 RePuro 550 DICHIARAZIOEN DI CONFORMITÁ NOME RePuro TIPO RECUPERATORE DI CALORE MODELLI Campo Sigla Descrizione 1..6 RePuro Nome unità 7..9 Taglia unità (100-170-250-350-450-550-650) Resistenza di pre-riscaldamento Al quale questa dichiarazione si riferisce è conforme alle seguenti norme armonizzate:...
-
Page 3: Table Of Contents
INDICE 1. AVVERTENZE GENERALI ........................................... 5 1. 1 . Conservazione della documentazione ........................................5 1.2. Avvertenze sulla sicurezza e norme d’installazione ..................................5 2 IDENTIFICAZIONE DEL PRODOTTO ........................................ 5 3. INFORMAZIONI ..............................................6 3. 1 . Movimentazione .................................................6 3.2. Trasporto .................................................... 6 3.3. - Page 4 AERMEC S.p.A AERMEC S.p.A. si riserva il diritto, in ogni momento, di effettuare qualsiasi modifica al fine di migliorare il proprio prodotto, e non è obbligata ad aggiungere tali modifiche a macchine precedentemente fabbricate, già consegnate o in fase di costruzione.
-
Page 5: Avvertenze Generali
AVVERTENZE GENERALI 1.2. AVVERTENZE SULLA SICUREZZA E NORME D'INSTALLAZIONE LIMITI DI FUNZIONAMENTO Le unità RePuro AERMEC sono costruite dell’unità: L’unità deve essere installata ad secondo gli standard tecnici e le regole opera di un tecnico abilitato e qua- di sicurezza riconosciute. Sono proget-... -
Page 6: Informazioni
Prima di procedere con l’installazio- Per ogni futuro riferimento e per a corredo. ne è necessario aprire il pannello e ogni comunicazione con AERMEC Installare le staffe prima di eseguire recuperare i materiali in essa con- S.p.A. è necessario indicare il nu- i collegamenti dell’unità. -
Page 7: Dimensioni
3.8. DIMENSIONI Aria espulsa Aria di rinnovo RePuro100 - RePuro170 Ø180 Ø150 8 0 0 6 5 5 RePuro250 - RePuro350 RePuro450 - RePuro550 - RePuro650 * = quota con accessorio AVM Spazi tecnici minimi ≥ 400 ≥ 400 ≥ 400 ≥... -
Page 8: Installazione Del Recuperatore
INSTALLAZIONE DEL RECUPERATORE 4.1. OPERAZIONI PRELIMINARI Predisporre gli impianti per l’alimentazione elettrica ed il collegamento con il pannello a filo. Predisporre un adeguato impianto di scarico della condensa. RePuro100 - RePuro170 I componenti per l’installazione delle unità RePuro sono contenuti all’interno. - Page 9 RePuro250 - RePuro350 I componenti per l’installazione delle unità RePuro sono contenuti all’interno. Prima di procedere con l’installazio- ne è necessario aprire il pannello e recuperare i materiali in essa con- tenuti. RePuro450 - RePuro550 - RePuro650 I componenti per l’installazione delle unità...
-
Page 10: Installazione
4.2. INSTALLAZIONE INSTALLAZIONE A SOFFITTO Attenzione: l’unità deve essere in- RePuro100 - RePuro170 stallata orizzontale, verificare con una bolla. Attenzione: usare dei tasselli con caratteristiche adeguate al tipo di parete. Attenzione: il soffitto deve essere in grado di sostenere in sicurezza il peso dell’unità. - Page 11 INSTALLAZIONE A PARETE RePuro100 - RePuro170 Attenzione: L’unità deve essere in- stallata orizzontale, verificare con una bolla. Attenzione: Usare dei tasselli con caratteristiche adeguate al tipo di parete. Attenzione: La parete deve essere in grado di sostenere in sicurezza il peso dell’unità.
- Page 12 INSTALLAZIONE A PAVIMENTO Attenzione: l’unità deve essere in- stallata orizzontale, verificare con una bolla. Attenzione: il pavimento deve esse- re in grado di sostenere in sicurezza il peso dell’unità. Attenzione: prima di procedere all’installazione prendere visione dei manuali degli accessori. Attenzione: prima di procedere all’installazione applicare all’unità...
-
Page 13: Collegamenti Elettrici
4.3. COLLEGAMENTI ELETTRICI Alimentazione elettrica 230V~50Hz . L’unità è fornita con il cavo di alimen- REPURO tazione lungo 2m e spina Schuko. 100 - 170 Predisporre una presa di corrente Schuko in prossimità dell’unità. Per proteggere l’unità contro i cor- tocircuiti, montare sulla linea di ali- mentazione un interruttore onnipo- lare magnetotermico 2A 250V (IG) -
Page 14: Collegamento Dei Canali Dell'aria All'unità
4.4. COLLEGAMENTO DEI CANALI DELL’ARIA ALL’UNITÀ RePuro100 - RePuro170 : - Per identificare la posizione dei ca- nali consultare il disegno. - Collegare i canali dell’aria ai rac- cordi, fissare i canali con fascette. Aria espulsa Aria di rinnovo RePuro250 - RePuro350 : - Prima di unire le flangie al pannello - montare i 4 raccordi alle flange - per identificare la posizione dei ca-... -
Page 15: Scarico Della Condensa
4.5. SCARICO DELLA CONDENSA Il raccordo di scarico condensa ha RePuro un diametro esterno di 20mm. L’impianto di scarico della con- 100mm densa deve essere dimensionato per consentire il deflusso della con- densa, prodotto dal RePuro e dalle 60mm eventuali altre unità (recuperatori, plenum, ecc.) collegate allo stesso impianto. -
Page 16: Estrazione Dei Filtri
4.7. ESTRAZIONE DEI FILTRI Per estrarre i filtri è necessario aver rimosso il pannello anteriore dell’u- nità. L’unità deve funzionare solo se i filtri sono in perfetta efficienza e corret- tamente inseriti nel suo interno. RePuro100 - RePuro170 RePuro450 - RePuro550 - RePuro650 RePuro250 - RePuro350 4.6. -
Page 17: Pannello Comandi A Filo
5.1. INSTALLAZIONE DEL PANNELLO A FILO Le unità RePuro AERMEC sono gestite dall’utente attraverso un pannello a filo con un design particolarmente sottile 12mm. Il pannello a filo può essere installato a parete sopra una scatola da incasso (Es.: modulo 503). - Page 18 Aprire il pannello a filo per poterlo fissare alla scatola da incasso; ATTENZIONE: non toccare la sche- da elettronica a mani nude per evitare danni dovuti a scariche elettrostatiche accidentali Collegare il morsetto al pannello a filo; Lunghezza cavo di collegamento = 6m Fissare il pannello a filo alla scatola da incasso;...
- Page 19 5.2. COMPATIBILITÀ TRA PANNELLO A FILO E SCATOLE DA INCASSO Il pannello a filo può essere fissato su scatola da incasso di varie tipologie. Di seguito sono riportati alcuni esempi: Type Type 503E 503E Type Type 502E 502E Type Type Wall Wall mounted...
- Page 20 SCHEMI ELETTRICI Ingresso di forzatura stato funzionamento ventilatori = Microswith segnalazione by pass premiscelazione Contatto ON/OFF remoto (NC) = Motoventilatore = Plasmacluster Display = Display del pannello comandi a filo = Relè = Motorino di by pass free cooling RS485 = Collegamento seriale RS485 supervisione = Motorino di by pass di premiscelazione RX POST = Resistenza di post riscaldamento...
- Page 21 RePuro250 - RePuro350 - RePuro450 - RePuro550 - RePuro650 TX/RX GND-TTL MODE TX/RX BL 1.5 mm² 1 2 3 4 MA 1.5 mm² DISPLAY ORANGE BLANC BLEU GRIS MARRON NOIR (450 ROUGE VIOLET 650) (450 ROSE RS485 TTL VERT 650) ORANGE WEISS BLAU...
-
Page 22: Manutenzione
MANUTENZIONE ORDINARIA È vietata qualsiasi operazione di pu- lizia, prima di aver scollegato l’unità dalla rete di alimentazione elettrica. Verificare l’assenza di tensione prima di operare. La manutenzione periodica è fonda- mentale per mantenere in perfetta efficienza l’unità sia sotto l’aspetto RePuro100 - RePuro170 funzionale che energetico. - Page 23 AERMEC S.p.A. 37040 Bevilacqua (VR) Italy–Via Roma, 996 Tel. (+39) 0442 633111 Telefax 0442 93730–(+39) 0442 93566 www.aermec.com - info@aermec.com RePuro 100 RePuro 250 RePuro 450 RePuro 650 RePuro 170 RePuro 350 RePuro 550 DECLARATION OF CONFORMITY NAME RePuro TYPE...
- Page 24 INDEX 1. GENERAL WARNINGS ............................................22 1. 1 . Conservation of documentation ...........................................22 1.2. Safety warnings and installation standards ......................................22 2 PRODUCT IDENTIFICATION ..........................................22 3. INFORMATION ............................................... 23 3. 1 . Handling ....................................................23 3.2. Transport ....................................................23 3.3. Checks on receipt ................................................23 3.4.
- Page 25 AERMEC S.p.A AERMEC S.p.A. reserves the right at any moment to make any modifications considered necessary to improve our products and is not obliged to add these modifications to machines that have already been fabricated, delivered or are under construction.
- Page 26 GENERAL WARNINGS 8.2. SAFETY WARNING AND INSTALLA- TION STANDARDS OPERATING LIMITS of the unit: The AERMEC RePuro units are manufac- The unit must be installed by a tured in accordance with recognised Minimum temperature competent and qualified techni- technical standards and safety regula- -15°C *...
- Page 27 Note: at least 200mm space to install a future reference 10.10. DIMENSIONS trap communication with AERMEC S.p.A. it is cleaning of filters necessary to state the serial number. cleaning of the heat exchanger 10.1. HANDLING Before installation remove from within...
- Page 28 HEAT RECOVERY UNIT INSTALLATION 11.1. PRELIMINARY FUNCTIONS Prepare the system for the electrical power and connection for the wired control panel. Prepare an adequate condensate drainage system. Open the unit front panel. RePuro 250 - RePuro 350 RePuro 450 - RePuro 550 - RePuro 650 RePuro 250 - RePuro 350 Preparation of components Remove all the installation components...
- Page 29 11.2. INSTALLATION Wall mounting To wall mount the unit use the wall mounting plate provided. The unit is supplied with the wall mount plate attached to the rear side. Warning: The unit must be installed per- fectly horizontal. Warning: The location of the wall mount plate on receipt of the unit does not correspond to the final position for in- stallation (see diagrams).
- Page 30 11.3. ELECTRICAL CONNECTIONS Power supply 230V ~50Hz. The unit is supplied with the power REPURO cable 2 m long and Schuko plug. 100 - 170 Provide a Schuko socket in proxim- ity to the unit. To protect the unit against short cir- cuits provide in the power supply line a circuit breaker 2A, 250V (IG) with minimum opening contact of 3...
- Page 31 11.4. AIR DUCT CONNECTIONS TO THE UNIT Power supply 230V~50Hz. The unit is supplied with the power cable and Schuko plug. The power cable is 2 metres long. Provide a Schuko socket in proximity to the unit. To protect the unit against short circuits provide a circuit breaker 2A 250V (IG) with minimum opening contact of 3mm in the supply line.
- Page 32 11.5. CONDENSATE DISCHARGE Install the condensate discharge con- RePuro nection on the base of the unit and fix with the screw. 100mm The condensate discharge connection has an external diameter of 20 mm. 60mm The condensate discharge connection has to be connected to the conden- sate discharge system.
- Page 33 11.6. FILTER REMOVAL To remove the filters it is necessary to have removed the front access panel of the unit. The unit must only be operated with clean filters correctly internally fitted. RePuro 250 - RePuro 350 RePuro 450 - RePuro 550 - RePuro 650 11.7.
- Page 34 WALL MOUNTING THE CONTROL PANEL The AERMEC RePuro units are controlled by the user through a wired wall mounted control panel. The control panel has an espe- cially low profile design (12 mm) and can be mounted over a recessed electrical wall box.
- Page 35 Open the control panel to be able to fix onto the recessed electrical wall box WARNING: After having opened the control panel do not touch the circuit board with bare hands to avoid dam- age from accidental static discharge Connect the terminal to the control panel Connecting cable length = 6m Fix the control panel to the recessed box...
- Page 36 12.2. COMPATIBILITY BETWEEN CONTROL PANEL AND RECESSED WALL BOX The wall mounted control panel can be mounted on a recessed wall box of various types; the following schematics detail the compatibility between the recessed wall box and the control panel. Type Type 503E...
- Page 37 ELECTRICAL SCHEMATICS = Forced fan operation input = Fan motor = Remote ON/OFF contact (NC) = Plasmacluster Display = Display of the wired panel = Relay = Free cooling bypass actuator RS485 = Serial RS485 connection supervisor = Pre-mixing bypass actuator RX POST = Re-heating element = Fuse RX PRE...
- Page 38 RePuro250 - RePuro350 - RePuro450 - RePuro550 - RePuro650 TX/RX GND-TTL MODE TX/RX BL 1.5 mm² 1 2 3 4 MA 1.5 mm² DISPLAY ORANGE BLANC BLEU GRIS MARRON NOIR (450 ROUGE VIOLET 650) (450 ROSE RS485 TTL VERT 650) ORANGE WEISS BLAU...
- Page 39 MAINTENANCE Any cleaning procedure is forbidden before disconnecting the unit from the power supply. Check for the absence of voltage before proceeding. Periodic maintenance is fundamental to keep the unit in perfect efficiency both functionally and for energy. It is fundamental to provide annual checks for: RePuro 250 - RePuro 350 14.1.
- Page 40 AERMEC S.p.A. 37040 Bevilacqua (VR) Italie–Via Roma, 996 Tél. (+39) 0442 633111 Téléfax 0442 93730 - (+39) 0442 93566 www.aermec.com - info@aermec.com RePuro 100 RePuro 250 RePuro 450 RePuro 650 RePuro 170 RePuro 350 RePuro 550 Nous, soussignés de la présente, déclarons sous notre exclusive responsabilité que...
- Page 41 TABLES DE MATIÈRES 1. MISES EN GARDE GÉNÉRALES ........................................37 1. 1 . Conservation de la documentation ..........................................37 1.2. Mises en garde sur la securite et normes d'installation ................................37 2. IDENTIFICATION DU PRODUIT ........................................37 3. INFORMATIONS ..............................................38 3. 1 . Manutention ..................................................38 3.2.
- Page 42 Avec nos remerciements, AERMEC S.p.A AERMEC S.p.A se réserve le droit d’effectuer, à tout moment, tout type de modification dans le but d’améliorer son produit, et n’a aucune obligation d’ajouter ces modifications aux machines déjà fabriquées, livrées ou en cours de fabrication.
-
Page 43: Mises En Garde Générales
MISES EN GARDE SUR LA SECURITE ET NORMES D'INSTALLATION LIMITES DE FONCTIONNEMENT RALES de l'unité: L’unité doit être installée par un Les unités RePuro AERMEC sont fabri- technicien autorisé qualifié, Température minimum de l'air: quées selon les standards techniques conformément à la législation na- -15°C *... -
Page 44: Informations
Remarque: l'évacuation de la condensation Pour toute référence future et pour pour effectuer le siphon; chaque communication avec AERMEC au nettoyage des filtres; S.p.A., il faut indiquer le numéro de série. au nettoyage de l'échangeur; Avant l'installation, doit être récupéré... -
Page 45: Installation Du Récupérateur
INSTALLATION DU RÉCUPÉRATEUR 4.1. OPÉRATIONS PRÉLIMINAIRES Prévoir les installations pour l'alimentation électrique et le raccordement avec le panneau à câble. Prévoir une installation adaptée d'évacuation de la condensation. Ouvrir le panneau frontal de l'unité. RePuro 250 - RePuro 350 RePuro 450 - RePuro 550 - RePuro 650 RePuro 250 - RePuro 350 Préparation des composants Récupérer tous les composants pour... -
Page 46: Installation
4.2. INSTALLATION Installation murale Pour installer l’unité sur le mur, utiliser la plaque pour installation. L’unité est fournie avec la plaque appli- quée sur le côté arrière. Attention: l’unité doit être installée en position parfaitement horizontale. Attention: la position de la plaque de montage au moment de la réception de l’unité... -
Page 47: Branchements Électriques
4.3. BRANCHEMENTS ÉLECTRIQUES Alimentation électrique 230V~50Hz. L’unité est fourni avec le câble d’alimen- REPURO tation et la fiche Schuko. Le câble d’ali- 100 - 170 mentation est long de 2 mètres. Prévoir une prise de courant Schuko à proximité de l’unité. Pour protéger l’unité... -
Page 48: Raccordement Des Canaux De L'air À L'unité
4.4. RACCORDEMENT DES CANAUX DE L’AIR À L’UNITÉ 4.5. Monter les 4 raccords aux brides de l’unité et les fixer avec les vis fournies. Appliquer les éléments isolants aux 4 raccords. Raccorder les canaux de l’air aux rac- cords, fixer les canaux avec les colliers. Pour identifier la position des canaux, consulter le dessin. -
Page 49: Vidange De La Condensation
4.6. VIDANGE DE LA CONDENSATION Installer le raccord d'évacuation de la RePuro condensation sur la base de l'unité, fixer avec la vis. Le raccord d'évacuation de la conden- 100mm sation a un diamètre extérieur de 20 60mm Le raccord d'évacuation de la conden- sation doit être raccordé... -
Page 50: Extraction Des Filtres
4.7. EXTRACTION DES FILTRES Pour extraire les filtres, il faut avoir enle- vé le panneau avant de l’unité. L’unité doit fonctionner uniquement si les filtres fonctionnent parfaitement et s’ils sont correctement insérés à l’inté- rieur. RePuro 250 - RePuro 350 RePuro 450 - RePuro 550 - RePuro 650 4.8. -
Page 51: Panneau De Commandes
INSTALLATION DU PANNEAU AU MUR Les unités RePuro AERMEC sont gérées par l'utilisateur par l'intermédiaire d'un panneau à câble à installer sur le mur; le panneau de commandes a un design particulièrement fin (12mm) et peut être installé au-dessus d'un boîtier encastrable 503. - Page 52 Ouvrir le panneau de commandes pour pouvoir le fixer au boîtier encas- trable; ATTENTION: après avoir ouvert le pan- neau de commandes, ne pas toucher la carte électronique à mains nues pour éviter des dommages dus à des décharges électrostatiques acciden- telles Raccorder la borne au panneau mural;...
-
Page 53: Compatibilité Entre Le Panneau De Commandes Et Les Boitiers Encastrables
5.2. COMPATIBILITÉ ENTRE LE PANNEAU DE COMMANDES ET LES BOITIERS ENCASTRABLES Le panneau mural peut être fixé sur l’un des boîtiers encastrables de divers types; ci-dessous est reporté un schéma qui récapitule la compatibilité entre les boîtiers encastrables et les panneaux de commande; Type Type 503E... -
Page 54: Schemas Electriques
SCHEMAS ELECTRIQUES = Entrée état de fonctionnement du ventilateur forçant = Microswith signalisation by pass pré-mélange = Contact à distance ON/OFF (NF) = Fan Display = Af chage l de panneau de commande = Plasmacluster = Petit moteur de by pass free cooling = Relais = Petit moteur de by pass de pré-mélange RS485... - Page 55 RePuro250 - RePuro350 - RePuro450 - RePuro550 - RePuro650 TX/RX GND-TTL MODE TX/RX BL 1.5 mm² 1 2 3 4 MA 1.5 mm² DISPLAY ORANGE BLANC BLEU GRIS MARRON NOIR (450 ROUGE VIOLET 650) (450 ROSE RS485 TTL VERT 650) ORANGE WEISS BLAU...
-
Page 56: Maintenance Ordinaire
MAINTENANCE ORDINAIRE Toute opération de nettoyage est inter- dite, avant d'avoir débranché l'unité du réseau d'alimentation électrique. Vérifier l'absence de tension avant d'agir. La maintenance périodique est fonda- mentale pour conserver l'unité en parfait état tant du point de vue du fonctionne- ment que de la consommation d'éner- gie. - Page 57 AERMEC S.p.A. 37040 Bevilacqua (VR) Italy–Via Roma, 996 Tel. (+39) 0442 633111 Telefax 0442 93730 – (+39) 0442 93566 www.aermec.com - info@aermec.com RePuro 100 RePuro 250 RePuro 450 RePuro 650 RePuro 170 RePuro 350 RePuro 550 Wir, die Unterzeichner der vorliegenden Erklärung, erklären unter unserer ausschließlichen KONFORMITÄTSERKLÄRUNG...
- Page 58 INHALT 1. ALLGEMEINE HINWEISE............................................ 55 1. 1 . Aufbewahrung der Unterlagen .............................................55 1.2. Sicherheitshinweise und installationsbestimmungen ..................................55 2. KENNUNG DES PRODUKTS ..........................................55 3. INFORMATIONEN ..............................................56 3. 1 . Bewegen ....................................................56 3.2. Transport....................................................56 3.3. Kontrollen beim empfang ..............................................56 3.4.
- Page 59 Verbesserung des Produkts dient. Nochmals vielen Dank. AERMEC S.p.A. AERMEC S.p.A. behält sich das Recht vor, jederzeit zur Verbesserung des Produkts Veränderungen durchzuführen, ohne verpflichtet zu sein, diese Veränderungen auch an bereits hergestellten, ausgelieferten oder sich in Herstellung befindlichen Einheiten vorzunehmen.
-
Page 60: Allgemeine Hinweise
ALLGEMEINE HINWEISE 1.2. SICHERHEITSHINWEISE UND INSTAL- LATIONSBESTIMMUNGEN BETRIEBSGRENZEN der Einheit: Die AERMEC-Einheiten RePuro wurden in Die Einheit muss durch qualifiziertes Übereinstimmung mit den technischen Minimale Lufttemperatur: -15°C und erfahrenes Personal installiert wer- Standards und anerkannten Sicherheits- den, wobei die nationale Gesetzge- regeln gebaut. -
Page 61: Informationen
Kondenswasserableitung. Bei allen zukünftigen Bezugnahmen 3.10. ABMESSUNGEN Für den Siphon muss ein Raum von sowie bei jeder Kommunikation mit mindestens 200 mm zur Verfügung AERMEC S.p.A. ist die Seriennummer stehen. anzugeben. für die Reinigung der Filter. für Reinigung 3.1. -
Page 62: Installation Des Wärmerückgewinners
INSTALLATION DES WÄRMERÜCKGEWINNERS 4.1. VORBEREITENDE MASSNAHMEN Die Anlagen für die Stromversorgung und den Anschluss der kabelgebundenen Bedientafel vorbereiten. Eine geeignete Kondensatabflussanlage vorbereiten. Frontplatte der Einheit öffnen. RePuro 250 - RePuro 350 RePuro 450 - RePuro 550 - RePuro 650 RePuro 250 - RePuro 350 Vorbereitung der Komponenten Alle Komponenten zur Installation der RePuro Einheiten, die sich in der Einheit... -
Page 63: Installation
4.2. INSTALLATION Wandinstallation Für die Wandinstallation der Einheit die Befestigungsplatte verwenden. Die Platte befindet sich auf der Rücksei- te der Einheit. Achtung: Die Einheit muss vollkommen waagerecht installiert werden. Achtung: Die Position der Befestigungs- platte beim Empfang der Einheit stimmt nicht mit der endgültigen Installations- position überein (siehe Zeichnungen). -
Page 64: Elektrische Anschlüsse
4.3. ELEKTRISCHE ANSCHLÜSSE Stromversorgung 230V~50Hz . Zum Lieferumfang der Einheit gehören REPURO das Stromversorgungskabel und der 100 - 170 Schuko-Stecker. Das Stromversorgungs- kabel ist 2 Meter lang. Eine Schuko-Steckdose in der Nähe der Einheit vorbereiten. Zum Schutz der Einheit gegen Kurzschlüs- se ist an der Speiseleitung ein allpoliger Leitungsschutzschalter (IG) max. -
Page 65: Anschluss Der Luftkanäle An Die Einheit
4.4. ANSCHLUSS DER LUFTKANÄLE AN DIE EINHEIT Die 4 Anschlüsse für die Flansche der Einheit montieren und mit den mitgelie- ferten Schrauben befestigen. Die Isolierelemente an den 4 Anschlüs- sen anbringen. Die Luftkanäle mit den Anschlüssen ver- binden; die Kanäle mit Schellen befesti- gen. -
Page 66: Kondenswasserableitung
4.5. KONDENSWASSERABLEITUNG Den Anschluss für den Kondensatabfluss RePuro am Sockel der Einheit installieren; mit der Schraube befestigen. Der Anschluss für den Kondensatabfluss 100mm hat einen Außendurchmesser von 20 mm. Der Anschluss für den Kondensatabfluss 60mm muss an die Kondensatabflussanlage angeschlossen werden. Die Abmessungen der Kondensatab- flussanlage müssen für den Ablauf des Kondensats geeignet sein, das von der... -
Page 67: Entnahme Der Filter
4.7. ENTNAHME DER FILTER Zur Entnahme der Filter muss die Front- platte der Einheit entfernt werden. Die Einheit darf nur betrieben werden, wenn die Filter voll funktionsfähig sind und korrekt in die Einheit eingesetzt wur- den. RePuro 250 - RePuro 350 RePuro 450 - RePuro 550 - RePuro 650 4.6. -
Page 68: Bedientafel
5.1. INSTALLATION DER WAND-BEDIENTAFEL Die AERMEC-Einheiten RePuro werden vom Benutzer mit der kabelgebundenen Bedientafel, die an der Wand zu installieren ist, gesteuert. Die Bedientafel hat eine besonders geringe Dicke (12 mm) und kann über einem Einbaugehäuse 503 installiert werden. Die kabelgebundene Bedientafel muss mit dem mitgelieferten Verbindungskabel an die RePuro Einheit angeschlossen werden. - Page 69 Bedientafel öffnen, um diese am Ein- baugehäuse zu befestigen. ACHTUNG: Nach dem Öffnen der Be- dientafel die Steuerkarte nicht mit blo- ßen Händen berühren, um sie nicht durch unbeabsichtigte elektrostatische Ladungen zu beschädigen. Klemme mit der Wandbedientafel verbinden. Länge Verbindungskabel = 6 m Bedientafel am Einbaugehäuse befestigen.
-
Page 70: Kompatibilität Zwischen Bedientafel Und Einbaugehäusen
5.2. KOMPATIBILITÄT ZWISCHEN BEDIENTAFEL UND EINBAUGEHÄUSEN Die Wandbedientafel kann an verschiedenartig gestalteten Einbaugehäusen befestigt werden; im Folgenden wird eine Plan dargestellt, der die Kompatibilität zwischen Einbaugehäusen und Bedientafel zusammenfasst. Type Type 503E 503E Type Type 502E 502E Type Type Wall Wall mounted mounted... -
Page 71: Schaltpläne
SCHALTPLÄNE 6.1. = Input zwingen fan Betriebszustand = Mikroschalter Anzeige Bypass Vormischung = Kontakt ON / OFF-Steuerung (NC)) = Fan Display = Anzeige Bedienfeld Draht = Plasmacluster = Bypass-Motor Free Cooling = Relay = Bypass-Motor Vormischung RS485 = RS485 seriellen Anschluss Aufsicht = Sicherung RX POST = Nachheiz-Widerstand = Gemeinsamer Leiter... - Page 72 RePuro250 - RePuro350 - RePuro450 - RePuro550 - RePuro650 TX/RX GND-TTL MODE TX/RX BL 1.5 mm² 1 2 3 4 MA 1.5 mm² DISPLAY ORANGE BLANC BLEU GRIS MARRON NOIR (450 ROUGE VIOLET 650) (450 ROSE RS485 TTL VERT 650) ORANGE WEISS BLAU...
-
Page 73: Ordentliche Wartung
ORDENTLICHE WARTUNG Jegliche Reinigungsarbeiten sind verbo- ten, bevor die Einheit von der elektrischen Stromversorgung getrennt wurde. Vor der Arbeit ist sicherzustellen, dass keine Spannung anliegt. Die periodische Wartung ist grundlegend, um die Einheit voll funktionsfähig zu erhal- ten, sowohl unter funktionalen als auch unter Energie-Aspekten. - Page 74 RePuro 100 RePuro 250 RePuro 450 RePuro 650 RePuro 170 RePuro 350 RePuro 550 DECLARACIÓN DE CONFORMIDAD NOMBRE RePuro TIPO RECUPERADOR DE CALOR MODELOS Campo Sigla Descripción 1..6 RePuro Nombre de la unidad 7..9 Tamaño de la unidad (250-350-450-550-650) Resistencia de precalentamiento Al cual se refiere esta declaración, cumple con las siguientes normas armonizadas:...
- Page 75 ÍNDICE 1. ADVERTENCIAS GENERALES .......................................... 73 1. 1 . Conservación de la documentación ...........................................73 1.2. Advertencias sobre la seguridad y normas de instalación ................................73 2. IDENTIFICACIÓN DEL PRODUCTO ......................................... 73 3. INFORMACIONES ..............................................74 3. 1 . Desplazamiento .................................................. 74 3.2.
- Page 76 AERMEC S.p.A AERMEC S.p.A. se reserva el derecho de realizar, en cualquier momento, modificaciones para el mejoramiento de su producto, y no está obligada a añadir tales modificaciones a las máquinas fabricadas anteriormente ya entregadas o en fase de fabricación.
-
Page 77: Advertencias Generales
1.2. ADVERTENCIAS SOBRE LA SEGURI- DAD Y NORMAS DE INSTALACIÓN LÍMITES DE FUNCIONAMIENTO Las unidades RePuro AERMEC están fa- de la unidad: La unidad la debe instalar un téc- bricadas de acuerdo con los estánda- nico habilitado y cualificado, y lo res técnicos y las reglas de seguridad... -
Page 78: Informaciones
Nota: correspondientes, que se suministran instalación; Para cada referencia futura y para como accesorio. para la preparación de los canales comunicar AERMEC S.p.A. Instale los rodapiés antes de conectar de impulsión y de expulsión; necesario indicar número la unidad. -
Page 79: Instalación Del Recuperador
INSTALACIÓN DEL RECUPERADOR 4.1. OPERACIONES PRELIMINARES Prepare las instalaciones para la alimentación eléctrica y la conexión con el panel de cable. Prepare una instalación de descarga de condensados adecuada. Abra el panel frontal de la unidad. RePuro 250 - RePuro 350 RePuro 450 - RePuro 550 - RePuro 650 RePuro 250 - RePuro 350 Preparación de los componentes... -
Page 80: Instalación
4.2. INSTALACIÓN Instalación en pared. Para instalar la unidad en la pared use la placa para instalación. La unidad se entrega con la placa apli- cada en el lado trasero. Atención: la unidad se debe instalar en una posición perfectamente horizontal. Atención: la posición de la placa de montaje cuando se recibe la unidad no corresponde a la posición final de insta-... -
Page 81: Conexiones Eléctricas
4.3. CONEXIONES ELÉCTRICAS Alimentación eléctrica 230V~50Hz . 3 mm. La unidad se entrega con el cable de REPURO alimentación y el enchufe Schuko. El ca- 100 - 170 ble de alimentación tiene 2 metros de largo. Prepare una toma de corriente Schuko cerca de la unidad. -
Page 82: Conexión De Los Canales Del Aire A La Unidad
4.4. CONEXIÓN DE LOS CANALES DEL AIRE A LA UNIDAD Monte los 4 racores en las bridas de la unidad y fíjelos con los tornillos suminis- trados. Aplique los elementos aislantes a los 4 racores. Conecte los canales del aire a los raco- res, fije los canales con abrazaderas. -
Page 83: Descarga De Condensación
4.5. DESCARGA DE CONDENSACIÓN Instale el racor de descarga de con- RePuro densados en la base de la unidad, y fíjelo con el tornillo correspondiente. El racor de descarga de condensados 100mm tiene un diámetro exterior de 20 mm. El racor de descarga de condensados 60mm se debe conectar a la instalación de descarga de condensados. -
Page 84: Extracción De Los Filtros
4.7. EXTRACCIÓN DE LOS FILTROS Para extraer los filtros es necesario qui- tar el panel de la parte frontal de la unidad. La unidad puede funcionar solo si los fil- tros están en perfectas condiciones de eficiencia y si están bien colocados en su interior. -
Page 85: Panel De Mandos
INSTALACIÓN DEL PANEL EN LA PARED El usuario puede controlar las unidades RePuro AERMEC mediante un panel de cable que tiene que instalar en la pared; el panel de mandos tiene un diseño muy sutil (12 mm) y se puede instalar sobre una caja empotrable 503. - Page 86 Abra el panel de mandos para poder- lo fijar a la caja empotrable; ATENCIÓN: después de abrir el panel de mandos, no toque la tarjeta elec- trónica con las manos descubiertas para evitar daños debidos a descar- gas electrostáticas accidentales Conecte la borna al panel de pared;...
-
Page 87: Compatibilidad Entre El Panel De Mandos Y Las Cajas Empotrables
5.2. COMPATIBILIDAD ENTRE EL PANEL DE MANDOS Y LAS CAJAS EMPOTRABLES El panel de pared se puede fijar sobre una caja empotrable de diversos tipos; a continuación se reproduce un esquema que resume la compatibilidad entre las cajas empotrables y el panel de mandos; Type Type 503E... -
Page 88: Esquemas Eléctricos
ESQUEMAS ELÉCTRICOS 6.1. CE = Entrada ventilador forzando estado de funcionamiento MSF = Microinterruptor de indicación de desviación premezcla CF = Póngase en contacto ON / OFF (NC) MV = Fan Display = Control de la pantalla del panel de cableado PC = Plasmacluster DMF = Motor de desviación free cooling RL = Relé... - Page 89 RePuro250 - RePuro350 - RePuro450 - RePuro550 - RePuro650 TX/RX GND-TTL MODE TX/RX BL 1.5 mm² 1 2 3 4 MA 1.5 mm² DISPLAY ORANGE BLANC BLEU GRIS MARRON NOIR (450 ROUGE VIOLET 650) (450 ROSE RS485 TTL VERT 650) ORANGE WEISS BLAU...
-
Page 90: Mantenimiento Ordinario
MANTENIMIENTO ORDINARIO Se prohíbe cualquier operación de lim- pieza, antes de desconectar la unidad de la red de alimentación eléctrica. Antes de iniciar controle que no haya corriente. El mantenimiento periódico es fun- damental para mantener la perfecta eficiencia de la unidad, tanto desde el punto de vista funcional como energé- tico. - Page 92 AERMEC S.p.A. Aermec si riserva la facoltà di apportare in qualsiasi momento tutte le modifiche ritenute necessarie per il miglioramento del prodotto con 37040 Bevilacqua (VR) - Italien eventuale modifica dei relativi dati tecnici. Via Roma, 996 - Tel. (+39) 0442 633111 Telefax (+39) 0442 93730 - (+39) 0442 93566 www.aermec.com...
Need help?
Do you have a question about the RePuro 100 and is the answer not in the manual?
Questions and answers