Table of Contents
Advertisement
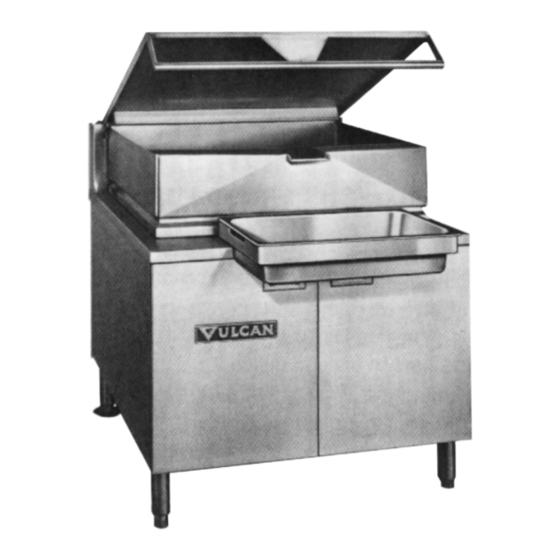
GAS & ELECTRIC TILTING BRAISING PANS
MODEL
G30O
G30C
G40O
G40C
E30O
E30C
E40O
E40C
V U L C A N - H A R T C O M P A N Y , P . O . B O X 6 9 6 , L O U I S V I L L E ,
FORM 30959 (3-96) (Formerly 30763 & 30764)
ML-52701
ML-52702
ML-52705
ML-52706
ML-52703
ML-52704
ML-52707
ML-52708
INSTALLATION &
OPERATION MANUAL
K Y
4 0 2 0 1 - 0 6 9 6 ,
TEL. (502) 7 7 8 - 2 7 9 1
Advertisement
Table of Contents

Related Manuals for Vulcan-Hart G30O


Summary of Contents for Vulcan-Hart G30O
- Page 1 INSTALLATION & OPERATION MANUAL GAS & ELECTRIC TILTING BRAISING PANS MODEL G30O ML-52701 G30C ML-52702 G40O ML-52705 G40C ML-52706 E30O ML-52703 E30C ML-52704 E40O ML-52707 E40C ML-52708 V U L C A N - H A R T C O M P A N Y , P . O . B O X 6 9 6 , L O U I S V I L L E , 4 0 2 0 1 - 0 6 9 6 , TEL.
- Page 2 IMPORTANT FOR YOUR SAFETY THIS MANUAL HAS BEEN PREPARED FOR PERSONNEL QUALIFIED TO INSTALL GAS EQUIPMENT, WHO SHOULD PERFORM THE INITIAL FIELD START-UP AND ADJUSTMENTS OF THE EQUIPMENT COVERED BY THIS MANUAL. POST IN A PROMINENT LOCATION THE INSTRUCTIONS TO BE FOLLOWED IN THE EVENT THE SMELL OF GAS IS DETECTED.
-
Page 3: Table Of Contents
TABLE OF CONTENTS GENERAL..............4 INSTALLATION . -
Page 4: General
KEEP THESE INSTRUCTIONS FOR FUTURE USE GENERAL Vulcan-Hart Tilting Braising Pans are available in two sizes. Models G30 and E30 have a 30-gallon capacity and Models G40 and E40 have a 40-gallon capacity. Models with a suffix of "O" have an open base and models with a suffix of "C"... -
Page 5: Location
LOCATION For Gas Powered Braising Pans Only The braising pan must be kept free and clear of combustible substances. The braising pan, when installed, must have minimum clearance from combustible and non-combustible construction of 6" from the sides and 6" from the rear. The installation location must allow adequate clearances for servicing and proper operation. -
Page 6: Installation Codes And Standards
INSTALLATION CODES AND STANDARDS Your Vulcan Tilting Braising Pan must be installed in accordance with: In the United States: 1. State and local codes, or in the absence of local codes, with: 2. National Fuel Gas Code, ANSI-Z223.1 (latest edition), available from the American Gas Association, Inc., 1515 Wilson Blvd., Arlington, VA 22209. -
Page 7: Service Connections
SERVICE CONNECTIONS To reach service and utility connections, remove the left side panel. To remove, hold the panel from underneath and lift it up. While holding the panel up, swing out the lower part of the panel until it clears the top flange and remove. -
Page 8: Installation Diagram - Gas Heat Braising Pans
INSTALLATION DIAGRAM — GAS HEAT BRAISING PANS Fig. 2 — 8 —... -
Page 9: Electrical Connections
ELECTRICAL CONNECTIONS (see Fig. 3) WARNING: ELECTRICAL AND GROUNDING CONNECTIONS MUST COMPLY WITH THE NATIONAL ELECTRICAL CODE AND/OR OTHER LOCAL CODES. WARNING: DISCONNECT THE ELECTRICAL POWER SUPPLY AND PLACE A TAG AT THE DISCONNECT SWITCH TO INDICATE THAT YOU ARE WORKING ON THE CIRCUIT. The control box for field wire connection is located on the lower left side of the braising pan. -
Page 10: Installation Diagram - Electric Heat Braising Pans
INSTALLATION DIAGRAM — ELECTRIC HEAT BRAISING PANS Fig. 3 — 10 —... -
Page 11: Operation
OPERATION WARNING: THE TILTING BRAISING PAN AND ITS PARTS ARE HOT. USE CARE WHEN OPERATING, CLEANING OR SERVICING THE BRAISING PAN. BEFORE FIRST USE Using a non-corrosive, grease-dissolving commercial cleaner, clean the protective metal oils from all surface parts and the interior of the tilting braising pan. Follow the cleaner manufacturer's directions. Rinse thoroughly and drain the pan. -
Page 12: Lighting And Shutdown Of Pilot - Gas Braising Pan With Electronic Ignition
7. Lower the braising pan (see OPERATION OF LIFTING SYSTEM in this manual). The braising pan will not operate with the pan in the "up" position. 8. Turn the thermostat to the desired cooking temperature. Complete Shutdown 1. Turn manual shutoff valve to OFF. 2. -
Page 13: Electric Heat Braising Pans
DO NOT use the braising pan as a deep fat fryer, use it only for shallow pan frying (cooking oil film not more than " thick). Its use for deep frying could result in a fire hazard. See COOKING HINTS in this manual for additional information. -
Page 14: Operation Of Lifting System
Do not overheat the clad stainless steel plate by setting the temperature well above recommended temperatures, or by operating the braising pan without any fluid inside the pan to absorb heat. Overheating the plate may cause warpage and will carbonize any cooking oil on the plate and cause sticking. -
Page 15: Unloading Prepared Foods
1. Close all front doors. 2. Press the upper half of the rocker switch to raise the braising pan and the lower half of the rocker switch to lower the braising pan. The switch must be held for continuous raising or lowering of the braising pan. -
Page 16: Steaming Inserts (Optional)
STEAMING INSERTS (Optional) Your tilting braising pan can be used for steaming frozen and fresh foods. The 30-gallon pans (Models E or G30) can be loaded with a maximum of two steaming pans, size 12" x 20" x 4" deep. The 40-gallon pan (Models E or G40) will accept up to three steam pans of this same size. -
Page 17: Cleaning
CLEANING WARNING: DISCONNECT ELECTRICAL POWER SUPPLY BEFORE CLEANING. Clean your braising pan regularly. Keep the plate surface clean. To produce evenly cooked, perfectly braised products, keep pan surface free from carbonized grease. Carbonized grease on the surface hinders the transfer of heat from the pan surface to the food. This results in spotty browning and loss of cooking efficiency. -
Page 18: Cooking Guidelines
COOKING GUIDELINES The guidelines given below are suggested quantities, temperature settings, and estimated numbers of orders per load and per hour. When two temperatures are given, the first is to start the product, and the second to finish the product. The following temperatures should be used: Temperature Thermostat... - Page 19 BATCHES G/E30O/C G/E40O/C PORTION TEMP. PER LOAD PER LOAD ° ITEM SIZE HOUR QTY. PORTIONS QTY. PORTIONS VEGETABLES CANNED 3 oz. 30 lb. 45 lb. FRESH Beans, Wax, Green 3 oz. 25 lb. 50 lb. Beets 3 oz. 30 lb. 60 lb.
- Page 20 BATCHES G/E30O/C G/E40O/C PORTION TEMP. PER LOAD PER LOAD ° ITEM SIZE HOUR QTY. PORTIONS QTY. PORTIONS CHICKEN Pan Fried 2 – 50 pieces 80 pieces Whole 2 oz. 350 – 200 16-5 lb. 24-5 lb. FRANKFURTERS Grilled 2 oz. 22 lb.
-
Page 21: Maintenance
MAINTENANCE WARNING: THE TILTING BRAISING PAN AND ITS PARTS ARE HOT. USE CARE WHEN OPERATING, CLEANING OR SERVICING THE BRAISING PAN. WARNING: DISCONNECT ELECTRICAL POWER SUPPLY AND PLACE A TAG AT THE DISCONNECT SWITCH TO INDICATE THAT YOU ARE WORKING ON THE CIRCUIT BEFORE PERFORMING ANY MAINTENANCE. -
Page 22: Door Hinges
Lubricate the front door hinges with a silicone spray lubricant every 6 months. Spray the lubricant on the hinge pin at the top and bottom of all front doors. ADJUSTMENTS At least twice a year, have a Vulcan-Hart authorized service person clean and adjust the tilting braising pan for maximum performance. VENT When cool, annually check the ventilation system. -
Page 23: Troubleshooting
1. Thermostat is not turned ON. 2. Blown fuse in main electrical panel. 3. Pan is not in lowest position. 4. Problem with the heating elements. Contact your Vulcan-Hart authorized servicer. FORM 30959 (3-96) (Formerly 30763 & 30764) PRINTED IN U.S.A. — 23 —...
Need help?
Do you have a question about the G30O and is the answer not in the manual?
Questions and answers