Advertisement
Quick Links
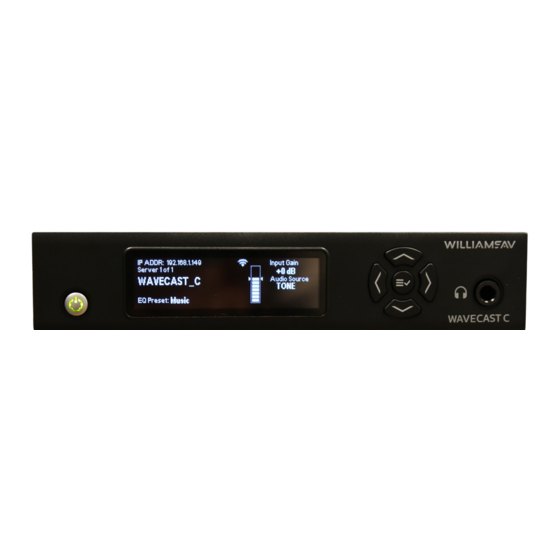
WaveCAST C
WF T5C/WF T5CD
Wi-Fi Network Required for
Streaming
The WaveCAST C does not provide a network on its own. If
streaming audio over Wi-Fi is desired, the WaveCAST C must be
connected to a network providing DHCP and Wi-Fi. The network
needs to be installed and established before the WaveCAST C
audio streaming can be used. Depending on how many users
need to access/stream audio, hardware and configuration
requirements will differ. Please see our WaveCast Networking
Guide for these considerations.
You may connect the device to a computer via a network
connection to help troubleshoot any networking problems.
Installation Procedures
1. Position the WaveCAST C transmitter near the sound
system or mixer from which it will receive audio. We do not
recommend wall or ceiling mounting, nor putting the device
on a cart.
2. Connect the power supply to the Power Input jack located
on the back of the WaveCAST C. Then plug the line cord
into the AC wall socket. Press in the power button on the
front of the WaveCAST C until it clicks/latches in. The power
button should light up. If not, go back and check the power
connections.
3. Choose and configure the analog audio source. The audio
source must be configured in the menu before plugging
the source into the jack to avoid damage to the input circuit.
Push the V (DOWN ARROW) button twice to highlight
"Audio Source". Push the < (LEFT ARROW) or > (RIGHT
ARROW) buttons to choose between ANALOG LINE IN, MIC,
PHANTOM MIC +12V, 400 Hz Test Tone, or Dante. When the
desired audio source is displayed, it is live.
4. Push the power button to turn the unit off.
5. Connect the audio source to the audio input jack on the rear
of the WaveCAST C, or the Dante network to the Dante jack.
6. Push the power button to turn the unit on.
7. With the audio source playing, adjust the Input Gain on the
WaveCAST C so that the level pulses average around 0dB.
Press the V (DOWN ARROW) once to highlight "Input Gain"
then the < (LEFT ARROW) or > (RIGHT ARROW) buttons
repeatedly to decrease or increase the input audio level.
8. Select an Audio Preset. The WaveCAST has three pre-
configured Audio Presets to choose from: Hearing Assist,
Music, and Voice. A Custom preset is also available. The
performance of the WaveCAST is optimized for each of the
pre-configured Audio Presets. Using the menu and control
buttons on the front of the WaveCAST, push the Menu
button, the display will change to show Audio Settings. Use
the forward right arrow button to display Audio Source in the
selection box. Push the down v button to show Audio Presets.
Now press the right arrow button to display the list of Presets.
Use the up and down buttons to alternate between Hearing
Assist, Music, Voice and Custom selections. When the desired
Audio Preset is displayed, press the right arrow button to
apply the setting. If Custom is desired, push the right arrow
button to enter the custom settings. Press the Menu button
to exit the menu.
9. Connect an Ethernet cable from your local area network,
or Wi-Fi router to the Ethernet port on the WaveCAST. This
network will be used to broadcast the audio.
10. Once the transmitter detects an active network is present
(either Ethernet or Dante), the WaveCAST's Ethernet control
IP address will be displayed in the upper left part of the main
screen on the OLED.
11. Use a device, such as a smartphone, with the WaveCAST App
installed to listen to the audio and test that device is working
and sounds correct.
Back Panel
QUICK START GUIDE
Advertisement

Subscribe to Our Youtube Channel
Related Manuals for Williams AV WaveCAST C


Summary of Contents for Williams AV WaveCAST C
- Page 1 5. Connect the audio source to the audio input jack on the rear Streaming of the WaveCAST C, or the Dante network to the Dante jack. 6. Push the power button to turn the unit on. The WaveCAST C does not provide a network on its own. If streaming audio over Wi-Fi is desired, the WaveCAST C must be 7.
- Page 2 2. Join the WaveCAST Wi-Fi Network the WaveCAST C server. Once the WaveCAST App is downloaded, join the same Wi-Fi network that the WaveCAST C is on. If no channels are listed, the phone/receiver is not seeing the audio server (WaveCAST C). For Additional Information Ensure you are on the correct Wi-Fi network.
Need help?
Do you have a question about the WaveCAST C and is the answer not in the manual?
Questions and answers