
Subscribe to Our Youtube Channel
Related Manuals for Hamilton/Buhl VENU100AM


Summary of Contents for Hamilton/Buhl VENU100AM
- Page 1 INSTRUCTION MANUAL VENU100AM Portable PA Amplifier System Never-Ending Learning Innovation www.HamiltonBuhl.com...
-
Page 3: Table Of Contents
Table of Contents Introduction and Product Specifications ....4 Important Safety Information ......5 Component and Control Panel Description . -
Page 4: Introduction And Product Specifications
1. Introduction and Product Specifications Introduction and Product Specifications Thank you for choosing the HamiltonBuhl® VENU100AM PA Amplifier System. Please read this manual carefully before using and retain for future reference. Please recharge this unit every month to achieve the best performance. -
Page 5: Important Safety Information
2. Important Safety Information Important Safety Information When a failure or problem occurs, please contact the manufacturer for further troubleshooting, evaluation and/or repair. One receiver cannot receive a signal from two of the same frequency microphones simultaneously. Other brand microphones with different frequencies cannot be used with this receiver. Do not open or attempt to fix or adjust this product Do Not Disassemble yourself. -
Page 6: Component And Control Panel Description
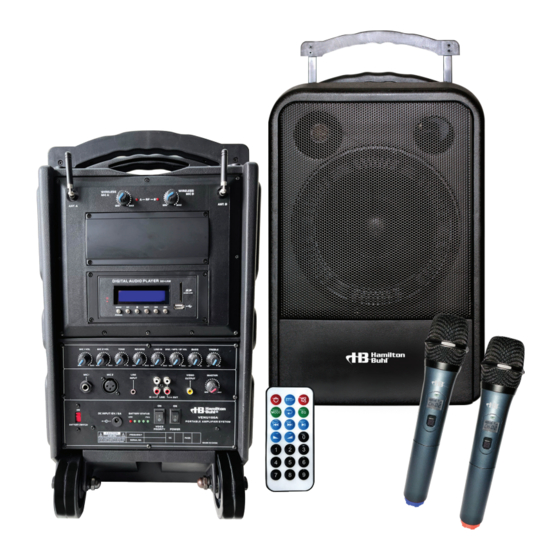
3. Component and Control Panel Description Component Description Handle Telescopic Trolley Metal Shield Battery Compartment Wheels Tripod (not included) Mount Hole Control Panel Cabinet... - Page 7 3. Component and Control Panel Description Control Panel Wireless MIC A Volume Wireless MIC A RF LED Indicator Wireless MIC B Volume Wireless MIC B RF LED Indicator Antenna A Antenna B MP3 Player Module (USB Port / SD Card Slot)
- Page 8 3. Component and Control Panel Description Control Panel (continued) (1) Power switch (9) Wired MIC-2 volume control (balanced input) (2) Power LED indicator: When voltage is low, red light appears. (10) Balanced input jack (11) TONE control (3) Battery Status LED Indicator: Battery supply: When battery voltage (12) REVERB control reduces from strong to weak, green...
-
Page 9: Operations Guide
4. Operations Guide Operations Guide This unit uses DC power. When inputting DC 15V, current cannot be less than 5A, or the system will not work properly. Before using this device, please charge fully for approximately 10-12 hours. 1. (A) When using DC power, insert one end of DC cord into DC power input jack (4), and insert the other end into AC power outlet. -
Page 10: Wireless Microphone Parts And Specifications
5. Wireless Microphone Parts and Specifications Handheld Wireless Microphone (UHF 3V) (1) Mesh cover (2) Power LED Indicator (3) Display (4) Power Switch (Off/Stand-By/On) (5) Plastic Body (6) Battery Cover (7) Cap (Orange Tip/Ch 1/915.00MHz) (Blue Tip/Ch 2/918.70MHz) 1. Open battery cover (6) and insert batteries (pay careful attention to positive and negative pole positions). -
Page 11: Wireless Belt Pack Transmitter (Optional) Parts And Specifications
6. Wireless Belt Pack Transmitter (Optional) Parts and Specifications Wireless Belt Pack Transmitter (Optional) (UHF 3V) (1) ON/OFF Power (2) Power LED Indicator (3) MIC IN (4) Antenna (5) Belt Clip (6) Battery Compartment/Cover 1. Open the battery cover (6) and insert 2 x “AA” batteries according to the polarity indicated with + or -. -
Page 12: Wired Headset/Lapel Microphone (Optional) Specifications
7. Wired Headset/Lapel Microphone (Optional) Specifications Wired Headset/Lapel Microphone (Optional) Specifications Microphone Type Condenser Frequency Range 50Hz~16KHz Directional Characteristic Uni-Directional Sensitivity -46dB ±3dB (1V/PA@1KHz) Output Connector Cable φ0.14” XLR Material Black Shield Cover 8. Included Components Included Components (1) Main Unit (1) AC Cord /DC Adapter (2) Wireless Handheld Microphones (4) 1.5V “AA”... -
Page 13: Multi-Format Player And Remote Control Functions
Digital Audio Player Digital Audio Player 9. Multi-Format Player and Remote Control Functions 6. Digital Audio Player 6. Digital Audio Player 6.1 Parts Description 6.1 Parts Description Multi-Format Player A. Front Panel A. Front Panel With Bluetooth With Bluetooth SD+USB SD+USB DIGITAL AUDIO PLAYER DIGITAL AUDIO PLAYER... -
Page 14: Remote Control
10. Remote Control Remote Control Battery Installation Pull the tab to remove the protective PVC plastic film from the contacts before using the remote control. Battery Cover Spring PVC Insulation Changing the Battery Battery life is approximately one year, depending on usage frequency and operation. If the remote control does not work when it is near the unit, please change the battery. -
Page 15: Valve Regulated Sealed Lead Acid Battery
11. Valve Regulated Sealed Lead Acid Battery Valve Regulated Sealed Lead Acid Battery 1. Please follow these instructions to use and maintain the batteries: When a battery is fully depleted, charge it fully within 72 hours, to avoid battery damage. Charging the battery in a timely manner will help prevent an internal short circuit, outer case distortion, plate corruption, or a voltage drop. - Page 16 Product Registration: Visit www.HamiltonBuhl.com 1. Click on Customer Care 2. Click on Product Registration Icon 3. Please fill out all fields marked with * to register Warranty: Warranty begins the date item ships from our warehouse. All products have a one year warranty from original date of shipment, unless otherwise noted.
Need help?
Do you have a question about the VENU100AM and is the answer not in the manual?
Questions and answers