Table of Contents
Advertisement
Advertisement
Table of Contents

Related Manuals for ClearSounds CL600


Summary of Contents for ClearSounds CL600
-
Page 2: Limitation Of Liability
It shall be the sole obligation of the purchaser to assure that CL600 Phone is installed and programmed properly, and that the unit is used and maintained properly. This includes, but is not limited to, periodic use to assure that the phone, including batteries, is in proper working order, that the phone is located within sufficient range of the remote band to... - Page 3 WARNING: Do not place the CL600 on any metal surface. It could reduce reception range. WARNING: The CL600 is capable of amplifying sounds to a loud volume. It is important to instruct all potential users of its proper operation. It is advised to adjust the volume control to the minimum level (Low) when not in use and alert other users that hearing damage can potentially result from misuse.
-
Page 4: Table Of Contents
Phone mounting – desk & wall use Setting the dialing mode Programming ringer – volume & style Programming memory dial buttons CL600 Emergency Connect Phone Operation Programming 6 Emergency Connect SOS dialing numbers Record an Emergency Connect SOS message Play the Emergency Connect SOS message... - Page 5 Using the outgoing speech volume Using the last number redial Using the flash button Using the mute button CL600 Caller ID Operation Viewing your Caller ID display Viewing incoming calls New calls / message waiting indicator Remove call record(s) from Caller ID A specific call record...
-
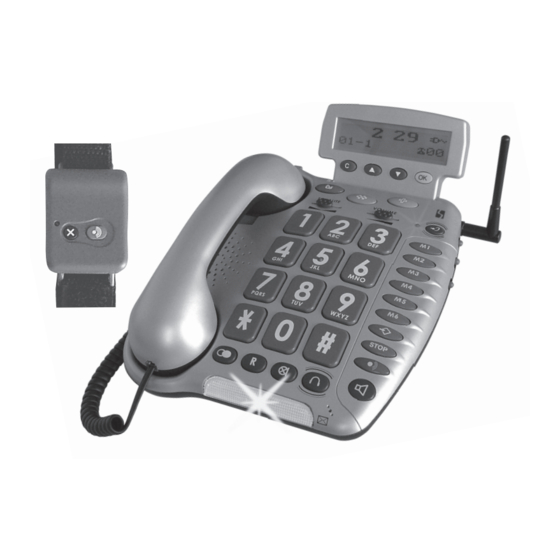
Page 6: Features And Functions
Features & Functions Figure #2 Front 1. C (delete) button (up) button (down) button 4. OK (accept) button – Priority memory button – Priority memory button - Priority memory button 8. Antenna 9. AMPLI – Amplification & tone activation button 10. - Page 7 Ringer / shaker / strobe select mode Phone line jack AC power adapter jack Volume reset override switch (ON/OFF) Optional bed shaker jack 10. Optional Audio/Neckloop jack (3.5mm jack) 11. Optional Telephone jack (2.5mm hands-free) Figure #3 Left side Right side Back...
- Page 8 Figure #4 Handset Handset Boost button Memory card to record speed dial numbers Phone keyholes (mounts) Battery compartment Bottom...
- Page 9 “UP / DOWN arrow” buttons are used to highlight or scroll through the menu. C button is used to cancel or confirm an action/entry or clear a stored Caller ID call. Your CL600 Phone has a screen with different icons, which help you to use the tele- phone The telephone is powered by battery (+battery indicator).
-
Page 10: Installation Steps
Installation of your ClearSounds™ CL600 Emergency Connect Phone is easy. There are some basic steps you need to take when you set-up your CL600 Emergency Connect Phone for the first time. 1. Check parts list. 2. Install (4) AAA Alkaline batteries (not included). Batteries are necessary in case of network power failure to save stored numbers in memory and are required for the “Phone Book”... - Page 11 Caller ID display during shipping. Desk / Table Use 1. Connect one end of the 6ft telephone cord to the line jack on the back of your CL600 Phone and connect the other end to a modular phone jack (RJ11C).
-
Page 12: Setting The Dialing Mode
(See diagram #10) 6. Connect the handset coil cord (curly cord) to the handset and to the telephone. 7. Lift the handset and listen for a dial tone. If you hear a dial tone, your phone is ready to use. If there is no dial tone, check all your cords to make sure they are plugged in securely. - Page 13 PROGRAMMING THE RINGER & AUXILIARY ALERT Ringer Volume: You can adjust the ringer volume of your CL600 as high as 95+ dB. The ringer volume adjustment is located on the right side of the telephone. The settings are OFF, LO, HI, .
-
Page 14: Programming Memory Dial Buttons
Your CL600 Phone is equipped with a bright STROBE light, which flashes a very bright strobe when the phone rings . It’s almost impossible to miss telephone (See diagram #13) calls when you select the Strobe Ringer. DIAGRAM #13 – Strobe Ringer (Flashing incoming call indicator) - Page 15 Entering a new number in the same location will automatically erase the previous number. DIAGRAM #16 Program Button If at any time you have questions about your telephone please contact our ClearSounds Customer Service Department at: 1-800-965-9043. (See diagram #16). (See diagram #17) .
-
Page 16: Cl600 Emergency Connect Phone Operation
CL600 Emergency Connect Phone Operation The ClearSounds™ CL600 Emergency Connect Phone allows you to ask for help con- veniently when there is an emergency. To activate the function, you need to preset the emergency connect SOS number and record an emergency connect SOS message, which will be heard by the person you contact. -
Page 17: Play The Emergency Connect Sos Message
SOS message has been received and to deactivate the CL600 from dialing the next number. Next the CL600 Phone will automatically turn ON the speakerphone allowing the person to speak to the emergency user. Otherwise, the CL600 arrow buttons, highlight <<SET SOS>>. -
Page 18: Test The Emergency Connect Phone
3. After you hang up the phone, press the Remote Band’s Emergency Connect But- ton. 4. The CL600 will dial the first phone number. Shortly after it dials the number, the CL600 starts to play its message. 5. If the person it calls doesn’t answer within about 30 seconds or answers but doesn’t press a number key, the CL600 calls the next number. -
Page 19: Activate The Remote Audio Monitoring
3. You will have 10 seconds to enter the Remote Audio Monitor Access PIN Code on your keypad (the access code is 1234 unless it has been changed). This turns on the speakerphone of the CL600 phone and allows you to listen in and have a two-way conversation. -
Page 20: Auto On Hook
AUTO ON HOOK When the Auto On Hook feature is ON, Your ClearSounds CL600 will automatically discon- nect the line after 5 - 8 minutes if the phone is left off the hook. This will restore your line to be able to receive another call even if you leave the handset off the base. -
Page 21: Using The Speakerphone
While on a speakerphone call, lift the handset. USING AUDIO AND TELEPHONE HEADSET ACCESSORY JACKS Your CL600 Emergency Connect Phone is equipped with both an Audio and Telephone Headset Jack, providing total flexibility and multi-functionality Audio & Headset jacks are amplified, allowing you to adjust both the tone and volume. - Page 22 3. If using the headset jack, press the to answer the call. 4. Depending whether you are using the 3.5mm Audio/Neckloop Jack or 2.5mm Telephone Headset Jack follow the directions above (A, B or C) DIAGRAM #21 Audio & Telephone Headset Jack Location (See diagram #22).
-
Page 23: Using The Amplification Function
Using the Amplification Function The CL600 Phone has an AMPLI button that controls the loudness and tone of the hand- set. Without pressing the AMPLI button, you are able to amplify the handset up to 30 dB of amplification. Once the AMPLI button is pressed, an extra level of amplification is added providing 30 to 50 dB of gain and tone control. -
Page 24: Using The Volume Reset Override
Using your CL600 emergency connect phone with hearing aids Your CL600 Phone can be used with hearing aids equipped with a telecoil (T-coil). Adjust your hearing aid “T-switch” to the “T” position. Make sure to hold the handset close to your hearing aid. -
Page 25: Using The Outgoing Speech Volume
You can adjust the sending volume (outgoing volume up to 12 dB of gain) by using the Speech Volume Control located on the right side of your CL600 phone. If your voice is faint or weak, adjust the volume to “HI”. You can also decrease the volume as well. There are three levels available “LO, NORMAL &... -
Page 26: Battery Low Indicator
#32) DIAGRAM #29 Total & New Calls Message Waiting If you have Voice Mail Service from your local phone company, your CL600 phone will display MESSAGE WAITING if a recorded message has been left Message Indicator light (See page #28) (See diagram #29) (See diagram #31). -
Page 27: Viewing Incoming Calls
NOTE: Those numbers can also be saved to your Phone Book tions on setting up your phone book). NOTE: Your CL600 stores up to 99 call records before the memory becomes full. When the next call comes in, the oldest record is automatically deleted. -
Page 28: New Calls / Message Waiting Indicator
(See diagram #35) position: 1. If you do not have Caller ID or Message Waiting Service, your CL600 will alert you that you have missed a call by causing the red indicator light to flash. To turn OFF, simply tap the 2. -
Page 29: Turn On The Call Waiting Caller Id Feature
NOTE: Once a call is removed from call history, it cannot be retrieved. Call Waiting Your CL600 Phone also has a Caller ID with Call Waiting feature that works with your service from the local phone service provider. Caller ID with Call Waiting lets you see who’s calling before you answer the phone even when you’re on another call. -
Page 30: Cl600 Miscellaneous Feature Setting
Set Area Code / LDS (Long Distance Service) Code Your ClearSounds CL600 allows you to dial from your Caller ID memory and your phone- book. When you use your phone for the first time or if you have moved to a different area code, you need to enter your area code into the phone. -
Page 31: Lcd Screen Contrast
5. Press the OK button. 6. Using the arrow buttons, enter your area code. After each number press the OK but- ton. The phone accommodates up to six (6) digits (allows for International codes). Once you have entered your area code, even if you are not using all six (6) digits, press the OK button until you reach the <<SET LDS CODE>>... -
Page 32: Adjust Number Size
5. Press the OK button. 6. Using the arrow buttons, select <<DAY-MONTH>> or <<MONTH-DAY>>. 7. Press the OK button. 8. Press the C button twice to exit. Hour format You can choose between (2) two formats: 12 hours or 24 hours In the hook position, 1. -
Page 33: Review /Modify Number/Name
5. Press the OK button. 6. Enter the phone number using the dial pad. To erase the previous digit press the C button. Include 1 + area code if necessary. 7. Press & Hold the OK button after entering the correct phone number. 8. -
Page 34: Save Number From Caller Id
find the phone number you want to save. arrow buttons, highlight <<PHONE BOOK>>. arrow buttons, scroll to select <<REVIEW>>. arrow buttons, scroll through the numbers and select the arrow buttons, scroll through the numbers and select the (headset) button. Your CL600... -
Page 35: Auto On Hook
7. Press the OK button to exit. Auto On Hook Should you leave the CL600 or another telephone off the hook, when the Auto On Hook feature is ON, your ClearSounds CL600 will automatically hang-up the line after 5 - 8... - Page 36 1. Make sure you are pressing the correct sequence of buttons for storing numbers. 2. If you are interrupted by the telephone company’s recorded announcement telling you to hang up or by a loud buzzing noise, ignore and continue to store the num- bers.
-
Page 37: Maintenance And Care
Maintenance and Care The CL600 Emergency Connect Telephone has been designed to give you years of de- pendable service with a minimum of care. To ensure the utmost in performance, follow these guidelines in caring for your phone: 1. Avoid dropping or knocking the unit. -
Page 38: Specifications
FCC Part 68 rules and requirement adopted by the ACTA. A compliant telephone cord and modular plug is provided with this product. It is designed to be connected to a compatible modular jack that is also compliant. - Page 39 NOTICE: If your home has specially wired alarm equipment connected to the telephone line, ensure the installation of the CL600 does not disable your alarm equipment. If you have questions about what will disable alarm equipment, consult your telephone company or a qualified installer.
-
Page 40: Warranty And Service
N1H 6J2. Tel no: 519-822-5420 Fax No: 519-822-5462 Contact person: Mr. Don Beam. The US Service Center is ClearSounds Communications 8160 S Madison St - Burr Ridge, IL 60527 USA Tel No: 800-965-9043 V or 800-814-5359 TTY Fax No: 888-654-9219 e-mail: info@clearsounds.com Contact Name: Customer Service for repair or warranty information.
Need help?
Do you have a question about the CL600 and is the answer not in the manual?
Questions and answers