Table of Contents
Advertisement
Advertisement
Table of Contents

Related Manuals for Mercury CyperPix S830D


Summary of Contents for Mercury CyperPix S830D
- Page 1 Digital User’s Manual...
-
Page 2: Table Of Contents
Content Chapter 1 Attention 1-1Safety Precautions………..……………………..………...…...……3 1-2 Before Using Your Camera……...……………………………...3 1-3 Operation Caution………...…..…...3 1-4 Package Contents………...…...………...4 Chapter 2 Getting to Know Your Camera 2-1 Names of Parts………...……...…...…...…...5 2-2 Specifications...….7 2-3 System Requirements……………………………………………………………8 Chapter 3 Controls, Operation, and Display 3-1 LED Indicators………...…...…...…..….9 3-2 LCD Monitor Display………...………...……...……….9 3-3 Power Supply.…………………………………..……………………….………..10 3-4 Shutter Button………... - Page 3 5-4 Setting Up the OSD Language………... ……...…30 5-5 Setting Up the Date/Time……………………………………...….…..30 5-6 PC Mode…………………….………...………………………………30 Chapter 6 Driver Installation 6-1 Installing the Camera Driver for PC……………….………...………..32 Chapter 7 Application Installation 7-1 Installing the Application for PC ... ……...34 Appendix: PicBridge error types...
-
Page 4: Chapter 1 Attention
1. Attention Please read through this manual carefully before using the camera and follow the instructions to avoid damages caused by improper operation. 1-1 Safety Precautions ●The software CD-ROM packaged with the camera is designed for PC only. Using a stereo or CD player may damage the CD-ROM. ●This camera is a precision electronic device. -
Page 5: Package Contents
5. Locations subject to strong magnetic field. 6. Rainy or snowy environment. ●Do not open the battery cover when the power is on. ●If water has gotten into the camera, turn the power OFF and remove the batteries immediately. ●How to maintain your camera: 1. -
Page 6: Chapter 2 Getting To Know Your Camera
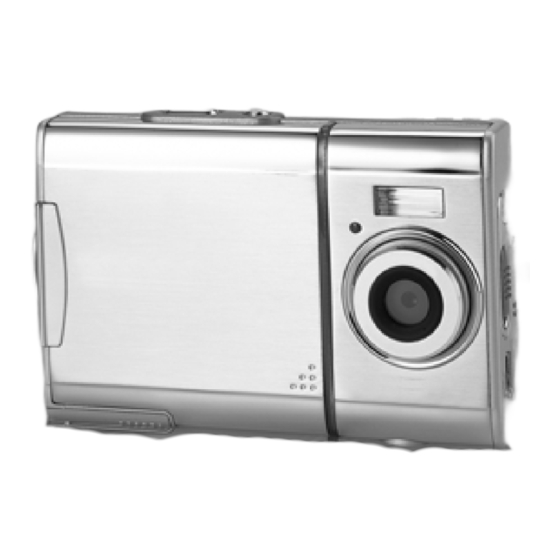
2. Getting to Know Your Camera 2-1 Names of Parts Front View (1) Shutter (2) Power Switch (3) Self-timer LED (4) Flash Light (5) Lens (6) Strap Holder (7) Battery Cover (8) Memory Card Slot (9) Tripod Socket (10) Microphone... - Page 7 Rear View (1) Macro LED (2) Status LED (3) Play back Button (4) Mode Button (5) Set Button (6) Function Key (7) Macro Button (8) USB/AV Port (9) LCD Monitor...
-
Page 8: Specifications
2-2 Specifications ● Lens: f=8.341mm ● Image Sensor: 1/2" CMOS with 3.0 mega pixels ● TFT LCD: 2” ● Focus: F / 3.0 ● Sensitivity: ISO 100 ● White Balance: Auto, Sunny, Tungsten, Fluorescent. ● Shutter: Electrical ● Shutter Speed: 1/4 sec. ~ 1/2000 sec. ●... -
Page 9: System Requirements
● Weight: About 117g (batteries excluded) 2-3 System Requirements When operating the digital camera, we strongly recommend you to use a better computer system for optimal performance. The minimal system requirement for digital camera is as follows: (For Macintosh computers, only... -
Page 10: Chapter 3 Controls, Operation, And Display
3. Controls, Operation, and Display 3-1 LED Indicators The meanings of the LED indicators located on the top of the LCD monitor are: Macro LED Standby/Busy (Green LED) (Red LED) The green LED will be on when the Macro key on the left hand side of Macro (Left Green LED) the camera is switched to Macro mode. -
Page 11: Power Supply
3-3 Power Supply To turn on the camera, press the power button. ● ● To turn off the camera, press the power button. Press the power button on the top to turn on/off the camera. When the ● power is on, the red indicator will be blinking and the LCD monitor turns ※... -
Page 12: Shutter Button
3-4 Shutter Button This camera is designed for 2-step shutter function. A "[ ]" mark will appear ● in the center of the LCD monitor when the Shutter button is pressed and held half way down. The camera will beep after the Shutter button is pressed down fully;... -
Page 13: Image/Movie Play Button
3-8 Play Back Button 1. Press this button you can change to the Playback Mode (quick view). Capture Mode → Playback Mode → Capture Mode Movie Mode → Playback Mode → Movie Mode Press Shutter Key to play the video and Press again to pause the video play or Press Key to stop the video play. -
Page 14: Caputer Mode
4. Navigation Modes and Menus 4-1 Capture Mode This mode is the first one after the camera power is on. You can take your favorite pictures in this mode. (1) Current working mode (2) Memory Status (3) Number of pictures (4) Remaining battery power (5) Zoom lever (6) Flash light status... - Page 15 selection entry mode Press the MODE button very quickly to enter the following settings. Press MODE button again to Exit...
-
Page 16: Movie Mode
4-2 Movie Mode (1) Movie Mode (2) Recorded Movie Time (seconds) (3) Recording (4) Remaining Battery Power Operation guidance: (1) Firstly, turn on the power, and then press the MODE button to enter the mode-select-entry mode. Secondly, use the button to select the symbol ) of movie mode and press the SET button to enter. - Page 17 Press the MODE button quickly to enter the following settings...
-
Page 18: Playback Mode
4-3 Play back mode In playback mode, the user can review the records including pictures and movies stored in flash memory before. This mode includes four menu pages which are DELETE menu page, DPOF menu page, PICBRIDGE menu page and AUTOPLAY menu page. 0 0 0 2/ 0 0 0 2 (1)Number of pictures (2)Remaining Battery Power... - Page 19 jump to next image. If the camera has connected to a printer which supports the function of PICBRIDGE, the user can press the SET button to print the current image immediately. Use the USB/AV cable to connect camera and printer. As in PICBRIDGE menu page, if the user selected the select-one menu item in DPOF menu page, an image and some icons will be displayed on the LCD.
- Page 20 Slideshow Start Auto Play DPOF (Digital Print Order Format) Settings ● There are three options when printing images with DPOF: Printing one image, printing all images and the option of printing the recorded date or not. ● DPOF function can only be operated when the printer settings of the memory card is inserted, and not active with the internal memory of the camera.
- Page 21 PICBRIDGE When the camera has connected to a printer by a USB/AV cable which supports the function of PICBRIDGE, it can control the printer to print a single picture or all of pictures stored in the storage media. During the printing, the printer’s status information including a variety of error messages will be displayed on the LCD.
- Page 22 ※ When you enter the PICBRIDGE menu page, the camera system will give a hint that you must insert the USB/AV cable which has connected to a printer. Only when the printer supports the function of PICBRIDGE, you...
-
Page 23: Setup Mode
can enter the print-setting interface, and then start to print the pictures. ※ If there are some error messages on the LCD during printing, please refer to the error- types-table in the appendix. (see Page 38) 4-4 Setup Mode In this mode, you can complete some special settings. There are two menu pages in this mode which are system page1 and system page2. - Page 24 ※ If the extend card has two level directory of DCIM (parent directory) and 100FSCAM (sub directory), the file will be copy to 100FSCAM. On the contrary, the system will firstly create the DCIM and 100FSCAM directory automatically, and then copy the files to 100FSCAM. ※...
- Page 25 Power Down When pressing button, the highlight bar will move to POWER DOWN 「 」 menu item, and then press the SET button to enter the sub page OSD Language Press the button to jump to SYSTEM page2 . The LANGUAGE menu item 「...
-
Page 26: Pc Mode
When pressing button, the highlight bar will move to TV menu item, 「 」 and then press the SET button to enter the sub page. Press SET to enter sub page Power Frequency When pressing 「 」 button, the highlight bar will move to FREQUENCY menu item, and then press the SET button to enter the sub page. -
Page 27: Mode Selection Entry Mode
Available functions of this mode: (1) In the PC connection page, the user can press mode which includes MASS STORAGE and PC CAMERA. (2) In this menu page, the user can press the SET button to set the USB mode. After press the SET button, there will be a USB symbol flickering. - Page 28 MODE...
-
Page 29: Chapter 5 Preparing Your Camera
5. Preparing Your Camera Attaching the Strap ●Insert the thin end of the strap into the strap holder. ●Pass the other end of the strap through the loop. ●Pull the strap tightly. 5-2 Loading Batteries ●Turn the camera off first. ●Insert 2 x AAA alkaline batteries or rechargeable batteries. -
Page 30: Loading And Removing The Memory Card
battery power indicator turns red) the camera would automatically turn off. ●Slide the battery cover open in the direction indicated by the arrow. ●Insert the batteries according to the indication on the inner side of the cover. ● Close and lock the battery cover. NOTE: Do not open the cover roughly to avoid damaging the battery compartment cover. -
Page 31: Setting Up The Osd Language
Mode Button to Format of the Setup Mode the memory card. ● There is 16MB internal memory built-in in the digital camera for Image Storage. If the memory card is inserted, it will be the top priority for saving data. - Page 32 8. You may start to operate with the newly added removable disk (SD device) offered by the digital camera. ● PC Camera The digital camera can be treated as a PC camera or a Web Cam. Please follow the instructions mentioned below: 1. Please follow the steps of “software installation, camera driver” to complete the installation of the camera driver.
-
Page 33: Chapter 6 Driver Installation
6 Driver Installation 6-1.Installing the Camera Driver for PC You can use the "Mass Storage" and "PC Camera" functions of the camera in the PC. To install the proper camera driver, perform the following: 1.Insert the Software CD supplied by the package into the CD-ROM drive. 2.The Auto-run program will be executed and the welcome screen will appear the following message: (If your CD-ROM drive doesn't support the auto-run function, please double click on the "My Computer"... - Page 34 7. After the installation is completed,the following screen will appear,press "Finish" to complete application installation.
-
Page 35: Driver Installation
7 Driver Installation 7-1.NewSoft application installation (In case of MP38) 1.Insert the Software CD supplied by the package into the CD-ROM drive. 2.The Auto-run program will be executed and the welcome screen will appear the following message: (If your CD-ROM drive doesn't support the auto-run function, please double click on the "My Computer"... - Page 36 6.Press "Yes" to accept the conditions of Legal Disclaimer and continue the installation. 7.Please select the area of language,then press "Next" to continue. 8.Entering the application setup screen, press "Next" to continue. 9.Press "Yes" to accept the conditions of Software License Agreement and continue the installation.
- Page 37 10.Please follow the installation wizard to select the folder location. 11.Please select the program folder name. 12.After the installation is completed, the following screen will appear. Press "Finish" to complete the application installation.
- Page 38 13. After the Multimedia Software is completed,the following screen will appear, press "Ok" to continue. 14. Entering DirectX9 setup screen, press "Ok" after the content is confirmed.
- Page 39 Appendix: PicBridge error types Type Value Description Paper related error (default) Paper is empty Load Error – paper not loaded correctly Eject Error – paper not ejected correctly Paper Media Error – paper not detected, paper skewed, roll paper cannot cut or turn off Paper jam Paper nearly empty Paper type / paper size combination not supported or paper...
Need help?
Do you have a question about the CyperPix S830D and is the answer not in the manual?
Questions and answers