Table of Contents
Advertisement
Quick Links
Advertisement
Table of Contents

Subscribe to Our Youtube Channel
Related Manuals for Mercury Stereo 12


Summary of Contents for Mercury Stereo 12
- Page 1 Mercury Stereo System User Guide Version 1.1...
-
Page 2: Table Of Contents
Manual Lensboards.........................13 Compatible Lenses.........................14 Base Spacers...........................16 Focus Spacers..........................16 Film Backs............................18 Mercury 65/70mm Panoramic Back....................19 Mercury 65mm Cut Film Back.......................24 Horseman 120 6x12 Back.......................27 Linhof Techno Rollex........................28 Da Yi 120 6x12 Back........................30 Large Format Sheet Film Holders....................33 Grafmatic............................34 Glass Plates and Tintypes.......................37 Instant Film.............................37... -
Page 3: Introduction To Medium Format Stereo Photography
Which Shutter?..........................60 Part IV: Viewing in 3D: Digital........................61 Compositing Digital 3D Images......................61 Screen Viewing............................62 Formatting Digital Images for a Mercury Parlorscope...............63 Xperia 1 series: 3840 x 1644......................64 Xperia Z5 Premium or XZ Premium:.....................64 Viewing Digital Images on your Mercury Parlorscope..............65 Parlorscope Optical Adjustments....................66... - Page 4 a film strip (negative or positive) without any wasted distance between them, maximize the resolution available for human viewing, and produce a “full field” image that, when reproduced at a 1:1 ratio (without shrinking or enlarging), perfectly fill the human visual field with a minimum of optical distortion.
- Page 5 The result was the Mercury Stereo 12, a full system that can make use of ground glass (with a full range of accessories), many different film formats (4x5 sheet film, 120 film, 70mm film, and even, experimentally, 135 film in a panoramic format), instantly interchangeable backs (switch from slow film to fast, BW to slide, etc.), and an interchangeable lens system that allows you to use 23 different...
- Page 6 entered the third dimension because no comparable tools were available, this camera is for you. Or if you are a camera tinkerer who would like to build on and innovate with an open platform in the world of stereography, this camera is for you. I can honestly say that no piece of equipment has ever reinvigorated my love of photography more than this camera.
-
Page 7: Part I: Camera Basics
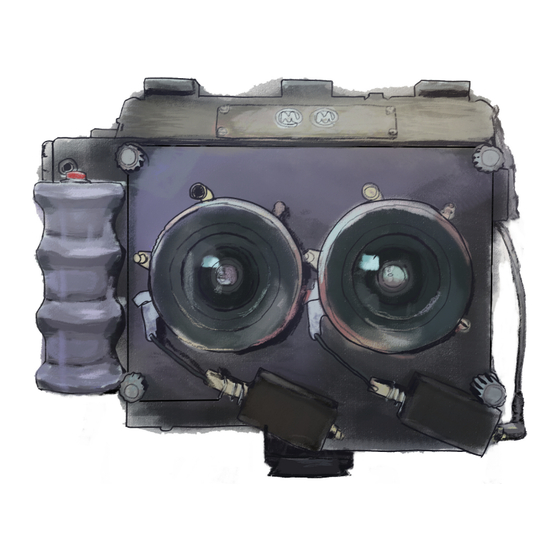
Getting to Know Your Stereo 12 The Mercury Stereo 12 is a modular platform, and as such it's difficult to define what a typical, singular camera looks like. But in this section we'll examine an example configuration, noting the most... - Page 8 The main thing the customer has to do once they receive their Mercury Stereo 12 is obtain and mount two shutters. The lenses then just screw into the shutters. Any set of lens elements (the glasses pieces that screw in) can be screwed into an assembled TLR Lens Board;...
- Page 9 Focus Spacer: The second spacer, nearest the lensboard, is the focus spacer. Each spacer produces a zone of focus: the distance between which everything is sharp. Stereo photography is not about focusing on a subject, but rather making sure that your set of most important subjects within the range of depth that is your actual subject, fall within a particular focus zone.
-
Page 10: Getting To Know Your Camera
Grip: The grip protects some electrical connections, and thus shouldn't be removed. However, it is replaceable should the need arise. Quick Release Strap hole: Each side of the camera possesses one of these holes, which is internally curved and designed to accept most quick release straps. Remote port: This 2.5mm jack allows you to connect a remote trigger. - Page 11 Lensboard Cable: This 3.5mm stereo Male-Male cable makes the electrical connection between the Stereo 12 body and electronic lensboards. Only disconnect this cable if you are changing lensboards. Side Handle connection: These threads adhere to the SmallRig side handle specification for cinema cage side handles.
- Page 12 Alkaline batteries. Lithium batteries last much longer, but have less power and can lead to inadequate triggering. Do not use rechargeable batteries—they don’t have enough amperage, and their internal circuitry will likely shut them down due to the Stereo 12’s unique circuitry.
- Page 13 This makes them more delicate, but they are still durable. Just like the Stereo 12, the Stereo M has a built-in Arca Swiss compatibel QR foot; the only difference is that the foot is shorter on the Stereo M, making it more compact to transport or store.
-
Page 14: Lens Options
The Stereo 12 is the appropriate camera to use in these situations. Most “regular” photography can be accomplished, on a tripod or handheld, with just a bit of practice. The Stereo M is also compatible with the vintage Olympus Double Cable Release. This will cost more, but some users prefer its single-plunger design, obviating the need to press both plungers simultaneously. -
Page 15: Manual Lensboards
A version with standard 62.5mm stereo base also exists if you are shure that you shutter configuration is compatible. Mamiya TLR: This accepts two Mamiya TLR shutters. They must be actuated via two cable releases. Unlike the Stereo 12 Electronic version of this lensboard, no aperture preview method is build-in to this... -
Page 16: Compatible Lenses
Compatible Lenses Most lenses that meet the following requirements are compatible with the Stereo 12 and M: Front elements no larger than 60mm in diameter (usually this translates to a 58mm filter thread) ... - Page 17 Manufacturer Mount Spacer Filter Size Depth Super Angulon 47mm f/5.6 Schneider none Apo-Digitar 47mm f/5.6 XL Schneider none Pinhole 50mm (0.3mm) Mercury pinhole none Bronica 50mm f/2.8 MC (ETRS) Bronica Mamiya Sekor 55mm f/4.5 (TLR) Mamiya Apo-Digitar 60mm f/4 Schneider 40.5...
-
Page 18: Base Spacers
Lens recommendations can be found at www.mercurystereo.com Detailed instructions for mounting shutters to Mercury lensboards are found in our supplemental document, “Lens and Shutter Assembly” and our video, How to Assemble Your Mercury Stereo 12 Lensboard. Base Spacers Almost all lenses require a base spacer. Base spacers are named after their total thickness. For example, a Base 12 is a spacer 12mm thick. -
Page 19: Focus Spacers
Mercury Works or 3D print your own using our files. Focus Spacer Labels: Stereo 12 focus spacers are designed such that they have a flat surface near their base that perfectly fits a single row of text from our Stereo Lens Info spreadsheet. You will notice that there are some sheets in the spreadsheet that are formatted with a black background and a subset of information. - Page 20 To mount this module, you must first replace your standard Stereo 12 Grip with the Front Rise Grip. It has a smaller profile, enabling the Front Rise system to fit. To remove your original grip, use a Torx...
-
Page 21: Film Backs
We have to machine and rebuild a vintage Graflex RH50 back (not itself compatible with the Stereo 12), modify its frame counter, refurbish, and add many features to it, but the result is a back that can accept 70mm aerial and portrait film, 65mm motion picture film, and even 120 film (with some limitations). -
Page 22: Mercury 65/70Mm Panoramic Back
70mm film as well as 65mm motion picture film (the film used for IMAX) using Mercury Works 65mm Cassette Spools (a set of which is included with this back). You will need two metal 70mm cassettes, which are sold separately (available via Ebay, and sometimes available from Mercury Works). - Page 23 ● Can be printed to medium format slides (just like IMAX 70mm exhibition) M-Alchemy, the Mercury Works film lab, can process any 65mm and 70mm film, in any length up to the maximum. We can also print beautiful slides from your negatives using the motion picture industry’s print film technology (as used in IMAX 70mm exhibition).
- Page 24 Note that the lever is only advancing when you feel tension. Sometimes your half stroke will happen before the full stroke (i.e., you’ll only feel tension start at the halfway point of the stroke). The other 50% of the time you will have tension from the beginning of the stroke, in which case, your second stroke will be the 0.5, and you’ll only advance it to the halfway point.
- Page 25 Shooting 120 film in the Mercury Panoramic Back While this back is primarily designed for long-roll medium format (65mm or 70mm), it is also possible to shoot 120 film in it. It isn’t as convenient as a dedicated 120 back, but it can be really handy if you primarily want to shoot 65mm and only occasionally want to shoot 120, or if you only want to bring one back with you on a trip and want a backup option in case you need to purchase film locally, etc.
- Page 26 Now load the backing paper as usual: pull it around the front of the film insert, then back around the takeup spool. Use the back’s advance lever to begin to wind the paper around the takeup spool. As you advance, the “Start” line on the backing paper will begin to travel across the insert.
-
Page 27: Mercury 65Mm Cut Film Back
Mercury 65mm Cut Film Back This is the least expensive back available for the Mercury Stereo system, as well as the lightest and smallest. It is a modified 4x5 (large format) sheet film holder, with added mounting grooves and a film path designed for 65mm motion picture film. - Page 28 The downside to these backs is that you must load them in darkness (a dark room or a changing bag). To load, use the Mercury 65mm Cut Film Guide. Just unroll a bit of film from the end of one of our bulk 65mm rolls and slide it, emulsion side down (i.e., the inside of the roll) into the groove of the Film...
- Page 29 Cut Film Accessories: To easily cut 65mm and 70mm strips of film to size in the dark (including adding corner notches that allow you to identify the emulsion side by feel if you later get mixed up), use our Cut Film Guide (available in two versions: one for 65mm film and one for 70mm film).
-
Page 30: Horseman 120 6X12 Back
(see below). The Horseman back is not cheap, though: it is only available used, and typically costs over $650 (and is thus more expensive than the Mercury 65/70mm Panoramic back). It is, however, much cheaper than the Techno Rollex (see below)! -
Page 31: Linhof Techno Rollex
This back produces a 56mm x 113mm usable image from the factory. It can, however, be machined by Mercury Works to modify it to a larger 56mm x 117mm image, enabling wider mounted slides (up to 48mm in most cases, up to 50mm in some). - Page 32 Linhof Technica cameras, which must be removed to work with some other Graflok cameras, including the Stereo 12 and Stereo M. This only takes a moment, is non-destructive, and doesn’t affect the function of the back. The small ridge near the base of the darkslide, held to the back...
-
Page 33: Da Yi 120 6X12 Back
Graflok 45 cameras, including the Mercury Universal and Mercury Stereo: We’ll provide this kit to any owner of a Mercury camera and the Techno Rollex, for free with any order. Just ask us! Da Yi 120 6x12 Back The Da Yi back is a currently-manufactured item from China. - Page 34 To work with the Stereo 12, you must remove this back’s extra screws that hold optional masks in place. This feature, to shoot smaller formats, is just a distraction. Removal of the mask-mounting screws does not expose any internal part of the back to light.
- Page 35 Our separate guide to this modification is available at www.mercurystereo.com. Mercury Works also offers, on a limited basis, a modification service to perform this modification on your back. Our version of the modification includes the installation of a film box clip to the back that also covers the...
-
Page 36: Large Format Sheet Film Holders
Standard 4x5 sheet film holders are not Graflok 45 compatible: they don't have the proper ridges to lock onto Graflok sliders. They do, however, perfectly slot into the Mercury Stereo 12. Instead of using the sliders to lock the sheet film holder in place, you will need to string two rubber bands over the back of the camera to hold it tightly in place. -
Page 37: Grafmatic
The main limitation of this back is that by default it includes a metal frame number mask wheel that eats into the usable image area on one side. This wheel needs to be removed for proper Stereo 12 use. Mercury Works makes a modified version of the Grafmatic that removes the wheel and also adapts its septums for any combination of 65mm, 70mm, or 4x5. - Page 38 Once you’ve loaded all of the septums you wish (with any combination of 4x5, 65mm, and 70mm), stack them together to that they are ready to insert into the Grafmatic: the large hole in each should be in the upper left corner. Arrange the septums in whatever order you prefer, with “Frame 1”...
- Page 39 Slide your complete stack back into the Grafmatic, hole-side first. Once they have slid all the way in, gently push them down against the spring and then slide the darkslide closed over them, holding them down in place. Close the darkslide completely, and then the full advance mechanism, until everything snaps back into its original size.
-
Page 40: Glass Plates And Tintypes
Wet plate backs hold only one wet plate at a time. When using wet plate with the Stereo 12 or M, be sure to clean all traces of any chemicals that spill into or touch the camera body soon after use, as collodion will damage the camera over time. -
Page 41: Essential Accessories
It is still available, for a premium price, used. While a new version of Type 100 film is being made as Instant, the larger 4x5 size required by the Stereo 12 has not yet been re-engineered. Essential Accessories Viewfinder Required when shooting without ground glass. -
Page 42: Camera Strap
Press cameras. Mercury Works makes a replacement foot for this finder. To replace the stock foot, just remove the two flathead screws on the original, lift away the foot, replace it with the Mercury version, and attach it using the original two screws. -
Page 43: Lens Caps
If you plan to shoot handheld for any length of time, we highly recommend a removeable side handle. This greatly improves the ergonomics of the Stereo 12, which has been engineered to accept some handles that conform to the Smallrig standard. Some handles have too short of mounting screws and can be modified. -
Page 44: Ground Glass Back
• Mercury Stereo 12 NATO adapter kit. This consists of a thin spacer that goes under your Mini NATO Rail and a replacement side cold shoe that conforms to the rail. If ordered at the same time as your camera, Mercury Works will install this for you. -
Page 45: Qr Clamp
If your tripod doesn't already have an Arca Swiss style QR base, we highly recommend getting one. The Stereo 12 has a built in QR plate meant to mount to this type of base. This is the most secure method of mounting your camera. -
Page 46: Mini Screwdriver Set
The Mercury Stereo Lens Shade system can be used with all lenses in our Recommended list. See Advanced Options for an explanation of the system. - Page 47 When used on-camera to protect a lensboard that is currently mounted, you use only the front shell. You need two front bolts that are at least 25mm longer than the bolts you are currently using. In practical terms, if you are using gray bolts, you’ll likely need red. If you’re using black bolts, you’ll likely need dark blue.
-
Page 48: Graflok 45 Rear Protective Cap
The Copal 0 Front Shell requires black bolts to couple with any Rear Shell. The Compur 00 Front Shell requires gray bolts to couple with any Rear Shell. Use of the Stereo 12 Shell system is very highly recommended for travel, backpacking, etc. Graflok 45 Rear Protective Cap This is a simple rear cover for your Stereo 12. -
Page 49: Mercury Stereo Toolkit App
Advanced Accessories Range Finder The Stereo 12 uses zone focusing, but if you are bad at estimating distances or want a more precise device, a vintage accessory range finder can be used. For more information and a comprehensive set of options with reviews, see the Mercury Range Finder Roundup at www.mercurycamera.com... -
Page 50: Ground Glass Loupe
This advanced device has two functions: to introduce a programmable delay before triggering your camera, or to precisely time a long exposure (1 second to 15 seconds, plus B). Both functions can be used on any shutters compatible with Stereo 12 Electronic Lensboards, including our Electric Pinhole lensboard. -
Page 51: Part Ii: How To Shoot A Stereo Photo With Your Camera
A comprehensive table of all spacers and their focus ranges at different f-stops can be found in the Mercury “Lens Focal Info” spreadsheet, available for download at www.mercurystereo.com. That spreadsheet can be printed to create labels for each lens-spacer combo that lists focal ranges at three different f-stops (circled below). - Page 52 (“W”). 3. Take a light reading. While a real light meter is the best way to do this, but if you don’t have one you can use any light meter app. Recommendations: Light Meter for Android, or Light Meter PRO for iOS. Input the ISO of your loaded film. Take a light reading with your phone. For stereo photography, because the goal is usually to maximize your depth of field, you generally want to choose the largest f-stop number you can, to maximize what is in focus (which increases the stereo depth in the image).
- Page 53 (c) Remove your lens caps. It’s easy to forget to do this when not using a ground glass back, since you are using a viewfinder and not looking through the lenses themselves when you are previewing! (d) Cock both of your shutters by moving the silver levers (circled below) to the left until they click in place.
- Page 54 Remove the two screws holding the battery cover in place. The Mercury takes two 9V batteries. We recommend using name brand Alkaline batteries. Lithium batteries last much longer, but have less power and can lead to inadequate triggering. Do not use rechargeable batteries—they don’t have enough amperage, and their internal circuitry will likely shut...
-
Page 55: Part Iii: Advanced Options
PART III: ADVANCED OPTIONS Shooting with Ground Glass If you are shooting in a controlled or slowly changing environment, the greatest precision is afforded by shooting on a tripod with ground glass. Large format photographers know the joy that this style of shooting brings. -
Page 56: Aperture Preview
Deluxe Mercury Ground Glass back, you can insert our hood or our magnifying viewer into the rails on the back. -
Page 57: Exposing Your Shot
Deluxe Ground Glass Back Accessories Unlike the basic Mercury Stereo ground glass, our Deluxe Ground Glass Back possesses two accessory rails that can be tightened or loosened with four thumbscrews. Accessories mount by sliding on either end of the back, under the accessory rails. -
Page 58: Mercury Stereo Lens Shade System
The eyepiece can be rotated to focus for particular viewers’ eyes. Mercury Stereo Lens Shade System This a fully modular system that consists of two parts: A Shade Base and a Shade. The Shade Base is rated by filter size: either the native filter size of the lenses you wish to use or the size of your step-up ring if using one (as we recommend). - Page 59 Thumbscrew Shade Shade Base To attach the Shade Base to your lenses, just press it on the front of your step-up adapter or lens until the front of both adapters are flush with the inside surface of the Shade Base. Shades come in 10mm increments from 25mm to 50mm.
-
Page 60: Shooting Hyperstereo And Close-Up Stereo
100mm + Shooting Hyperstereo and Close-Up Stereo The Mercury Stereo 12 is designed to emulate the human eyes, and records roughly the amount of depth perspective that we have (though this changes somewhat based on the focal length of the lens you use). -
Page 61: Extreme Hyperstereo
Of course, doing this will introduce all sort of potential alignment problems, but it's worth experimenting with! To calculate the proper base distance (between the two lenses/cameras), you can use the Mercury Stereo Toolkit app. -
Page 62: Extreme Close-Ups
In order to make this a functional port on a Mercury Stereo camera, you will need to mount the port on your lensboard and add a ground wire to it. -
Page 63: Which Shutter
Which Shutter? You can connect your flash or transmitter to either of your two shutters (not both). We recommend that you do an exposure test with both. Make sure that both your left and right images are exposed identically. This indicates that your flash unit is working well and you have a connected to a good shutter. -
Page 64: Part Iv: Viewing In 3D: Digital
Part IV: Viewing in 3D: Digital Compositing Digital 3D Images Once you have shot a stereo pair, you will need to edit and composite it into a 3D format before you can view it in full 3D. Pre-Editing You can edit your individual images like you would any other in a photo editing program such as Gimp, Photoshop, Lightroom, or Capture One. -
Page 65: Screen Viewing
5. If colors or exposure are inconsistent between the two images, use Image → Auto Correct Color to fix. Select the Left or Right side as your reference, and SPM will attempt to make the other images match. 6. When you’re happy with everything press “S” or select “Save” to save your stereo pair in side by side (SBS) format. -
Page 66: Formatting Digital Images For A Mercury Parlorscope
If you own, or will exhibit on, a Mercury Parlorscope, we highly recommend that you format your SBS digital images (see next section for analog slides) to optimize them for the particular phone model that you’re using inside the Parlorscope. -
Page 67: Xperia 1 Series: 3840 X 1644
Xperia 1 series: 3840 x 1644 1. Resize image to 2900 pixels wide (keeping the current aspect ratio). 2. If image height is now smaller than 1524, move to Step 3. If image height is now between 1525 and 1800, resize to a height of 1524 (keeping the current aspect ratio). -
Page 68: Viewing Digital Images On Your Mercury Parlorscope
Choose the option to center your image in the new canvas size. Save as a JPG for viewing. Viewing Digital Images on your Mercury Parlorscope Your Mercury Parlorscope can accept medium format slides or Sony 4K phones for digital viewing (if configured to do so; some versions of the Parlarscope omit digital viewing as a feature). -
Page 69: Parlorscope Optical Adjustments
This model uses a USB-C port. It will charge with any USB cable plugged into a USB power source. To connect the Mercury 2-key keyboard, you need a USB C (phone) to USB A (female) OTG cable, then a USB A to USB C cable to connect the keyboard itself. You can use the included OTG cable, or a splitter OTG cable that provides you with one USB A input and one USB C female input for charging. - Page 70 When in doubt, the IPD should be adjusted so that the lenses are at the center point. The Mercury Deluxe Parlorscope has physically larger lenses that do not have, and do not require, IPD adjustment. This viewer accommodates a wide range of IPD values. Accordingly, it possesses only focus adjustments: Due to the large, heavy lenses in this viewer, the focus adjustment must be kept quite firm.
-
Page 71: Part V: Viewing In 3D: Slides
1. Shoot 120 slide film. Kodak’s E100, Fuji’s Veliva 50, Velvia 100 (not available in US), and Provia 100 are all excellent slide films. They tend to be expensive, and must be processed E-6 (Mercury Works Lab processes this, as do some other labs). They are also slow (50 or 100 ISO) and have a very narrow dynamic range (about 6 stops). -
Page 72: Mounting Mf3D Slides In Standard Cardboard Mounts
Yi 6x12, Mercury 65/70mm, Mercury 135 Pano), you will usually use a 45mm wide window. Slide mounts of this width can be purchased directly from Mercury Works. If you shot with a 120mm modded Da Yi back, or a 4x5 sheet film holder, you can use between a 45mm and 50mm wide window;... - Page 73 4. Position one of your chips. At this point your should put on cotton gloves. I recommend this procedure: (a) Choose either the top of bottom of the slide to be your reference edge. The other one will get partially masked (how much depends on which slide mount you’re using). For instance, if your photo is a portrait and you like the headroom, choose the top as your reference edge.
- Page 74 Without needing to remember these numbers, and to very easily measure your slide distances, we have created the Mercury Depth Gauge. To use it, simply place the bottom of the gauge between the nearest two homologs in your image. If they fall within the white zone, they are legal.
-
Page 75: Viewing Mf3D Slides In Mercury Parlorscopes
Let dry for at least several hours (overnight to be extremely careful). 8. Test your slide out in a Mercury Parlorscope or other MF3D viewer and bask in its glory! Viewing MF3D Slides in Mercury Viewers Mercury Works makes three high-quality medium format viewers: Our flagship Deluxe Parlorscope, our more immersive Immersive Parlorscope, and our less expensive, steal-the-light Comfort Viewer. - Page 76 As dust and debris build up inside the slide carrier, it can be cleaned with a lens-cleaning cloth or (recommended) an anti-static cloth. Mercury Works makes a number of slide carriers, for different types of slides: 80x132mm cardboard slides: the standard MF3D slide mount. These mounts are available from Mercury Works and other companies and individuals online.
-
Page 77: Part Vi: Working On, Expanding, And Caring For Your Camera
While Mercury makes lensboards for most common shutters (see table below), there are many vintage shutters that we haven’t tested with the Stereo 12 but which would work just fine. A shutter will generally be compatible if it isn’t larger in diameter (including controls and ports) than 60mm, but... -
Page 78: Supported Shutters
Only set-and-release shutters are compatible with electronic actuation. Also, some shutters may be physically compatible with the Stereo 12 but you won’t be able to orient their actuation levers in a way that makes them electronically triggerable. In either of these cases, the shutters can still be used without electronic actuation. -
Page 79: Manual Lensboards
Electric Pinhole Includes switchable pinholes for 50mm and 70mm focal lengths. Regular electronic actuation or digitally timed with optional Trigger Controller. Also manually triggerable with two manual cable releases. Manual Lensboards (Stereo M and Stereo 12) Lensboard Notes 0 Manual Compatible with Copal 0, Copal 0 Press, Compur 0, Seiko/Fujinon large format size 0 shutters (not Seiko SLV). -
Page 80: Troubleshooting
The most delicate aspect of the Stereo 12 system is its electronic lensboard. When traveling with the camera in a backpack of suitcase we highly recommend protecting your lensboard with a Mercury Lensboard Shell (see Advanced Accessories section of this Guide for details). - Page 81 ● We always recommend that you protect your lensboards with our Lensboard Shells, as the most vulnerable components are their actuators. An impact or great deal of pressure against them can in some cases snap them off the lensboard. If this happens, you can glue them back together. We recommend using rubber cement or E6000: glues with some flex.
Need help?
Do you have a question about the Stereo 12 and is the answer not in the manual?
Questions and answers