Table of Contents
Advertisement
Advertisement
Table of Contents

Related Manuals for Xtool Key & Chip KC501


Summary of Contents for Xtool Key & Chip KC501
- Page 1 KC501 Key & Chip Programmer User Manual...
-
Page 2: Copyright
Intelligent CO., LTD. In countries that the trademarks, service marks, domain names, logos and the name of the company are not registered, Xtool claims that it still reserves the ownership of the unregistered trademarks, service marks, domain names, logos and the company name. -
Page 3: Declaration
Xtool. Use the device only as described in this manual. Xtool is not responsible for any consequences of violating the laws and regulations caused by using the product or its data information... -
Page 4: Cautions
Do not switch off the power or unplug the connectors during testing, otherwise you may damage the key programmer. AUTIONS Avoid shaking or dismantling the unit as it may damage the internal components. Do not use hard or sharp objects to touch the LCD screen. ... -
Page 5: Table Of Contents
ONTENT TRADEMARKS..................I COPYRIGHT..................... I DECLARATION..................II OPERATION INSTRUCTIONS............. II CAUTIONS!.....................III AFTERSALES-SERVICES..............III 1 GENERAL INTRODUCTION............. 1 Exposed View of KC501................2 Technical Specifications................4 Accessories......................5 2 HOW TO USE..................8 Program Keys & Emulators................8 Read Remote Frequency................9 Read Transponder ID & Chip Type............. 9 EEPROM Reading &... - Page 6 3 SUPPORT LIST................. 27 Key Programming Support List..............27 EEPROM Support List................. 30 Ecu Support List....................35 4 TROUBLESHOOTING..............36...
-
Page 7: General Introduction
Read & write Mercedes-Benz infrared key Read & write MCU/EEPROM chip This programmer could be used on all the advanced Xtool diagnosis/key programming tablets or PC/laptops with KC501 Studio installed. Some of the Xtool tablets (e.g., P700 series) doesn’t ... -
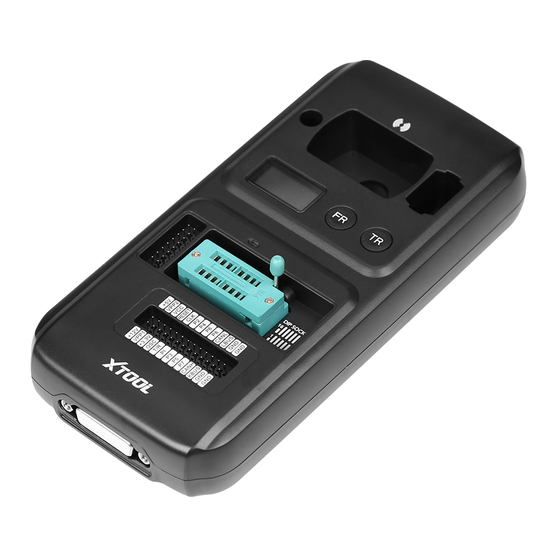
Page 8: Exposed View Of Kc501
working on MCU/ECU reading & writing process. USB-B Port: Provides data transmission between KC501 and Xtool devices or PC. Also provides 5V power supply when connected. DB 26-Pin Port: Can be connected with Mercedes-Benz infrared cable, ECU cable, MCU cable and MC9S12 cable. - Page 9 Cross Signal Pins: Holds the MCU board, MCU spare cable or DIY signal interface. The Cross-shaped signal pin is used to place MCU board, MCU spare cable or DIY signal cable to read or write MCU and ECU chips. Locker: Locks the EEPROM component transponder slot to make sure it is functioning.
-
Page 10: Technical Specifications
14 Remote Control Transponder Induction Area: Used to read and write remote control transponder data. 15 Mercedes Infrared Key Slot: Used to read or write Mercedes vehicle key data. TECHNICAL SPECIFICATIONS Item Description Display 0.96-in 128x64 Monochrome OLED screen Input Voltage 5V (USB-B)/12V (DC) Working -10~50℃... -
Page 11: Accessories
ACCESSORIES FQFP Boards: Weld microcontrollers on these boards to make jump wires more easily. 5 different boards are fitted inside the KC501 inventory, corresponding with microcontrollers with different pins (64/80/112/144/176). When welding the microcontroller, please note thatt the white dot refers to the pin 1. - Page 12 IC Clip Cable: A chip clip to read & write EEPROM chip without sealing-off the chip from the module. Please check “How to use – EEPROM” for more information on using this clip & cable set. Color Cable: Could be connected to 26-pin connector and used to jump wires for reading &...
- Page 13 & writing. To do that, connect the DB26 socket to the KC501, and jump wires onto the modules. Please check on Xtool tablets for connection details. USB3.0 to USB-B Cable: Connect KC501 with Xtool tablets or PC/laptop for data transferring and power supply for KC501.
-
Page 14: How To Use
When you’re using KC501 to your tablet for the first time it will tell you to bind the device to the tablet. If you want to use the device on another tablet after that, please find a PC or laptop, and contact your dealer or Xtool aftersales services. -
Page 15: Read Remote Frequency
READ REMOTE FREQUENCY KC501 allows you to recognize the frequency of the remotes. To do that, please do as follows: 1) Connect KC501 to any of the power supplies. 2) Insert the key into the slot (remote signal-radiation side down). 3) Press “FR”... -
Page 16: Eeprom Reading & Writing
EEPROM READING & WRITING INSTALLING EEPROM CHIP There are multiple ways to install EEPROM chip. Different methods require different accessories. 1) Install EEPROM directly a. Switch the locker up to unlock the slot lock. b. Put the EEPROM chip inside the slot. Remember to recognize the pin 1 on the chip and place the pin on the right-bottom corner of the slot. - Page 17 2) Via EEPROM PCBA a. Take out the PCBA and weld (or install) the EEPROM chip onto it. b. Turn the side with characters to the front (which will make characters upside down). c. Install the entire PCBA onto KC501 and connect it to the cross-signal pins.
- Page 18 3) Via IC test stand a. Turn the IC stand and make the pins inside the stand located to the right-side. The right-bottom corner of the stand indicates that’s pin 1. b. Press the locker on the stand and put the EEPROM chip inside it.
- Page 19 4) Via IC clip cable (no sealing-off required) a. Switch the locker on the KC501 up to unlock the slot lock. b. Insert the pin-side of the clip cable inside the slot. Remember to recognize the pin 1 of the clip cable, which is the wire that marked red.
-
Page 20: Read & Write Eeprom On Tablets
READ & WRITE EEPROM ON TABLETS Here we will show how to read & write EEPROM data using Xtool tablets. 1) After installed the EEPROM chip, connect KC501 to the tablet, then go to Special Function – EEPROM Adapter. 2) Select Read/Write EEPROM menu, select “KC501” menu, then find the EEPROM brand, the model and the scale on the following menus. - Page 21 3) There are 3 options under this menu. From Operation document menu you can find the way to recognize pin 1 on the EEPROM chip. We will click “Read data” first. 4) Now KC501 will read the data from the EEPROM chip. After it is done, you can edit the name of the EEPROM file and save it.
- Page 22 5) After the file is successfully saved, a notice will pop up and ask you if you need to edit the data. Click “Yes” to start editing, click “No” to exit reading process. You can also go to File Browser menu to edit the EEPROM files.
- Page 23 6) To write the data, click “write data” menu, then select the data you need to write. Click “Yes” to start writing.
-
Page 24: Read & Write Ecu/Bcm Data
7) Write successfully. READ & WRITE ECU/BCM DATA Here we will show how to use KC501 and Xtool tablets to read & write ECU/BCM data. Please check Support list for all the ECU/BCM we supported. For some of the operations, 12V power supply will be needed. We suggest... - Page 25 1) Connect KC501 to the tablet, go to EEPROM Adapter – Read/Write ECU data, and select the ECU/BCM you want to operate. 2) Open “Operation document” first to get the wiring diagrams for specific ECU/BCM. Use the XTA wiring harness or DuPont cable to connect the ECU and the KC501.
- Page 26 3) After it is done, click “Read data” to read the data from the ECU/BCM module. 4) After the ECU has done reading, you can edit the name of the file and it will save as a BIN file. The path will be shown on the screen.
- Page 27 5) After it is saved, you can also edit the file. It will pop up a notice after saving the file, then click “Yes” to check and edit the file, click “No” to exit the process. You can also go to File Browser menu to edit the data files.
- Page 28 7) Write successfully.
-
Page 29: Functions On Pc/Laptop
Before programming on PC or laptops please make sure you have installed “KC501 Studio” application on your devices. To download it, please go to Xtool official website, find Support – Download Center – Upgrade tool - KC501 and download the install pack. -
Page 30: Read & Write Eeprom With Pc/Laptop
READ & WRITE EEPROM WITH PC/LAPTOP 1) Select the correct EEPROM brand, model and scale, or click “Open” and find an existing BIN file. 2) Click “Read” button and wait for a while. The results will show on the interface, and you can edit it directly, or save it as BIN file. -
Page 31: Read & Write Transponder Chip With Pc/Laptop
3) If you need to write data, press “Write” button to write the file that already opened to the EEPROM chip. READ & WRITE TRANSPONDER CHIP WITH PC/LAPTOP Now this function only works on ID46/48 keys. Let us take one as an example. - Page 32 2) Select the key that you’re reading, and the interface will be changed. 3) Click “Read” for each column and it will show corresponding data. You can also edit the reading results and click “Write” to replace the data.
-
Page 33: Support List
UPPORT This is the support list updated on 3/7/2022. Please note that the support list will add functions as Xtool releases new updates, please check with Xtool official for latest updates. KEY PROGRAMMING SUPPORT LIST Model Manufa Models Year/IMMO... - Page 34 Chip) FBS3 IMMO Mercede Generate Infrared (Infrared s-Benz key) EWS2/EWS Generate Only EWS4 3/EWS4(44 key/Read&write D- supports read Chip) FLASH EEPROM CAS1/CAS2/ Generate pre- CAS3(46 processed key Chip) Generate CAS4(49 key/Read&write D- Chip) FLASH Read&write FEM/BDC EEPROM data Generate dealer 46 Chip Promaster CHRYS...
- Page 35 Generate dealer For all key lost Captur 2014+ situations Generate dealer For all key lost Clio IV 2016+ situations Generate dealer For all key lost Espace V situations Generate dealer For all key lost Kadjar IV situations Megane/Sceni Generate dealer For all key lost 2015+ c IV...
-
Page 36: Eeprom Support List
S60、S80、 Read D-FLASH For all smart XC60、 2008-2017 and obtain PIN XC70、V40、 code programming V70、V70 XC S60、S90、 Read D-FLASH V60、XC40、 2018- and obtain PIN code XC60、XC90 EEPROM SUPPORT LIST Manufacturer EEPROM Chip Type 24C01 24C02 24C04 24C08 24C16 24C32 24C64 24C128 24C256 24C512... - Page 37 AT25256 AT93C46 AT93C56 AT93C56A AT93C56B AT93C57 AT93C66 AT93C66A AT93C66B AT93C86 S24C01 S24C02 S24C04 S24C08 Seiko S93C46 S93C56 S93C66 S93C76 S93C86 M24C01 ST24C01 M24C02 ST24C02 M24C04 ST24C04 M24C08 ST24C08 M24C16 ST24C16 M24C32 M24C64 M93C46 ST93C46 M93C56 M93C66 M93C76 M93C86 ST95010 M95020...
- Page 38 ST95020 M95040 ST95040 M95080 ST95080 M95160 M95160-R M95160-V M95160-W ST95160 M95320 M95320-R M95320-V M95320-W ST95320 M95640 M95640-R M95640-V M95640-W ST95640 M95128 M95128-R M95128-V M95128-W ST95128 M95256 M95256-S M95256-V M95256-W M35080 M35160 X24C01 X24C02 X24C04 Xicor X24C08 X24C16 X25160 XLS24C02 EXEL XLS24C04...
- Page 39 XLS93LC06 XLS93LC46A XLS93LC46B XLS93LC46 XLS93LC56 XLS93LC56A XLS93LC56B FM24C02 NM24C02 FM24C04 NM24C04 FM24C08 NM24C08 Fairchild FM24C16 NM24C16 NM24C32 FM93C66 FM93C66A NM93C86 24C02 24C04 24C32 93046 93C46A 93C46B 93C56 93C56A MicroChip 93C56B 93C56C 93C66 93C66A 93C66B 93C66C 93LC66A 93C76 93C86 FM24C04 Ramtron FM24C16 FM24C64...
- Page 40 FM25160 93046(16) 93046(8) 93C56(8) 93C66(16) MicroWire 93C66(8) 93C76 WP0 93C76 WP1 93C86 WP0 93C86 WP1 CAT93C46 CAT93C56 CAT93C57(16) Catalyst CAT93C57(8) CAT93C66 CAT93C76 CAT93C86 CAT93C46 HOLTEK CAT93C56 93046(16) 93046(8) 93C56(8) 93C66(16) 93C66(8) 93C76 WP0 93C76 WP1 93C86 WP0 93C86 WP1 CAT93C46 CAT93C56 CAT93C57(16) ON Semi...
-
Page 41: Ecu Support List
ECU SUPPORT LIST Manufactu Models MCU Type EWS2 EWS3 EWS4 MC9S12DJ64 CAS2-2K79X MC9S12DG256 CAS3-0L15Y MC9S12XDP512 CAS3-0M23S CAS4-1L15Y CAS4-5M48H CAS4-1N35H MC9S12XEP100 CAS1-0K50E UNKNOWN MEVD1725(N13) Footwell for E-Chassis MC9S12XEQ384 BCM-2M25J BCM-1L15Y MC9S12XET512 Porsche BCM-5M48H MC9S12XEP100 BCM-1N35H BCM2 UPD70F3378 J518(-2010) Audi MC9S12DG128 J518(2010-) Steering lock HC08GR16-V1 MC68HC908GR16 EIZ-W211(ST12)... -
Page 42: Troubleshooting
ROUBLESHOOTING Here we will point out some of the common issues when using KC501 and how to check or solve by yourself. Q1: The lights on the device glows dimly. A1: Try checking following this order: Check USB cables. Make sure you are using original cables from KC501. - Page 43 A4: This KC501 has already been used on other devices. Please find a PC, then contact Xtool aftersales services. Q5: I was using KC501 on supported Xtool tablets, but it showed “Hardware not supported”. A5: Make sure you have downloaded “IMMOBILIZER-KC501LIB”...
- Page 44 ., L HENZHEN TOOLTECH NTELLIGENT Company address: 17&18/F, Building A2, Creativity City, Liuxian Avenue, Nanshan District, Shenzhen, China Factory address: 2/F, Building 12, Tangtou Third Industrial Zone, Shiyan Street, Baoan District, Shenzhen, China Service Hotline: 0086-755-21670995/86267858 Email: marketing@Xtooltech.com Fax: 0755-83461644 Website: www.Xtooltech.com...
Need help?
Do you have a question about the Key & Chip KC501 and is the answer not in the manual?
Questions and answers