Table of Contents
Advertisement
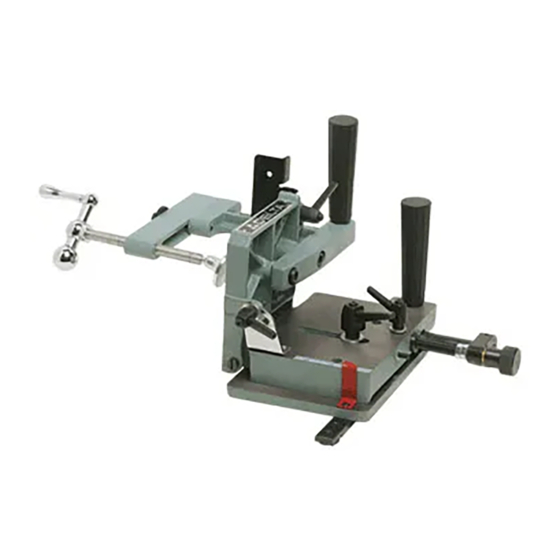
Tenoning Jig
Gabarit à
tenonner
Espigadora
- 01-13-06_RevA
A15102
Copyright © 2006 Delta Machinery
10" Contractors Saw
Instruction Manual
Manuel d'Utilisation
Manual de Instrucciones
FRANÇAIS (15)
ESPAÑOL (29)
www.deltamachinery.com
(800) 223-7278 - US
(800) 463-3582 - CANADA
34-183
(Model 36-978/36-979)
Advertisement
Table of Contents

Related Manuals for Delta 34-183


Summary of Contents for Delta 34-183
- Page 1 34-183 10" Contractors Saw (Model 36-978/36-979) Tenoning Jig Gabarit à tenonner Espigadora Instruction Manual Manuel d’Utilisation Manual de Instrucciones FRANÇAIS (15) ESPAÑOL (29) www.deltamachinery.com (800) 223-7278 - US (800) 463-3582 - CANADA - 01-13-06_RevA A15102 Copyright © 2006 Delta Machinery...
-
Page 2: Table Of Contents
Machinery strongly recommends that this product NOT be modified and/or used for any application other than for which it was designed. If you have any questions relative to its application DO NOT use the product until you have written Delta Machinery and we have advised you. -
Page 3: Safety Guidelines
13. USE RECOMMENDED ACCESSORIES. The use of accessories or eyes, or lay on your skin may promote absorption of harmful and attachments not recommended by Delta may cause damage material. Always use properly fitting NIOSH/OSHA approved to the machine or injury to the user. -
Page 4: Additional Specific Safety Rules
FUNCTIONAL DESCRIPTION FOREWORD Your new 34-183 Tenoning Jig will help you produce good strong joints. Although you can use many methods for joining wood, the classic mortise-and-tenon joint is one of the strongest and most widely used joints in woodworking. -
Page 5: Assembly
UNPACKING AND CLEANING Carefully unpack the machine and all loose items from the shipping container(s). Remove the protective coating from all unpainted surfaces. This coating may be removed with a soft cloth moistened with kerosene. (Do not use acetone, gasoline or lacquer thinner for this purpose.) After cleaning, cover the unpainted surfaces with a good quality household floor paste wax. - Page 6 6. Use the supplied 3mm hex wrench to loosen the set screw (M) Fig. 6. Remove the micro-adjustment assembly (N) from the tenoning jig (Fig. 7). Fig. 6 Fig. 7 Fig. 8 Fig. 9 7. Lift the jig assembly (P) Fig. 8 from the base (H). Remove the two button head screws and flat washers (R) from the base.
- Page 7 Place the tenoning jig guide bar (A) Fig. 12 into the left miter slot (D) and slide the tenoning jig back and forth to determine if it has side-to-side play. If the tenoning jig slides easily through the miter slot without side-to-side Fig.
-
Page 8: Operation
11. Turn the screw (M) Fig. 17 clockwise until it bottoms to prevent the vertical work-support plate (F) from accidentally being moved into the blade. Tighten the nut (L). 12. Loosen the screw (Y) Fig. 19, and adjust the pointer (Z) to the “1/8" mark on scale. Fig. - Page 9 The tenoning jig features a positive stop to ensure fast and accurate positioning of the backstop (G) Fig. 21 at 90 degrees to the saw table. To check and adjust the positive stop at 90 degrees, loosen lock handle (H) Fig.
- Page 10 • The objective is to make the parts fit closely together. Maximize the gluing surface by making the tenon as long as possible (approximately 1/2 the width of the stile or longer, if using narrow stock). Balance the joint by using the same amount of wood in the tenon as in the combined thickness of the mortise walls (Fig.
- Page 11 Loosen the clamp (M) Fig. 28. Remove the spacer block (K) and secure the workpiece (L) Fig. 29 in place. Keep the same face of the workpiece (L) against the vertical support plate (N) and the backup board (P). Turn the machine “on”, perform the second structural cheek cut, and turn the machine “off”.
- Page 12 Position the wooden stop block (S) Fig. 34 in front of the saw blade to prevent the workpiece from being trapped between the saw fence and the saw, causing kickback. Make sure that the workpiece is clear of the wooden stop block (S) before contacting the saw blade.
- Page 13 MITERED TENON TENON HAUNCHED ENDS MITERED CONCEALED TENON HAUNCHED TENON CUTS SHOULDER OF CHEEK OF TENON MORTISE TENON SIMPLE MORTISE BARE FACED THROUGH-WEDGED AND TENON TENON TENON WEDGE BLIND-WEDGED TENON RABBET TENON WITH LONG AND SHORT SHOULDERS SPLINE STUB SPLINE GROOVE (SINGLE SAW CUT) TENON OPEN MORTISE...
-
Page 14: Troubleshooting
Two Year Limited New Product Warranty Delta will repair or replace, at its expense and at its option, any new Delta machine, machine part, or machine accessory which in normal use has proven to be defective in workmanship or material, provided that the customer returns the product prepaid to a Delta factory service center or authorized service station with proof of purchase of the product within two years and provides Delta with reasonable opportunity to verify the alleged defect by inspection. -
Page 15: Français
The following are trademarks of PORTER-CABLE • DELTA (Las siguientes son marcas registradas de PORTER-CABLE • DELTA S.A.) (Les marques suivantes sont des marques de fabriquant de la PORTER-CABLE • DELTA): Auto-Set ® , BAMMER ® , B.O.S.S. ® , Builder’s Saw ® , Contractor’s Saw ® , Contractor’s Saw II™, Delta ® , DELTACRAFT ®...
Need help?
Do you have a question about the 34-183 and is the answer not in the manual?
Questions and answers