
Related Manuals for Prism CP


Summary of Contents for Prism CP
- Page 1 CP Portable Hoist User Manual Doc No. 999096 Revision of document: A Revision Date: 11.08.2022...
-
Page 2: Table Of Contents
Contents Safety Instructions and Warnings ......................4 Introduction............................4 Manufacture ............................5 European Authorised Representative ....................5 Symbols Used ............................6 Contraindications/Limitations ......................7 Intended Use ............................7 Additional Warnings and Safety Notices ..................... 9 Operating Environment ........................9 Essential Performance ........................10 1.10 EMC Statement .......................... - Page 3 Environmental - Storage and Operating Conditions ................29 Normal operating conditions ......................30 Shipping and storage conditions ....................... 30 Disposal ..............................30 10.0 Fault Finding ............................31 10.1 LED Display............................. 31 11.0 General Inspection, Maintenance and Cleaning ................... 34 11.1 Service ............................
-
Page 4: Safety Instructions And Warnings
Type 8 Type 10 Type 9 Type 11 The list below includes all types of CP that are covered by this User Manual and which track type they are suitable for. Hoist Type Trolley Type Track Type Carry Bar Type CP200 –... -
Page 5: Manufacture
Please read and understand this manual in its entirety before using your CP Hoist. The information in this manual is important for the safety of anyone near the CP Hoist and must be read and understood to help prevent injuries. It is also crucial to the proper operation and maintenance of the CP Hoist. -
Page 6: Symbols Used
1.4 Symbols Used The Table below includes all Symbols from BS EN ISO 15223-1:2016 that can be found in this Manual and on the Product and what they represent. Refer back to this Table when you are unsure of what a symbol represents. Consult instructions before use Caution –... -
Page 7: Contraindications/Limitations
Figure 1 The CP Hoist is a Ceiling Track Hoist, and should only be used whilst on the Ceiling Track. It has the ability to raise up an individual from one location, such as a bed, move the individual along the track to another location and finally lower the individual, such as into a chair or a bath. - Page 8 • Under no circumstance should the CP Hoist, track, sling or entire system be put in control of a person who has not been properly trained in the use and care of this equipment. Failure to adhere to this warning may result in serious injury to the operator, and / or the individual being hoisted / transferred.
-
Page 9: Additional Warnings And Safety Notices
Hoist’. • The CP Hoist has been designed to be portable in its local environment, from room to room, but not from site to site. Therefore the CP portable hoist does not require a carry case. You may need to seek specialist advice on how to assist some people with specific moving and handling needs. -
Page 10: Essential Performance
If users of this equipment are unsure of its compliance to EMC you can request the confirmation from Prism that the product is manufactured to the appropriate Electromagnetic Compatibility standard. - Page 11 7.1.1 Mains Terminal Disturbance Voltage Pass CISPR 11: 2009 A1:2010 EN 55016-2-3: 2004 + A1:2005 7.1.1 Electromagnetic Radiation Disturbance Pass CISPR 11: 2009 A1:2010 EN 55016-2-3: 2004 + A1:2005 7.2.1 Harmonic Current Emissions (AC Pass EN 61000-3-2: 2014 Power Port) 7.2.2 Voltage Fluctuations and Flicker (AC Pass...
-
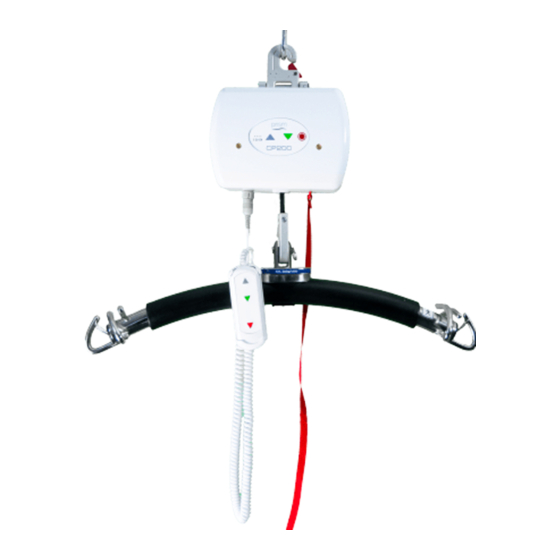
Page 12: Components/Key Parts
2.0 Components/Key Parts Please see below to familiarise yourself with the components of the Prism CP Hoist. The images below show the contents of the Portable Hoist. If you have not received all the components contact your local Prism Medical UK dealer immediately – contact details are provided on the last page of this manual. -
Page 13: Installation
The Hoist is not intended to be used in environments where there are rapid changes in the environmental temperature and humidity during intended use. This manual covers the safety and advice for the CP and moving and handling risks can be done in-house, as long as the person is competent to identify and address the risks. -
Page 14: Type 'Bf' Applied Parts
Prism slings to be attached, to lift and assist patient. See section 5.1 for instructions to attach carry bar to Hoist system and section 5.2 to attach an approved sling to the carry bar. To see Prism Medical UK approved sling list see table 5 and 6. -
Page 15: Slings
We recommend the use of Prism manufactured sling range (type ‘BF’ applied part) to be utilised with the CP Hoist. It is at the user’s discretion to use alternative supplied product. In utilising another manufacturer’s sling, checks must first be made to ensure the sling is safe to use and meets the requirements of BS EN ISO 10535 before its use and a full risk assessment to be carry out before use. - Page 16 The Mackworth slings with a safe working load of 200kg (440lb) or more that can be used with the CP Hoist are shown below in Table 5, complete with product codes. Size Mackworth Sling Range - Product Material and Code...
- Page 17 1201PN5020 1201PN4020 Table 5 The Care-Ability slings with a safe working load of 200kg (440lb) or more that can be used with the CP Hoist are shown below in Table 6, complete with product codes. 999096 – Revision A P a g e...
- Page 18 Size Care-Ability Sling Range - Product Material and Code Polyester Mesh Spacer Parachute CA300 Universal CA300PP1 CA300MP1 CA300SP1 CA300PAP1 CA300PP2 CA300MP2 CA300SP2 CA300PAP2 CA300PP3 CA300MP3 CA300SP3 CA300PAP3 CA300PP4 CA300MP4 CA300SP4 CA300PAP4 CA300PP5 CA300MP5 CA300SP5 CA300PAP5 X Small CA300PXS CA300MXS CA300SXS CA300PXS Small CA300PS...
- Page 19 CA501PP3 CA501MP3 CA501SP3 CA501PAP3 CA501PP4 CA501MP4 CA501SP4 CA501PAP4 CA501PP5 CA501MP5 CA501SP5 CA501PAP5 X Small CA501PXS CA501MXS CA501SXS CA501PAXS Small CA501PS CA501MS CA501SS CA501PAS Small/Medium CA501PSM CA501MSM CA501SSM CA501PASM Medium CA501PM CA501MM CA501SM CA501PAM Medium/Large CA501PML CA501MML CA501SML CA501PAML Large CA501PL CA501ML CA501SL CA501PAL...
- Page 20 CA600PP3 CA600MP3 CA600SP3 CA600PAP3 CA600PP4 CA600MP4 CA600SP4 CA600PAP4 CA600PP5 CA600MP5 CA600SP5 CA600PAP5 X Small CA600PXS CA600MXS CA600SXS CA600PAXS Small CA600PS CA600MS CA600SS CA600PAS Small/Medium CA600PSM CA600MSM CA600SSM CA600PASM Medium CA600PM CA600MM CA600SM CA600PAM Medium/Large CA600PML CA600MML CA600SML CA600PAML Large CA600PL CA600ML CA600SL CA600PAL...
- Page 21 Medium CA701HSPM CA701HSMM CA701HSSM CA701HSPAM Medium/Large CA701HSPML CA701HSMML CA701HSSML CA701HSPAML Large CA701HSPL CA701HSML CA701HSSL CA701HSPAL X Large CA701HSPXL CA701HSMXL CA701HSSXL CA701HSPAXL CA702 Comfort In Chair Hammock CA702PP1 CA702MP1 CA702SP1 CA702PAP1 CA702PP2 CA702MP2 CA702SP2 CA702PAP2 CA702PP3 CA702MP3 CA702SP3 CA702PAP3 CA702PP4 CA702MP4 CA702SP4 CA702PAP4 CA702PP5...
-
Page 22: Connecting The Handset To The Hoist
5.3 Connecting the Handset to the Hoist A sturdy ladder or steps may be required in order to access the underside of the Hoist to attach the hand controller. Caution should be used when this is required. Should the cord that connects the Hoist to the hand controller become disengaged from the underside of the hoist it must be re- connected in order for the Hoist to work. -
Page 23: Hoist Operation
6.0 Hoist Operation 6.1 Turning the Hoist ON and OFF To operate the Hoist, it must first be turned ON via the “ON” switch on the Hoist itself (see figure 21). On the opposite cover of the Hoist, the LED’s will turn GREEN to indicate that power is available. The hand controller will “wake up”... -
Page 24: Moving The Hoist Along The Track System
6.5 Charging the Hoist Handset Charging The CP Hoist is designed for Handset charging. A charging dock should have been fitted onto the wall nearby, usually at the end of the ceiling track system. The Charging Dock is also used as a handset hook, meaning at the end of each use of the hoist, the hoist should be traversed to the charging docks location and the handset should be placed into the charging dock for placement and charging. -
Page 25: Emergency Operation
Figure 27 Figure 26 Figure 29 Figure 28 Use only the charger that was supplied with the hoist or provided as a replacement. Use of any other charger will void all warranties and may cause damage to the hoist. 6.6 Emergency Operation Emergency stopping The Hoist unit has an emergency shut-off feature that allows the operator to cut all power from the Hoist. -
Page 26: Emergency Lowering
Emergency lowering In the event that the DOWN button on the handset does not function, or in power failure situations, the person may be lowered by Pressing down and HOLDING the red buttons. The emergency button’s is located on the handset and also on the Hoist membrane switch panel. -
Page 27: Technical Specification
There are no necessary modifications required for the device to perform its intended use. However, should the device or the installed system require modification, please consult your local Prism Medical UK dealer to arrange a date and time to assess the required changes to the system. -
Page 28: Specifications
7.2 Specifications Technical specification Hoist Motor 24VDC Charger Input 100-240V AC 50/60Hz 1.5A Charger Output 24VDC/1.0A Batteries 24 V dc (2 x 12V) 3.3Ah Nimh Hoist Case Flame Retardant ABS Hoist Case Degree of Protection IP21 Handset Degree of Protection IP67 Lifting Capacity (SWL) 200 kg (440 lb) -
Page 29: Expected Product Lifetime
• Lint – Due to the nature of the CP Hoist being installed closely to the ceiling, very little lint would be likely to gain access into the hoists workings. The hoist is recommended as per Service Guide to be wiped cleaned during every hoist inspection. -
Page 30: Normal Operating Conditions
8.1 Normal operating conditions +5°C to +40°C (41°F to 104°F) at a relative humidity between 15% to 90% RH, non-condensing but not requiring a water vapour pressure greater than 50hPa and atmospheric pressure between 700hPa to 1060hPa 8.2 Shipping and storage conditions -25°C to +5°C (-13ºF to 41ºF) with any humidity level. -
Page 31: Fault Finding
Find the fault and complete the recommended solution. If the fault is not found and/or the solution does not correct the problem, contact your local Prism authorized dealer immediately – contact details are provided on the last page of this manual. - Page 32 Table 12 999096 – Revision A P a g e | 32 of 44...
- Page 33 Table 13 999096 – Revision A P a g e | 33 of 44...
-
Page 34: General Inspection, Maintenance And Cleaning
Service must be completed by a Prism Medical UK authorised Service Engineer. Do not attempt to service the product yourself, or warranty is void. To ensure the safety and continued good function of your Hoist, routine service must be performed on your Prism CP Portable Hoist. -
Page 35: Lift Tape Caution
Ensure the Handset is functional, ensure the connection to the Hoist is correct and that all the buttons are working before operation with a patient. Trolley Ensure that the CP is attached to the Trolley correctly, with the QRS locking mechanism closed. Ensure that the Trolley is able to swivel smoothly without restraint. - Page 36 Follow the manufacturer’s safety instructions for the use of the cleaning product before use to ensure safe use for the operator and the patient. Ensure the cloth is damp before the cleaning process. Application is through a clean damp cloth applied to wipe the device down. Use in the following dilutions to ensure an effective clean: •...
-
Page 37: Warranty
This guarantee does not affect or in any way limit your Statutory Rights. 1. Prism guarantees the CP, supplied as new, against failure within the period of 12 months from the date of purchase by virtue of defects in material or workmanship. -
Page 38: Service Record History
13.0 Service Record History Complete this section after each service, repair inspection and/or maintenance. 999096 – Revision A P a g e | 38 of 44... - Page 39 999096 – Revision A P a g e | 39 of 44...
- Page 40 999096 – Revision A P a g e | 40 of 44...
- Page 41 999096 – Revision A P a g e | 41 of 44...
- Page 42 User notes: 999096 – Revision A P a g e | 42 of 44...
- Page 43 User notes: 999096 – Revision A P a g e | 43 of 44...
- Page 44 While every effort has been made to ensure the accuracy of information contained in this assembly and installation manual, no liability can be accepted by Prism Medical UK for any errors or omissions. Prism Medical UK operates a policy of continuous improvement.
Need help?
Do you have a question about the CP and is the answer not in the manual?
Questions and answers