Table of Contents
Advertisement
Quick Links
Consultation with SebaKMT
User Manual
Noise logger
SmartEAR
Mess- und Ortungstechnik
Measuring and Locating Technologies
Elektrizitätsnetze
Power Networks
Kommunikationsnetze
Communication Networks
Rohrleitungsnetze
Water Networks
Abwassernetze
Sewer Systems
Leitungsortung
Line Locating
1
Issue:
0 (09/2022) - EN
Article number:
87869
Advertisement
Table of Contents

Related Manuals for sebaKMT SmartEAR


Summary of Contents for sebaKMT SmartEAR
- Page 1 Consultation with SebaKMT User Manual Noise logger SmartEAR Mess- und Ortungstechnik Measuring and Locating Technologies Elektrizitätsnetze Power Networks Kommunikationsnetze Communication Networks Rohrleitungsnetze Water Networks Abwassernetze Sewer Systems Leitungsortung Line Locating Issue: 0 (09/2022) - EN Article number: 87869...
- Page 2 Consultation with SebaKMT...
-
Page 3: Consultation With Sebakmt
© SebaKMT All rights reserved. No part of this handbook may be copied by photographic or other means unless SebaKMT have before-hand declared their consent in writing. The content of this handbook is subject to change without notice. SebaKMT cannot be made liable for technical or printing errors or shortcomings of this handbook. -
Page 4: Terms Of Warranty
This warranty does not apply to faults in the software supplied. During the period of warranty, SebaKMT agree to repair faulty parts or replace them with new parts or parts as new (with the same usability and life as new parts) according to their choice. -
Page 5: Table Of Contents
Download and installation ................17 Call up the app ....................17 User interface ....................18 6.4.1 Start screen ...................... 18 6.4.2 Main menu ......................19 6.4.3 Help & Settings ....................20 Basic settings ....................21 SmartEAR installing and programming ............23... -
Page 6: Safety Instructions
Working with products It is important to observe the generally applicable regulations of the country in which the from SebaKMT device will be operated, as well as the current national accident prevention regulations and internal company directives (work, operating and safety regulations). - Page 7 Safety Instructions Repair and Repair and maintenance work has to be carried out by SebaKMT or authorised service partners using original spare parts only. SebaKMT recommends having the system maintenance tested and maintained at a SebaKMT service centre once a year.
-
Page 8: Technical Data And Delivery
Technical data and delivery Technical data and delivery Technical data SmartEAR is distinguished by the following technical parameters: Mechanics Display blue LED Operating temperature -20° C to +70° C / 0° F to +160° F Storage temperature -20° C to +70° C / 0° F to +160° F... -
Page 9: Scope Of Delivery And Optional Accessory
SmartEAR, NB-IoT noise logger with SIM card (O2 Telefonica); 1014081-003 incl. loop, rod antenna, magnet adapter and battery SmartEAR, NB-IoT noise logger with SIM card (Telekom EU extended) 1014081-004 incl. loop, rod antenna, magnet adapter and battery SmartEAR, NB-IoT noise logger with SIM card (Telekom North 1014081-005 America);... -
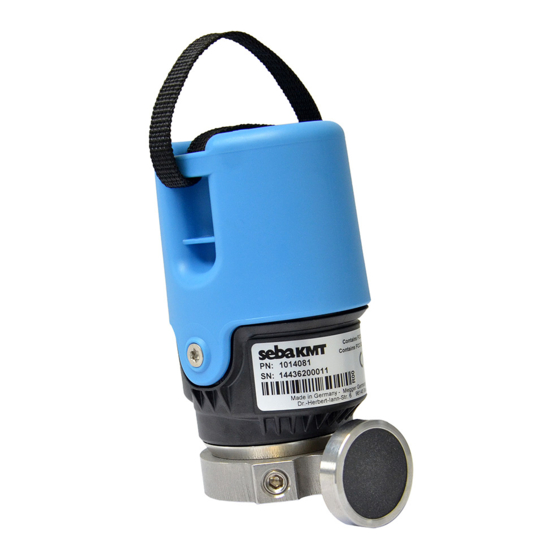
Page 10: Technical Description
Each SmartEAR logger has its own six-digit identification number (ID) with which the device can be uniquely identified and managed. Magnetic foot On/Off contact field The SmartEAR logger is activated by an internal magnet switch. The contact field for the magnet is located between the I/O symbol and the antenna. - Page 11 On a carrier plate are all electronic modules and the slot for the SIM card. O-ring The SmartEAR body has two rubber sealing rings. These ensure that the housing sits firmly on the body and that no moisture can penetrate the unit.
-
Page 12: Power Supply
Technical description Power supply SmartEAR has a powerful lithium-ion battery. The battery can be inserted or replaced by the user. Battery criteria The battery used must meet the following criteria: Parameter Value Type Lithium battery Size D cell Quantity Rated voltage 3.6 V... -
Page 13: First Use / Sim Card / Battery
The following sections describe what to do to remove the battery insulator, to insert a SIM card into the device and to change the battery. In all cases, the housing of the SmartEAR must be opened to gain access to the electronics module of the device. - Page 14 First use / SIM card / Battery Step Description Slowly pull the blue housing upwards off the electronics module. Note! The battery could fall out. Remove the battery. Remove the plastic disc. If the device does not yet have a SIM card, insert one (Nano-SIM).
-
Page 15: Changing The Sim Card
Changing the SIM card The slot for the nano SIM card is located on the back of the electronics module. To change the inserted SIM card, open the SmartEAR device as described in section 4.2. Remove the existing card from the slot and slide the new card into the slot as shown in the picture. -
Page 16: Switching Smartear On/Off
The LED goes out. Of course, instead of using the supplied magnet you can also use another magnet, e.g. the magnetic foot of a logger. If the status LED of the SmartEAR does not respond, the magnet used is not strong enough. -
Page 17: Smartear-Go
SmartEAR-GO! SmartEAR-GO! Introduction To be able to install SmartEAR loggers on site, you need an internet-enabled and GPS- enabled mobile device (smartphone or tablet) with iOS or Android operating system. The app SmartEAR-GO! must be installed on the device. Download and installation The app is available in the App Store and in the Google Play Store. -
Page 18: User Interface
SmartEAR loggers in the immediate vicinity are detected. Their IDs are listed. Connect devices via When you tap on the ID of a SmartEAR logger that has not yet been paired with your Bluetooth mobile device, a dialogue appears on the screen. There you will be asked to pair the logger with the mobile device. -
Page 19: Main Menu
SmartEAR-GO! 6.4.2 Main menu When you tap on the ID of a SmartEAR logger on the Start screen, the SmartEAR-GO! Main menu for that logger will open. List of functions Logger ID Here you have access to all the functions available for working with the logger:... -
Page 20: Help & Settings
Here you have access to the following functions and information: Demo With this function you can call up a demo installation process. The demo shows how a SmartEAR installation can look like step by step, if it is carried out with the help of the installation wizard. Settings Here you can access the basic settings of the SmartEAR-GO! app. -
Page 21: Basic Settings
Press the arrow key to return to the Start screen. Poseyedon Login In order for data exchange to take place between the SmartEAR loggers, the SmartEAR-GO! app and the POSEYEDON cloud, you must enter your POSEYEDON access data once in the SmartEAR-GO! App. - Page 22 SmartEAR-GO! Light theme You have the option of choosing between a light background or a dark background for the app interface. Proceed as follows: Step Description Tap the Menu icon in the top left of the Start screen. Tap on Settings Tap on Light theme to switch between the day theme and the night theme.
-
Page 23: Smartear Installing And Programming
SmartEAR installing and programming SmartEAR installing and programming The following is a step-by-step guide to installing and programming a SmartEAR logger at the desired measurement location. Requirements These conditions must be met: • SmartEAR loggers in sufficient numbers o properly prepared (Insulator removed / SIM card inserted / antenna... - Page 24 Confirm this request. The Bluetooth connection between the two devices is established. You will read CONNECTED on the screen. The SmartEAR-GO! Main menu for the logger in question opens. If no dialogue for pairing the two devices appeared, the devices may have already been connected at an earlier time.
- Page 25 Description On the Start screen, tap the ID of the logger to be installed. Result: The SmartEAR-GO! Main menu for this logger opens. Listed are a variety of functions that are available for working with the SmartEAR logger. Tap Deploy to start the installation wizard.
- Page 26 SmartEAR installing and programming Next step The installation wizard guides you to the first installation step: Antenna test The screen looks like this: The row of bars at the bottom of the picture symbolises the progress of the installation. Viewed from left to right, each bar represents one of the installation steps.
- Page 27 SmartEAR installing and programming Step Description Let the test run for some time and observe the display. The mobile phone signal is considered Very Good or Good when the display is permanently in the green or light green area. In this case, you can end the test...
- Page 28 SmartEAR installing and programming Next step The installation wizard leads to the installation step GPS position. Your current location is determined and displayed. If necessary, you can move the location symbol within the map with your finger. This has no effect on the determined GPS coordinates.
- Page 29 SmartEAR installing and programming Next step The installation wizard leads to the installation step Select measurement profile. Here you can select a measurement profile for the SmartEAR logger. These measurement profiles are available : Night measurement Permanent measurement 02:00 – 04:00 o‘clock 00:00 –...
- Page 30 SmartEAR installing and programming Next step Schritt The installation wizard leads to the installation step Realtime measurement . Here you can start a measurement and follow the recorded values of the SmartEAR logger in real time. Proceed as follows: Step...
- Page 31 SmartEAR installing and programming Next step Schritt The installation wizard leads to the installation step Transmission test. Here you can test the communication chain between SmartEAR logger and POSEYEDON Cloud. Proceed as follows: Step Description Tap the Start button bottom right.
- Page 32 SmartEAR installing and programming Next step The installation wizard leads to the last installation step: Result On the screen you will see a list of all the installation steps. The symbol next to a step indicates whether the respective step has been completed successfully.
- Page 33 Tento symbol indikuje, že výrobek nesoucí takovéto označení nelze likvidovat společně s běžným domovním odpadem. Jelikož se jedná o produkt obchodovaný mezi podnikatelskými subjekty (B2B), nelze jej likvidovat ani ve veřejných sběrných dvorech. Pokud se potřebujete tohoto výrobku zbavit, obraťte se na organizaci specializující se na likvidaci starých elektrických spotřebičů...
Need help?
Do you have a question about the SmartEAR and is the answer not in the manual?
Questions and answers