Table of Contents
Advertisement
Quick Links
Advertisement
Table of Contents

Related Manuals for Hasco GU60000


Summary of Contents for Hasco GU60000
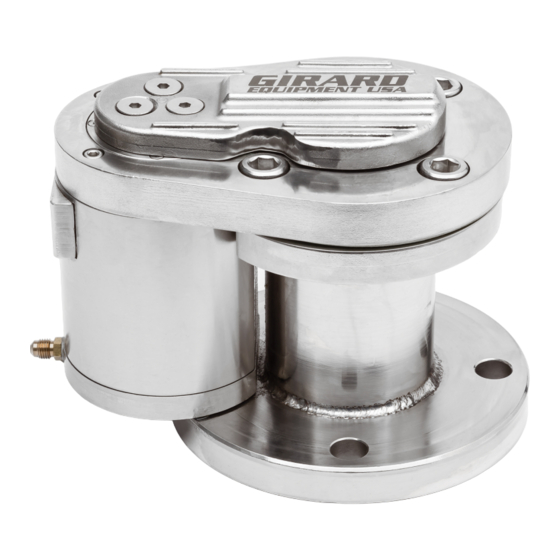
- Page 1 HASCO Valve Owner’s Manual GU60000 HASCO Model GU60000 Hydraulically Actuated Safety Clean Out Hydraulically actuated access valve safely and reliably allows the interior of the tank car to be accessible from alternate locations. Patent Number: USPTO #9,150,140 1/3/17...
-
Page 2: Table Of Contents
QF-730-009-HASCO Valve Revision Level B Table of Contents Technical Data ................... 3 Exploded View of Product ................ 4 Safety ......................6 General Safety Information ................6 Product Storgage ....................6 Product Handling ....................6 Disposal Requirements ..................6 Installation Instructions ................7 Operation Instructions ................ -
Page 3: Technical Data
QF-730-009-HASCO Valve Revision Level B Technical Data Overall height: 7 3/8” – in open position or 6 5/8” – in closed position All components constructed from corrosion resistant 316 Stainless Steel Design pressure (MAWP): 30 PSI (2.0 BAR) Minimum required hydraulic pressure to open: 500 PSI... -
Page 4: Exploded View Of Product
QF-730-009-HASCO Valve Revision Level B Exploded View of Product (GU60000) Girard Equipment, Inc. | GU60000... - Page 5 QF-730-009-HASCO Valve Revision Level B Exploded View of Product (GV60580) Girard Equipment, Inc. | GU60000...
-
Page 6: Safety
QF-730-009-HASCO Valve Revision Level B Safety General Safety Information WARNING: All safety regulations must be followed during the operation of this product. Follow maintenance instructions as set forth in this manual to avoid serious injury. Do not attempt to disassemble the device unless you have been properly trained by a Girard Equipment representative. -
Page 7: Installation Instructions
Weld flange GV60240 to nipple. Step 3 Cross-section view showing positioning REAR OF TANK FRONT OF TANK Notch for HASCO valve to be facing 3, 6, 9 or 12 o’clock position (shown at 6 o’clock position). Girard Equipment, Inc. | GU60000... - Page 8 Place new GV60540 Teflon envelope gasket (Centered on flange) Step 5 Place HASCO Valve over gasket and line up with 4 bolt holes. Lubricate GQ95115 screw threads with a light oil. Install 4 GQ95115 screws and torque to 100-110 ft-lbs, following the torque pattern below.
- Page 9 QF-730-009-HASCO Valve Revision Level B Step 6 Hydraulic Line Connection Pumps are shipped dry and must be filled and primed before use. Remove and discard GV40000 1/8” plastic plug from lower side of valve. Step 7 Install a 1/8-27 NPT nipple, or 1/8” 90° street elbow (GV60592) and 1/8” x 6” SS nipple (GV60594 supplied, with thread sealer to attach hydraulic line.
- Page 10 QF-730-009-HASCO Valve Revision Level B Step 8 Install hydraulic line to valve, and route hydraulic lines as shown in Fig. A. Check for leaks and bleed hydraulic lines as shown in Step 9 on next page. The recommended location for the hydraulic pump is at the rear of the trailer.
- Page 11 QF-730-009-HASCO Valve Revision Level B Step 9 Bleeding of Hydraulic Lines All air must be bled from hydraulic lines before hydraulic device is used. 1) Remove vent plug from hydraulic pump and fill reservoir with hydraulic fluid as shown in Fig. C. (next page) Girard recommends using Mobil DTE 24 or 25 Hydraulic Oil Fig.
- Page 12 Note: Fill reservoir as necessary 3) Once air is completely purged from the system, reconnect the hydraulic line to the HASCO valve. 4) Top off reservoir with hydraulic fluid and reinstall vent plug as shown in Fig. C. Note: It should take 5-7 pumps on average to open both valves in series. If more than 10 pumps are required, it is an indication the system is not properly charged.
- Page 13 Open the HASCO Valve Align the adapter flange with the opening of the Fully open the HASCO Valve using the HASCO Valve and fasten tightly using the 2 hex hand pump (see operating instructions) cap screws (GV60597) and washers (GV60599)
-
Page 14: Operation Instructions
Revision Level B Operation Instructions It is the responsibility of all persons performing the operation of the HASCO Valve to read and understand this procedure before starting work. Before using a Girard valve with a hydraulic actuator installed, follow the procedure for bleeding hydraulic lines, located in the Installation Instructions section of this manual. -
Page 15: Maintenance Instructions
O-ring (in extremely low temperatures, this may be difficult). The HASCO GV60540 gasket should be replaced anytime the valve is removed from the tank to assure proper sealing of the HASCO valve to the tank. -
Page 16: Test Instructions
QF-730-009-HASCO Valve Revision Level B Test Instructions The tank should be pressure tested according to work instructions from a Design Certifying Engineer. Pay close attention to the weld flange in case of possible leaks in this area. Troubleshooting and Repair THE VALVE LEAKS AROUND THE SEAL 1. -
Page 17: Replacement Parts
GV60400 -220 O-Ring Seal (installed on Base) GV60280 Cam Follower GV60595 HASCO ½” Hex “L” Wrench GV69990 HASCO Valve Seal Kit (Includes 1 ea. GV60380, GV60540, GV60400) Warranty All goods manufactured by Girard Equipment, Inc. from “genuine” Girard parts are... -
Page 18: Cut Out Template
Cut along outer line to use template.
Need help?
Do you have a question about the GU60000 and is the answer not in the manual?
Questions and answers