Table of Contents
Advertisement
Quick Links
Advertisement
Table of Contents

Related Manuals for Hasco H1281-6


Summary of Contents for Hasco H1281-6
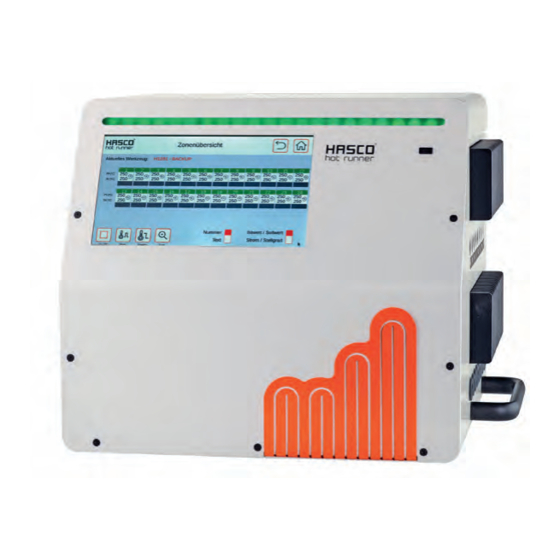
- Page 1 Operating instructions H1281/... Primezone Control unit GB 05 / 21...
-
Page 2: Introduction
Introduction Dear customer, thank you for having chosen a HASCO temperature controller. This high quality device has been produced in our ISO 9001-certified factory and was shipped to you after a thourough quality test. Unpack Check the device for eventual shipping damage. - Page 3 HASCO Hasenclever GmbH + Co KG has the right to make changes to the product descri- bed or documentation without prior notice, if they are made for reasons of reliability and qua- lity improvements, or by technical progress.
-
Page 4: Table Of Contents
Specification…….……………………………………………………… Installation and wiring…...…………………………………………….. Operation.………………………………………………………………. 5.1 Main switch...…………………………………………………………… 5.2 Operating elements and keys..……………………………………….. 5.3 Touchscreen……….…………………………………………………… HASCO Touchscreen Operation System...…………………………… 6.1 „Homescreen“…………………………………………………………… 6.2 Part „Hotrunner“ - view total situation…………………………………. 6.2.1 Zones - view in groups. ………………………………………….. 6.2.2 Zones - detail view...………………………………………………... -
Page 5: Features
Ready to use compact multizone temperature controller for all 230V hotrunner systems - Compact unit for 6 up to 48 zones - User friendly touchscreen operation with HASCO Touchscreen Operation System - Adaptive control algorithm with automatic self-tuning for every zone... -
Page 6: Safety Advice
If spare parts are required, only parts recommended by the supplier must be used. The use of other parts may cause damage and/or hazard for operation personnel. 14. Please respect further recommandations and warnings described in this opera- tions manual. HASCO hot runner 6... -
Page 7: Environmental Advice
: 1. Operator 2. Tool setter / shift leader 3. Administrator 4. Maintenance and repair personnel 5. Manufacturer Definition of the different qualification levels see next page. HASCO hot runner 7... - Page 8 „Administrator“ To 5.) Manufacturer - Scope of activities : All activities exceeding 4.), especially modifications, upgrading of functions and up- dating of the devices software HASCO hot runner 8...
-
Page 9: Specification
Power control : 0...100% proportional, zero-voltage switching Triac rated up to 35A Automatic soft-start : (factory defaults) Powersetting 50% / temperature 120°C / time 1 min HASCO hot runner 9... - Page 10 Specif ication (cont.) Sensor-/load-connectors : 24-pole standard-industry female plug 16A/400V Pin assignment HASCO-norm, other norms available Accuracy : 0,25% FS Insulation voltage : 2,5kV mains/sensor circuit Dimensions : 410 x 367 x 185mm (WxDxH, 6 - 16 zones) 410 x 367 x 345mm (WxDxH, 24 / 32 zones)
-
Page 11: Installation And Wiring
1 heater 12,5 A 2 heaters 12,5 A 3 heaters 11,5 A 4 heaters 10,5 A 5 heaters 10,0 A 6 heaters 9,5 A Load and TC-connection following HASCO-norm : Other pin assignment norms available on request. HASCO hot runner 11... - Page 12 To activate the 2nd temperature set-point (stand-by function), a 24V DC switching con- tact is wired to pin 6 and 7. No external power source may be connected to this input. This function can also be activated manually on the touchscreen. +24V DC HASCO hot runner 12...
- Page 13 Remark : For the units with 6 and 8 zones, heatsink and fuseholders are only present on one side of the casing Back side small casing 6-16 zones : Main switch Mould connectors (6 zones each) Alarm connector Power cord HASCO hot runner 13...
- Page 14 Front view high casing 24-32 zones : Back side high casing 24-32 zones : HASCO hot runner 14...
-
Page 15: Operation
Operations manual H1281 Front view triple casing 40-48 zones : Back side triple casing 40-48 zones : HASCO hot runner 15... -
Page 16: Main Switch
The LED-strip can constantly show red, yellow or green light, which indicates the follo- wing operational states : - Red : Alarm is present - Yellow : Particular operational situation such as softstart, setpoint value not yet reached or manual powersetting - Green : Undisturbed operation (see picture above) HASCO hot runner 16... -
Page 17: Touchscreen
You can enlarge the screen image with two fingers as you are used to on actual smartphones or tablet computers („pinch-to-zoom-function“). To facilitate reading and operation of the touchscreen, the frontpanel of the device (or its upper part for the higher casing types) is tilted. HASCO hot runner 17... -
Page 18: Hasco Touchscreen Operation System
6.1 Homescreen The “Homescreen” is the start-up operation screen for all functions and programs of the HASCO touchscreen operation system, comparable to the desktop of a PC, smart- phone or tablet computer. From every screen, the “Home”-button will lead you directly to the homescreen, this button is always on the upper right corner of the screen. -
Page 19: Part „Hotrunner" - View Total Situation
The display field of the actual mould name is also a button to access directly the mould memory without passing trough the homescreen (see chapter 6.6). HASCO hot runner 19... - Page 20 Activation of Boost– and Stand-By-function is indicated by orange colouring of the respective button, see example in chap.6.2.2 . If one of both functions is active, the other one is locked. Alternative : „Stand-By“ can also be activated with an external switching contact (see also chapter 4.4). HASCO hot runner 20...
- Page 21 With the „Magnifier“ -button, you can enlarge the display of all zones. In the enlarged view, actual temperature, setpoint, heating powersetting and -current are being dis- played (example see next page). By pressing again the „Magnifier“ -button, you can switch back to the overview of all zones. HASCO hot runner 21...
-
Page 22: Zones - View In Groups
- Group assignment . The colours as well as the buttons are the same as in the overview of all zones. Operation is made in the detail view (next page), touching of a zone guides you directly there. HASCO hot runner 22... -
Page 23: Zones - Detail View
All inputs can be copied with the copy button to one other, several or all zones (see also page 31). HASCO hot runner 23... - Page 24 These limit values are set in the zones configuration menu (see chapter 6.3.4). To modify them, the operator must at least have the user rights level „Shift leader“. HASCO hot runner 24...
- Page 25 In addition to that, the alarm symbol (bell) on the left side of the alarm display field is illuminated. Finally, the LED-alarm lighting strip above the touchscreen is illuminated. Pressing the alarm symbol opens the alarm memory with a list of all actual alarms, see also chap. 6.7 : HASCO hot runner 25...
- Page 26 With the intelligent control characteristic, overshot is securely avoi- ded. No operators action is needed to ensure automatical adaptation („Autotuning“ or similar). Manual Manual : If the button „Manual“ is pressed, the following dialogue window opens : HASCO hot runner 26...
- Page 27 The operational modes „Auto“, „Manual“ and „Measuring zone“ are being indicated in the overview of all zones by a symbol in the associated zone. This mode can be copied to another, several or all zones (see page 31). HASCO hot runner 27...
- Page 28 Boost holding time : Value in sec. See “Boost temperature“. temperature Standby temperature : This parameter is the setpoint for the stand-by operation of this zone. Attention : Setpoint 2 must be entered as an absolute value . HASCO hot runner 28...
- Page 29 Pressing the key „Group configuration“ opens the following dialogue window : Select first on the right side the group, whose zones must be configurated. Then, the actual zones belonging to this group (if any) are marked green, as well as the name of the group, HASCO hot runner 29...
- Page 30 In all screens showing more than one zone, you always can toggle between name and number of the zones by using the „NUM“ or „TXT“-toggle switch (see chapter 6.2). HASCO hot runner 30...
- Page 31 Finally, the group affiliation of all zones as well as zones name, if attributed, are shown. As in all other screens, toggling between zones number and –name can be done with the „NUM / TXT“ toggle switch (see also chap. 6.2). HASCO hot runner 31...
- Page 32 Operation of the button arrays „Operational mode“, „Boost / Standby“ as well as „Settings“ is only possible for operators with user rights „Shift leader“ or higher. If this is not the case, those buttons are locked, indicated by a grey colour (see example next page). HASCO hot runner 32...
-
Page 33: Part „Settings
Operations manual H1281 6.3 Settings This button on the Homescreen leads you to the functions „Settings“ of the HASCO Touchscreen Operation System. The extent of the functions available here depends on the user right level of the operator (see below). - Page 34 When selecting this function, the following menu opens, where the password can by modified for every user right level (see next page). Select first the user right level, for which the password must be adapted : HASCO hot runner 34...
- Page 35 Operations manual H1281 Choose Start user Change user rights at start-up : When selecting this function, the following menu opens, where the user right level when starting-up the system can by modified (Factory default = „Operator“). HASCO hot runner 35...
-
Page 36: Settings - Language
(see chapter 6.1). Adapting the active language is allowed in all user levels Available languages fill several pages on the screen, toggle between them with the arrow keys. HASCO hot runner 36... -
Page 37: Settings - System
Please take that fact into account when analy- sing time sensitive events. When pressing the „Date-/timesetting“-key, the following dialogue appears (see next page) : HASCO hot runner 37... - Page 38 Finally, quit the dialogue with the red cross. Sensor Type - Temperature control - sensor type : When pressing the „Sensor type“-key, the following dialogue appears : HASCO hot runner 38...
- Page 39 ! The USB memory device must first be connected to the USB-data port on the front panel of the device (see chapter 5.2). HASCO hot runner 39...
- Page 40 ? No update file found ! When all functional requirements are fulfilled, the complete software update process is now executed automatically, afterwards, the system is operational without any further action by the operator / administrator. HASCO hot runner 40...
- Page 41 Control parameter - Temperature control configuration : Temperature control of your HASCO unit is fully automatic, that means with automatic adaptation to the characteristics of every connected heating zone. In rare cases of very unusual behaviour of an heating zone, this automatic adaptation can be switched off.
- Page 42 To change the unit of all temperature values, press the button „°C / °F“. The following dialogue menu ones : All temperature values, also setpoints in the mould memory, are automatically transfor- med into the respective other unit and displayed accordingly. HASCO hot runner 42...
- Page 43 (e.g. fire or damage of the internal memory device), so all mould data must then be re-entered manually. For data saving on an external memory device as well as re-loading the mould memory from this device, the following menu is used (see also overview in chapter 6.3.3): Mould memory Mould memory HASCO hot runner 43...
- Page 44 15m depending on local conditions. 2. Selecting HTML-page : The easiest way to do so is to scan the QR-code shown on the HASCO screen and press „Activating link“, „Connecting“ or so on your device. With newer devices, a QR- code scanner is integrated into the camera.
-
Page 45: Settings - Zones Configuration
The entry of data described here is valid for the zone named on top of the screen. If those data must become valid for several zones, use the copy function as described in the detail view of one zone. With the arrow keys (see above), you can roll trough all zones. HASCO hot runner 45... - Page 46 Ad 2.) Zones name and Autonaming : Change name - Manual entry of a name for a zone : When pressing this button, an alphanumerical keyboard opens. After having typed the desired name or number, save with HASCO hot runner 46...
- Page 47 1. Press then the Autonaming“ button, which opens the copying field known from other copy procedures in the zone detail view. Mark all zones, which must be part of that numbered row (see following page). HASCO hot runner 47...
- Page 48 Ad 3.) : Function group configuration Setpoints Editing „Setpoints“ : When pressing this button, the following dialogue menu opens, where additional set- points accessible only for users from „Shiftleader“ level on can be set (see next page) : HASCO hot runner 48...
- Page 49 The boost-function is only available during normal operation, not in stand-by operation. De-activation of the boost is done by entering a boost-addition of „0°C“ Boost holding time : Value in sec. See “Boost temperature“. HASCO hot runner 49...
- Page 50 Just as in the zone detail view, you can also use the copy function in the zone configu- ration menu to copy data entries or settings from one zone to another, several or all other zones. Description see chap. 6.2.2. . HASCO hot runner 50...
- Page 51 Softstart is only activated for the first heating after start-up of the device, if the actual temperature is < 80°C. If the actual temperature is > 80°C, no softstart is performed, but the system starts heating only after 1min delay time. HASCO hot runner 51...
- Page 52 The duration of the total heating process depends on the slowest zone, it can take up to 30min for some moulds. This setting is valid for all zones together. HASCO hot runner 52...
- Page 53 If more groups must be defined (e.g. spruces), use the free groups A, B or C. Setting up a heating sequence is done step-by-step from left to right (see next page) : HASCO hot runner 53...
- Page 54 When thermocouple failure occurs, this zone is set to operation mode „Manual“. Heating remains active, but is now operating in manual mode with constant powerset- ting. By pressing this key, the following dialogue opens (see next page) : HASCO hot runner 54...
- Page 55 By pressing this key, the following dialogue opens : To activate coupling, touch the display field „Zone“ antippen, enter the number of the reference zone with the known numpad and confirm with the „Arrow key“. HASCO hot runner 55...
- Page 56 Alarm configuration Safety alarm In this menu bar, the different alarms of the controller can be configurated: Load shedding alarm : When pressing the key „Load shedding alarm“, the following dialogue menu opens (see next page) : HASCO hot runner 56...
- Page 57 For all other users, the key is locked, see also example on page 33. Temperature Temperature alarm : When pressing the key „Temparature alarm“, the following dialogue window opens : Limit above setpoint °C Limit below setpoint °C HASCO hot runner 57...
- Page 58 After having finished the limit value entry, quit the menu with the red cross and get back to the „zone configuration menu“. Amps Heater current alarm : When pressing the key „Current alarm“, the following dialogue window opens : HASCO hot runner 58...
- Page 59 When pressing the key „Leakage alarm“, the following dialogue window opens : When pressing again the key „Leakage alarm“, the known numpad opens, where you can enter a modified powersetting limit value. The actual limit value is displayed in the field and updated after modification. HASCO hot runner 59...
- Page 60 The leakage alarm does not influence the actual control behaviour, that means the alarm threshold value does not limit actual heating powersetting. If this shall be done, a powersetting limitation can be set, see chapter „zones configuration - setpoints“ HASCO hot runner 60...
-
Page 61: Part „Mould Diagnosis
The mould diagnosis is a separate function of the HASCO controller and can only be performed outside current operation. The continuous heating is switched off, no production can be run during mould diag- nosis. - Page 62 In the „Normal view“, the result for each zone is depicted with a colour, a legend on the right side of the screen explains them. For more information about the analysis result in one particular zone, press the field of this zone, the following window then shows up (see next page) : HASCO hot runner 62...
- Page 63 Also in the enhanced view, you can access the detail result by pressing the associated zone field (see above). HASCO hot runner 63...
- Page 64 The memory device is connected via the USB-port on the front of the device. Attention: Given the USB interface definition, any USB-port is hasardous as well from the hard- ware- (EMV) as from the software standpoint. Please consider this when defining rules of access to the unit. HASCO hot runner 64...
-
Page 65: Part „Real Time Analysis
- Powersetting (heating power) are shown for all zones as bargraphs : If the control behaviour of a given zone shall be analyzed in detail, pressing the „zone“ button opens a curve showing that zone (see next page) : HASCO hot runner 65... - Page 66 For an enlarged view of the curve, use the „Pinch-to-zoom“ function, see chap. 5.3) By pressing the button (upper right side), you get back to the overview of all zones. HASCO hot runner 66...
-
Page 67: Part „Mould Memory
When a mould is loaded from the memory (also the default settings), all actual para- meters are overwritten and so, lost. If you have found an actual set of parameters by trials, save them first as described below as a different mould (new name). HASCO hot runner 67... - Page 68 Keyboard Loading a set of parameters : 1. Choose the desired mould (the name is then marked in ORANGE) Mold data set Werkseinstellung - Reset H1281 - Backup HASCO Mold 1 HASCO Mold 2 HASCO hot runner 68...
- Page 69 This function must only be used, if the stored data saved under this name will certainly not be needed anymore. If they might be usefull at a later moment, you better store the actual version under a new name (eg. mould xxx version 2 or so). HASCO hot runner 69...
- Page 70 2. Press „Deleting mould“ (see previous page) 3. Acknowledge with Attention : Deleting a mould from the memory removes all associated parameters and settings irrevocably. The factory default / RESET values can‘t be removed or overwritten. HASCO hot runner 70...
-
Page 71: Part „Alarms
(problem solved), this alarm is also automatically deleted from the list. To view all alarms, also the previous ones, press the button „History“ below the list (see above and next page). This choice is confirmed by an orange colour of the button. HASCO hot runner 71... - Page 72 Alarm Phase L1 is missing Phase L2 is missing Phase L3 is missing Temperature alarm zone 1 Current alarm zone 1 Temperature alarm zone 2 Current alarm zone 2 HASCO hot runner 72...
-
Page 73: Keyword Index
Curve tracing - see real time analysis…….………………………. 65 Data export…………………………………………….……………. 64 Export result mould diagnosis……………………………………..64 Heating current……………………………………………...……… 21 - 24 High temperature alarm - see temperature alarm….…………..…. 25, 57 Homescreen………………………………………………...………. 18 Key lock - see user rights…………………………………………... 33 HASCO hot runner 73... - Page 74 Software - version number…………………………………………. 33 Standby………………………………………. …………………...… 20 Synchronised heat-up - see zones synchronisation...…………….. 52 Temperature alarm………………………………………………..… 25, 57 Temperature unit switching °C / °F………………………………… 42 Thermocouple failure operation…………………………..………... 54 Touchscreen…………………………………………………………. 13 - 15, 17 Touchscreen cleaning……………….……………………………… HASCO hot runner 74...
- Page 75 Zone - coupling to another.………………………………………… 55 Zone - enter name………………………………………………….. 46 Zones - group view…..……………………………………………... 22 Zone - switching on/off (single).……………………………….…… 26 - 27 Zone - switching on/off (all)…...……………………………….…… 20 Zones synchronisation - see synchronised heat-up…………..…. 52 HASCO hot runner 75...
-
Page 76: Ce-Conformity Certificate
2011/65/EU Applicable harmonized norms : EN 60204 Part 1 EN 61000-6-1 EN 61000-6-3 This declaration is binding for the distributor HASCO Hasenclever GMBH + Co. KG Römerweg 4, D-58513 Lüdenscheid · Germany Lüdenscheid, 01.10.2020 Florian Larisch HASCO hot runner 76... - Page 77 Built to Control.
- Page 78 05 21 1 i © by HASCO Hasenclever GmbH + Co KG Postfach 1720, D-58467 Lüdenscheid T +49 2351 957-0, F +49 2351 957-237 info@hasco.com, www.hasco.com Subject to technical modifications. Please always check all the data against the product information we publish on the internet.
Need help?
Do you have a question about the H1281-6 and is the answer not in the manual?
Questions and answers