Advertisement
Quick Links
Recess in Cavity
as an add on
to Music/
Performance
Audio Infrastructure
by Others
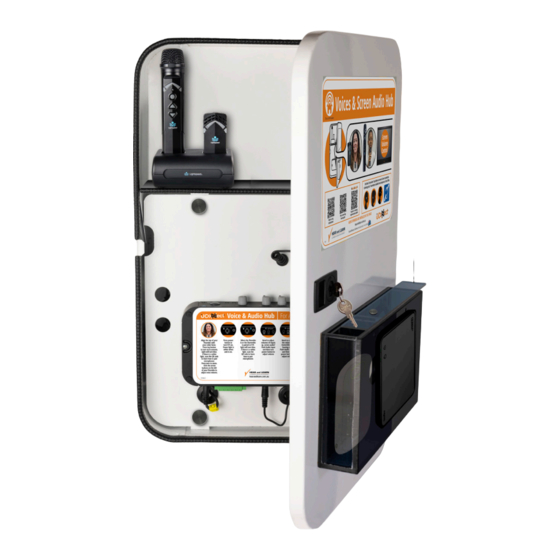
UConnect SoundHouse by hearandlearn.com.au is a bespoke steel cabinet
complete with internal electronics, power supplies, labelling and signage for
capturing and delivering instructional audio in learning spaces.
There are two versions of the UConnect SoundHouse – our WALL MOUNTED
version and our RECESSED version. This document is relevant to installing our
RECESSED version which have a right angled rear body for easy install complete
with flange. It should not wall mounted.
SOUNDHOUSE IS FOR EVERYDAY USE BY TEACHERS AND LEARNERS, BE UNOBSCURED, HAVE EASY ACCESS AND WITH LINE OF SIGHT OF AREAS OF THE ROOM.
25mm
1
Flexmike
Sharemike
1.
Flexmike and Sharemike paired to
3.
Output from Comms Box to Input on
Access Link inside SoundHouse
ElectroBox inside SoundHouse. If the
2.
Output from AccessLink to Comms Box
length of cable from output of Access Link
for Music / Performance Audio Infra-
to Comms Box is less than 10m, use
structure by Others. If the length of
general audio cable with 3.5mm male plug
cable from output of AccessLink to
to connect to from Access Link to Comms
Comms Box is less than 10m, use
Box. If length of cable is greater than 10m,
general audio cable with 3.5mm male
use CAT 5E/6 cable with Audio Extenders
plug to connect to from Access Link to
at each end.
Comms Box. If length of cable is
4. Depending on the size and configura
greater than 10 metres, use CAT 5E/6
tion of the space, a second Sound-
cable with Audio Extenders at each
House may be required. Consult with
end.
Hear and Learn.
UConnect SoundHouse & Mini, 975 Point to Pair, Redcat Point to Pair & Topcat Point to Pair are part of the
This configuration of SoundHouse includes our Access Link receiver. Our Flexmike
and Sharemike are paired to the Access Link pre installed in the SoundHouse. These
microphones are charged and stored in the SoundHouse for convenient usage.
Your RECESSED SoundHouse is equipped with HEARING AUGMENTATION facilities. This
means forms of electronic Instructional Audio, PA, Screens – will be connected to the
SoundHouse making it available to people in these spaces who have receivers built in their
hearing aids.
400mm required
at mounting location
to allow access
300mm
Projector
2
500mm
3
600mm
required
at mounting
location
to allow
access
1000mm
from floor
7
5.
Braille Tactile signs provided by Hear
and Learn. These are compulsory and
mounted to these rules:
•
Sign must be located not less than
•
1200 mm and not higher than
•
1600 mm above the floor or ground
surface
•
Located on wall on the latch side of
the door with the leading edge of
the sign located between 50 mm
and 300 mm from the architrave or
if this is not possible, the sign may
be placed on the door itself.
See
hearandlearn.com.au/hearing-augmentation-solutions
hearandlearn.com.au
Offices Australia wide (03)93709355
By Others
TV
4
5
Comms
Box
Second
SoundHouse
6
Gym speakers
6.
HearAssist includes local installation
assistance, commissioning and staff
training.
7.
Connection of power to GPO's prebuilt
into SoundHouse. No wall GPO(s)
required.
Hear and Learn
Speaker cable help
hearandlearn. com. au
/install
technology family.
1/12
Advertisement

Related Manuals for Hear and Learn UConnect SoundHouse


Summary of Contents for Hear and Learn UConnect SoundHouse
- Page 1 Hear and Learn. be placed on the door itself. hearandlearn.com.au/hearing-augmentation-solutions hearandlearn.com.au UConnect SoundHouse & Mini, 975 Point to Pair, Redcat Point to Pair & Topcat Point to Pair are part of the Hear and Learn technology family. Offices Australia wide (03)93709355...
- Page 2 The SoundHouse recessed-in-wall model is designed for recessing into a wall cavity. NOTE: This requires carpentry which stakeholders in this project have been advised about previously. Recess in Cavity as an add on to Music/ Performance Audio Infrastructure by Others There are two parts: The SoundHouse and the flange to cover the...
- Page 3 Recess in Cavity as an add on to Music/ Performance Audio Infrastructure by Others OUTPUT From Comms Box Cables to TransmitterTray OUTPUTS on the front of SoundHouse 3/12...
- Page 4 Recess in Cavity as an add on to Music/ Performance Audio Infrastructure by Others 4/12...
- Page 5 Recess in Cavity as an add on to Music/ Performance Audio Infrastructure by Others 5/12...
- Page 6 90 mm but not Slide the cover flange more to allow safe onto SoundHouse Box operation of the Template for recessing Hear and Learn SoundHouse before fixing box to wall SoundHouse door. carpentry. Download installation template at: hearandlearn.com.au/install 6/12...
- Page 7 Screw fix Soundhouse box to in wall carpentry. Spacers may be required. Recess in Cavity as an add on to Music/ Performance Audio Infrastructure by Others Screw fix Hole dimensions through for pilot holes cut outs on in stud/spacer both sides. 300mm Distance between right and left...
- Page 8 Detailed stud mounting hole location Recess in Cavity as an add on to Music/ Performance Audio Infrastructure by Others 8/12...
- Page 9 Recess in Cavity as an add on to Music/ Performance Audio Infrastructure by Others Precabling is to be completed prior to installation of 25mm hole shown is to be used SoundHouse in accordance with electrical diagrams for the power supply with an electrician 25mm power for the project.
-
Page 10: Cable Connection
See speaker cabling instructions at hearandlearn.com.au/install Cable Connection If your SoundHouse has Recess in Cavity Access Link/receiver/microphones as an add on to Music/ Performance Audio Infrastructure by Others Output from Access Link to amp input in Comms Box for gym speakers 10/12... - Page 11 Cable Connection If your SoundHouse has Recess in Cavity Access Link/receiver/microphones as an add on to Music/ Performance Audio Infrastructure by Others OUTPUT From Comms Box Cables to TransmitterTray OUTPUTS on the front of SoundHouse 11/12...
- Page 12 Recess in Cavity as an add on to Music/ Performance Audio Infrastructure by Others 12/12...
Need help?
Do you have a question about the UConnect SoundHouse and is the answer not in the manual?
Questions and answers