Advertisement
Quick Links
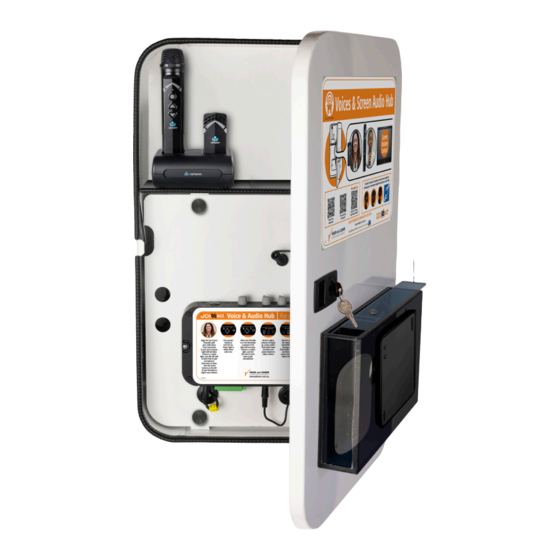
UConnect SoundHouse by hearandlearn.com.au is a bespoke steel cabinet
complete with internal electronics, power supplies, labelling and signage for
capturing and delivering instructional audio in learning spaces.
There are two versions of the UConnect SoundHouse – our WALL MOUNTED
version and our RECESSED version. This document is relevant to installing our
WALL MOUNTED version which have a stylised rear body for easy install complete.
It is not designed to be recessed into a wall cavity.
SOUNDHOUSE IS FOR EVERYDAY USE BY TEACHERS AND LEARNERS, BE UNOBSCURED, HAVE EASY ACCESS AND WITH LINE OF SIGHT OF AREAS OF THE ROOM.
1A
1B
2A
1A.
For the purpose of Hearing Augmentation,
use CAT 5E/6 cable with 3.5mm Stereo
SoundHouse captures and distributes
Audio Cat5e/6 Extenders at each end
TV/Screen/Projector audio. No
for connection to SoundHouse (via
additional speaker infrastructure
3.5mm male plug) and to TV/Screen/
required. If the length of cable from
/Projector (to suit output of device).
output of TV/Screen/Projector to
1B.
For the purpose of Hearing
SoundHouse is less than 10m, use
Augmentation, SoundHouse captures
general audio cable with 3.5mm male
front office messaging/PA. From clos
plug to connect to SoundHouse with
est PA speaker, cable from rear of
suitable connection to TV/Screen/
speaker to SoundHouse to terminal
Projector. If length of cable from out-
in SoundHouse. SoundHouse trans
put of TV/Screen/Projector to
forms signal internally – no additional
SoundHouse is more than 10 metres,
transformer required.
UConnect SoundHouse & Mini, 975 Point to Pair, Redcat Point to Pair & Topcat Point to Pair are part of the
Your wall mounted SoundHouse is equipped with HEARING AUGMENTATION facilities.
This means forms of electronic Instructional Audio, PA, Screens – will be connected to the
SoundHouse making it available to people in these spaces who have receivers built in their
hearing aids.
Additionally, your wall mounted SoundHouse MAY be equipped with SOUNDFIELD
facilities. This means electronic Instructional Audio will be delivered by Hear and Learn
speakers in the space, and voices will also be captured by Hear and Learn teacher
Flexmikes and student Sharemikes
400mm required
at mounting location
to allow access
300mm
Projector
TV
PA
25mm
1000mm from floor
Flexmike
Sharemike
5
2A. Your SoundHouse may have Soundfield
equipment installed. Hear and Learn one
piece teacher Flexmike and student
Sharemike paired to SoundHouse via
1.9 ghz Dect platform to avoid congestion
with other forms of education technology.
Microphones are stored and charged
within the lockable SoundHouse.
2B.
Your SoundHouse may have Soundfield
equipment installed and will involve
speakers being installed. PLEASE SEE THE
SPEAKER CABLING INSTRUCTIONS at
hear andlearn.com.au/install. This will
See
hearandlearn.com.au/hearing-augmentation-solutions
hearandlearn.com.au
Offices Australia wide (03)93709355
TCQ
WMQ
2B
600mm
DRQ
C1055
500mm
required
at mounting
location to
3
allow access
4
involve 2 core, 1.5mm figure 8 speaker
cable to Hear and Learn speaker(s) as
per design to suit size, shape and
ceiling type of learning space. Contact
Hear and Learn for installation advice.
3. Braille Tactile signs provided by Hear
4.
and Learn. These are compulsory and
mounted to these rules:
•
Sign must be located not less than
5.
•
1200 mm and not higher than
•
1600 mm above the floor or
ground surface and
•
Located on wall on the latch side
Hear and Learn
Speaker cable help
hearandlearn. com. au
/install
of the door with the leading edge of
the sign located between 50 mm
and 300 mm from the architrave or
if this is not possible, the sign may
be placed on the door itself.
HearAssist includes local installation
assistance, commissioning and staff
training.
Connection of power to GPO's prebuilt
into SoundHouse. No wall GPO(s)
required.
technology family.
1/12
Advertisement

Related Manuals for Hear and Learn uconnect SoundHouse


Summary of Contents for Hear and Learn uconnect SoundHouse
- Page 1 This will Located on wall on the latch side hearandlearn.com.au/hearing-augmentation-solutions hearandlearn.com.au UConnect SoundHouse & Mini, 975 Point to Pair, Redcat Point to Pair & Topcat Point to Pair are part of the Hear and Learn technology family. Offices Australia wide (03)93709355...
- Page 2 2/12...
- Page 3 3/12...
- Page 4 4/12...
- Page 5 Direct wall mounted Cable routing Precabling is to be completed prior to installation of SoundHouse in accordance with electrical diagrams for the project. All SoundHouses require connection of power to inbuilt GPO’s in SoundHouse. Connection of power to SoundHouses to be performed by electrician. Other cables will require connection as per electrical diagrams.
- Page 6 hearandlearn.com.au/install 6/12...
- Page 7 7/12...
- Page 8 8/12...
-
Page 9: Cable Connection
www.hearandlearn.com.au/install Cable Connection If your SoundHouse has 975 amp/receiver/microphones 9/12... - Page 10 www.hearandlearn.com.au/install Cable Connection If your SoundHouse has 975 amp/receiver/microphones 10/12...
- Page 11 Cable Connection If your SoundHouse has 975 amp/receiver/microphones Screen 1 Screen 2 Other AV device Cables to TransmitterTray on the front of SoundHouse Ensure cables fully plugged in as shown above Ensure power supplies including USB power supplies fully plugged in and turned on 11/12...
- Page 12 12/12...
Need help?
Do you have a question about the uconnect SoundHouse and is the answer not in the manual?
Questions and answers