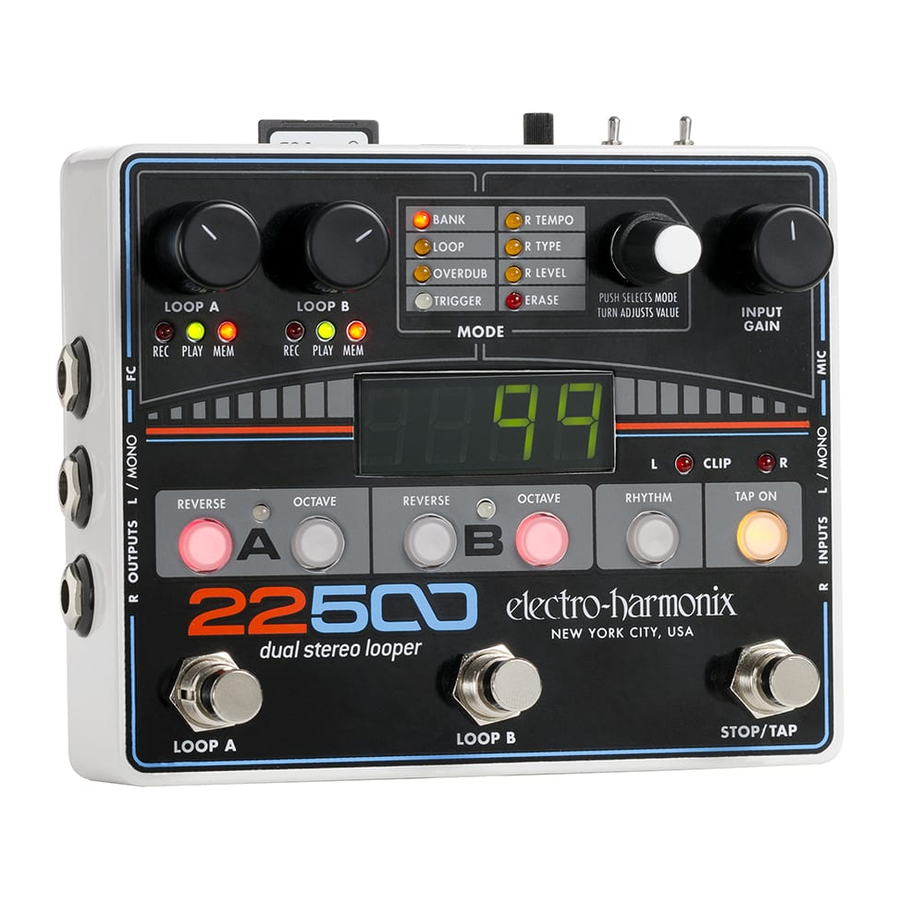
Electro Harmonix 22500 Dual Stereo Looper Manual
- Quick start manual (29 pages) ,
- Quick start manual (2 pages)
Advertisement
- 1 Features
- 2 MODES − Selecting/Types/Use
- 3 Recording/Playing/Overdubbing Loops
- 4 LOOP Mode Explanation
- 5 Parallel Loop Recording/Playback Examples
- 6 Sequential Loop Recording/Playback Examples (Freeform & Loop-Lock Mode)
- 7 CONTROLS & INDICATORS
- 8 MORE ON TEMPO & TAP TEMPO
- 9 MORE ON UNDO/REDO
- 10 I/O & POWER
- 11 SIGNAL PATH
- 12 EXPLANATION OF MODES
- 13 MEMORY CARD, USB, IMPORTING AUDIO
- 14 WARRANTY INFORMATION
- 15 FCC COMPLIANCE
- 16 Videos
- 17 Documents / Resources
Features
- Dual Stereo Loops with either independent or locked loop lengths
- Sequential Looping enables verse/chorus switching
- Parallel Looping allows simultaneous playback of two loops
- Selectable Microphone input with adjustable gain and Phantom Power
- Reverse and Octave functions at the touch of a button
- Undo-Redo your last overdub
- Overdub with adjustable feedback amount
- Create loop lengths that are completely free-form, locked to each other or quantized to internal rhythms
- 100 Loop Banks per SD Card, each bank containing up to 2 loops
- Rhythm Guide with 16 built-in drum loops
- Footswitch selectable for All Stop, Tap-Tempo, or Rhythm Start/Stop
- USB Port enables backup/restore to PC or MAC
- Includes high capacity SD Memory Card for up to 12 hours of loop time
- Optional external Bank-Up/Down Foot Controller (sold separately)
- 9.6VDC/500mA power supply included

Your 22500 comes equipped with an Electro-Harmonix 9.6VDC500mA power supply. The 22500 requires 240mA at 9VDC with a center negative plug and does not accept batteries. Using the wrong adapter may damage your unit and void the warranty. Please do not exceed 10.5VDC on the power plug.
MODES − Selecting/Types/Use
MODE SELECTION & KNOB:

- Press and release the MODE knob to select or deselect modes.
- When a particular mode LED is lit solid, the mode is selected. Turn MODE to adjust the value seen on the display.
- If a mode LED is blinking, no mode is selected. Turn the MODE knob to scroll through all the modes.
- When you land on the MODE you want to adjust, press and release the MODE knob to enter into the mode. The selected LED goes solid.
- At this point you can turn the MODE knob to adjust its value. After doing so, press and release the MODE knob to exit out of the mode. The selected mode LED blinks.
 BANK:
BANK:
BANK mode allows you to select the current loop bank. Each SD Card can hold up to 100 banks, numbered 00 to 99.
 LOOP:
LOOP:
LOOP mode is where you change settings for Loop Lock/Freeform, Loop Lock Multiply, Quantize, Parallel/Sequential, and 1-Shot.
 OVERDUB:
Very much like a Feedback control on a delay effect, the OVERDUB value sets the loop audio volume loss for each pass while overdubbing. Set to 100 so the loop never loses volume.
 TRIGGER:
Trigger the start of loop recording automatically when you start playing your instrument. Use TRIGGER mode to set the threshold level. As the Trigger threshold is set higher, less signal volume is required to trigger loop recording.
 R TEMPO:
R(hythm) TEMPO mode displays and allows adjustment to the tempo. The displayed tempo is in BPM and represents the current tempo for Loops A and B and the Rhythm loop.
 R TYPE:
R(hythm) TYPE mode displays and allows you to select a Rhythm. The 22500 comes supplied with 16 Rhythms from the factory. You may also add your own Rhythm loops.
 R LEVEL:
R(hythm) LEVEL mode sets the volume of the Rhythm loop. The range is 0 to 100. R LEVEL has a second page which displays "COPY". COPY mode initiates the copy of the factory default rhythms to the SD Card.
 ERASE:
ERASE mode erases either Loop A or Loop B or both loops simultaneously.
Recording/Playing/Overdubbing Loops
LOOP FSW ACTIONS

LOOP A First:
Even though the loops may be completely independent in Freeform mode, we recommend you always record Loop A first. When set to Loop-Lock mode, the 22500 requires Loop A to be recorded first since Loop B's length is automatically set by Loop A.
START RECORDING - No Loop in Memory:
NON QUANTIZE MODE:
- Set LOOP Mode to F nP.
- Press LOOP A or B's FSW once to begin recording loop immediately. REC LED lights.
4-BEAT QUANTIZE MODES:
- Set LOOP Mode to F 4P. Each bar is 4 beats.
- Ensure RHYTHM button is lit.
- Press STOP/TAP FSW to start Rhythm loop.
- Press LOOP A's FSW once. Recording begins on the following beat 1. REC LED lights.
END RECORDING / SET LOOP LENGTH:
NON QUANTIZE MODE: Press LOOP A or B's FSW once to end recording, set the loop length, and begin playback. PLAY LED lights solid, MEM LED blinks.
4-BEAT QUANTIZE MODE: Press LOOP A or B's FSW once to enter Record-End mode. The loop will stop recording when it reaches the end of the current bar. PLAY LED lights solid, MEM LED blinks.
The loop immediately begins playback after the recording ends. Exception: in 1-Shot mode, the loop does not play back immediately. You must press Loop's FSW to initiate play back.
LOOP PLAY/STOP:
PLAY: If a loop is stopped, press its FSW once to start playback. PLAY LED lights solid.
STOP: If the loop is playing, overdubbing, or recording, press its FSW twice to stop the loop. MEM LED blinks or is lit solid.
OVERDUB START/STOP:
OVERDUB START: While a loop is playing, press the loop's FSW once to enter overdub. REC, PLAY LEDs lit solid. MEM LED blinks or is lit solid. If blinking, undo may be performed.
OVERDUB STOP: While a loop is overdubbing, press its FSW once to end overdub; the loop continues playback. PLAY LED lights solid, MEM LED blinks indicating undo is available.
LOOP Mode Explanation
Page 1: Quantize, Parallel/Sequential, Loop Lock Settings
The settings in LOOP mode dictate how loops are recorded, played back, and interact with each other. In this mode the following settings can be adjusted:
- Lock Loop B's length to Loop A
- Play and record the loops in parallel or sequentially
- Quantize loops to exact bar lengths, synchronized to the 22500's Rhythm

The settings in LOOP mode dictate how loops are recorded, played back, and interact with each other. In this mode the following settings can be adjusted:

1-Shot mode: In 1-shot mode the loop audio is played one time through and then stops; the loop does not continue to play.
Loop A 1-Shot

A1oF: 1-Shot mode is OFF for LOOP A

A1on: 1-Shot mode is ON for LOOP A
Loop B 1-Shot

b1oF: 1-Shot mode is OFF for LOOP B

b1on: 1-Shot mode is ON for LOOP B
Parallel Loop Recording/Playback Examples
Freeform Mode
In Parallel mode, one or both loops play simultaneously, allowing you to use the 22500 like a 2 track recorder or two independent loopers. To follow these examples, please set LOOP Mode to the settings shown at the start of each section.

FREEFORM PARALLEL — QUANTIZE OFF

- Loops play back simultaneously.
- Each loop may be independently started or stopped.
- Loop B's length is independent of Loop A.
- Either Loop A or B may be recorded first but default tempo is set by A.
RECORD LOOP A:
- Press Loop A's FSW to begin recording Loop A immediately.
- Press Loop A's FSW again to end recording on Loop A and to set its length. Loop A will now start playing back. You could also end Loop A by pressing Loop B's FSW to immediately end Loop A and begin recording Loop B.
- While Loop A is playing, you could overdub onto Loop A by pressing its FSW, stop Loop A by double-tapping its FSW, or just let it play.
RECORD LOOP B:
- Whether Loop A is playing, overdubbing, recording or stopped, press Loop B's FSW to immediately begin recording Loop B. If you press Loop B's FSW while Loop A is making its initial recording, Loop A's length is set at the moment you press B's FSW.
- Press Loop B's FSW to end recording and to set Loop B's length. Loop B will now start playing back.
- At this point, you could overdub onto Loop B by pressing its FSW, stop Loop B by double-tapping its FSW, or just let it play.
FREEFORM PARALLEL — QUANTIZE ON

- Similar to Freeform mode with Quantize off except Loop A and B's lengths are quantized to the nearest bar. Loop A's initial recording tempo establishes the default tempo for both loops.
RECORD LOOP A:
- Ensure the RHYTHM button is lit. Start the Rhythm loop by pressing the STOP/TAP FSW.
- Press Loop A's FSW. Loop A begins recording on beat 1 of the next bar.
- Press Loop A's FSW to end recording. The 22500 will stop recording on beat 1 of the following bar.
NOTE: Pressing Loop A's FSW before the Rhythm loop is playing puts Loop A in Record-Ready mode. It waits for you to start the Rhythm loop. Once you start the Rhythm, Loop A begins recording on beat 1 of the second bar.
RECORD LOOP B:
- While Loop A is playing, overdubbing, recording or stopped, press Loop B's FSW to put B into Record- Ready mode; Loop B's REC LED blinks. Loop B begins recording on the next bar's beat 1. If Loop A is recording its initial loop when you press B's FSW, Loop A continues to record until the current bar finishes recording.
- Press Loop B's FSW to end recording. Loop B continues recording until the current bar finishes. Loop B then begins playing back automatically.
Loop Lock Mode
Continuing examples of Parallel Loop recording and playback, this time with Loop B's length locked to Loop A.
LOOP-LOCK PARALLEL — QUANTIZE OFF

- Loop A's length automatically sets the length for Loop B.
- Loop A must be recorded first.
- The second digit in Loop Mode sets the loop multiple for Loop B.
RECORD LOOP A:
- Record Loop A as done in Freeform—Quantize Off.
RECORD LOOP B:
- Loop B's record start depends on the current state of Loop A. If Loop A is playing or overdubbing, pressing Loop B's FSW puts Loop B into Record-Ready mode; Loop B begins recording at Loop A's cycle point. If Loop A is recording its initial loop or stopped, pressing Loop B's FSW immediately begins recording Loop B.
- Loop B's length is automatically determined by Loop A's length multiplied by the Loop Multiple setting, the second digit in LOOP mode. For example, if Loop A is 3 seconds and the Loop Multiple is set to 2, Loop B's length will be 6 seconds. Loop B automatically stops recording when it reaches the correct loop length. Both Loop B's REC and PLAY LEDs blink when it is about to stop recording.
PLAYING LOOPs A & B:
- If you start playing one of the loops, the other loop—though remaining silent—will follow along. When you start the second loop, it begins playing immediately in sync with the first loop, as if the second loop was unmuted.
LOOP-LOCK PARALLEL — QUANTIZE ON

- Similar to Loop-Lock mode with Quantize Off except Loop A's length is quantized to the nearest bar. Again, Loop A must be recorded first.
RECORD LOOP A:
- Ensure the RHYTHM button is lit. Start the Rhythm Loop by pressing the STOP/TAP FSW.
- Record Loop A as done in Freeform—Quantize On.
RECORD LOOP B:
- While Loop A is playing, overdubbing, recording or stopped, press Loop B's FSW to put B into recordready mode; Loop B's REC LED blinks. Loop B begins recording on the next bar's beat 1. If Loop A is recording its initial loop when you press B's FSW, Loop A continues to record until the current bar finishes.
- Loop B's length is automatically determined by Loop A's length multiplied by the Loop Multiple setting, the second digit in LOOP mode. For example, if Loop A is 2 bars and the Loop Multiple is set to 2, Loop B's length will be 4 bars. Loop B automatically stops recording when it reaches the correct loop length.
PLAYING LOOPs A & B:
- If the Rhythm loop is playing, Loops A and B start playback on the first beat 1 after pressing their respective footswitches. If no Rhythm loop is playing then Loop A and B play back in the same way as with Quantize Off.
Sequential Loop Recording/Playback Examples (Freeform & Loop-Lock Mode)
In Sequential mode, only one loop plays at a time, allowing you to switch back and forth between the 2 loops either immediately or when one of the loops comes to its end. To follow these examples, please set LOOP Mode to the settings at the start of each section.
FREEFORM SEQUENTIAL — QUANTIZE OFF

- Loops are switched back and forth immediately upon pressing their footswitches.
- Either Loop A or B may be recorded first but A sets Bank's default tempo.
RECORD LOOP A:
- Press Loop A's FSW to begin recording Loop A immediately.
- Press Loop A's FSW again to end recording on Loop A and to set its length. Loop A starts playing back.
- While Loop A plays, you could overdub, stop, or continue playback.
RECORD LOOP B:
- Whether Loop A is playing, overdubbing, recording or stopped, press Loop B's FSW to immediately stop Loop A and begin recording Loop B. If you press Loop B's FSW while Loop A is making its initial recording, Loop A's length will be set at the time you press the Loop B FSW.
- Press Loop B's FSW to end recording and to set Loop B's length. Loop B starts playback.
BACK AND FORTH BETWEEN LOOPS A & B:
- Toggle back and forth between the two loops by pressing the FSW of the loop that is currently not playing or overdubbing.
- Let's say both loops contain audio and at the moment Loop B is playing. If you press Loop A's FSW, Loop B immediately stops playback and Loop A starts.
NOTE: Freeform Sequential can also be performed with Quantize on.
LOOP-LOCK SEQUENTIAL — QUANTIZE ON

- Loops change over when the currently playing loop ends.
- Loop A must be recorded first.
- Loop A's length is quantized to the nearest bar.
- Loop B's length is a multiple of Loop A.
RECORD LOOP A:
- Ensure the Rhythm loop is playing.
- Record Loop A as done in Freeform—Quantize On.
RECORD LOOP B:
- While Loop A is playing or overdubbing, press Loop B's FSW to put B into Record-Ready mode; Loop B's REC LED blinks. When Loop A comes to the end of its loop, Loop B begins recording immediately. Loop A stops playback.
- Loop B's length is automatically determined by Loop A's length multiplied by the Loop Multiple setting, the second digit in LOOP mode. For example, if Loop A is 2 bars and the Loop Multiple is set to 3, Loop B's length will be 6 bars. Loop B automatically stops recording when it reaches the correct loop length. Both Loop B's REC and PLAY LEDs blink when it is about to stop recording.
BACK AND FORTH BETWEEN LOOPS A & B:
- If Loop A is playing or overdubbing and you press Loop B's FSW, Loop B enters Play-Ready mode (B's PLAY LED blinks), and waits for Loop A to end before changing over to Loop B. Same for going from Loop B to Loop A.
NOTE: Loop-Lock Sequential can also be performed with Quantize off.
CONTROLS & INDICATORS
LEFT INPUT TOGGLE SWITCH (MIC/INST) – The left channel has two input connector choices: set LEFT INPUT to the down position for the ¼" instrument input jack or set to the up position for the XLR microphone input.
MIC TRIM Knob – The MIC TRIM knob allows you to fine tune the gain of the XLR MIC input jack. The maximum gain available at the MIC TRIM knob is +27dB. Normally it is best to start with MIC TRIM at its maximum setting.
PHANTOM POWER TOGGLE SWITCH (ON/OFF) – when set to the upper, ON position, phantom power is applied to the XLR MIC input jack. Set to the down position to disable phantom power on the microphone input.

Please ensure your microphone can withstand phantom power (+45VDC) before setting this switch to the ON position. In particular, phantom power is known to possibly damage ribbon microphones.
INPUT GAIN Knob – The INPUT GAIN knob sets the overall gain for both the LEFT and RIGHT inputs equally. INPUT GAIN also sets the output level of your dry signal at the output jacks. Ideally you would turn up INPUT GAIN until you see the CLIP LEDs light briefly and then reduce the INPUT GAIN slightly. If you need more output level for the dry signal do not be afraid to turn up the INPUT GAIN knob. The maximum gain available at the INPUT GAIN knob is +14dB. Unity gain for the ¼" inputs is located at about 11 o'clock on the INPUT GAIN knob.
When the LEFT INPUT switch is set to MIC, the MIC TRIM knob on the rear panel first sets the microphone's gain, and then the INPUT GAIN knob further adjusts the gain. If you attach both a microphone and a Right input, use MIC TRIM to match the microphone's level to the Right input. Then use INPUT GAIN to set the input volume for both channels.
CLIP L & R LEDs – When an input signal's amplitude exceeds the maximum input level of the 22500's A/D converter, the channel's respective CLIP LED briefly lights up. Aim to adjust the INPUT GAIN knob so that these LEDs barely ever light. However it is also not wrong if they light consistently. Let your ears decide if there is audible distortion. If distortion is present and it doesn't sound right, turn down the INPUT GAIN knob.
LOOP A & LOOP B Knobs – These two knobs set the output volume for their respective loops. The LOOP A knob adjusts the output volume for Loop A at all times and the LOOP B knob adjusts the output volume for Loop B at all times. These knobs are always live and are not saved with loop banks.
REC LEDs for LOOP A & LOOP B – These red LEDs, along with the PLAY and MEM LEDs, give a visual indication of each loop's current activity.
When the REC LED is lit solid but PLAY and MEM are not lit: the respective loop is currently recording its initial loop.
When the REC LED is lit solid while also PLAY and MEM are active: the loop is currently overdubbing onto an established loop. Only one loop can record or overdub at a time; Loop A and Loop B cannot simultaneously record or overdub. One loop can record or overdub while the other plays though.
A blinking REC LED indicates one of two things:
- You pressed a loop's footswitch to begin recording a new loop and the loop is not yet recording but is in Record-Ready mode. Record-Ready occurs if you have set a Trigger threshold (see TRIGGER mode) for the loop and now the 22500 is waiting for an audio signal to exceed the threshold at which point it will begin recording. Record-Ready also occurs when a Quantize mode (see QUANTIZE) is enabled: after pressing a loop's FSW to begin recording, the 22500 waits for the next bar's beat 1 or the next beat of the Rhythm loop and then automatically starts recording on the beat.
- You are about to finish recording an initial loop. When recording a quantized loop – during the intended last bar of the loop – press the loop FSW to enter Record-End mode. The 22500 will record out the rest of the bar while the REC LED blinks. If you have Loop-Lock mode enabled, when recording Loop B, Loop B's REC LED automatically blinks to indicate it is about to stop recording Loop B.
MEM LEDs for LOOP A & LOOP B – If these orange LEDs are lit solid or blinking, it indicates that a loop is currently in memory. A blinking MEM LED indicates that undo or redo is available for the loop. The table below describes the MEM LEDs four different states:
| MEM LED STATE | WHAT IT MEANS |
| OFF | The respective loop is empty; it has no audio in memory. |
| ON | The respective loop contains audio that may be played or overdubbed but cannot perform Undo or Redo. |
| BLINKING Rapidly | The respective loop contains audio and you can perform an Undo function that will erase the entire loop permanently. This state occurs right after recording an initial loop and is a quick way to erase the loop if you are not satisfied with it. |
| BLINKING at Medium Pace | The respective loop contains audio and an overdub was recently performed. Both Undo and Redo are available to remove or restore the last overdub layer. |
PLAY LEDs for LOOP A & LOOP B – If these green LEDs are lit solid for a respective loop, the loop is playing. When both the REC and PLAY LEDs are lit for a respective loop then the loop is overdubbing.
The PLAY LED blinks to indicate the loop is about to start or stop playing. This occurs when the 22500 is set to Sequential mode with either Loop Lock or Quantize enabled. In these cases the loop currently playing will finish out its loop while PLAY blinks before changing over to the other loop. The PLAY LED also blinks when you are about to finish out the recording of an initial loop with either Loop Lock or Quantize enabled.
MODE/VAL Knob – The MODE/VAL knob has no pointer because it is attached to a rotary encoder that can be continuously rotated in either direction. The MODE/VAL knob has two functions: 1) to cycle through and choose one of the 8 available modes and 2) once a mode is chosen, to adjust the value of that mode. When you land on any given mode, the current value of the mode is displayed in the 4-digit display.
SELECTING MODES – The 8 selectable modes are located to the left of the MODE/VAL knob. Each mode has an LED that, when lit solid, indicates the mode is selected and its value is ready to be adjusted by turning the MODE/VAL knob. If a mode LED is blinking, turning MODE/VAL allows you to scroll through all modes.
When you arrive at the mode you would like to adjust, press and release the MODE/VAL knob to select the mode. The mode's LED will stop blinking and light up solid. If more than one parameter can be adjusted on the 4-digit display, such as in LOOP Mode, the currently selected parameter will continue to blink while you adjust it.
REVERSE Button – Loop A and Loop B each have a REVERSE button allowing you to enable/disable the Reverse function for each loop independently. Press the REVERSE button and the respective loop reverses its Playback/Overdub direction. When enabled, the REVERSE buttons glow red. Reverse can be used at any time except when recording an initial loop.
NOTE: pressing REVERSE while a loop is synchronized to the 22500's Rhythm loop could put the loop out of sync with the Rhythm. In this case we recommend you stop loop playback (Rhythm can continue to play), press REVERSE, and then start loop playback. The reversed loop will be in sync with the Rhythm loop.
OCTAVE Button – Similar to the REVERSE buttons, Loop A and Loop B each have an independent OCTAVE button. Each press of an OCTAVE button cycles the respective loop's speed through the following choices: half speed or down, double speed or up, original speed. The OCTAVE buttons glow red when either half speed or double speed are activated, the OCTAVE button does not illuminate when set to original speed. Enabling half speed or double speed for a loop does not change the playback speed of the other loop or the Rhythm loop. You can playback and overdub in any of the Octave modes.
Half Speed: Upon pressing the OCTAVE button to activate half speed, the 4-digit display shows the word "down" for about 1 second. When set to half speed, the pitch of the loop goes down 1 octave and the tempo is halved. Exactly like playing a tape at half speed.
Double Speed: Press the OCTAVE button again to activate double speed. The 4digit display shows the word "UP" for about 1 second. When set to double speed, the pitch of the loop goes up 1 octave and the tempo is doubled. Exactly like playing a tape at double speed.
TRIGGER LEDs – Loop A and B each have a white LED situated between the REVERSE and OCTAVE buttons. When illuminated these LEDs indicate that TRIGGER mode is activated for their respective loop. These LEDs blink when they are waiting for an input signal to exceed their trigger threshold to start loop recording. See more on TRIGGER mode.
LOOP A & LOOP B FSWs – These two footswitches (FSWs) control much of the activity for their respective loops. If you start with an empty loop, the following actions can be performed by pressing either of the Loop FSWs:
Press Loop FSW once > Start Recording Initial Loop >
Press Loop FSW once > End Recording and Set Loop Length, Immediately Start Playback >
Press Loop FSW once > Start Overdubbing >
Press Loop FSW once > End Overdubbing, Continue to Playback Loop >
Press and Hold Loop FSW for 1.5 Seconds > Undo Last Overdub > Release FSW >
Press and Hold Loop FSW for 1.5 Seconds > Redo Last Overdub > Release FSW >
Double Tap Loop FSW > Stop just the Loop associated with the FSW >
Press Loop FSW once > Start Loop Playback
STOP/TAP FSW – The STOP/TAP FSW performs the following 3 functions: Stop Everything, Start/Stop Rhythm loops, Tap Tempo. The STOP/TAP FSW function can be changed by enabling or disabling the RHYTHM and TAP ON buttons above the FSW.
RHYTHM Button – When this button glows orange RHYTHM is enabled and the STOP/TAP FSW starts and stops the Rhythm loop.
TAP ON Button – Press this button to enable/disable TAP ON and allow the STOP/TAP FSW to perform tap tempo for the loops and Rhythm.
The following table breaks down the function of the STOP/TAP FSW depending on the buttons that are enabled.
| RHYTHM BUTTON | TAP ON BUTTON | STOP/TAP FSW FUNCTION |
Disabled | Disabled |
|
Enabled | Disabled |
|
| Disabled | Enabled |
|
| Enabled | Enabled |
|
MORE ON TEMPO & TAP TEMPO
TEMPO – The 22500 displays the current tempo setting, in BPM, when you select R TEMPO mode. The settable tempo range is 40.0 to 320.0 BPM. The tempo setting is saved with each bank, so as you change banks the last used tempo for a given bank is recalled the next time you return to the bank.
TEMPO ADJUSTMENTS – You may adjust tempo in two ways: 1) by rotating the MODE knob when R TEMPO is selected or 2) by tapping a tempo using the STOP/FSW when TAP ON is enabled.
USING TAP TEMPO – It is usually best practice to give the STOP/TAP FSW 3 taps each time you set the tempo. The 22500 employs tap averaging where 3 or more taps are averaged together to set the tempo. If you have already set the tempo with previous taps and you want to update the tempo slightly faster or slower, then 2 taps can be used but we still recommend going with at least 3 taps. The tap tempo range is 40 to 320 BPM.
NOTE: If you tap 3 times but one pair of taps is way off from the other, the 22500 throws away the 3rd tap which means a 4th tap is needed to set the tempo.
TIME STRETCH & COMPRESSION – When you adjust tempo, Loop A and B do not change pitch. Their audio is time stretched or compressed, making the loops faster or slower to remain in sync with the adjusted tempo setting. The time stretching/compressing algorithm creates audio artifacts that often sound like tremolo, this is normal.
NOTE: The Rhythm loop audio does not time stretch or compress when you adjust the tempo. Instead the Rhythm loop changes speed so both pitch and time are altered.
LOOP A SETS BANK DEFAULT TEMPO – When you record Loop A's initial loop, the tempo setting at the time of its recording establishes the default tempo for the loop bank in which you are working.
RETURN TO ORIGINAL TEMPO – After making adjustments to the tempo you may want to return to the original tempo that was set at the time you first recorded Loop A. Pressing and holding either the STOP/TAP FSW or MODE knob returns the 22500 to Loop A's original tempo setting. The 22500 only returns to Loop A's original tempo, it does not return to Loop B's original tempo, even if Loop B was recorded first.
To return to the original tempo using the STOP/TAP FSW: ensure the RHYTHM and TAP ON buttons are not both enabled, then press and hold the FSW for 1.5 seconds. When both buttons are enabled, pressing and holding the FSW stops all loops. Using MODE knob: make sure the R TEMPO LED is lit solid or blinking and then press and hold the MODE knob for 1.5 seconds.
NON-QUANTIZE TEMPO CHANGES – Tempo is always active, even when you create loops where Quantize is disabled. Most likely the non-Quantized loops you create will have nothing to do with the original Tempo setting. If you plan on changing the tempo of non-Quantized loops you can set the tempo wherever you like before creating Loop A. Then use the initial tempo setting as a starting place for adjusting tempo later. NOTE: Tap tempo may not work as expected for non-Quantized loops.
MORE ON UNDO/REDO
The 22500 allows for one level of undo and redo. When each loop's MEM LEDs are blinking, an undo or redo is capable of being performed for the respective loop. If the MEM LED is lit solid than no undo or redo is available for that loop.
PERFORMING UNDO/REDO – Press and hold the footswitch associated with the loop for which you wish to perform undo. For example, hold down the LOOP A FSW for 1.5 seconds, after which the display shows "undo" or "rEdo". At this point undo or redo has been carried out on Loop A, and the footswitch may be released.
INITIAL LOOP UNDO – After recording Loop A or B's initial loop, if you perform an undo it will completely erase the loop. Using undo to erase a new loop is handy because it is a quick way to start over on a loop while using only your feet. You do need to be careful though because you cannot perform a redo to bring the loop back. After you have entered overdub for a loop you can no longer erase the initial loop using undo, instead use ERASE mode.
OVERDUB LOOP UNDO/REDO – Once you begin overdubbing onto a loop, undo and redo are both available. Undo removes the last overdub layer while redo restores the last overdub, after an undo is performed.
NOTE: if you undo an overdub and then begin overdubbing again, the previous overdub is erased.
UNDO NO LONGER AVAILABLE – Undo and redo are only available at the time you are creating the loop. You lose the ability to undo an overdub if you change loop banks or power cycle the unit. In either case, when you return to the loop bank the loop remains as you left it. If you performed undo on your last overdub and then power cycle or change banks, the overdub cannot be restored with redo.
I/O & POWER
L/MONO Input – ¼" Left Instrument/Line Input Jack. Plug the output of your instrument or another effects pedal into this jack. If you use just one input we recommend you use the L/MONO input. In order to use this jack the LEFT INPUT switch on the rear panel must be set downward to INST. The input impedance presented at this jack is 1MΩ. The maximum allowable signal level into this jack is +11 dBu, it is an unbalanced input.
MIC Input – XLR Input Jack for microphones. To use the MIC input, set the LEFT INPUT switch to MIC. Flip the PHANTOM POWER switch to ON to apply a phantom power voltage of approximately +45VDC to the MIC input. Please ensure the microphone you are using can withstand phantom power before enabling the switch. In particular, phantom power is known to possibly damage ribbon microphones. The input impedance presented at the XLR input is 10kΩ.
R Input – ¼" Right Instrument/Line Input Jack. Plug the output of your instrument or another effects pedal into this jack. Use this jack for stereo recording or for recording a second instrument. The input impedance presented at this jack is 1MΩ. The maximum allowable signal level into this jack is +11 dBu, it is an unbalanced input.
L/MONO Output – ¼" Left Output Jack. The Left output signal is sent through this jack. The dry signal present at the Left input – whether the ¼" input or the MIC input – will be output on the L/MONO Output jack. The left signal on Loop A, Loop B, and the Rhythm loop come out of the L/MONO Output jack. The source impedance of the L/MONO Output is approximately 400Ω.
R Output – ¼" Right Output Jack. The Right output signal is sent through this jack. The dry signal present at the Right input jack is output on the R Output jack. The right signal of Loop A, Loop B, and the Rhythm loop come out of the R Output jack. The source impedance of the R Output is 400Ω.
FC Jack – ¼" Foot Controller Jack. Insert a standard, mono ¼" instrument cable into the FC jack. Connect the other end of the cable to the optional 22500 Foot Controller. The 22500 Foot Controller can be used to scroll up or down through the 22500's loop banks. Press and hold the footswitches on the Foot Controller to jump by 10 through the banks. The 22500 does not accept general purpose footswitch boxes at its FC jack. Use the 22500 Foot Controller only.
9V Power Jack – Connect the output plug of the supplied AC Adaptor into the 9VDC power jack on the rear panel of the 22500. The 22500's current requirement is 240mA at 9VDC. The polarity of the power jack is center negative. The maximum allowable power supply voltage is 10.5 VDC.
SIGNAL PATH
Left/Right Audio Paths – The Left and Right channels remain separate throughout the 22500.
Signals input through either the L/MONO ¼" jack or the XLR MIC connector are recorded onto the left channel of each loop. The loop's left channel is output through the L/MONO output jack only. You cannot record L/MONO ¼" jack or XLR MIC inputs simultaneously. Use the LEFT INPUT toggle switch to choose one or the other. When LEFT INPUT is set to INST, the L/MONO ¼" jack connects to the input of the loop recorder. The MIC setting connects the XLR input to the loop recorder.
Signals input through the R ¼" input jack are recorded onto the right channel of each loop. The loop's right channel is output through the R output jack only.
Use the EHX Pan Pedal, mixer, or audio workstation with the outputs of the 22500 to create a stereo mix-down for a variety of applications.
Stereo Looping – The 22500 always records each loop in stereo, no matter your settings or the connections to the input/output jacks.
EXPLANATION OF MODES

- Press and release the MODE knob to enter in and out of modes.
- When a particular mode LED is lit solid, then the mode is selected.
- If a mode LED is blinking, no mode is selected. Turn the MODE knob to scroll through all the modes.
- When you land on the MODE you want to adjust, press and release the MODE knob to enter into the mode. The selected LED goes solid.
- At this point you can turn the MODE knob to adjust its value. After you have adjusted the value, press and release the MODE knob to exit out of the mode. The selected MODE LED blinks.
NAVIGATING THROUGH THE MODES – The MODE-encoder knob is used to navigate around the 8 Modes. While any of the 8 Mode LEDs is blinking, turning the MODE knob in either direction will cycle in a circular fashion through all the modes.
Rotate the MODE knob clockwise to cycle around the modes in a clockwise direction. For example, rotate clockwise to move from BANK to R TEMPO to R TYPE. Rotate MODE counter-clockwise to cycle through the modes in a counterclockwise direction, for example from BANK to LOOP to OVERDUB.
As you move from mode to mode, the 4-digit display shows the value of the current mode. When you arrive at the mode you want to adjust, press and release the MODE knob. Once a mode is selected, its LED goes solid. At this point, turn the MODE knob to adjust the current value of the selected mode. Press and release the MODE knob again to exit the current mode. The mode LED will start blinking and you may now cycle around to other modes.
BANK Mode – BANK mode allows the user to choose the current loop bank. The loop banks are not stored internally to the 22500 but instead are located on the SD Card. The range of available banks on any given SD Card is 00 to 99. A blank card gives you 100 empty banks ready for use.
Whenever you select an empty bank, most mode values automatically default back to the last settings you used when recording a new initial loop even if it was in a different bank number. The 22500 defaults back to your last used mode values so that you can set up the 22500 to work a certain way and always come back to that way of working when creating new loops. If you would like to change your default settings, first go to an empty bank and then change the settings before starting to record on either loop. The following modes are saved as part of your default loop mode: LOOP, OVERDUB, TRIGGER, R TEMPO, R TYPE, R LEVEL, RHYTHM, and TAP ON.
The 22500 does not allow Loop Banks to change while a loop is recording or overdubbing. If you change banks while playing loops, everything stops.
LOOP Mode – LOOP mode is used to set key parameters for creating loops and controlling how the loops interact with each other. In LOOP mode you can choose Parallel or Sequential loop play, set up Quantize, Freeform or Loop-Lock, the Loop-Lock Multiple, and 1-Shot modes.
LOOP mode has 3 pages. Pages 2 and 3 disable/enable 1-Shot mode while the first page sets all the other parameters listed above. Here's a more in-depth breakdown of LOOP mode's 3 pages:
LOOP Mode: Page 1 – Each of the 4 digits sets an individual parameter:
Some typical examples of LOOP mode's Page 1 display include:

Digit 1 – F or L: Digit 1 determines the relationship between Loop A and Loop B's length. When set to F, for Freeform, Loop A and B are completely independent and may have different lengths that are unrelated to each other. When set to L, for Loop Lock, Loop B's length is always a multiple of a Loop A and the 22500 automatically sets Loop B's length when recording Loop B's initial loop.
Digit 2 – blank, .5, 1, 2, ..., 9, U: When Digit 1 is set to L, Digit 2 sets the Loop Lock Multiple for Loop B. If Digit 1 is set to F, then Digit 2 is blank since a Loop B's length is not locked to Loop A.
Digit 2 has 10 numbers available, each signifying the loop multiple for Loop B, for example.5x, 1x, 2x up to 9x. The numbers start with.5, where Loop B will be half the length of Loop A. When Digit 2 is set to 1, Loop B's length equals Loop A's length, when set to 2, Loop B is twice the length of Loop A and so on up to 9x the length of Loop A.
Digit 2 has one other choice available which is the letter U. When set to U, you, the user, can set the loop multiple as you create Loop B where the only restriction is that the multiple must be a whole number. To end Loop B, when set to U mode, press Loop B's FSW, then the 22500 will continue recording Loop B until it comes to the end of the current Loop A multiple.
Digit 3 – Quantize Modes – n, 2, 3, 4, 6, b: Digit 3 sets the Quantize mode for both Loop A and Loop B. Quantize mode allows you to create loops that are exact bar or beat lengths. For example, a loop that is exactly 4 bars in length, with each bar 4 beats in length or a loop that is 6 beats long. Quantize is disabled when Digit 3 is set to n (Non-Quantize), otherwise Quantize is enabled.
NOTE: Quantized loop lengths are synchronized to the 22500's Rhythm drum loop which must be playing in order to record a Quantized loop. The easiest way to properly play in time with a Quantized loop is to play along with one of the Rhythm loops. The 22500 does not start recording the first loop on a Quantized loop bank unless the Rhythm loop is also playing. For example, if you press Loop A's FSW to begin recording a loop and the Rhythm loop is not playing, Loop A remains in Record-Ready mode (REC LED blinking) until 1 bar or 1 beat after you start Rhythm loop playback.
Using Quantize Modes 2, 3, 4, 6: These four quantize modes all record loops in the following manner:
- Press either loop footswitch, the 22500 begins recording the loop on beat 1 of the Rhythm loop's following bar. For example, if you press the Loop A FSW on beat 2 of the Rhythm loop, the 22500 enters RecordReady mode and waits for the Rhythm loop's next beat 1. At the moment beat 1 hits, the 22500 starts recording.
- When ending a recording, the 22500 records out the current bar in which you press the loop FSW. If you press the loop FSW on beat 2 during the second bar of recording, the 22500 continues to record up to the following beat 1 of the next bar, at which point the 22500 goes into PLAY mode. The loop will be exactly 2 bars in length.
2: 2/4 time, quantizes loops to full bar lengths where each bar has 2 beats.
NOTE: Quantize mode 2 works best with Rhythm loops that are 2/4, 4/4, and 6/8. The 22500 does not contain a 2/4 Rhythm loop, though the majority of factory Rhythms are 4/4. When you have a Rhythm playing, the RHYTHM button's LED blinks on the first beat of each bar while the TAP ON button's LED blinks on both beats.
3: 3/4 time, quantizes loops to full bar lengths where each bar has 3 beats.
NOTE: Quantize mode 3 works best when the Rhythm Type is set to a 3/4 drum loop. The 22500 does not contain a 3/4 Rhythm loop from the factory but R TYPE 01 is a generic metronome click which may be used. When you have a Rhythm playing, the RHYTHM button's LED blinks on the first beat of each bar while the TAP ON button's LED blinks on all three beats.
4: 4/4 time, quantizes loops to full bar lengths where each bar is made up of 4 beats. Since most popular western music uses the 4/4 time signature, this will probably be the most used Quantize mode. The majority of built-in rhythms that are supplied with the 22500 are in 4/4 time.
NOTE: When you have a rhythm playing, the RHYTHM button's LED blinks on the first beat of each bar while the TAP ON button's LED blinks on all four beats.
6: 6/8 time, quantizes loops to full bar lengths where each bar has six 1/8th note beats. Normally 6/8 time is used to create a triplet feel and the 1 and 4 beats are usually accented.
NOTE: Quantize mode 6 works best with a 6/8 Rhythm loop. One 6/8 Rhythm loop is included from the factory: R TYPE 16. When you select 6/8 quantize, the RHYTHM button's LED blinks on the first beat and the TAP ON button's LED blinks on all six beats.
b: beat, quantizes loop lengths to the nearest beat. You can make your loop any number of beats in length. The 22500 begins recording the loop on the following beat after you press either the Loop A or Loop B FSW and ends the loop on the first beat after you press either FSW. We consider b Quantize to be an expert setting and is best attempted after you have mastered one of the other Quantize settings.
NOTE: Both the RHYTHM and TAP ON LEDs blink on every beat.
Digit 4 – Parallel or Sequential Modes – P or S: Digit 4's setting determines how Loop A and Loop B interact with each other when recording, overdubbing and playing back.
P: Parallel Mode: Loop A and Loop B playback simultaneously. Additionally one loop can either be recording or overdubbing while the other plays, both loops cannot record or overdub at the same time. When Digit 1 is set to F, Loop A and B are independent of each other so the 22500 can be used like two loopers in one unit. Set Digit 1 to L for Loop-Lock mode and the 22500 acts like a 2-track recorder where Loop B's length is set by Loop A and the two loops play back in sync with each other.
S: Sequential Mode: Only one loop plays, records or overdubs at a time. Sequential mode works best when you want to change from one loop to another without any gaps, for use in verse.chorus situations or A.B parts. When Digit 1 is set to F and Digit 3 to n, Non-Quantize, the loops change instantly when you press the FSW of the loop currently not playing. If you set Digit 3 to any of the Quantize modes, the loops change over on the next beat 1, or the next beat if Digit 3 is b. If you set Digit 1 to L, no matter the setting of Digit 3, loops change over when the loop currently playing reaches its end.
1-SHOT Mode – When enabled, 1-Shot plays a loop in its entirety just once. When the end of the loop's audio is reached – whether recording, playing or over-dubbing – the loop goes into Stop mode automatically.
NOTE: While 1-Shot is enabled: after recording an initial loop, the loop stops immediately and does not playback once. You must press the loop's FSW to hear the loop.
LOOP Mode: Page 2, LOOP A 1-SHOT Setting – Page 2 of LOOP mode enables/disables 1-Shot mode for Loop A. The display shows A1oF when 1-Shot mode is turned off or A1on when 1-Shot is enabled.
LOOP Mode: Page 3, LOOP B 1-SHOT Setting – Page 3 of LOOP mode enables/disables 1-Shot mode for Loop B. The display shows B1oF when 1-Shot mode is disabled or B1on when 1-Shot is enabled.
Changing the 1-Shot setting works the same way as any other mode: press and release the MODE knob to jump into the mode, LOOP LED lights up solid, and then turn the MODE knob to change the setting.
NOTE: upon completing an initial loop recording, the loop does not immediately playback if 1-Shot is enabled. Press the loop's FSW to initiate loop playback.
OVERDUB Mode – OVERDUB mode acts like a Feedback control on a delay, setting the attenuation amount for each loop cycle while overdubbing. The lower the value for OVERDUB, the faster it loses volume with each loop cycle. Set OVERDUB to 100 and the previous version of the loop remains at the same volume during overdub. PRO TIP: set OVERDUB to a value under 100 and the looper acts as a digital delay where the loop length equals the delay time.
TRIGGER Mode – Use TRIGGER mode to automatically start recording a new loop when you play a note on your instrument or pick up a sound with a microphone. TRIGGER mode contains two pages: Page 1 sets the Trigger threshold for Loop A while Page 2 sets the Trigger threshold for Loop B. The higher the value you set for TRIGGER, the lower the amplitude needed from your instrument or microphone to start loop recording. To disable Trigger, decrease the TRIGGER value until the display shows "oFF". Here's how to set up triggered loop recording:
- Go to Page 1 of LOOP mode and ensure Quantize is not enabled. Set the third digit to n. TRIGGER mode does not work in Quantize mode because Quantize has its own method for automatically initiating a recording.
- Navigate to TRIGGER mode for Loop A. Press and release the MODE knob to enter TRIGGER mode.
- Turn the MODE knob to set the Trigger threshold for Loop A. We recommend starting with 80. The higher the threshold setting, the smaller the input signal needed to trigger loop recording. As soon as you change Loop A's Trigger value to something other than "oFF," Loop A's white Trigger LED lights up.
- Press and release Loop A's FSW. You should see both Loop A's REC LED and Trigger LED blinking. The 22500 is in Record-Ready mode, waiting for a sound to trigger recording.
- Start playing your instrument. The 22500 should automatically begin recording upon playing your first note. If the recording does not start, or starts recording late: stop loop recording, increase the TRIGGER value and try again.
- Press Loop A's FSW to end loop recording. Stop recording the loop in the same way you would when not using Trigger.
- Disable TRIGGER by decreasing its setting so that the display shows "oFF".
R TEMPO Mode – R(hythm) TEMPO mode displays the current tempo in BPM and allows for tempo adjustment. Select R TEMPO and turn the MODE knob to change tempo. As you do so, both Loop A and B and the Rhythm loop will follow along with the tempo change. Loop A and B do not change pitch as you adjust tempo but the Rhythm loop does.
If tempo has been adjusted since recording a Loop Bank's first loop – either by tapping in a new tempo or by rotating the MODE knob – press and hold MODE for about 1.5 seconds, while R TEMPO is lit or blinking. The 22500 will jump back to the original tempo.
R TYPE Mode – R(hythm) TYPE mode allows you to choose the current Rhythm loop. The 22500 comes supplied with 16 Rhythms from the factory, in locations 01–16. The Rhythms are stored on and played from the SD Card (see R LEVEL below for steps on restoring the Rhythm loops to a new card). Rhythm loops are for playback only, they cannot be overdubbed.
The display shows three digits: Digit 1, which is not adjustable indicates the time signature for the Rhythm loop (2 = 2/4, 3 = 3/4, 4 = 4/4, 6 = 6/8). Digits 3 and 4 show the current Rhythm type. From the factory 01 to 16 are available but you may add any Rhythm loop between 00 and 99, as the 22500 can playback user Rhythm loops. See "Importing Audio Files for RHYTHM Loops" for information on preparing and importing Rhythm loops.
R LEVEL Mode – R(hythm) LEVEL mode contains 2 pages. The first page is where you set the volume for the Rhythm loop. The range is from 0–100 with 100 being the loudest. R LEVEL's second page is called "COPY". When you insert a new SD Card into the 22500, it normally would not contain the factory default Rhythm loops. The COPY function copies the factory Rhythms to the SD Card. Here's how to perform the COPY function:
- Go to Page 2 of R LEVEL mode so that the word "COPY" is displayed.
- Press and release the MODE knob. R LEVEL's LED should be lit solid.
- Ensure an SD Card is inserted into the 22500. NOTE: if the SD Card contains Rhythm loops in locations 01–16, they will be overwritten when performing the COPY function.
- Press and hold the MODE knob. Release the knob when you see "COPY" blinking.
- Wait 6 seconds. COPY continues to blink while the factory Rhythm loops are copied to the SD Card.
- When COPY is complete, the word "done" is displayed. The SD Card is now ready to play the factory Rhythms.
ERASE Mode – ERASE mode is used to erase one or both loops in the currently selected bank. Erasing both loops will reset all of the current bank's settings back to the default settings. Here's how to perform the ERASE function:
- Select ERASE mode. The ERASE LED should be lit solid.
- Rotate MODE to select the loop to be erased. As you rotate MODE first the A Loop blinks, then B, then both A and B together. Whichever loop is blinking will be the one that is erased.
- Press and hold MODE to erase the loops. After holding for 1.5 seconds, the erase function is completed. When you see the MEM LED shut off for the loop you erased, release MODE.
MEMORY CARD, USB, IMPORTING AUDIO
SDHC Memory Card – The 22500 records 16-bit audio at a sample rate of 44.1 kHz. All recorded audio is stored on removable Secure Digital High Capacity (SDHC) memory cards. Cards ranging from 4GB to 32GB, labeled as SDHC, are acceptable. We recommend you use cards with a speed class of 4 or higher, as indicated by a number inside a semi-circle on the card itself. The 22500 does not accept cards labeled as SD (2GB or less) or SDXC (larger than 32GB).
The 22500 comes supplied with an 8GB card which allows for a total loop recording time of up to 12 hours. The maximum recording time for one single loop is 6 hours, no matter the size of the card. Regardless of the card's size, each card holds up to 100 loop banks.
22500 Requirements for SDHC Cards
Minimum Card Size: 4GB
Maximum Card Size: 32GB
Card Speed: Speed Class 4 or greater is recommended
Approximate total loop recording time for each standard SDHC card size:
4GB = 6 hours
8GB = 12 hours
16GB = 24 hours
32GB = 48 hours
Max Recording Time for one single loop no matter the card size: 6 hours
Cards need to be formatted to the FAT32 file system. Most cards are preformatted for FAT32. If you need to format an SD Card, attach the 22500 to a Windows PC via the USB port, and choose "FAT32" under the File System pulldown menu.
The 22500 does not record or playback without a proper SDHC Card inserted into its card slot.
SD Card Removal – To remove the SD card, push the card into the 22500, this releases the card and allows a spring to push it out of the slot part of the way. Once released, pull the card out the rest of the way.
You can exchange SD cards in the 22500. Please make sure the 22500 is in the idle state before removing the card; it should not be playing, recording or overdubbing when you remove the card. If you do remove the card during recording or overdubbing, you could damage the card's file system where the 22500 does not properly read or write to the card. If this occurs, connect the 22500 to a Windows PC with a USB cable and run the Scandisk utility on the card. If the card still does not work, re-format the card for FAT32; unfortunately you will lose all loops that are on the card.
USB Port – The 22500 is fitted with a USB Port allowing you to move the 22500's files to and from your computer using a standard USB cable. The USB Port is located on the rear panel of the 22500, next to the SDHC card slot. When you connect your 22500 to a computer, through the USB connector, it will display the SD card inside the 22500 as a "Removable Disk." You may then copy files to and from the SD card. The 22500 is automatically recognized by PCs running Windows XP or later or Macs running OS X.
It is important to turn off write-caching when connecting 22500 to a PC. Follow these steps to turn off write-caching:
- In Windows explorer, right-click the Removable Disk (X:) icon and select Properties.
- Select the Hardware tab.
- Under all disk drives, select EHX 22500 Looper USB Device.
- Select Properties.
- Select the Policies tab. If the Windows user is not an administrator, select Change Settings to reveal a Policies tab.
- Select Quick Removal or Optimize for Quick Removal.
The 22500 records all audio files as wave files (.wav). Any audio program that accepts wave files as a viable format can play or edit the 22500 audio files. Every PC and Mac can play wave files. The biggest plus is the ability to insert your 22500 files into your favorite software application.
22500's SD Card File System – All loops that you record on the 22500 are placed into the Bank folders. The Bank folders are numbered 00 through 99 and they match the Bank number you see on the 22500's display when you scroll through the banks. The Bank folders are titled BANKxx on the SD Card, where xx stands for a number between 00 and 99. Only the bank numbers in which you have recorded audio will have folders. For example, if you have never recorded into Bank 20, there will be no folder called BANK20. If you erase a bank, the bank folder remains but no audio files will be present.
All of the Rhythm Loops are located in the folders called LOOPxx on the SD Card. The xx stands for a number between 00 and 99. From the factory, the 22500 comes supplied with 16 loops.
Using a PC or Mac, you can import audio files made elsewhere onto the 22500 or backup and restore loops to the SD card inside the 22500.
Backing Up Files – The best way to back up any given loop or loop bank would be to copy the bank's entire folder to a preferred directory on your computer's hard drive. You may want to change the name of the bank folder once on your hard drive to easily determine the contents of the folder. When backing up it is important to save all files in the bank folder including one or both audio files and the USERBANK.SET file.
Restoring Files – To restore a loop, locate the bank folder on your hard drive. Copy the entire bank folder into the 22500's SD card root directory. If necessary, rename the folder to BANKxx, where xx is an available loop number between 00 and 99. You do not need to restore to the same bank number in which the loops were originally recorded.
When restoring files to the SD Card, it is recommended to restore both the audio files and the USERBANK.SET file. The 22500 may not play as intended if USERBANK.SET is not present.
Importing Audio Files for Loop A & Loop B
The 22500 is capable of Playing and Overdubbing audio files that are made elsewhere. Place the files onto the SD card using a computer and USB, and follow the important specifications below for a working audio import:
- The audio files must be in.wav format.
- The.wav files must have 16-bit resolution and a sample rate of 44.1kHz.
- The audio files must be stereo.
- The tempo of the audio files must be no less than 60BPM and no more than 240BPM.
- Call the file intended for Loop A: LOOPA.WAV; the file for Loop B: LOOPB.WAV.
- Find a Bank folder in the root directory of your SD Card then copy and paste it to the same root directory. Do NOT rename it at this time.
- Copy your audio files into the new Bank folder.
- In the new Bank folder, delete the USERBANK.SET file.
- Open the BANKTMPO.TXT file in your Bank folder. In the line, where it says TEMPO = xxx.xxxxx bpm, write in the BPM number used to create the loops; this will be the default tempo for the loop bank. Note: this. TXT file must be in ASCII or ANSI format.
- Rename the Bank folder to a number between 00-99.
Importing Audio Files for RHYTHM Loops
The 22500 allows you to import your own Rhythm loops onto the SD card and play them as your background rhythms. Your Rhythm loops can replace the factory Rhythm loops on the SD Card or be in addition to the factory Rhythm loops. Here's how to import your own Rhythm loops onto the SD Card:
- Connect your computer to the 22500 using a standard USB cable. The SD Card currently seated in the 22500 should pop up as a Removable Disk in your computer's file system. Alternatively, if you have an SD Card reader, you can remove the SD Card from the 22500 and place it in your card reader.
- Look at the root directory of the SD Card. You should see a number of folders called LOOPxx. The Rhythm loops are located in these LOOPxx folders. If you want to create a new loop folder, instead of overwriting an already existing folder, pick one of the LOOPxx folders and copy it. Then paste the folder into the SD Card's root directory, where all the LOOPxx folders are currently located.
- Rename the new LOOP folder to a number that doesn't already exist on the SD Card. Let's say LOOP25.
- Double-click LOOP25 to look inside the folder. Delete the TRACKM.wav file currently located inside the folder.
- Copy your new audio file into the LOOP25 folder. Then rename the audio file TRACKM.wav.
- Double-click the TEMPO.TXT file also located within the LOOP25 folder. There are two parameters that you may edit and the 22500 will recognize: Tempo and BpBar. Write in the original tempo for the audio loop you made and the number of beats per bar (BpBar). Four choices are available for BpBar: 2, 3, 4, and 6:
- 2 = 2/4 or 2 beats per bar
- 3 = 3/4 or 3 beats per bar
- 4 = 4/4 or 4 beats per bar
- 6 = 6/8 or 6 1/8th note beats per bar
We have some rules for the Rhythm loop audio files imported onto the 22500:
- The audio files must be in.wav format.
- The.wav files must have 16-bit resolution and a sample rate of 44.1kHz.
- The audio files must be stereo.
- The tempo of the audio files must be no less than 60BPM and no more than 240BPM.
- The audio files must be named TRACKM.wav.
- The TEMPO.TXT file needs to be present in the LOOPxx folder, preferably copied from an established loop. You must edit two parameters within TEMPO.TXT: Tempo and BpBar.
- In the second line of TEMPO.TXT, where it says TEMPO = xxx.xxxxx bpm, insert the BPM number at which the audio file was created. The 22500 considers this tempo to be the default tempo for this particular Rhythm loop helping it remain in sync at other tempos.
- Write the number of beats per bar in the BpBar setting. 2 gives you 2 beats per bar, 3 gives you 3 beats per bar, 4 yields 4 beats per bar and 6 gives you six 1/8th note beats per bar.
- The allowable Loop folder range is from LOOP00 to LOOP99.
WARRANTY INFORMATION
Please register online at http://www.ehx.com/product-registration or complete and return the enclosed warranty card within 10 days of purchase. ElectroHarmonix will repair or replace, at its discretion, a product that fails to operate due to defects in materials or workmanship for a period of one year from date of purchase. This applies only to original purchasers who have bought their product from an authorized Electro-Harmonix retailer. Repaired or replaced units will then be warranted for the unexpired portion of the original warranty term. If you should need to return your unit for service within the warranty period, please contact EHX Customer Service at 718-937-8300 or info@ehx.com for a Return Authorization Number. Along with your pedal, please include a brief description of the problem as well as your name, address, telephone number, copy of your receipt, and a check or money order.
United States - $12
Canada - $15
Europe and other countries - $25
Ship to:
Electro-Harmonix
C.O New Sensor Corporation
47-50 33rd Street
Long Island City, NY 11101
Attn: Service Department
Please make checks/money orders payable to New Sensor Corporation.
To hear demos on all EHX pedals visit us on the web at www.ehx.com
Email us at info@ehx.com
FCC COMPLIANCE
Note: This equipment has been tested and found to comply with the limits for a Class B digital device, pursuant to part 15 of the FCC Rules. These limits are designed to provide reasonable protection against harmful interference in a residential installation. This equipment generates, uses, and can radiate radio frequency energy and, if not installed and used in accordance with the instructions, may cause harmful interference to radio communications. However, there is no guarantee that interference will not occur in a particular installation. If this equipment does cause harmful interference to radio or television reception, which can be determined by turning the equipment off and on, the user is encouraged to try to correct the interference by one or more of the following measures:
- Reorient or relocate the receiving antenna.
- Increase the separation between the equipment and receiver.
- Connect the equipment into an outlet on a circuit different from that to which the receiver is connected.
- Consult the dealer or an experienced radio. TV technician for help.
Modifications not expressly approved by the manufacturer could void the user's authority to operate the equipment under FCC rules.

VideosElectro-Harmonix 22500 - Review Video
Documents / Resources
References
Download manual
Here you can download full pdf version of manual, it may contain additional safety instructions, warranty information, FCC rules, etc.
Advertisement


Need help?
Do you have a question about the 22500 and is the answer not in the manual?
Questions and answers