Table of Contents
Advertisement
Advertisement
Table of Contents

Related Manuals for Electro-Harmonix 95000


Summary of Contents for Electro-Harmonix 95000
- Page 1 User Reference Manual 95000 performance loop laboratory...
-
Page 2: Table Of Contents
AUX IN Jack | +48V Phantom Power Button | L and R INPUT Combo Jacks ©2017 Electro-Harmonix. All rights reserved. 95000 and Electro-Harmonix and logo are trademarks of New Sensor/Electro-Harmonix. Product and company names used within the manual are trademarks of their respective companies. -
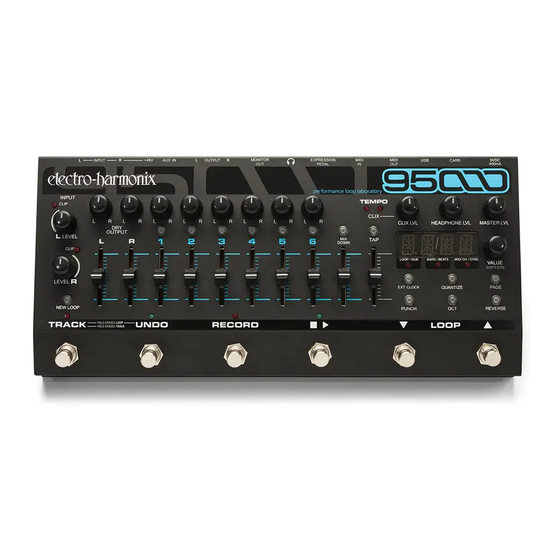
Page 3: Meet The 95000
MEET THE 95000 Thank you for purchasing the Electro-Harmonix 95000 Performance Loop Laboratory. Please set aside some time to read this manual and familiarize yourself with this unique instrument’s layout and operation. Then keep the manual close by to use as a reference guide. -
Page 4: Quick Start Guide
Turn up the HEADPHONE the loop you just recorded. Press PLAY to loop LVL knob to approximately 50%. the 95000 back to the beginning, put the 95000 3. Plug the supplied AC Adapter into an AC into OVERDUB mode, and automatically outlet and insert its output plug into the continue recording onto TRACK 2. -
Page 5: Record 2 Tracks Simultaneously (Stereo) | Record A
2. After about one second, all the Track button also blinks rapidly. buttons blink. Continue to hold down the 6. The 95000 begins recording at the end of footswitches for about another second the Count-In, as indicated by the flashing until the LEDs stop blinking. - Page 6 MIXING RESTORE FACTORY SETTINGS Prepare to Mix To restore your 95000 to its original factory setting: press and hold the REVERSE button for 5 1. You can mix your 6 tracks down to one seconds or longer until you see some of the TRACK stereo Mixdown track at any time.
-
Page 7: Basic Terminology And Key Concepts
LOOP: A loop is made up of 6 mono tracks and one stereo Mixdown track. All tracks are the exact same length. Think of a loop in terms of multi-track tape: the 6 tracks and the Mixdown track in a 95000 loop always playback, overdub or record in parallel, at the same speed and in the same direction. The one exception to this rule occurs with the use of Constant Tempo Mixdown mode, as described later in this manual. - Page 8 Undo: The undo function allows you to remove the last overdub layer that was recorded on a track. The 95000 has one level of undo for each track. You can independently undo each track without affecting the other tracks.
-
Page 9: Monitoring
HEADPHONE LVL knob is an analog knob placed the Left Output. When pan is set to the full CW in the signal path after the 95000’s D/A position, the Input is monitored at the Right Converter. Therefore, it has no bearing on the Output. -
Page 10: The Record Transport
NEW LOOP Button Use the INPUT LEVEL L and R knobs to adjust Press the NEW LOOP button to put the 95000 the amplitude of the left and right input signals into Record-Ready mode. The NEW LOOP before they are sent to the A/D Converter. To... -
Page 11: Input Level L/ R Knobs And Clip Leds | New Loop
Footswitch track(s). The buttons associated with each track or pair of tracks light green when active. The 95000 supports one level of undo/redo per track. This functionality allows the last Erase Tracks recorded audio layer on a given track to be Erase a track so that it plays silence. -
Page 12: Input Level L/ R Knobs And Clip Leds | New Loop
RECORD LED will light up solid anytime the 95000 is recording or overdubbing audio. The RECORD LED blinks at a medium rate when the 95000 is in Record-Ready mode. The table below explains the result of pressing the RECORD footswitch in relation to the current mode of the 95000. -
Page 13: Quantize Button
Reverse function will activate. extended or truncated to the nearest full bar. In But the 95000 will most likely lose its place within Quantize mode, you can be sloppy about ending the bar, even though its tempo is still synchronized the loop;... -
Page 14: Tracks, Track Selection, Mixdown, Tempo
TRACKS, TRACK SELECTION, MIXDOWN, TEMPO TRACKS OVERVIEW There are 6 tracks available for you to record your instruments and vocals. You can record a maximum of 2 tracks simultaneously. Each of the 6 tracks contains a volume fader and pan knob to balance your levels and place your tracks within the stereo spectrum. -
Page 15: Tracks Overview | Track Faders | Track Select
Constant Tempo Mixdown may only be entered To illustrate how this works, imagine you while the 95000 is idle. If the MIXDOWN button record a loop in the key of E and then push is off, press it twice to activate Constant the TEMPO slider upwards. -
Page 16: Buttons | Mixdown Track | Track Pan Knobs
LED only blinks BPM to 240 BPM. The TEMPO slider can then on the first beat of a bar. When the 95000 uses adjust the tempo from half the current tap its internal tempo, the TEMPO slider and/or... -
Page 17: Led Display And Control
LED DISPLAY AND CONTROL LED DISPLAY VALUE Push to Jump Knob The VALUE knob modifies the active parameter. The 4-digit LED display provides visual feedback Push/click the knob to toggle between the left and control for a number of functions. These and right parameters. -
Page 18: Primary Mode Pages | Loop/Dub Mode | Bars/Beats
PRIMARY MODE PAGES beat location. If you turn the VALUE knob while the loop is playing, the 95000 will jump to the LOOP/DUB Mode new location and continue playback. When you The LOOP/DUB page shows the current loop stop a loop, the loop automatically goes back number and the active track’s overdub... -
Page 19: Led Display | Value Push To Jump Knob | Page Button
New settings are global; they affect all of Count-In bars is represented by the loops and are saved in internal memory so number shown in the display. The default that the 95000 recalls your last used setting is 1 bar. settings during power up. Loop Fade-Out... -
Page 20: Rear Connections And Controls
9VDC 400mA Power Jack When either of the EXT. CLOCK modes is enabled, the 95000 uses the MIDI OUT jack as a MIDI THRU Connect the output plug of the factory-supplied jack. Whatever messages the MIDI IN jack receives AC Adapter into this 9VDC power jack. The are passed back through the MIDI OUT jack. -
Page 21: Connector | Expression Pedal Jack | Headphone
This 3.5mm stereo input is mixed with the stereo Plug headphones into the 1/4” Stereo Headphone output of the 95000 in the analog domain and is jack. Each channel of the Headphone jack can output through the L and R OUTPUT jacks, the deliver 0.1W into 16 ohms. -
Page 22: In Depth: Recording Tracks
INPUT jacks, or both if recording two separate pressing either the RECORD or PLAY footswitches instruments or if recording in stereo. to end the loop. The 95000 begins recording 2. To monitor your recording, connect one or immediately upon pressing RECORD and ends... -
Page 23: Quantize Loop Recording | Stereo Mode | Record A
New Loop. In any QUANTIZE mode has no effect on the state of case, we do not generally recommend the 95000 once you have recorded the New moving the TEMPO slider while recording a Loop and established the loop length. -
Page 24: Quantize Loop Recording | Stereo Mode | Record A
If you would like to halt Track Erase, You can only change loop numbers while the release the TRACK footswitch before the 95000 is in Idle or Play modes. If the 95000 is LEDs cease blinking. playing back a loop and you change loop ... -
Page 25: In Depth: Overdubbing Tracks
DUB feedback setting. Using high settings such as 8 or 9, it is possible to use the 95000 as a Overdubbing very long delay pedal. Set DUB to 0 and all previously recorded audio will be erased. -
Page 26: Choose A Track To Overdub | Overdubbing | Dub
BPM track. Enable Punch-In and press RECORD: the speed to the tempo of your TAP presses. This track will go silent. The 95000 simultaneously function works well for percussive loops, but erases the previously recorded audio and it may result in “out of tune”... -
Page 27: In Depth: Mixdown
Performing a Mixdown To exit Mixdown mode, press the MIXDOWN 1. While the 95000 is idle, press the MIXDOWN button until its LED button no longer lights, or button once. The MIXDOWN button lights up press the TRACK footswitch to cycle through solidly to indicate that the 95000 is ready the 6 tracks. -
Page 28: Constant Tempo Mixdown Mode
NOTE: The abbreviated term CT Mixdown button until the MIXDOWN LED blinks rapidly. will hereafter be used when appropriate to The 95000 must be idle to enter or exit CT refer to the more bulky term Constant Mixdown mode. -
Page 29: Memory Card And Usb
To remove the microSDHC card, push the card into the 95000. This action engages a spring The 95000 comes supplied with a 16GB card. Its that releases the card and pushes it partially maximum loop recording time of up to 375 minutes back out of the slot. -
Page 30: 95000'S Microsdhc Card File System | Backing-Up
USB cable. The USB Port is located next to the at least 8 files appear inside the folder. The microSD card slot on the rear panel of the 95000. names for the 8 files are the same in each loop folder: TEMPO.TXT;... - Page 31 The 95000 is capable of playing and 95000 are powered up. overdubbing audio files made elsewhere, as 2. Connect the 95000 to your computer with a long as you import them onto the microSDHC standard USB cable. card using a computer and USB. Note the 3.
-
Page 32: Midi Sync
MIDI. A MIDI Stop command is sent out when you stop a loop to put the 95000 into Idle mode. So, if The 95000 works best with MIDI master the 95000 is playing a loop and you press either... -
Page 33: Mode) | Bx (Beat Sync External Clock Mode) | Tutorial
95000 as MIDI Clock Slave recording, press the PLAY footswitch to set If you are using the 95000 as a MIDI Clock slave the loop length either after the 3rd beat of and want to produce loops of a set number of... - Page 34 MIDI Start message set internally by the 95000 or it is set to EXT. to the MIDI Clock slave and the slave begins CLOCK and is receiving MIDI Clock sync.
-
Page 35: Midi Controller And Program Messages
(CC) and Program Change (PC) messages at all of the 100 loops on the microSDHC card, or to times. The 95000 does not send PC and CC trigger a button press of any button on the messages, it only receives these messages. - Page 36 MIDI CC Tables The table on the left lists each 95000 Control Change number (CC#), the data range used by each CC#, and the parameter assigned to each CC#. The table on the right lists all of the button presses and their associated data values available through CC3.
- Page 37 MIDI Program Change (PC) Messages The 95000 responds to PC messages to allow the direct selection of loops, initiate button pushes and mute/unmute all tracks. PC # Function Select Loop 00 Select Loop 01 … Select Loop 99 TRACK FSW Press...
-
Page 38: Signal Path Diagram
SIGNAL PATH DIAGRAM... -
Page 39: Factory Drum Loops
If you would like to restore the factory drums for any or all of the loops, they are available for download on the 95000’s product page at www.ehx.com. -
Page 40: Warranty
Please register online at http://www.ehx.com/product-registration or complete and return the enclosed warranty card within 10 days of purchase. Electro-Harmonix will repair or replace, at its discretion, a product that fails to operate due to defects in materials or workmanship for a period of one year from date of purchase. This applies only to original purchasers who have bought their product from an authorized Electro-Harmonix retailer.
Need help?
Do you have a question about the 95000 and is the answer not in the manual?
Questions and answers