Moxee K779HSDL Mobile Hotspot Manual
- User manual (34 pages) ,
- Service manual (12 pages) ,
- Quick start manual (9 pages)
Advertisement
- 1 INTRODUCTION
-
2
DEVICE CONFIGURATION
- 2.1 Login to your Device
- 2.2 Home Page
- 2.3 SMS
- 2.4 Settings
- 2.5 Internet
- 2.6 Wireless
- 2.7 WLAN MAC Filter
- 2.8 Network
- 2.9 Firewall
- 2.10 IP Filter
- 2.11 Port Forwarding
- 2.12 DMZ Settings
- 2.13 SNTP
- 2.14 PIN Management
- 2.15 Device Information
- 2.16 Statistics
- 2.17 System Log
- 2.18 System Admin
- 2.19 Upgrade
- 2.20 Reboot & Reset
- 2.21 Logout
- 3 Troubleshooting
- 4 Q&A
- 5 Health and Safety Information
- 6 Documents / Resources
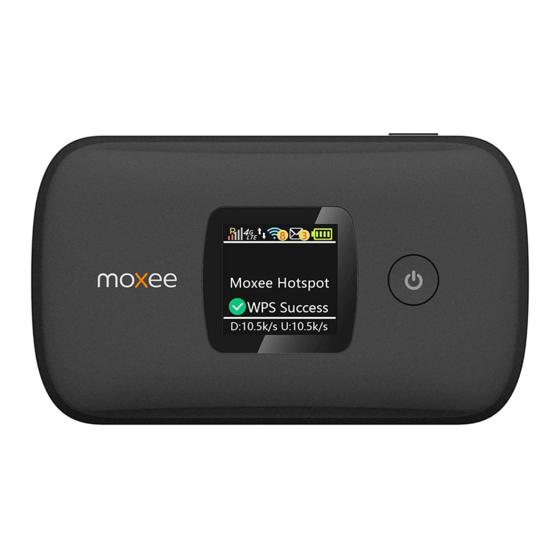
INTRODUCTION
Device Overview

- Menu button
- Signal and Roaming status icon
- Network mode icon
- Wi-Fi signal icon
- Unread message icon
- Battery icon
- Power Button
- Micro USB Port
- Battery cover
- The point of removing the back cover
Display Layout and icons
![]()
| Icon | Description |
 | Signal and roaming status icon |
 | Network mode icon |
 | Data flow icon |
 | Wi-Fi signal and number of access users |
 | The number of unread messages, maximum is 100 |
 | Battery capacity icon, if battery capacity is lower than 25%, this icon is red |
 | Data Statistics, used/total |
 | WPS status indicator |
 | Download and upload data speed |
Hardware Installation
Install SIM Card and Battery
- Power off the device
- Remove the back cover and battery
- Insert the SIM card into card slot in the correct position
- Install back cover and battery
Note: DO NOT remove SIM card when the device is powered on since this may damage the card and the device.
Installing the SIM Card
Follow the instruction to install the SIM card.
- Remove the SIM card from the outer card, being careful not to touch the gold contacts.
- Turn the power off. Remove the battery cover and remove the battery. Locate the SIM card slot. Hold the card so the writing on the back of the card is facing you and the gold contacts are properly aligned with the SIM card slot.
- Insert the SIM card into the slot until it is fully inserted.


Note: Do not bend, scratch and avoid exposing your SIM card to static electricity, water or dirt.
Inserting and Charging the Battery
- Remove the battery cover and align the battery contacts with the terminals in the battery compartment as shown. Push the battery down until it clicks into place.
- Place the battery cover over the battery compartment and press it downward until it clicks into place.
Removing the LTE SIM Card
- Turn the power off. Remove the battery cover and take out the battery.
- Gently remove the SIM card from the SIM card slot.


Connecting Wi-Fi Enabled Devices To Your Device
Note: It is recommended the battery be fully charged in order to use your device via Wi-Fi for the first time.
Follow these Steps:
- Enable your Wi-Fi application to allow your mobile device to establish a connection with your device.
- Look for the network (SSID) named "Moxee HotspotXX_2.4G" or "Moxee HotspotXX_5G". Where XX are the last two digits of the device IMEI.
- Click Connect and enter the default username and password printed under the battery of your device.
Note: Your Wi-Fi SSID and password will also be displayed on the device screen each time the device is powered on.
Accessing the Internet
After successfully establishing the connection between your device and Wi-Fi clients, you can have access the Internet.
Setting up your WPS
If your terminal support WPS, you do not have to input the password manually once your WPS has been set up.
To use WPS please follow these steps:
- Enable WPS in the WebUI through Settings->Wireless->WLAN Settings->WPS
- Press "Menu" button on the device to select "WPS Active" page on the screen
- Press "Power" button to active WPS function.
Then you can enable the WPS function on your terminal to connect the hotspot.
DEVICE CONFIGURATION
Login to your Device
To configure your device, open your web browser and input the default URL:
- http://192.168.1.1 or http://device.WebUI
- The default user name is: admin
- The default password is 12$ following with last 3 digits of the device IMEI (For example: 12$123).
Note: You can find the default User Name and Password printed in the device label by removing the back cover and battery.
It is suggested to change the default login password of the WebUI to prevent unauthorized users from changing the hotspot's settings.

Congratulations! You have successfully logged in to your Hotspot. Once you have logged in to your Hotspot via your web browser, you can see the Home page for the hotspot.
Home Page
In this section you can select any of the three options to configure your device.

Internet Info Button: you can check the Internet Status by clicking the icon ![]() , the Internet mode, network status, connection time and connection related parameters will be displayed.
, the Internet mode, network status, connection time and connection related parameters will be displayed.
Wi-Fi Status Button: you can check the Wi-Fi information of the hotspot by clicking the icon ![]() , the 2.4GHz & 5GHz Wi-Fi status, SSID and password will be displayed.
, the 2.4GHz & 5GHz Wi-Fi status, SSID and password will be displayed.

Clients Button: you can check the connected client information by clicking the icon ![]() the connected client's device name, IP address and Mac address will be displayed.
the connected client's device name, IP address and Mac address will be displayed.

SMS
You can click "SMS" to see the SMS information.
InBox: You can read, select, delete, refresh and select multiple SMS messages.

Note: The device only receives SMS, and does not send SMS.
Settings
You can click "Settings" on the main page to configure the hotspot.
Internet
Mobile Connection
In this section, you can configure your mobile data connection.
Note: If you are unsure of your APN Settings, please contact your service provider. The device supports auto APN, which means you do not need to edit APN settings for most cases.

Mobile Data: To Enable/Disable Mobile connection
Data Roaming: To Enable/Disable Roaming connection
Carrier Name: APN Profile Name
Network Mode: 4G
Network Operator: Auto/Manual, it is suggested to select "Auto"
Wireless
WLAN settings
In this section you can configure the Wi-Fi settings for your Hotspot device.
You can change the Wi-Fi SSID and password in this section, after updating your settings click "Apply".
Please note that any changes made in this section may require you to reconnect the Wi-Fi.
2.4GHz is for 802.11b/g/n
5GHz is for 802.11 a/ac/n

If you are unsure of Wi-Fi Channel and Channel Width, it is suggested to select "Auto".
WLAN MAC Filter
MAC address filtering (also known as link-layer filtering) is a feature for IPv4 addresses that allows you to include or exclude computers and devices based on their MAC address. Every Ethernet device has a unique MAC (Media Access Control) address. The MAC address is assigned at the factory and consists of six pairs of hexadecimal characters, for example, 00:DS:GG:22:35:01.
You need to know the MAC address of the devices you wish to filter.
You can choose "Whitelist" or "Blacklist", both can be configured by selecting WLAN Mac Filter option.
- Disable will disable the WLAN MAC filter.
- Whitelist will only allow devices with the selected MAC address connect.
- Blacklist will only deny devices with the selected MAC address from connecting.


Network
DHCP
In this section you can configure the DHCP settings. The Default values are:
- DHCP server is enabled
- Gateway IP address: 192.168.1.1
- DHCP IP Range: 192.168.1.100 to 192.168.1.200
- DHCP lease time: 24 hours(86400 seconds)
Click "Apply" after configuring the new settings.


Firewall
Your hotspot's high-performance firewall feature continuously monitors internet traffic, protecting your network and connected devices from malicious internet attacks. In this section you can "enable" or "Disable" for Firewall/IP Filter settings.
Note: In order to enable IP Filter, the Firewall setting must be set to "Enable" first.

IP Filter
You can filter the packages by IP address, Protocol, Port number. IP Filtering's configuring includes LAN IP address, LAN port, WAN IP address, WAN port and Protocol functions.
- Whitelist: Set the websites that users are allowed to access. If the whitelist is empty, users will not be able to access the Internet.
- Blacklist: Set the websites that you do not want users to access.
- The value range of LAN/WAN Port is 1-65535.
- Settings will not take effect until the "Apply" button is clicked.


Port Forwarding
In this section you can enable external computers to access FTP or other services provided by the LAN.
- IP address: Assigned to each device connected to a computer network that uses the Internet Protocol for communication.
- LAN/WAN port: The part of the computer that provides services. It is a single part and the value range of LAN/WAN Port is 1-65535.
- Protocol: Protocols applied by services
.
Example: How to setup Port Forwarding for port 21 (FTP server)

Note: This will enable to provide access to others to your FTP server in your LAN through WAN.
Step 1: Assign a static IP to your local computer that is hosting the FTP server.
Step 2: Login to the Gateway and go to Settings / Features /Port forwarding
Step 3: Enter WAN Port to 21; Enter LAN IP Address to be the static IP of computer, Enter LAN port to 21;
Step 4: Click Apply to activate.
DMZ Settings
DMZ allows outside network to connect in and communicate with internal LAN devices via this WAN interface.

IP Address: Give a static IP address to the DMZ Host when Enabled radio button is checked. Be aware that this IP will be exposed to the WAN/Internet.
SNTP
In this section you can synchronize the internal clocks with the network.

PIN Management
In this section you can enable or disable the PIN of SIM card. Please be aware you can only input 3 times the wrong PIN number, otherwise the SIM card will be locked.
Note: You will need to request the PUK code to your carrier.

Device Information
In this section you can check the basic information of the device. Please contact your carrier for more information.

Device Name: Name of the Hotspot for identification purpose.
Software Version: Software version currently loaded in the Hotspot.
Hardware Version: Hardware version currently loaded in the Hotspot.
IMEI: The unique identification number that is used to identify the 4G-LTE module.
IMSI: The international mobile subscriber identity used to uniquely identify the 4G-LTE module.
MAC: A unique number that identifies the Hotspot.
Statistics
In this section you can easily monitor your data usage. Please note that upload, download and total data usage will be reset when the device is restored to default factory settings.

Clear history: Click it to clear the history statistics.
Traffic configuration: Click to configure data traffic plan as below.

System Log
In this section, you can configure the system logs you want to check, such as main process, hotspot, wireless, dialup, Wi-Fi, web server, device control.

Note: You can download the system log into an external file by selecting the Export option.
System Admin
The admin account can change all hotspot settings. Click Apply to save the new Username and the new Password.
Note: To keep your hotspot secure, it is recommended to create a stronger password.

Upgrade
Your hotspot can automatically detect firmware updates. In this section you can manually check if there is new firmware for your hotspot and update. When there is a new version, it will display a "new" icon in the WebUI, and you can select the icon to proceed with the update. You can also check the current software and hardware information.

Online Update operation:
Click the button "Check for update" to confirm if there is an update available. If there is one available, it will guide you to confirm if you want to proceed with the update.
Reboot & Reset
In this section you can reboot your device or reset it to factory default settings.

Reboot: Select to reboot your device.
Reset: Select to reset your device.
Logout
Click logout to logout from your hotspot. Once you log out you will return to the login page.
Troubleshooting
If you are having trouble with your device, here are a few things you can do to get it to function properly.
- If the device is not responsive, reboot it by press the "Power" button for about 8 seconds
- Restore factory settings
Q&A
What do I do if I see the SSID but failed to connect?
- Check if the password you entered is the correct one.
- Check if WPS security is enabled on your PC? If so, check the device to see if it is expecting a WPS action from your PC.
What to do if there is no service?
The possible reasons are an unstable network signal, or a hardware problem.
You can try the following solutions:
- If you are inside a building or near a structure that may be blocking the signal, change the position or location of the device. For example, try moving the device close to a window.
- Check the hardware for any loose parts or damage.
What to do if I have forgotten my Wi-Fi Key?
- You can find the Wi-Fi Key in the Wi-Fi Info page on the LCD.
- You can also reset the device to factory defaults by press the reset button for 5 seconds.
What to do if "PIN locks" or "PUK locks"?
The SIM card is locked. Login into the WebUi ( http://192.168.1.1 or http://device.WebUI) and input the PIN or PUK code you received from your carrier provider and Enter your PIN code or PUK code you got from the operator.
Note: If you entered wrong PIN code 3 times, then PUK is needed, and if the wrong PUK is entered 10 times, the SIM card will be locked forever.
Data connection failed
You may be on a not network or limited coverage area, try to move to a different location or a better network coverage area.
The modem cannot connect to the Internet when overseas
You can check if the data roaming function is enabled in the Device Setting page on the display of the device device.
Note: Make sure you have international roaming enabled on your plan. You can contact your service provider before you go overseas to enable roaming.
Health and Safety Information
To the Owner
- Some electronic devices, such as the electronic system of vehicles, are susceptible to electromagnetic interference sent by your device if inadequately shielded. Please consult the manufacturer of your device before using if necessary.
- Operating your device may interfere with medical devices like hearing aids and pacemakers. Please always keep them more than 20 centimeters away from such medical devices when they are turned on. Turn your device off if necessary. Consult a physician or the manufacturer of the medical device before using your device.
- Be aware of the usage limitation when using your device at places such as oil warehouses or chemical factories, where there are explosive gases or explosive products being processed. Turn off your device if required.
- The use of electronic transmitting devices is forbidden in aircrafts, at gas stations, and in hospitals. Please observe and obey all warning signs and power off your device in these conditions.
- Do not touch the inner antenna area; it will affect your device's performance.
- Store your device out of the reach of little children. Your device may cause injury if used as a toy.
- Do not touch the metallic parts of your device when the device is operating as this may cause burns.
Using Your Device
- Please use original or authorized accessories only. Using any unauthorized accessories may affect your device's performance, and violate related national regulations about telecom terminals.
- Avoid using your device near or inside metallic structures or establishments that can emit electromagnetic waves; it may influence signal reception.
- Your device is not waterproof. Please keep it dry and store in a shady and cool place.
- Do not use your device immediately after a sudden temperature change. In such case, it will produce moisture inside and outside your device. Wait until it becomes dry.
- Handle your device carefully. Do not drop, bend, or strike it; your device may get damaged.
- Do not attempt to disassemble the device.
- An operating temperature range of -10°C to +45°C and humidity range of 5% to 95% are recommended.
Battery Handling
- Do not short-circuit the battery, as this can cause excessive heat and fire.
- Do not store battery in hot areas or dispose of it in a fire, as this can cause an explosion.
- Do not disassemble or modify the battery.
- When not using the battery for a long period, remove it from your device and store it in a cool, dry place.
- Never use a damaged or worn-out charger or battery.
- Dispose used batteries in an approved recycling container.

Do not handle or touch the battery if it is damaged.
Limited Warranty
This warranty does not apply to defects or errors in the Product caused by:
- Reasonable abrasion.
- End User's failure to follow KonnectONE's installation, operation or maintenance instructions or procedures.
- End User's mishandling, misuse, negligence, or improper installation, disassembly, storage, servicing or operation of the Product.
- Modifications or repairs not made by KonnectONE or a KonnectONE-certified individual.
- Power failures, surges, fire, flood, accidents, actions of third parties or other events outside KonnectONE's reasonable control.
- Usage of third-party products, or usage in conjunction with third-party products provided that such defects are due to the combined usage.
- Any other cause beyond the range of normal usage intended for the Product.
- End User shall have no right to reject or return the Product, or receive a refund for the Product from KonnectONE under the above-mentioned situations.
- This warranty is End User's sole remedy and KonnectONE's sole liability for defective or nonconforming items, and is in lieu of all other warranties, expressed, implied or statutory, including but not limited to the implied warranties of merchantability and fitness for a particular purpose, unless otherwise required under the mandatory provisions of the law.
Limitation of Liability
KonnectONE shall not be liable for any loss of profits or indirect, special, incidental or consequential damages resulting from or arising out of or in connection with using of this product, whether or not KonnectONE had been advised, knew or should have known of the possibility of such damages, including, but not limited to lost profits, interruption of business, cost of capital, cost of substitute facilities or product, or any downtime cost.
Radio Frequency (RF) Energy
This model device meets the government's requirements for exposure to radio waves.
This device is designed and manufactured not to exceed the emission limits for exposure to radio frequency (RF) energy set by the Federal Communications Commission of the U.S. Government: The exposure standard for wireless devices employs a unit of measurement known as the Specific Absorption Rate, or SAR. The SAR limit set by the FCC is 1.6 W/kg. Tests for SAR are conducted using standard operating positions accepted by the FCC with the device transmitting at its highest certified power level in all tested frequency bands. Although the SAR is determined at the highest certified power level, the actual SAR level of the device while operating can be well below the maximum value. This is because the device is designed to operate at multiple power levels so as to use only the position required to reach the network. In general, the closer you are to a wireless base station, the lower the power output.
The highest SAR value for the model device as reported to the FCC when worn on the body, as described in this user guide, is 1.41 W/kg (Body-worn measurements differ among device models, depending upon available enhancements and FCC requirements.)
While there may be differences between the SAR levels of various devices and at various positions, they all meet the government requirement.
The FCC has granted an Equipment Authorization for this model device with all reported SAR levels evaluated as in compliance with the FCC RF exposure guidelines. SAR information on this model device is on file with the FCC and can be found under the Display Grant section of http://www.fcc.gov/oet/ea/fccid/ after searching for: 2APQU-K779HSDL
FCC Compliance
FCC ID: 2APQU-K779HSDL
This device complies with part 15 of the FCC Rules. Operation is subject to the following two conditions: (1) This device may not cause harmful interference, and (2) this device must accept any interference received, including interference that may cause undesired operation.

Changes or modifications not expressly approved by the manufacturer could void the user's authority to operate the equipment.
Note: This equipment has been tested and found to comply with the limits for a Class B digital device, pursuant to part 15 of the FCC Rules. These limits are designed to provide reasonable protection against harmful interference in a residential installation. This equipment generates, uses, and can radiate radio frequency energy and, if not installed and used in accordance with the instructions, may cause harmful interference to radio communications. However, there is no guarantee that interference will not occur in a particular installation. If this equipment does cause harmful interference to radio or television reception, which can be determined by turning the equipment off and on, the user is encouraged to try to correct the interference by one or more of the following measures:
- Reorient or relocate the receiving antenna.
- Increase the separation between the equipment and receiver.
- Connect the equipment into an outlet on a circuit different from that to which the receiver is connected.
- Consult the dealer or an experienced radio/TV technician for help.
Cancer and Reproductive Harm
www.P65Warnings.ca.gov

Documents / Resources
References

Download manual
Here you can download full pdf version of manual, it may contain additional safety instructions, warranty information, FCC rules, etc.
Advertisement


Need help?
Do you have a question about the K779HSDL and is the answer not in the manual?
Questions and answers