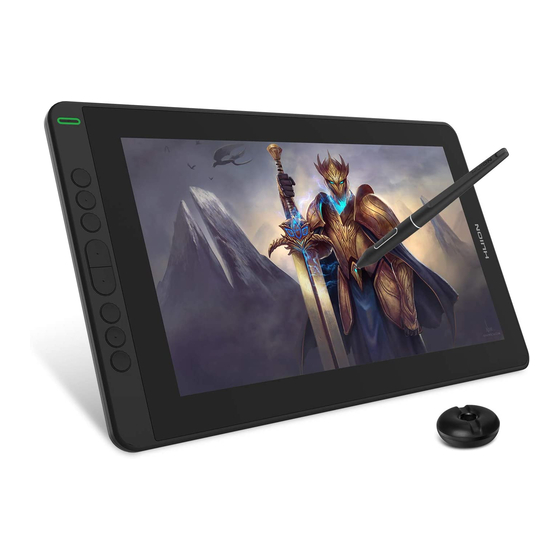
Huion KAMVAS 13 - Drawing Pen Display Manual
- Manual (38 pages) ,
- User manual (31 pages) ,
- Faq (8 pages)
Advertisement
- 1 Precautions
- 2 Product Overview
- 3 Product Basic Operation
- 4 Function Setting
- 5 Specifications
- 6 Troubleshooting
- 7 Videos
- 8 Documents / Resources

Precautions
- Please read this manual carefully before using, and keep it well for future reference.
- Before cleaning the display please unplug the USB cable and wipe with a soft damp cloth, do not use any kind of detergents.
- Please don't place the display near water sources such as bathtub, washbasin, sinks, washing machine, damp basement, swimming pool, etc.
- Do not place the display on where is unstable or a height for children reaching easily in order to avoid danger.
- Do not place the display and digital pen close to the magnetic field.
- The grooves and holes on the back case is designed for ventilation to prevent the monitor from overheating. Please don't place the display on beds, sofas, carpets or in embedded device.
- Only power supplies shown on the nameplate can be used for the display. If you have questions about the power supply which you are using, please consult the distributor of your display.
- To protect your display, please switch off the power when it is not in use. During blackouts or not using for long time, please unplug the display from the socket.
- Don't overload the socket or lengthen the power wire, which may lead to electric shocks.
- Make sure no foreign bodies get inside the monitor through grooves and prevent liquid from splashing on the display as to prevent short-circuit or fire.
- If the display has a breakdown, do not open the main case and try to repair it by yourself. Please ask for a service for proper repair and maintenance.
- When the following situations occur, please unplug the power adapter and you may need a service for full repair and maintenance:
- The power wire or plug is damaged or worn out;
- There is liquid splashed inside of the display;
- The display has fallen or the LCD is broken;
- When obvious abnormalities occur to the display
- While getting the components replaced, you are supposed to guarantee that the repairman is using the substitute components specified by the manufacturer. Unauthorized component replacement might cause fire, electric shocks or other dangers.
Product Overview
Display Introduction
Thanks for choosing HUION® KAMVAS® 13 Pen display. This is a new generation of portable desktop-level professional drawing display, which can greatly improve your work efficiency of painting and creation, and full of fun. You can freely painting and writing, depicting different lines and colors, just as the pen writes on the paper, which brings you a real shock experience.
To give you a better understanding and using of your KAMVAS display, please read this user manual carefully. The user manual only shows the information under Windows, unless otherwise specified, this information applies to both Windows and Macintosh systems.
Product and Accessories
Product Overview
3-in-1 Connection Cable
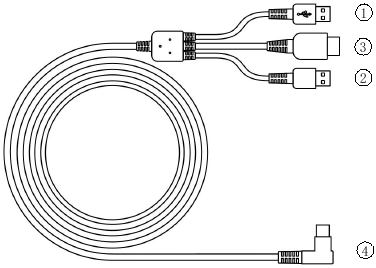
- USB
- HDMI
- Power (Red USB Port)
- Type-C
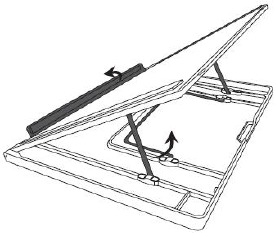
Display Stand (Optional)
We designed this standspecially for your KAMVAS display, you can adjust the angle of the display according to your usage habit, and make you feel more comfortable in painting and creating.
Other Accessories

Digital Pen

Pen Holder

Pen Nibs

Nib Clip
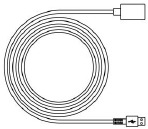
USB Extension Cable
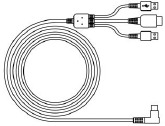
3-in-1 Cable

Stand(Optional)

Cleaning Cloth

Glove

Quick Start Guide
Connected to Computer
Connected with 3-in-1 Cable
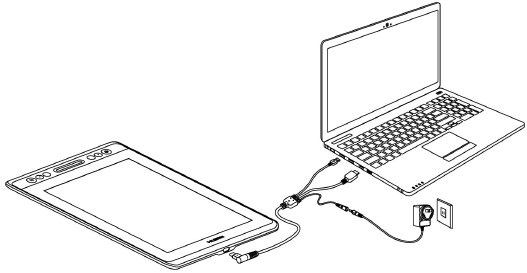
Notice:
Generally the device can be powered on when the black USB-A cable is connected to your computer. A flashing screen of the device may indicate a low battery, in which case you are suggested to connect the red colored USB-A cable to another USB interface on your computer or the power adaptor. The power adaptor is not included in the package and requires extra cost. Power adaptor of your mobile phone is also compatible.
Connected with USB-C to USB-C Cable
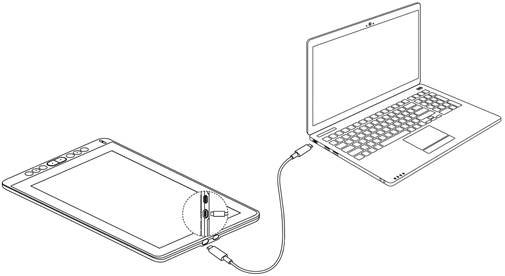
* USB-C to USB-C cable is not included in the package and requires extra cost. Please purchase the cable through official channels as it is customized and cables from unknown sources may not be usable with the device.
Driver Installation
OS Support
Windows 7 or later, macOS 10.12 or later
Install via Download
Please download the driver from our website: www.huion.com/download
After finishing installation, you can find the driver icon ![]() in the system tray area, which means the driver was installed successfully; when you connect the tablet to computer, the icon will change to color
in the system tray area, which means the driver was installed successfully; when you connect the tablet to computer, the icon will change to color ![]() , which means the driver has already recognized the tablet and you can start using it now.
, which means the driver has already recognized the tablet and you can start using it now.
Notice:
- Before installing, you need to uninstall other driver of similar products, includingthe old driver of this product.
- Before installing, please close all graphics software and anti-virus software toavoid unnecessary mistake.
Connected to Android Phone/Tablet
As shown in the figure above, connecting your Android phone and pen display with USB-C to USB-C USB 3.1 Gen1 cable and connecting the pen display and the power adapter or power bank with USB-C to USB-A cable.
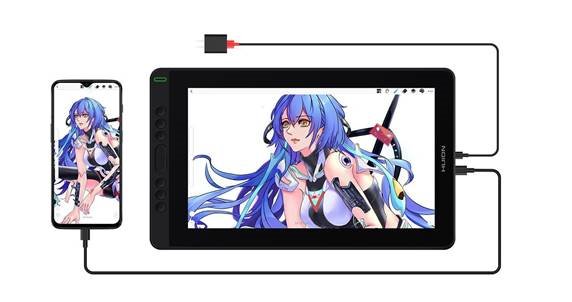
Note:
- USB-C to USB-C cable and USB-C to USB-A cable is not included in the package and requires extra cost. Please purchase the cable through official channels as it is customized and cables from unknown sources may not be usable with the device.
- The power adaptor is not included in the package and requires extra cost. Poweradaptor of your mobile phone is also compatible.
- Please make sure your smart android phone support Dex or PC mode.
Pen Nib Replacement
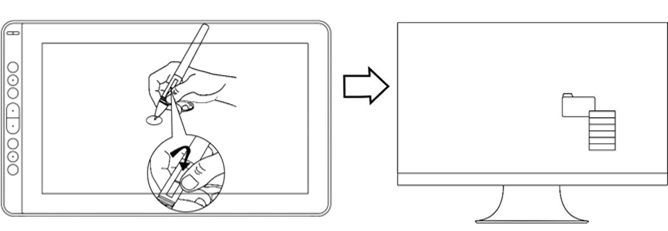
The nib will be wear out after using for long time, then you need to replace a new nib.

Product Basic Operation
Using The Pen
Hold the pen
Hold the pen as you hold a normal pen or pencil. Adjust your grip so that you can toggle the side switch easily with your thumb or forefinger. Be careful not to accidentally press the switch while drawing or positioning with the pen.
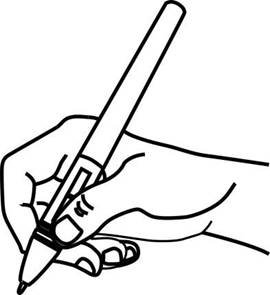
Notice: When not in use, place the pen in the pen case or on the desk. Do not place the pen on the surface of screen, which may interfere with the use of other screen cursor positioning equipment, it may also cause your computer unable to enter the sleep mode.
Position the cursor
Move the pen slightly above the active area without touching the screen surface, the cursor will move to the new position accordingly.
Press the pen tip on the screen to make a selection. Tap the screen once with the pen tip, or touch it to the screen with enough pressure to register a click.


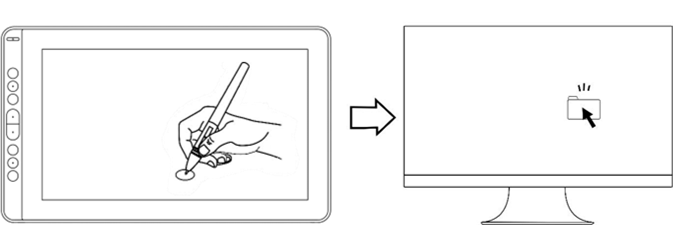
Click
Use the pen tip to tap on the screen once to produce a click. Tap to highlight or select an item on the screen and double-click to open it.
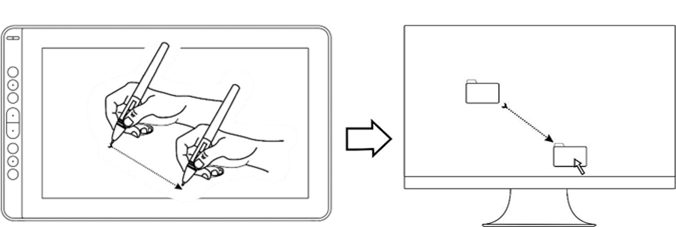
Move
Select the object, then slide the pen tip across the screen to move it.
Use the side buttons
The side buttons of the pen can be set to two different customizable functions. You can use the buttons whenever the pen tip is within 10mm of the display active area.
You do not have to touch the pen tip to the display in order to use the switch.
Using the Display
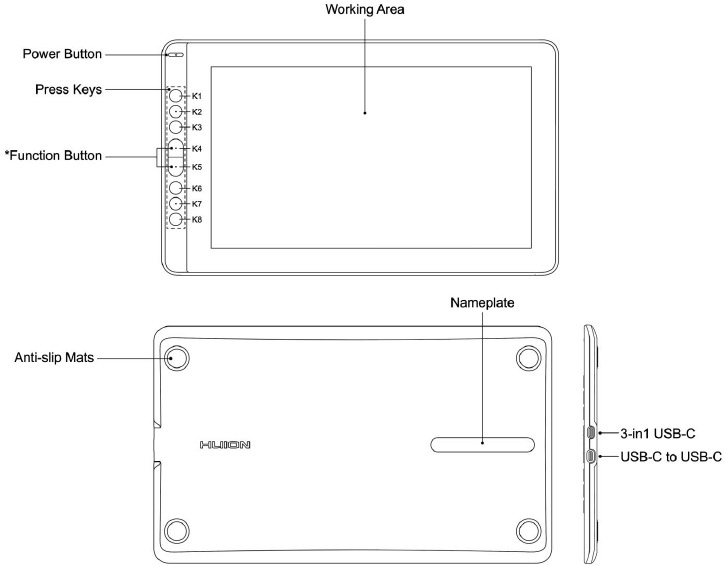
Power Button
The power button was placed on the left side of the digital screen, you need to turn on the power switch before using.
Press Keys
There are 8 press keys on the top left side of the display, which you can modify the functions according to your own habits, thus will help to improve your work efficiency.
OSD Function
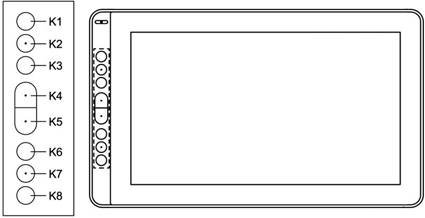
Enter OSD Menu:
- Press K4 & K5 for around three seconds until the OSD menu appears and meanwhilethe indicator will flash green. The function of K2 K3 K6 K7 will become OSD function.
- In the menu, the function of K2 K3 K6 K7 will become as the following:
K2 AUTO: Before entering menu, its function is auto adjustment.
After entering menu, its function is back to previous menu.
K3 MENU: Press to call up the menu, after entering menu, its function is confirm.
K7- : After entering menu, its function is down/left/decrease.
K6 + : After entering menu, its function is up/right/increase.
Exit OSD Menu: - Press K4 & K5 again for around three seconds until the OSD menu disappears, thefunction of K2 K3 K6 K7 will become shortcuts function again.
Function Setting
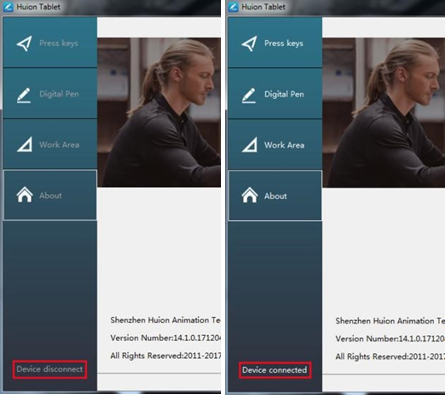
Device Connection Prompt
- Device disconnected: The display hasn't connected to your computer.
- Device connected: The display has already connected to your computer.
Working Area Setting
Using Multiple Monitors
When the KAMVAS Display and other monitors are used in the same system, the movement of the screen cursor on the standard display depends on the system configuration. If the secondary display is a mirrored mode connection, this display and another monitor will display exactly the same image and screen cursor movement. If you are in the extended display mode, you need to set the display on the driver that which portion of the display screen your KAMVAS will map to.
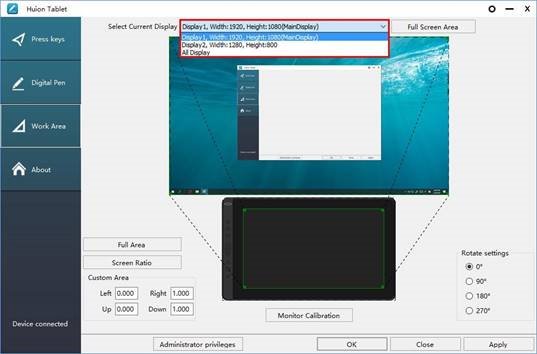
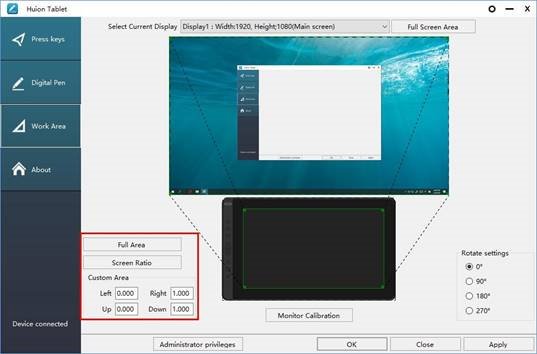
Working Area Setting
Define the display area that will be mapped to the screen area.
- Full Area: the entire active area of the Display. This is the default setting.
- Same Ratio with LCD.
- Customize Area: 1.> Enter coordinate values. or2>. Drag the corners of theforeground graphic to select the screen area.
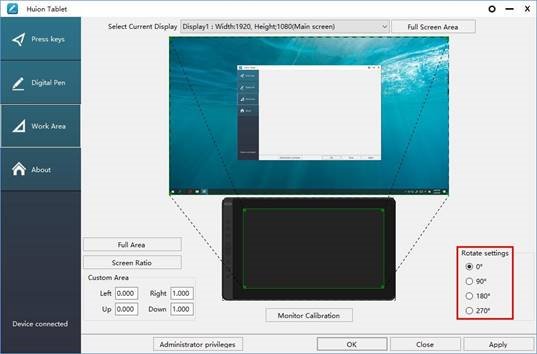
Rotate Working Area
By changing the direction of the display to adapt to the left and right hand operation. We provide four directions of choice.
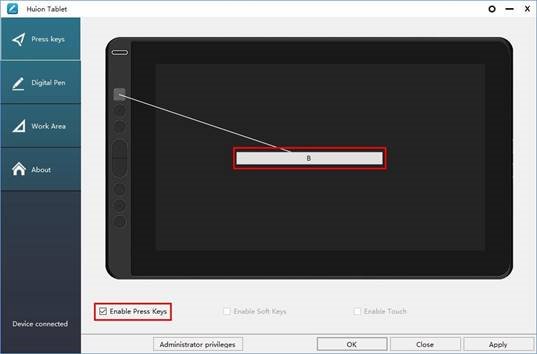
Press Keys Function Setting
Default Setting: Place the cursor on the button or click the button icon to see the default values for the press keys
Customized press Keys: Select the function to be achieved on the pop-up dialog box, then click APPLY or OK to take effect.
Touch Bar: you can slide up and down to achieve zoom function.
Enable/Disable Press Key: Check/Uncheck"Enable Press key"
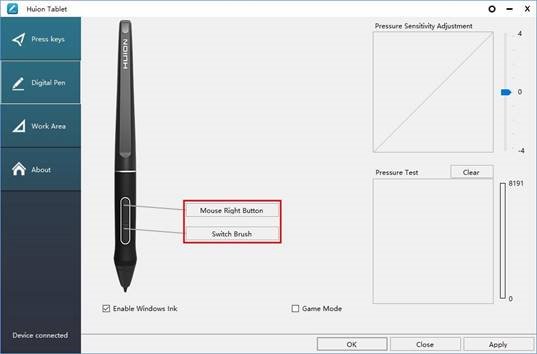
Pen Button Setting
Select the function to be achieved on the pop-up dialog box, then click APPLY or OK to take effect.
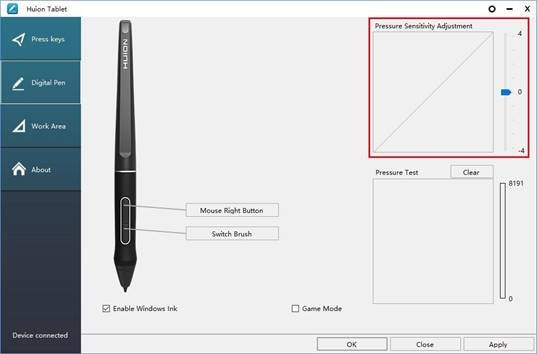
Pressure Sensitivity Setting
The pressure sensitivity will be changed by dragging the slider up and down, the smaller the value, the more sensitive the pressure.
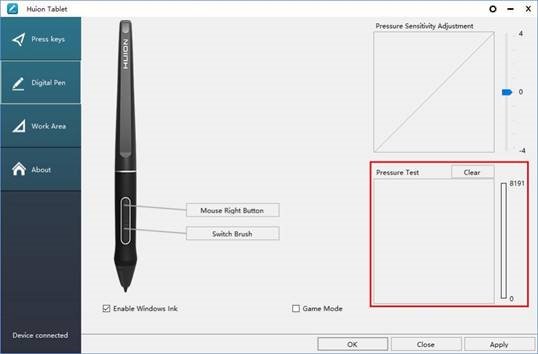
Pen Pressure Testing
You can gradually apply pressure to the stylus on the screen to test the pressure level. Click "Clear" button to clear all the ink.
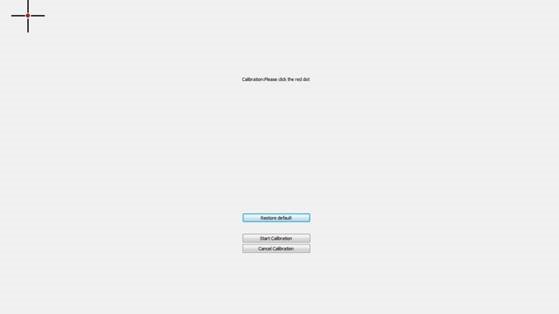
Calibration
Screen Calibration: Click the red point of the cross center appearing on the screen to complete the calibration.
Restore Factory Settings: Click "Restore Default" to restore to the factory settings.
Cancel Calibration: Click"Cancel calibration" or press ESC on the keyboard to cancel the calibration.
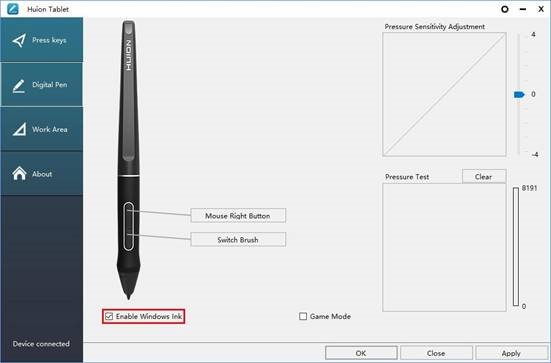
Enable the Windows Ink feature
Microsoft Windows provides extensive support for pen input. Pen features are supported in such as Microsoft Office, Windows Journal, Adobe Photoshop CC, SketchBook 6 and so on.
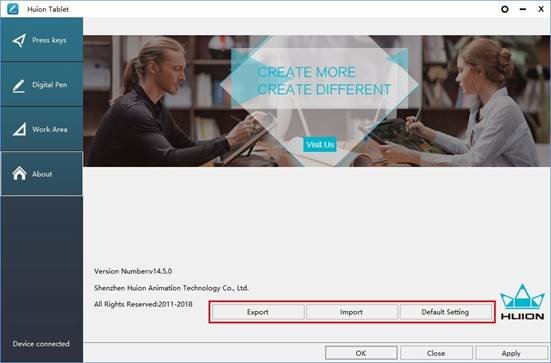
Data Export and Import
The driver supports exporting and importing your customized configuration data of the product, which is convenient for you to use different software and avoid the trouble of repeated settings.
Specifications
| Model | GS1331 | |
| Screen | Panel Size | 13.3 inch |
| Resolution | 1920 x 1080(16:9) | |
| LCD Type | IPS LCD | |
| Active Area | 293.76 × 165.24 mm | |
| Contrast Ratio | 1000:1 | |
| Brightness | 220 cd/m 2 | |
| Response Time | 25 ms | |
| View Angle | 89°/89°(H)/89°/89°(V) (Typ.)(CR>10) | |
| Gamut | 120% sRGB | |
| Display Color | 16.7 M(8bit) | |
| Touch | Touch Type | Passive Electromagnetic Resonance |
| Resolution | 5080 LPI | |
| Pressure Level | 8192 | |
| Accuracy | ±0.5 mm(Center), ±3 mm(Corner) | |
| Sensing Height | 10 mm | |
| Report Rate | 266 PPS | |
| Pen | Model | PW517 |
| Dimension | 163.7 x Φ14.3 mm | |
| Buttons | Two Customized Press Key | |
| General | Output Voltage | 5V 2A |
| Video Interface | USB-C(3-in-1 Cable) & USB-C (USB 3.1) | |
| Press Key | 8 Customized Press Key | |
| Dimension | 366.5 x 217.4 x 11.8mm | |
| Net Weight | 0.98 kg(without stand) | |
| Adjustable Stand | Two Levels Stand(Optional) | |
| OS Support | Windows 7 or later, macOS 10.12 or later | |
Troubleshooting
Possible Breakdowns Related to DISPLAY
| Abnormal Phenomena | Possible Solutions |
| Power indicator does not flash | *Make sure power is on *Check the socket and power cable |
| No display on the screen |
|
| Images are blurred | Please set the display resolution with 1920 x 1080. |
| Lack of colors | Check the pins of the signal wire are not bent or fractured. |
| There is chromatic aberration | As the regional color temperature is different, so minor chromatic aberration is a normal phenomenon. |
| Images jitter or ripple images appear | It is likely that there is electric equipment nearby that brings about electronic interference. |
Possible Breakdowns Related to FUNCTIONS
| Abnormal Phenomena | Possible Solutions |
| Pen doesn't work and no pressure in the graphics software |
|
| Cursor movement is abnormal | Try re-inserting the USB cable or restarting your computer. |
| The side button of the pen doesn't work | When pressing the side button, please make sure that the nib didn't touch the glass surface and the distance between the nib and surface is within 10mm |
| There is a deviation between the tip and the cursor | Try calibration |

VideosHuion Kamvas 13 Review Video
Documents / Resources
References
Download manual
Here you can download full pdf version of manual, it may contain additional safety instructions, warranty information, FCC rules, etc.
Advertisement


Need help?
Do you have a question about the KAMVAS 13 and is the answer not in the manual?
Questions and answers