Advertisement
- 1 INTRODUCTION
- 2 POWER AND CHARGING
- 3 MAKING AND ENDING CALLS
- 4 ENTERING TEXT AND SYMBOLS
- 5 CAMERA AND PHOTOS
- 6 CONTACTS
- 7 TEXT AND PICTURE MESSAGES
- 8 BLUETOOTH SETTINGS
- 9 EMERGENCY ASSISTANCE BUTTON
- 10 PHONE SETTINGS & STARTUP WIZARD
- 11 HOW-TO VIDEOS
- 12 CONTACT US
-
13
Videos
- 13.1 Doro PhoneEasy 626: Cell Phone Overview & Tour Video (1 of 9)
- 13.2 Doro PhoneEasy 626: Getting Started Video (2 of 9)
- 13.3 Doro PhoneEasy 626: Using the Emergency Alert Feature Video (3 of 9)
- 13.4 Doro PhoneEasy 626: Making and Receiving Calls Video (4 of 9)
- 13.5 Doro PhoneEasy 626: Sending and Receiving a Text Message Video (5 of 9)
- 13.6 Doro PhoneEasy 626: Using the Camera Video (6 of 9)
- 13.7 Doro PhoneEasy 626: Using the Phonebook Feature Video (7 of 9)
- 13.8 Doro PhoneEasy 626: Transferring Contacts Video (8 of 9)
- 13.9 Doro PhoneEasy 626: Inserting and Removing the SIM Card & Memory Card Video (9 of 9)
- 14 Documents / Resources
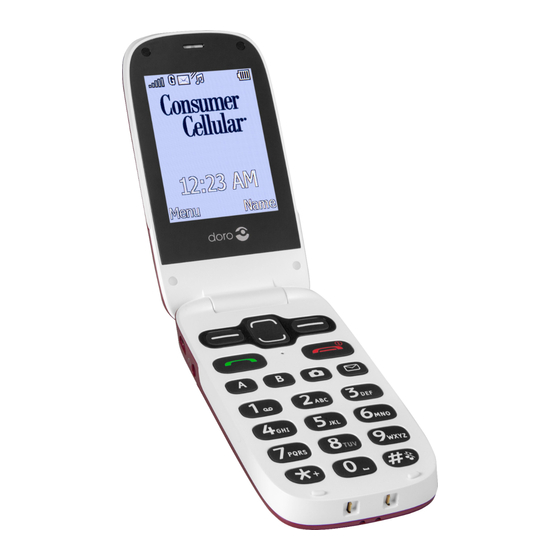
INTRODUCTION

BEFORE YOU GET STARTED
Take a moment to familiarize yourself with your new cellphone's buttons and icons. You can refer back to this diagram as you read through this Quick Tip guide.
POWER AND CHARGING
THE POWER BUTTON
To turn your phone on or off, press and hold the red Power On/Off key on the top, right side of the phone's keypad. Then press Yes to confirm.

CHARGING THE BATTERY
When the battery icon displayed on the screen appears completely full, or the charging light stops blinking, the battery is fully charged. If the battery has not been used for a long time or if the battery power is completely depleted, the charging icon may take several minutes to appear after you plug your phone into the charger.

MAKING AND ENDING CALLS

MAKING A CALL
If you would like to make a call, enter the phone number including the area code by pressing the numbers on the keypad and then press the green Call key to dial the number.
RECEIVING A CALL
When a call comes in, all you need to do to answer is simply open the flip cover. If the phone is already open, just press the green Call/Answer key to answer it, or the red End Call key to reject it.
ENDING A CALL
When you are finished with your conversation, press the red End Call key or close the flip cover to end the call.
ENTERING TEXT AND SYMBOLS
ENTERING TEXT
To enter text into your phone, press a numerical key repeatedly until the desired character is shown. For instance, the letters "A, B and C" can be accessed by pressing the number 2 button on the keypad. You will need to wait a few seconds before entering the next character.

ENTERING SYMBOLS

You can enter a symbol in any input mode—just press the Star key to display a list of symbols. Press the Navigation keys to scroll to the desired symbol, and then press OK using the Left Soft key to enter the symbol.
Alternatively, you can press the number 1 key multiple times to choose from a variety of symbols.
CAMERA AND PHOTOS
USING THE CAMERA
To take a photo using your phone's camera, you will need to place your phone into camera mode. You can do this by pressing the Camera key on the keypad. You can zoom in or out using the Navigation keys. When you are ready to capture an image, simply press the Camera key again.

VIEWING YOUR PHOTOS
To view a picture that you've taken, select Menu from the home screen using the Left Soft key, then scroll to Camera and select OK. Next, scroll to Picture Gallery and select OK. You can now view and manage your photos.

CONTACTS
ADDING A CONTACT
It's easy to add someone as a contact into your phone. Simply select Name on the home screen using the Right Soft key. New Contact will be highlighted automatically. Simply select Add and enter the person's name using the keypad, then use the Navigation keys to scroll down and enter either a mobile, home or office number. When you're finished, select Save and your contact will be added.

SEARCHING FOR A CONTACT
To search for a name from the home screen, select Name using the Right Soft key. Scroll though the list of Contacts until you find the name you're looking for. Once you locate that person, press the green Call key to make a call.

TEXT AND PICTURE MESSAGES
CREATING AND SENDING TEXT & PICTURE MESSAGES
To create and send a text message, select the Messaging key on the keypad—it's the key with the white envelope on it. Select Create New by pressing OK with the Left Soft key, then select Text Message by pressing OK again.
Now you can enter your message using the alphanumeric keypad. When you're finished, you'll need to select a recipient for your message. Select To using the Left Soft key, then select a contact from the phone book, or enter a phone number.
If you are sending to a contact, scroll down to the person's name and press Add using the Left Soft key. Then select OK to send the text message.

You can also send a picture message directly from the Camera app. After you snap a photo, preview it on the screen. Then select Options and Send. Next, select Send by Picture Message to send your photo via text message.
You can compose a message to go with your photo. Select Options with the Left Soft key and To to choose a recipient. From there, select a recipient and send the message the same way you would for a text message as shown on the previous page.

BLUETOOTH SETTINGS
Using a Bluetooth headset is a great way to keep your hands free while talking on your Doro cellphone.
The first step is to "pair" your Bluetooth device with your cellphone. To do this, turn your Bluetooth headset or earpiece on.
Then you'll need to set up your phone.

From the home screen, select Menu using the Left Soft key. Then scroll down to Settings and select OK with the Left Soft key. Scroll to Bluetooth and select OK. Select Function On/Off by selecting OK, then select ON.
Use the Right Soft key to go Back, then selectSearch Device. The phone will begin to search for Bluetooth devices. When you see your Bluetooth device on the screen, select it. You may need to enter a password for pairing. Enter the password and select OK.
Your Bluetooth device should now be connected to your phone—just press the red End Call key to exit and return to the Home Screen.

EMERGENCY ASSISTANCE BUTTON
If you need help, the Emergency Assistance button located on the back of your phone allows you to easily contact a family member or friend. To use this feature, you'll need to start by programming the button.
To program the button, first select Menu using the Left Soft key. Scroll to Settings and select OK. Then scroll to Assistance and select OK.
Next, scroll to Activation and select OK with the Left Soft key. Select On, then select OK.

NOTE:
The On selection will have the number 3 beside it. This means that the Emergency Assistance button must be pressed 3 times in order to activate it. This prevents an accidental activation if the button is pressed by mistake.
The next step is to save a phone number that will be called in the event of an emergency when the button is pressed 3 times.
To save a phone number select Back with the Right Soft key, then scroll down to Number List and select OK.
Next, select Add. You can either select a number from your phone book or add a number manually. For this example, select phone book and then select OK. Locate the name of the contact you want automatically called, and press OK.
Press the red End key to return to the home screen.

PHONE SETTINGS & STARTUP WIZARD
CHANGE PHONE SETTINGS
You have the ability to customize settings on your phone so it fits your needs even better. Below are just a few of the settings that can be adjusted.

BRIGHTNESS
You can adjust the brightness of the phone's display by choosing a level.

- Select Menu, then Settings and Display
- Select Brightness and scroll to choose a brightness level
- Press the Left Soft key to select OK
TIP:
When using the phone for the first time, you can use the Startup Wizard to create some basic settings. Press Yes to change or No if you do not want to change the settings at this time.
WALLPAPER

You can change the wall paper that is displayed on your screen:
- Select Menu, then Settings, Display, and Wallpaper
- Use the Navigational keys to scroll through wallpapers in the System or User categories
- Press the Left Soft key to select OK
RINGTONE VOLUME

You can adjust the ringtone volume to be louder or softer:
- Select Menu, then Settings, and Sound
- From there, select Volume
- Use the Navigational keys to change the ringtone volume
- Press the Left Soft key to select
HOW-TO VIDEOS

Get to know your Doro PhoneEasy® 626 with our How-To videos, located on our website at ConsumerCellular.com/Doro626
Here you will find simple, easy-to-follow videos that cover topics such as making and receiving calls, using the contacts feature, sending and receiving text messages and much more. You will also find complete phone manuals that you can download on this web page.
CONTACT US

If you have any questions, our friendly U.S. based customer support representatives will be happy to help you.
You will be connected to a representative for free by contacting us the following ways:
- Dialing 6-1-1 from your cellphone
- Choosing Consumer Cellular from your cellphone's contact list
- Calling (800) 686-4460 from any phone
If you're calling for assistance with your cellphone, it is best that you call us from a different phone using the toll-free phone number listed above. You can also go online to find answers to frequently asked questions by visiting ConsumerCellular.com/Support
Or, you can view your cellphone's manual at ConsumerCellular.com/Doro626

© 2017 Consumer Cellular, Inc. Consumer Cellular and the Consumer Cellular logo are trademarks of Consumer Cellular, Inc.
Other company names, product names, and marks mentioned herein are property of their respective owners and may be trademarks or registered trademarks.
VideosDoro PhoneEasy 626: Cell Phone Overview & Tour Video (1 of 9)
Doro PhoneEasy 626: Getting Started Video (2 of 9)
Doro PhoneEasy 626: Using the Emergency Alert Feature Video (3 of 9)
Doro PhoneEasy 626: Making and Receiving Calls Video (4 of 9)
Doro PhoneEasy 626: Sending and Receiving a Text Message Video (5 of 9)
Doro PhoneEasy 626: Using the Camera Video (6 of 9)
Doro PhoneEasy 626: Using the Phonebook Feature Video (7 of 9)
Doro PhoneEasy 626: Transferring Contacts Video (8 of 9)
Doro PhoneEasy 626: Inserting and Removing the SIM Card & Memory Card Video (9 of 9)
Documents / Resources
References
![http://consumercellular.com]() Consumer Cellular Cell Phones & Plans | Consumer Cellular
Consumer Cellular Cell Phones & Plans | Consumer Cellular![http://consumercellular.com]() Support & FAQs on Cellphone Plans - Consumer Cellular
Support & FAQs on Cellphone Plans - Consumer Cellular
Download manual
Here you can download full pdf version of manual, it may contain additional safety instructions, warranty information, FCC rules, etc.
Advertisement


Need help?
Do you have a question about the DORO PhoneEasy 626 and is the answer not in the manual?
Questions and answers