
Subscribe to Our Youtube Channel
Related Manuals for AEG HVB75450IB


Summary of Contents for AEG HVB75450IB
- Page 1 HVB75450IB User Manual Istruzioni per l’uso Piano cottura USER MANUAL...
-
Page 2: Table Of Contents
11. ENVIRONMENTAL CONCERNS..............27 FOR PERFECT RESULTS Thank you for choosing this AEG product. We have created it to give you impeccable performance for many years, with innovative technologies that help make life simpler – features you might not find on ordinary appliances. Please spend a few minutes reading to get the very best from it. - Page 3 ENGLISH instructions in a safe and accessible location for future reference. 1.1 Children and vulnerable people safety This appliance can be used by children aged from 8 • years and above and persons with reduced physical, sensory or mental capabilities or lack of experience and knowledge if they have been given supervision or instruction concerning the use of the appliance in a safe way and understand the hazards involved.
- Page 4 WARNING: Unattended cooking on a hob with fat or • oil can be dangerous and may result in fire. Never use water to extinguish the cooking fire. Switch • off the appliance and cover flames with e.g. a fire blanket or lid.
-
Page 5: Safety Instructions
ENGLISH compliance with the conditions specified in overvoltage category III must be guaranteed. The earth cable is excluded from this. When you route the mains cable, make sure that the • cable doesn't come into direct contact (for example using insulating sleeving) with parts that can reach temperatures of more than 50°C above room temperature. - Page 6 • Before installation, make sure that the become too hot. local distribution conditions (nature of • Use the correct electricity mains the gas and gas pressure) and the cable. adjustment of the appliance are •...
- Page 7 ENGLISH • Do not let the appliance stay • Do not use large cookware that unattended during operation. overlap the edges of the appliance. • Set the cooking zone to “off” after This can cause damage to the each use. worktop surface.
-
Page 8: Installation
2.7 Disposal • Disconnect the appliance from the mains supply. WARNING! • Cut off the mains electrical cable Risk of injury or suffocation. close to the appliance and dispose of • Contact your municipal authority for • Flat the external gas pipes. - Page 9 ENGLISH 3.3 Injectors replacement 3.4 Gas selection WARNING! WARNING! Information for authorised Information for authorised installer only. installer only. 1. Remove the pan supports. 1. Touch for 3 seconds. 2. Remove the caps and crowns of the 2. Within 7 seconds, touch for 3 burner.
- Page 10 3.7 Connection cable WARNING! Make sure the flame does To replace the connection cable use only not go out when you move the special cable or its equivalent. The quickly from the maximum to cable type is: H05V2V2-F T90.
- Page 11 ENGLISH min. 38 mm min. 2 mm 1) Unless otherwise specified in the oven installation. < 20 mm 12 mm 45 mm 28 mm 29 mm 38 mm 19 mm...
- Page 12 Kitchen unit with door min 6 mm min 5 mm CAUTION! 60 mm Install the appliance only on a worktop with flat surface. A. Removable panel B. Space for connections 3.9 Installing hob under the...
-
Page 13: Product Description
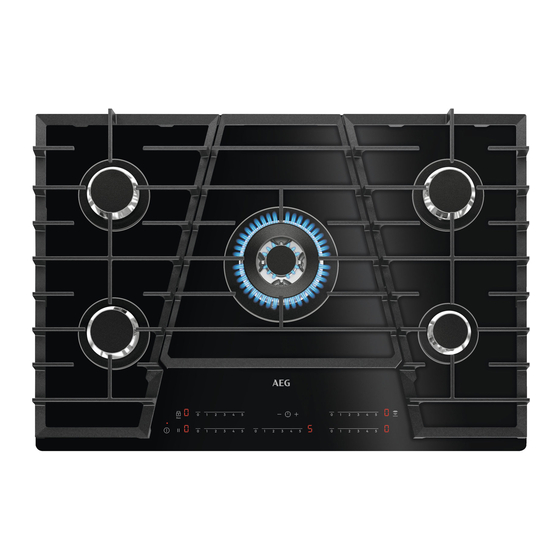
ENGLISH 4. PRODUCT DESCRIPTION 4.1 Cooking surface layout Semi-rapid burner Multi Crown burner Auxiliary burner Control panel 4.2 Control panel layout Use the sensor fields to operate the appliance. The displays, indicators and sounds tell which functions operate. Sen‐ Function Comment field ON / OFF... - Page 14 Sen‐ Function Comment field Reset the hob To reset the hob (Refer to "Troubleshoot‐ ing"). Reset led indicator To show activated function. Reset procedure required. To activate and deactivate the Timer. To increase or decrease the time. Area for Hob²Hood infra‐...
-
Page 15: Daily Use
ENGLISH 5. DAILY USE WARNING! WARNING! Refer to Safety chapters. Be very careful when you use open fire in the kitchen environment. The 5.1 Burner overview manufacturer declines any responsibility in case of the flame misuse. 1. Touch for 1 second to activate the hob. - Page 16 5.3 Turning the burner off To unlock the control panel, touch again. To put the flame out, touch the control You can turn the burners off bar to the off position while the control panel is WARNING! locked. Use...
- Page 17 ENGLISH 5.7 Minute Minder Hob²Hood You can use this function as a Minute It is an advanced automatic function Minder when the hob is activated. which connects the hob to a special hood. Both the hob and the hood have 1.
-
Page 18: Hints And Tips
4. Touch a few times until comes WARNING! After end of cooking, the hood does not turn off 5. Touch of the Timer to select an automatically. Turn it off automatic mode. manually. Touch to set the speed manually. - Page 19 Heat to boiling function To find the full range of cooker hoods which work with this function refer to our Simmering consumer website. The AEG cooker hoods that work with this function must have the symbol Blending, melting in‐ gredients 6.4 Examples of cooking...
-
Page 20: Care And Cleaning
Bur‐ gers Bur‐ gers Bur‐ gers Fries 20-30 Be‐ cha‐ 5-10 5-10 Rice por‐ 10-20 30-40 ridge 1) Stirring continuously 2) Without lid 7. CARE AND CLEANING WARNING! WARNING! Refer to Safety chapters. Do not use knives, scrapers or similar instruments to clean the surface of the 7.1 General information... - Page 21 ENGLISH when you wash the pan supports by hand and dry them. If necessary, remove stubborn stains with a paste cleaner. 3. After you clean the pan supports, make sure that they are in correct positions. 4. For the burner to operate correctly, make sure that the arms of the pan supports are aligned with the centre of the burner.
-
Page 22: Troubleshooting
7.6 Periodic maintenance conditions of the gas supply pipe and the pressure adjuster, if fitted. Speak to your local Authorised Service Centre periodically to check the 8. TROUBLESHOOTING WARNING! Refer to Safety chapters. 8.1 What to do if... Problem... - Page 23 ENGLISH Problem Possible cause Remedy There is no sound when you The sounds are deactivated. Activate the sounds. Refer to touch the panel sensor "Daily use". fields. You can hear sparking for a Air currents around the burn‐ Make sure that air currents few seconds after the flame from windows or doors do goes out and automatic re-...
- Page 24 Problem Possible cause Remedy Temporary condition of fail‐ Follow the same procedure comes on. ure. as if warning appeared. If the problem persist, con‐ tact an Authorised Service Centre. Too many attempts to clear Wait for 15 minutes. comes on.
-
Page 25: Technical Data
ENGLISH 8.3 Labels supplied with the accessories bag Stick the adhesive labels as indicated below: MOD. MOD. MOD. TYPE PROD.NO. IP20 PROD.NO. PROD.NO. SER.NO. 0049 SER.NO SER.NO 03 IT DATA DATA MADE IN ITALY A. Stick it on Guarantee Card and send C. -
Page 26: Energy Efficiency
Multi Crown Semi-rapid 0,75 Auxiliary 0,47 10. ENERGY EFFICIENCY 10.1 Product information according to EU 66/2014 Model identification HVB75450IB Type of hob Built-in hob Number of gas burners Left rear - Semi-rapid 57.5% Right rear - Semi-rapid 57.5% Energy efficiency per gas burner Middle - Multi Crown 54.7%... -
Page 27: Environmental Concerns
ENGLISH • If it is possible, use a pressure cooker. Refer to its user manual. 11. ENVIRONMENTAL CONCERNS with the household waste. Return the Recycle materials with the symbol product to your local recycling facility or Put the packaging in relevant containers contact your municipal office. -
Page 28: Informazioni Di Sicurezza
11. CONSIDERAZIONI SULL'AMBIENTE.............. 55 PER RISULTATI PERFETTI Grazie per aver scelto di acquistare questo prodotto AEG. Lo abbiamo creato per fornirvi prestazioni impeccabili per molti anni, grazie a tecnologie innovative che vi semplificheranno la vita - funzioni che non troverete sulle normali apparecchiature. - Page 29 ITALIANO sono responsabili di eventuali lesioni o danni derivanti da un'installazione o un uso scorretti. Conservare sempre le istruzioni in un luogo sicuro e accessibile per poterle consultare in futuro. 1.1 Sicurezza dei bambini e delle persone vulnerabili Quest’apparecchiatura può essere usata da bambini a •...
- Page 30 (medi). AVVERTENZA: L’elettrodomestico e le parti • accessibili si riscaldano molto durante l'uso. Fare attenzione a non toccare gli elementi riscaldanti. AVVERTENZA: Non lasciare mai il piano cottura •...
-
Page 31: Istruzioni Di Sicurezza
ITALIANO non usare o toccare la superficie – dell'apparecchiatura, non utilizzare l'apparecchiatura. – Se il cavo di alimentazione è danneggiato, deve • essere sostituito dal produttore, da un centro di assistenza autorizzato o da una persona qualificata per evitare situazioni di pericolo. Se l'apparecchiatura è... - Page 32 è pesante. Usare sempre i • Assicurarsi che sia installata una guanti di sicurezza e le calzature protezione contro gli urti. adeguate. • Utilizzare il serracavo sul cavo. • Proteggere le superfici di taglio con • Assicurarsi che il cavo un materiale di tenuta per evitare che dell’alimentazione o la spina (ove...
- Page 33 ITALIANO • Prima di procedere con l’installazione, • Rimuovere tutto l'imballaggio, le verificare che le condizioni di etichette e la pellicola protettiva (se distribuzione locale (pressione e tipo presente), prima del primo utilizzo. di gas) e i valori preimpostati • Assicurarsi che le aperture di dell’apparecchiatura siano compatibili.
-
Page 34: Installazione
• Non lasciare mai un bruciatore • Pulire l'apparecchiatura con un panno acceso con o senza tegami vuoti inumidito e morbido. Utilizzare solo sopra. detergenti neutri. Non usare prodotti • Non mettere fogli di alluminio abrasivi, spugnette abrasive, solventi sull'apparecchiatura. - Page 35 ITALIANO Modello ......PNC ......... Numero di serie ......3.2 Collegamento del gas AVVERTENZA! A. Fine dell'albero con dado Le istruzioni seguenti Connessione rigida: relative all'installazione, alla Eseguire il collegamento usando tubi in manutenzione e alla metallo rigidi (rame con finecorsa ventilazione devono essere meccanico) (UNI-CIG 7129).
- Page 36 3.4 Selezione gas Per accedere alla modalità. 5. Il display del timer mostra il tipo di AVVERTENZA! gas selezionato. Informazione unicamente 6. Toccare per impostare il tipo di per i installatori autorizzati. gas a seconda della seguente tabella. 1. Sfiorare per 3 secondi.
- Page 37 ITALIANO indicati sulla targhetta dei dati dell'apparecchiatura. • L'apparecchiatura è provvista di cavo di collegamento alla rete. Deve essere dotato di una spina in grado di supportare il carico indicato sulla targhetta dei dati. Accertarsi di inserire la spina nella presa corretta. •...
- Page 38 38 mm min. 2 mm 1) Se specificato non diversamente nell'installazione del forno. < 20 mm 12 mm 45 mm 28 mm 29 mm 38 mm 19 mm...
- Page 39 ITALIANO consentire un accesso facile nel caso in cui sia necessaria un intervento di assistenza tecnica. Unità da cucina con porta min 6 mm min 5 mm ATTENZIONE! Installare l'apparecchiatura 60 mm solo su un piano di lavoro con superficie piatta. A.
-
Page 40: Descrizione Del Prodotto
4. DESCRIZIONE DEL PRODOTTO 4.1 Superficie di cottura Bruciatore semirapido Bruciatore multi corona Bruciatore ausiliario Pannello dei comandi 4.2 Pannello dei comandi Usare i tasti sensore per mettere in funzione l’apparecchiatura. I display, le spie ed i segnali acustici mostrano quale funzione è attiva. - Page 41 ITALIANO Tasto Funzione Commento senso‐ Spia LED Per mostrare la funzione attivata. Ripristinare il piano cottu‐ Per ripristinare il piano cottura (fare riferi‐ mento a "Risoluzione dei problemi"). Spia LED di ripristino Per mostrare la funzione attivata. Procedura di ripristino richiesta. Per attivare e disattivare il timer.
-
Page 42: Utilizzo Quotidiano
4.4 Indicatore superficie calda AVVERTENZA! Se la zona di cottura si surriscalda in fase di cottura, l'indicatore di potenza mostra un'avvertenza Superficie Calda quando la zona cottura è spenta. La spia Superficie calda è accesa, finché non si raffredda la zona di cottura, il piano cottura non è... - Page 43 ITALIANO 5.3 Spegnimento del 1. Toccare per 1 secondo per bruciatore attivare il piano cottura. Dopo 20 secondi di non utilizzo, il piano Per spegnere la fiamma, toccare la barra cottura si disattiva. di controllo fino a portarla in posizione off 2.
- Page 44 5.6 Pausa modificare inavvertitamente il livello di potenza. La funzione imposta tutti i bruciatori in Per bloccare il pannello dei comandi: funzione sul livello di potenza più basso. 1. Impostare il livello di potenza. Quando la funzione è attiva, non sarà...
- Page 45 ITALIANO Modalità automatiche accende e si spegne. Sfiorare per 3 secondi. si accendono. Sfiorare Moda‐ Descrizio‐ Illumi‐ Velocità del timer per effettuare la selezione lità ne della nazione automa‐ seguente: modalità auto‐ tica del‐ • - i segnali acustici sono spenti matica la ven‐...
-
Page 46: Consigli E Suggerimenti Utili
6. CONSIGLI E SUGGERIMENTI UTILI AVVERTENZA! Bruciatore Diametro delle Fare riferimento ai capitoli pentole (mm) sulla sicurezza. Semirapido (posteriore 120 - 240 6.1 Pentole destro) ATTENZIONE! Semirapido (anteriore 120 - 220 Non usare pentole in ghisa, sinistro) teglie in terracotta o coccio, grill o piastre tostapane. - Page 47 Per scoprire l'intera gamma di cappe da Simboli del metodo di cottura usati nella cucina compatibili con questa funzione tabella: fare riferimento al sito web del nostro cliente. Le cappe da cucina AEG Riscaldare l'olio compatibili con questa funzione devono riportare il simbolo Cottura rapida 6.4 Esempi di impiego per la...
-
Page 48: Pulizia E Cura
Ham‐ bur‐ gers Pata‐ tine 20-30 fritte Be‐ scia‐ 5-10 5-10 mella Por‐ ridge 10-20 30-40 di ri‐ 1) Mescolare continuamente 2) Senza coperchio 7. PULIZIA E CURA AVVERTENZA! AVVERTENZA! Fare riferimento ai capitoli Non usare coltelli, raschietti sulla sicurezza. - Page 49 ITALIANO Se necessario, rimuovere le macchie più ostinate servendosi di un apposito prodotto in pasta. 3. Dopo aver pulito i supporti pentole, assicurarsi che siano riposizionati correttamente. 4. Per fare in modo che il bruciatore funzioni correttamente, verificare che le braccia dei supporti pentole si trovino allineati al centro del bruciatore 7.3 Rimozione dei supporti...
-
Page 50: Risoluzione Dei Problemi
• Per pulire gli elementi smaltati, lo per evitare difficoltà di accensione o di spartifiamma e la corona, lavarli con riconoscimento della fiamma. - Page 51 ITALIANO Problema Causa possibile Soluzione Viene emesso un segnale È stato appoggiato qualcosa Rimuovere l'oggetto dai tasti acustico e il piano cottura si su uno o più tasti sensore. sensore. spegne. Quando il piano cottura è ac‐ ceso viene emesso un se‐ gnale acustico.
- Page 52 Problema Causa possibile Soluzione La fiamma non si accende in si accende. Per resettare l’allarme 3 tentativi. spegnere e riaccendere il piano cottura. Quando riap‐ Lo spartifiamma del brucia‐ tore o la corona non sono pare l’allarme , dopo l'ani‐...
- Page 53 ITALIANO Problema Causa possibile Soluzione C'è un errore nel piano di Scollegare il piano cottura si accendono. cottura. dalla rete elettrica per un certo periodo di tempo. Scol‐ legare il fusibile dall’impianto elettrico della casa. Ricolle‐ garlo. Se compare di nuovo, rivolgersi a un centro di assistenza tecnica autoriz‐...
-
Page 54: Dati Tecnici
9. DATI TECNICI 9.1 Dimensioni del piano di cottura Larghezza 750 mm Profondità 510 mm 9.2 Altri dati tecnici Gas - Origina‐ G20 (2H) 20 mbar 10,2 kW POTENZA TO‐ TALE: Gas - sostitu‐ G30 (3+) 28-30 mbar 734 g/h... -
Page 55: Efficienza Energetica
ITALIANO 10. EFFICIENZA ENERGETICA 10.1 Informazioni prodotto conformi alla norma UE 66/2014 Identificativo modello HVB75450IB Tipo di piano di cottura Piano di cottura da incasso Numero di bruciatori a gas Posteriore sinistro - Semirapido 57.5% Posteriore destro - Semirapido 57.5%... - Page 56 www.aeg.com/shop...
Need help?
Do you have a question about the HVB75450IB and is the answer not in the manual?
Questions and answers