
Subscribe to Our Youtube Channel
Related Manuals for Aritech Mini 6920P


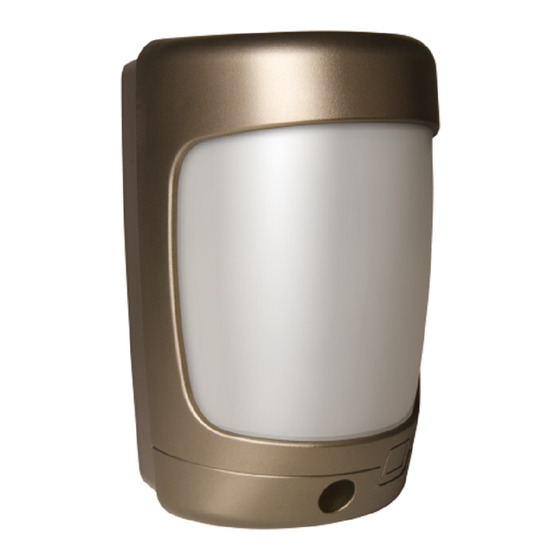
Summary of Contents for Aritech Mini 6920P
- Page 1 6920P/6921P Mini Outdoor Dual Tech Detector Installation Sheet EN DE ES FR NL PL PT SV © 2021 Carrier P/N 466-5590-ML • REV E • ISS 26MAR21 1 / 26...
- Page 2 (1) (2) P/N 466-5590-ML • REV E • ISS 26MAR21 2 / 26...
-
Page 3: En: Installation Sheet
require the detection subject to move further through the EN: Installation Sheet already reduced detection area before an activation is signaled. Remove the back wall fixing plate. Screw the back plate to Package the wall. Always ensure that one of the fixing screws is used to secure the rear tamper plate to the wall (Figure 1, The package contains: item 1) as well as using the other screw fixing points... -
Page 4: Specifications
Switch 2 ON = Pulse count 1 (most sensitive) Multibeam alignment and masking The multifunction lens fitted to the Mini detector produces five Detection LED long-range beams and five medium- to short-range curtain PIR Switch 1 ON = Both LEDs Enabled beams. -
Page 5: Montage Des Geräts
PLACED ON THE MARKET BY: Manufacturer Contact information Carrier Fire & Security Americas Corporation Inc. 13995 Pasteur Blvd firesecurityproducts.com or www.aritech.com Palm Beach Gardens, FL 33418, USA AUTHORIZED EU REPRESENTATIVE: Carrier Fire & Security B.V. DE: Installationsanleitung Kelvinstraat 7, 6003 DH Weert, Netherlands... - Page 6 Abstandsänderungen zum Bewegungsmelder erfasst. Das Erfassungsbereich hinein bewegen, bevor ein Modul ist so programmiert, dass Objekte außerhalb des Aktivierungssignal ausgelöst wird. Erfassungsbereiches ignoriert werden. Entfernen Sie die Rückplatte zur Wandbefestigung. Schrauben Sie die Rückplatte an der Wand fest. Neben Das Bewegungsmeldermodul ist mit zwei verschiebbaren den anderen Schraubenbefestigungspunkten Blenden ausgestattet, die nur zum Verkleinern des Erfassungswinkels des PIR-Sensors dienen.
-
Page 7: Technische Daten
Impulszähler Eingangsspannung 9 bis 15 V DC Beim Impulszählerwert handelt es sich um die Anzahl der Schaltstrom 8 mA (12 V Nennspannung) Erfassungen, die in einem Bewegungsmelder vorliegen Impulszähler 1 oder 2 müssen, bevor ein Alarmsignal ausgelöst wird. Temperaturausgleich Analog (Thermistor) und digitale Schalter 2 AUS = Impulszähler 2 Empfindlichkeitsanpassung Digitaler Mikroprozessor mit nichtflüchtigem... - Page 8 3). Coloque el cuerpo del detector en la placa Kontaktinformationen trasera. firesecurityproducts.com oder www.aritech.com Retire la tapa aflojando el tornillo de bloqueo. Utilize la herramienta de apertura como muestra la Figura 2, tenga precaución al hacer palanca en la tapa frontal de la base ES: Hoja de instalación...
-
Page 9: Especificaciones
Enmascaramiento y alineación multihaz Contador de impulsos El contador de impulsos es el número de veces que el detector La lente multifunción del detector mini produce cinco haces de debe detectar una presencia antes de comunicar una alarma. largo alcance y cinco haces PIR de cortina de medio a corto alcance. -
Page 10: Información Normativa
Carrier Fire & Security B.V. Kelvinstraat 7, 6003 DH Weert, Países Bajos Información de contacto ESTOS PRODUCTOS ESTÁN DESTINADOS Advertencias del firesecurityproducts.com o www.aritech.com A LA VENTA A, E INSTALACIÓN POR, UN producto y descargos de PROFESIONAL DE SEGURIDAD responsabilidad EXPERIMENTADO. -
Page 11: Montage De L'unité
Montage de l’unité Masquage et alignement multifaisceaux Lors de l’installation, protégez les composants électroniques Les objectifs multifonctions intégrés au mini détecteur des infiltrations d’eau. Celles-ci peuvent avoir des permettent de bénéficier de cinq faisceaux IRP longue portée conséquences négatives sur l’unité ou endommager cette et de cinq faisceaux de courte à... -
Page 12: Caractéristiques Techniques
Compteur d’impulsions Réglage de sensibilité numérique et Compensation de température analogique (thermistance) Le compteur d’impulsions indique le nombre de détections Contrôle Microprocesseur numérique avec mémoire nécessaires avant le déclenchement d’une alarme. non volatile Interrupteur 2 désactivé : deux impulsions Test de marche Mode de test de sortie avec voyant. -
Page 13: Collegamento Dell'unità
Figura 2 e con attenzione fare leva nella fessura sotto il Informations de contact coperchio anteriore. Il coperchio è incernierato nella parte superiore e si solleva dalla sede in cui è posizionato firesecurityproducts.com ou www.aritech.com (Figura 3). Rimuovere le due viti di fissaggio e aprire il coperchio IT: Istruzioni d’installazione della morsettiera. - Page 14 cespugli, laghetti, scarichi di caldaie e animali. Il modulo LED di rilevamento a microonde rileva il movimento effettivo in avvicinamento o in Interruttore 1 ON = Entrambi i LED attivati allontanamento rispetto al rilevatore ed è programmato per ignorare eventuali oggetti che si muovono all’esterno dell’area Interruttore 1 OFF = Entrambi i LED disattivati da controllare.
-
Page 15: Certificazione E Conformità
Carrier Fire & Security B.V. Informazioni di contatto Kelvinstraat 7, 6003 DH Weert, Netherlands Avvertenze sul QUESTI PRODOTTI SONO DESTINATI ALLA firesecurityproducts.com o www.aritech.com prodotto VENDITA A, E DEVONO ESSERE MONTATI e dichiarazioni di DA, UN ESPERTO QUALIFICATO. CARRIER non responsabilità... - Page 16 De detectormodule is uitgerust met twee bewegende sluiters Opmerking: De aanbevolen optimale montagehoogte voor de detector is 3 m. Hoewel het mogelijk is om de unit om alleen de detectiehoek van de PIR-sensor te verkleinen. De gordijnen zijn bevestigd aan de draai- en kantelmodule, hoger te monteren, levert dit een kleiner detectiebereik op zoals wordt weergegeven in afbeelding 7.
-
Page 17: Algemene Informatie
Algemene Informatie Looptest & opstarttijd Fabrikant OP DE MARKT GEBRACHT DOOR: Houd 3 minuten aan als opstarttijd voor de elektronica Carrier Fire & Security Americas Corporation Inc. wanneer de stroom wordt ingeschakeld, voordat u start met de 13995 Pasteur Blvd looptest. -
Page 18: Podłączanie Urządzenia
Pokrywa odchyli się od góry Contact informatie i wysunie z gniazda (rysunek 3). firesecurityproducts.com of www.aritech.com Odkręć dwie śruby zabezpieczające i otwórz pokrywę bloku styków. Za pomocą nożyka przetnij gumowe uszczelnienie, aby umożliwić doprowadzenie okablowania PL: Arkusz instalacyjny do urządzenia (rysunek 4). - Page 19 W tabeli 2 poniżej przedstawiono typowe ustawienia i pionowo) moduł soczewki względem pola widzenia, aby uzyskać poprawny obszar pokrycia. i konfiguracje maskowania. Tabela 2: Regulowanie wiązek i konfiguracja maskowania Dane techniczne Wysokość Konfiguracja Pochylenie Maks. (°) zasięg (m) Zasięg Kąt wykrywania od 14° do 70°, Maks.
-
Page 20: Instalação Da Unidade
(Figura 1, item 3). Informacje kontaktowe Monte o corpo principal do detector na placa traseira. firesecurityproducts.com lub www.aritech.com Retire o conjunto da tampa, desapertando para tal o parafuso de bloqueio. Utilize a ferramenta de abertura, conforme apresentado na Figura 2. -
Page 21: Ligar A Unidade
a tampa se afaste da base do detector. A tampa articula- Substitua sempre a lente da forma correcta para assegurar uma cobertura exacta do padrão de feixes, conforme mostrado se a partir de cima e levanta-se da ranhura (Figura 3). na Figura 8. -
Page 22: Informação Reguladora
(10,587 GHz) Unido Palm Beach Gardens, FL 33418, USA Informação de contacto REPRESENTANTE EU AUTORIZADO: Carrier Fire & Security B.V. Kelvinstraat 7, 6003 DH Weert, Netherlands firesecurityproducts.com ou www.aritech.com P/N 466-5590-ML • REV E • ISS 26MAR21 22 / 26... - Page 23 ordentligt. Återställ kabelöppningshöljet och säkra det med SV: Installationsblad de 3 fästskruvarna. Se till att kabeln är placerad inom kabelskenan. Varning: Förpackning När detektorn är inriktad och ansluten: a. Placera höljet på detektorns huvuddel. Förpackningen innehåller: b. Dra åt låsskruven. •...
-
Page 24: Information Om Regler Och Föreskrifter
Figur 10 Potentialfritt relä, signalkontakt 24 VAC/DC vid 50 mA med en integralresistor i 25-Ω - Färg Objekt Beskrivning serien. Larmtid 5 sekunder Mikrovåg aktiv Orange Ingångsspänning 9 V till 15 V likström Röd PIR aktiverad Ström 8 mA (12 V nominell) Röd + Orange Detektionslarm Pulsräkning... - Page 25 (10.525 GHz) Danmark Holland, Ungern, Island Indonesien, Lettland, Litauen Malta, Norge, Portugal Ryssland, Sydafrika, Spanien Taiwan, Ukraina, 6921P Frankrike, Grekland, Thailand, UAE; (10.587 GHz) Storbritannien Kontaktuppgifter firesecurityproducts.com eller www.aritech.com P/N 466-5590-ML • REV E • ISS 26MAR21 25 / 26...
- Page 26 P/N 466-5590-ML • REV E • ISS 26MAR21 26 / 26...
Need help?
Do you have a question about the Mini 6920P and is the answer not in the manual?
Questions and answers