Table of Contents
Advertisement
Available languages
Available languages
Quick Links
Fax +32 2 359 95 50
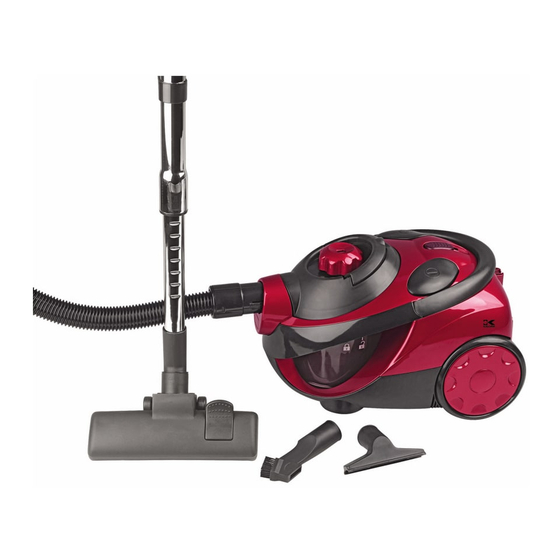
Bagless Vacuum Cleaner
Aspirador sin bolsa
www.KALORIK.com
Copies of the I/B. Please reproduce them without any
changes except under special instruction from Team
International BELGIUM. The pages must be reproduced
and folded in order to obtain a booklet A5 (+/- 148.5 mm
width x 210 mm height). When folding, make sure you
keep the good numbering when you turn the pages of
the I/B. Don't change the page numbering. Keep the
language integrity.
Front cover page (first page)
Assembly page 1/28
USK VC 16107
120V~ 1200W
Advertisement
Table of Contents

Related Manuals for Kalorik USK VC 16107


Summary of Contents for Kalorik USK VC 16107
- Page 1 Fax +32 2 359 95 50 Bagless Vacuum Cleaner Aspirador sin bolsa www.KALORIK.com Front cover page (first page) changes except under special instruction from Team International BELGIUM. The pages must be reproduced and folded in order to obtain a booklet A5 (+/- 148.5 mm width x 210 mm height).
-
Page 2: Important Safeguards
Fax +32 2 359 95 50 IMPORTANT SAFEGUARDS When using your appliance, basic safety precautions should always be followed, including the following: READ ALL INSTRUCTIONS WARNING : To reduce the risk of fire, electric shock or injury: 1. Do not leave appliance when plugged in. Unplug from outlet when not in use and before servicing. -
Page 3: Polarized Plug Instructions
Fax +32 2 359 95 50 12. Do not pick up anything that is burning or smoking, such as cigarettes, matches, or hot ashes. 13. Do not use the vacuum cleaner without filters or dust container in place. 14. Turn off all controls before unplugging. -
Page 4: Carrying Handle
Fax +32 2 359 95 50 PARTS 1. Floor brush 2. Tool holder 3. Telescopic tube 4. Wind force adjuster 5. Handle 6. Hose 7. Dust level indicator 8. Cord rewind button 9. Carrying handle 10. Power cord 11. ON/OFF switch 12. -
Page 5: Assembling The Vacuum Cleaner
Fax +32 2 359 95 50 ASSEMBLING THE VACUUM CLEANER • Unpack the appliance and its accessories. • Insert the connection piece of the flexible hose into hose connection inlet on the front part of the appliance. Press until it clicks. - Page 6 • The vacuum cleaner is delivered with the following accessories: Upholstery brush Combined crevice tool and small brush For cleaning corners, edge and draws and other places that are difficult to reach, such as gaps on the keyboard, bookshelves and windows.
- Page 7 Fax +32 2 359 95 50 • Pull out a sufficient length of power cord. A yellow mark on the power cord shows the ideal cable length. Do not extend the cable beyond the red mark. Insert the plug into the power socket and switch on the appliance by pressing the ON/OFF switch.
- Page 8 Dust level indicator AFTER USE • Stop the vacuum cleaner by pressing the ON/OFF switch ( • Unplug the appliance from the power supply and press the cable rewind button ( ) to rewind the cable automatically. Should the cable block, pull it out 2ft and try again.
-
Page 9: Maintenance And Cleaning
Make sure no water enters in the appliance when doing so. Cleaning the filters and the dust container The filters guarantee you fresh air when vacuum cleaning. Filters that are maintained properly will allow your appliance to keep its maximum suction power. The dirtier the filters, the weaker the suction power will be. - Page 10 Fax +32 2 359 95 50 Cleaning the HEPA filter • After emptying the dust container clean the HEPA filter if necessary. • To do so, you can detach the HEPA filter by turning it anti-clockwise. • It is also possible to take out the HEPA filter by removing the top cover of the dust container.
-
Page 11: Motor Protection Filter
Fax +32 2 359 95 50 Cleaning the motor protection filter • Under the dust container on the main unit, there is a motor protection filter. This filter should be cleaned regularly. Clean it with clear water and let it dry naturally. -
Page 12: Troubleshooting
Fax +32 2 359 95 50 TROUBLESHOOTING Trouble Possible cause An object is blocking the suction Suction power pipe decreases The filters are not fitted properly or are blocked Whistling sound during the first This is not a fault hours of operation The cover does not The dust container is fit properly... -
Page 13: Warranty
You can also fill this warranty card online, at the following address: www.KALORIK.com This KALORIK product is warranted for 1 year from the date of purchase against defects in material and workmanship. This warranty is not transferable. - Page 14 Consumer Service Representatives, to the nearest authorized KALORIK Service Center (please visit our website at www.KALORIK.com or call our Customer Service Department for the address of the nearest authorized KALORIK Service Center).
-
Page 15: Consejos De Seguridad
Fax +32 2 359 95 50 CONSEJOS DE SEGURIDAD Cuando use algún aparato eléctrico siempre deben seguirse precauciones básicas de seguridad incluyendo las siguientes: LEA TODAS LAS INSTRUCCIONES. ADVERTENCIA choque electrico o lesiones: 1. No deje solo el aparato cuando esté conectado. Desconéctelo de la toma de corriente cuando no lo use y antes de darle servicio. - Page 16 Fax +32 2 359 95 50 10. No coloque objetos en las aperturas. No lo use con una abertura bloqueada; manténgalo libre de polvo, pelusa, pelo y cualquier cosa que pueda reducir el flujo de aire. 11. Mantenga lejos de las aperturas y partes móviles, el pelo, ropa suelta, dedos y todas las partes del cuerpo.
- Page 17 Fax +32 2 359 95 50 COMPONENTES 1. Cepillo universal 2. Soporte para accesorio 3. Tubo telescópico 4. Botón para el reglaje manual de la potencia de aspiración 5. Empuñadura 6. Manguera 7. Indicador del nivel de polvo 8. Botón de enrollador de cable automático 9.
- Page 18 Fax +32 2 359 95 50 ASEMBLAJE DEL APARATO • Desembalar el aparato y todos sus accesorios. • Inserte el tubo flexible en el orificio de conexión hasta que haga clic. • Para quitar la manguera, desconecte el aparato. Presione los botones situado en el acoplamiento y estire •...
- Page 19 Fax +32 2 359 95 50 • El cepillo universal tiene dos posiciones. La posición con cepillo metido permite limpiar superficies lisas, la posición con cepillos sacados permite limpiar alfombras, etc. • Este aparato contiene los siguientes accesorios: Upholstery brush Accesorio combinado boquilla plana y cepillo pequeño Utilice la boquilla plana para limpiar rincones y otros lugares de difícil acceso como por ejemplo teclados, estanterías y ventanas.
- Page 20 Fax +32 2 359 95 50 • Cuando su aparato este completamente montado, estire del cable hasta obtener la longitud deseada. Una señal amarilla le indica que ha desenrollado prácticamente la totalidad del cordón. Una señal roja indica la longitud limite, no estire nunca mas allá...
- Page 21 Fax +32 2 359 95 50 • La potencia de aspiración también se puede regular manualmente con el botón en la empuñadura. • Cuando el depósito de polvo está lleno, la señal del indicador de nivel se pone rojo. Esto indica que debe vaciar el depósito. Si el depósito está...
-
Page 22: Limpieza Y Mantenimiento
Fax +32 2 359 95 50 • Por motivos de higiene, vacíe el recipiente de polvo preferiblemente después de cada utilización (ver párrafo limpieza). • Cuando no utiliza el aspirador, guarde el tubo en vertical. Cuélguelo debajo del aparato. LIMPIEZA Y MANTENIMIENTO •... - Page 23 Fax +32 2 359 95 50 • Presione el botón de apertura del fondo del depósito para abrir y vaciarlo automáticamente. • Después de haberlo vaciado y limpiado, deja secarse el depósito. Limpieza del filtro HEPA • Después del vaciamiento del depósito, limpie el filtro HEPA si es necesario.
- Page 24 Fax +32 2 359 95 50 • Si ha sacado la tapa del depósito, vuelva a fijarla en el depósito. Compruebe que la flecha en la tapa del depósito está alineada con el cierre abierto en el depósito y gírela en el sentido de las agujas del reloj hasta que la flecha se alinee con el cierre cerrado en el depósito.
-
Page 25: Problemas Y Soluciones
Fax +32 2 359 95 50 PROBLEMAS Y SOLUCIONES Problema Causa posible El tubo está tapado La potencia de aspiración disminuye Los filtros no están instalados correctamente o están tapadas. Durante las primeras horas de funcionamiento Es normal. puede producirse un ruido agudo. - Page 26 KALORIK, o a un uso con fines comerciales. No existe garantía por las partes de cristal, jarras de cristal, filtros, cestos, hojas y accesorios en general.
- Page 27 Servicio al Consumidor, al servicio post-venta KALORIK lo más próximo. (Visite nuestro sitio internet www.KALORIK.com o llame al Servicio al Consumidor para obtener la dirección del Servicio post-venta KALORIK exclusivo lo más próximo).
- Page 28 A5 (+/- 148.5 mm width x 210 mm height). When folding, make sure you keep the good numbering when you turn the pages of the I/B. Don’t change the page numbering. Keep the language integrity. w ww.KALORIK.com...
Need help?
Do you have a question about the USK VC 16107 and is the answer not in the manual?
Questions and answers