Advertisement
Quick Links
WARNING: ELECTRICAL SHOCK HAZARD. Failure to follow these warnings could result in death or serious injury.
• Before carrying out any work on electrically operated components, make sure they are disconnected from the power supply.
• Before installing the HD Series, disconnect all connections to the vehicle battery.
• Make sure all power connections are tight and secure. Important! When connecting power terminals inside the compressor box
unit you MUST torque the power post to 140 in-lb (15.82 Nm).
• All electrical connections should be made by a trained technician.
• CAUTION: PERSONAL INJURY HAZARD. Incorrect installation of the HD Series may place the safety of the user at risk.
Failure to obey this caution could result in minor or moderate injury.
NOTICE: The HD Series should be installed by a qualified technician.
NOTICE: The connection to the vehicle's electrical system should be protected by a fuse recommended for your system. Please
visit www.bluesea.com and click on Circuit Wizard for guidance on properly sizing wires and breakers.
NOTICE: The battery must be capable of supplying the required current and voltage.
• When handling our products, always use protective gloves and protective footwear. The product is made from mostly stainless
steel and can have sharp edges that can cut you. The units are also very heavy, so lift with 2 people- never alone, and make
sure before lifting that ALL screws are tight when securing the cover. 2 of the screws in the middle on the long sides and 1 on the
backside keep the cover from sliding off. It's very important that they are put in and secured before moving. When installing
cover screws, make sure unit is level and make sure holes are aligned. Do not force screws. They are stainless steel and will
seize.
• Do not add any oil when charging this unit with refrigerant. The compressors are pre-charged with PVE oil.
• If oil leaves the unit during future recoveries, you may add the amount that left the system with more PVE oil. Call us for info on
the viscosity. Never add PAG oil or leak dyes that are not compatible with PVE oil. Call us and we can recommend a suitable
leak dye. PAG or PAG electric oil will ruin the compressor and void your warranty.
Do not reverse
polarity. Damage will result and void your warranty.
•
HD Series
Installation Instructions
Page
1
of
22
Advertisement

Related Manuals for Cruise N Comfort HD Series


Summary of Contents for Cruise N Comfort HD Series
- Page 1 • All electrical connections should be made by a trained technician. • CAUTION: PERSONAL INJURY HAZARD. Incorrect installation of the HD Series may place the safety of the user at risk. Failure to obey this caution could result in minor or moderate injury.
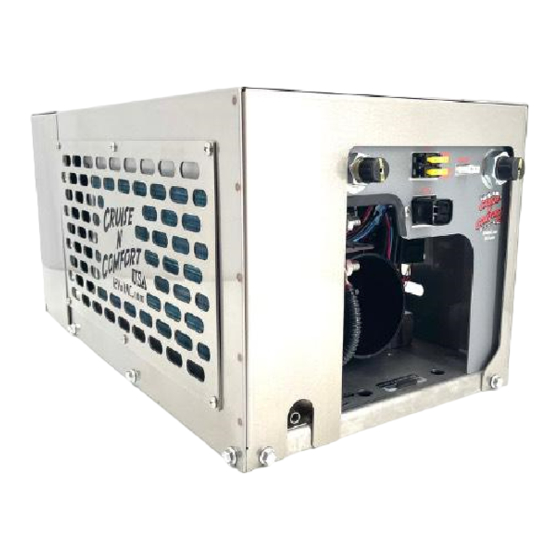
- Page 2 If the return air cannot easily return into the unit, cooling performance will be limited. The side that has perforated holes and the words “Cruise N Comfort USA” laser cut into it is the intake for return air, DO NOT RESTRICT THIS INTAKE.
- Page 3 5. Run the supplied condenser wire from the evaporator box to the condenser fan. Make the proper connections for the correct condenser (see Figures 4a, 4b, 4c), solder together and shrink wrap. Note: electrical connections should be performed by a qualified individual for your safety and the safety of the user.
- Page 4 Call us if you would like help with this or see the charging video on our website under the manual and videos tab. Our HD Series hold 2.25 pounds of R134a refrigerant or 3, 12oz cans when using the 7 foot lines we provide. To make communication easy with the person charging the system please print page 22 and give to the technician to avoid confusion.
- Page 5 Vent / Ducting Tips: • Do not reduce vent sizes or ducting- or have long runs of ducting. • It is a good idea to let the air do the traveling. • Always use insulated ducting when exposed to air- otherwise tubing can sweat and condense water. •...
- Page 6 CRUISE N COMFORT THE INFORMATION CONTAINED IN THIS DRAWING IS THE SOLE PROPERTY OF CRUISE N COMFORT ANY REPRODUCTION JOB NAME: IN PART OR AS A FINISH: WHOLE WITHOUT THE WRITTEN PERMISSION STAINLESS HD UNIT OF CRUISE N COMFORT IS PROHIBITED. Page...
- Page 7 Figure 2: Component placement for the HD- Series in a small trailer/van. This installation is typical and has been very successful for our customers and van builders. The unit is typically mounted in a cabinet down low or mid height with the front exposed for maximum air return. Then 2 vents are straight out of the unit in short runs with minimal 90 degree angles.
- Page 8 Rear Van Garage Space This is acceptable if the pass thru bulk head door is left open during use to return air to the garage. Another option is to face the return grill to the bulkhead and cut a corresponding hole to the evaporator. You may leave the cut open or use our detachable grill (see pictures below).
- Page 9 Mid Vehicle mid level using the front of the HD cover Mid Vehicle Low Upper Cabinet Page...
- Page 10 HD Series Refrigerant Lines HD-12/24 Refrigerant Lines THIS INSTALLATION MUST BE DONE BY A ASE CERTIFIED MASTER AUTOMOTIVE REPAIRMAN CERTIFIED IN AIR CONDITIONING REPAIR Outside Vehicle Condenser/fan assembly Outside Vehicle Large Port #8 Figure 7: Small Port #6 Inside Vehicle...
- Page 11 CERTIFIED MASTER AUTOMOTIVE REPAIRMAN CERTIFIED IN AIR CONDITIONING REPAIR Outside Vehicle Condenser/fan assembly Figure 8: Positive (Red) Negative (yellow) Inside Vehicle Condenser Condenser IMPORTANT!!! IMPORTANT!!! 60 AMP FUSE OR Breaker / Fuse and Controller RESETTABLE wire size must be CIRCUIT sized appropriately Main Power BREAKER...
- Page 12 Figure 3: Installation Requirements For Cruise N Comfort USA Remote Condenser Large Port 15 degrees or more Small Port Try to give the unit a minimum of 6 inches around all sides for proper air flow. Do not box this unit in. Hot air will flow out of the back of the fans and return into the front and cause undesired results.
- Page 13 Page...
- Page 14 Figure 4: Condenser Wiring Figure 4a: Single Fan 12 Volt 12” Fan Supplied Cable to unit Page...
- Page 15 Dual Fan 12 Volt / 24 Volt (option) Figure 4b wired series for daytime use in moderate climates or night time use in moderate climates 10” Fan 10” Fan Supplied Cable to unit Double Fan 12 Volt / 24 volt (option) wired parallel for use in extreme climates (Southwest US).
- Page 16 Figure 4c: Double Fan 48 Volt Our 48 volt systems are currently only available with the double fan configuration. The unit is 2- 24 volt fans wired in series. DO NOT WIRE THESE IN A PARALLEL CONFIGURATION- IT WILL RUIN THE FANS. 10”...
- Page 17 2.983 15.269 14.793 14.317 12.150 Liquid PROPRIETARY AND PAGE: MATERIAL: COMPANY: CONFIDENTIAL CRUISE N COMFORT THE INFORMATION CONTAINED IN THIS DRAWING IS THE SOLE PROPERTY OF Liquid PART NAME: METAL CONCEPTS REPRODUCTION IN FINISH: VES-HD - 1214 SINGLE FAN PART OR AS A WHOLE...
- Page 18 Figure 6: DUAL FAN CONDENSER OPTION DIMENSIONS Optional Rock Guard 26.802 26.802 25.901 1.210 0.984 MATERIAL SIZE DWG. NO. TITLE: CRUISE N COMFORT CONDENSER BRACKET FINISH ASSEMBLY - DOUBLE SHEET 1 OF 1 DO NOT SCALE DRAWING Page...
-
Page 19: Do's And Don'ts
DO’S AND DONT’S Here are a couple tips and tricks that will help you get more out of your CNC unit: • Use the vehicle’s a/c to help cool the area down. The a/c unit on your van or vehicle is a lot larger in capacity than your CNC unit. - Page 20 Use only pure R134a refrigerant Do not use freon with additives or any cans that say first charge or have oil in them. PAG and other oils will short the compressor. The compressor is pre loaded with 4 OZ of PVE oil before shipment.
- Page 21 5 inch minimum Clearance issues Page...
-
Page 22: Initial Charging
Initial Charging: 1. Remove smaller rear cover to expose fill ports. 2. Evacuate unit with vacuum pump and manifold gauge set for at least 20 minutes. 3. Check to make sure system is holding vacuum. 4. Fill with 2.25 lbs. of R134a Refrigerant (no oil charge! No PAG OIL! PAG oil and other additives will ruin the compressor and void the warranty).
Need help?
Do you have a question about the HD Series and is the answer not in the manual?
Questions and answers