Table of Contents
Advertisement
Quick Links
HARBOR BREEZE and logo design are
trademarks or registered trademarks of
LF, LLC. All rights reserved.
Purchase Date
Questions, problems, missing parts? Before returning to your retailer, call our customer
service department at 1-888-251-1003, 8 a.m. - 8 p.m., EST, Monday - Sunday. You could
also contact us at partsplus@lowes.com or visit www.lowespartsplus.com.
VR21099
WALL LANTERN
1
ITEM #4145472
4145473
MODEL #WL136MW
WL136MBK
Español p. 11
ATTACH YOUR RECEIPT HERE
ADJUNTE SU RECIBO AQUÍ
APPROVED FOR USE
IN WET LOCATIONS
Advertisement
Table of Contents

Related Manuals for Harbor Breeze WL136MW


Summary of Contents for Harbor Breeze WL136MW
- Page 1 ITEM #4145472 4145473 WALL LANTERN MODEL #WL136MW WL136MBK HARBOR BREEZE and logo design are trademarks or registered trademarks of Español p. 11 LF, LLC. All rights reserved. ATTACH YOUR RECEIPT HERE ADJUNTE SU RECIBO AQUÍ APPROVED FOR USE Purchase Date...
-
Page 2: Table Of Contents
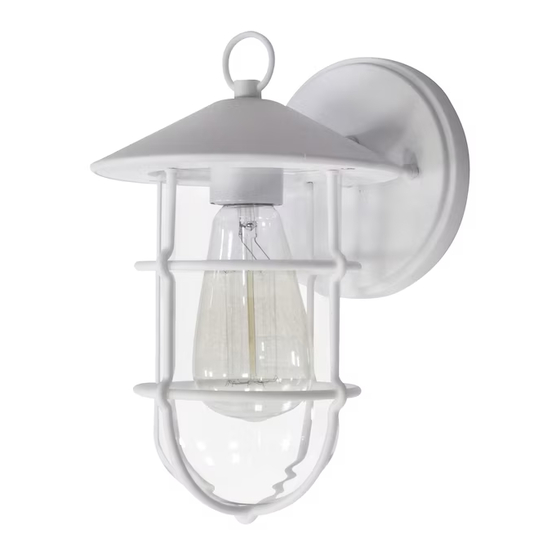
TABLE OF CONTENTS Package Contents ........................2 Hardware Contents ...........................3 Safety Information ........................3 Preparation ...........................4 Assembly Instructions ......................5 Care and Maintenance ......................10 Troubleshooting ........................10 Warranty ..........................10 PACKAGE CONTENTS PART DESCRIPTION QUANTITY Fixture Mounting Strap Decorative Nut (preassembled to screw (D)) Screw (preassembled to mounting strap (B)) Nut (preassembled to screw (D)) Shade (preassembled to cage (G)) -
Page 3: Hardware Contents
HARDWARE CONTENTS (shown actual size) Machine Wire Screw Connector Qty. 2 Qty. 3 SAFETY INFORMATION READ AND SAVE THESE INSTRUCTIONS. DANGER • For your protection and safety, carefully read and understand the information provided in this manual completely before attempting to assemble, install or operate this product. Failure to do so could lead to electrical shock, fire or other injuries that could be hazardous or even fatal. -
Page 4: Preparation
SAFETY INFORMATION WARNING • To avoid personal injury, the use of gloves may be necessary while handling fixture parts with sharp edges. • DO NOT suspend any fixture by the house wires. A fixture must always be mounted directly to a mounting strap which is first attached to the outlet box. -
Page 5: Assembly Instructions
ASSEMBLY INSTRUCTIONS Turn off circuit breakers and wall switch to the fixture supply line leads. DANGER: Failure to disconnect power supply prior to installation may result in serious injury or death. Remove existing fixture and disconnect all electrical wiring. Outlet Box Remove two decorative nuts (C) on mounting strap (B). - Page 6 ASSEMBLY INSTRUCTIONS Attach mounting strap (B) to outlet box (not included) using the existing washers and outlet box screws or the machine screws (BB). NOTE: If the outlet box screws required for your outlet box are of a different size than the machine screws (BB), consult with a licensed electrician before proceeding.
- Page 7 ASSEMBLY INSTRUCTIONS Unwrap BARE wire from BLACK and 4 4 7a WHITE wires on back of fixture (A). Prepare wire by stripping 1/2 inch of insulation from wire ends using wire strippers (not included). Connect BARE/GREEN ground wire from outlet box to BARE ground wire from fixture (A) using wire connector (AA).
- Page 8 ASSEMBLY INSTRUCTIONS Wrap electrical tape (not included) around each individual wire connector (AA) down to the wire. WARNING: Make sure no bare wire or wire strands are visible after making connections. Push wire connectors (AA) gently into outlet box. Carefully push excess wiring into outlet box.
- Page 9 ASSEMBLY INSTRUCTIONS Align screw holes at top of cage (G) with holes on fixture (A) and reinsert shade screws (H) previously removed. Securely tighten both shade screws (H). 12. Restore power and test fixture (A). If light does not function, please refer to TROUBLESHOOTING on the following page.
-
Page 10: Care And Maintenance
CARE AND MAINTENANCE • Shut off main power supply. Wipe fixture with a soft, damp cloth. Use window cleaner to clean shade. Do not use an abrasive cleaner on shade or fixture. TROUBLESHOOTING WARNING: Before beginning work, shut off the power supply to avoid electrical shock. PROBLEM POSSIBLE CAUSE CORRECTIVE ACTION...
Need help?
Do you have a question about the WL136MW and is the answer not in the manual?
Questions and answers
How can I get replacement glass for Model #WL136MBK?
You can get replacement glass for Harbor Breeze Model #WL136MBK by contacting the customer service department at 1-888-251-1003 (available 8 a.m. - 8 p.m. EST, Monday - Sunday). You can also email partsplus@lowes.com or visit www.lowespartsplus.com for assistance.
This answer is automatically generated