Table of Contents
Advertisement
Quick Links
Advertisement
Table of Contents

Subscribe to Our Youtube Channel
Related Manuals for dji O3 Pro


Summary of Contents for dji O3 Pro
- Page 1 DJI High-Bright Remote Monitor User Guide 使用说明 v1.2 2022.09...
-
Page 2: Table Of Contents
Contents Disclaimer and Warning Introduction Overview Mounting/Removing the Battery Activation Linking Monitoring Interface System Menu Appendix 免责声明和警告 简介 部件名称 安装 / 拆卸电池 激活 对频 监看界面 系统菜单 附录... -
Page 3: Disclaimer And Warning
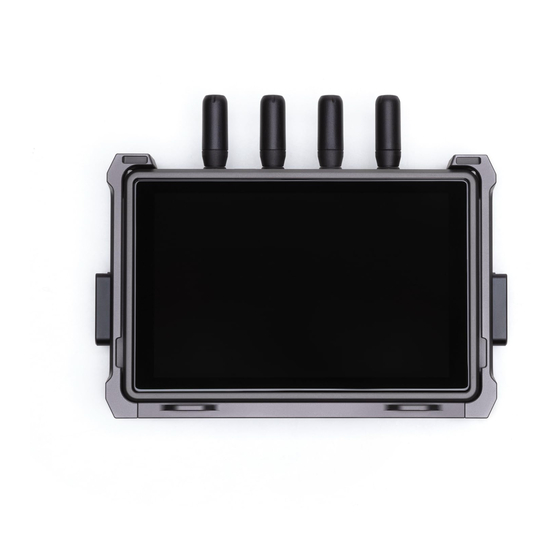
Boasting DJI’s O3 Pro Video Transmission technology, the DJI High-Bright Remote Monitor can connect wirelessly to compatible devices when used with the Ronin 4D Video Transmitter or DJI Video Transmitter. The monitor enables users to follow the live view of the camera and to control the camera remotely. -
Page 4: Mounting/Removing The Battery
Make sure to use the WB37 battery within the operating temperature range. DO NOT disassemble or pierce a battery in any way or it may leak, catch fire, or explode. Refer to the WB37 Intelligent Battery Safety Guidelines for more information. © 2022 DJI All Rights Reserved. - Page 5 NP-F battery release button pops up, indicating the battery is firmly in place. M2×5 M2×6 Press and hold the battery release button on the battery adapter and push the battery in the opposite direction to remove it. © 2022 DJI All Rights Reserved.
-
Page 6: Activation
Make sure to connect the device to the DJI Assistant 2 software and log in with your DJI account to make sure it is correctly recognized when the device is used in a country or region that is different from where it was activated. - Page 7 Main Monitor. Make sure that at least one remote monitor is powered on and connected to Ronin 4D before enabling Broadcast mode. Using DJI Video Transmitter: enable Broadcast mode in the menu on the video transmitter. 2. Power on the remote monitor. Tap to enter System Menu and then Connection Settings.
-
Page 8: Monitoring Interface
10‘ Z-Axis 8’ Follow 7‘ 6’ 5‘6 5’ Track 4‘6 4’ 3‘6 3‘ 2‘9 A001C0001 A001C0001 2‘6 10000 128(2.1) 08:02:16:06 8K/16:9 +0.0 17 18 19 20 21 Mirror Control Mode on Ronin 4D Enabled © 2022 DJI All Rights Reserved. - Page 9 Tap to enter video transmission channel settings to switch the channel mode, check the signal quality, and select the channel and downlink bandwidth. Channel Mode: tap to switch between Auto and Manual. In Auto mode, channels with strong interference will be avoided automatically and the © 2022 DJI All Rights Reserved.
- Page 10 20M for longer transmission distance and better anti- interference. When using with the DJI Video Transmitter, if the video transmitter is linked to the remote monitor in Control mode and Broadcast mode is enabled, users can select the prioritized mode.
- Page 11 Focus Meter: when enabled, the focus meter will be displayed on the right of the screen. It can be used to assist focus when the Ronin 4D Hand Grips or DJI Three-Channel Follow Focus is used. The focus plane distance (the yellow arrow pointed to) and depth of field (area within yellow dotted lines) can be displayed in the focus meter and LiDAR waveform when the focus point information and aperture value are read.
- Page 12 Waveform: when enabled, the bottom of the screen will show the relationship and degree of the light and shadow in the current screen with a waveform. 24.5M 5600 Clear SS 1/50 IRIS F2.8 A001C0018 08:02:16:06 08:02:16:06 Waveform Effect Image © 2022 DJI All Rights Reserved.
- Page 13 Tap to enable or disable the exposure display. The feature supports Zebra Stripes, Waveform, and False Color. Go to the menu and select Display then Exposure Assistant to apply settings. 21. Playback Button Tap to access playback and play the last recorded video. © 2022 DJI All Rights Reserved.
-
Page 14: System Menu
60 in this setting. Auto corresponds to the option Auto in this setting. The DJI Remote Monitor Expansion Plate is required when using HDMI/SDI output functions. Input Signal: select OcuSync when using the transmitter as the input source. Select HDMI when using the HDMI port on the monitor as the input source. - Page 15 Gyroscope Control is disabled. Hand Grip Dial This setting will appear only when using with DJI Video Transmitter. Set the function of the dial on the right hand grip if the Ronin 4D Hand Grip is mounted to the monitor.
-
Page 16: Appendix
1. Power on the device and connect it to a computer with a USB-C cable. 2. Launch DJI Assistant 2 (Ronin Series) and log in with a DJI account. 3. Select the device and click Firmware Update on the left side of the screen. - Page 17 Connection: mount the DJI Remote Monitor Expansion Plate to the monitor. Connect the DC- OUT port on the DJI Master Wheels or Force Pro to the DC-IN port on the expansion plate using the DJI High-Bright Remote Monitor Controller Cable.
-
Page 18: Chs 免责声明和警告
免责声明和警告 使用本产品之前,请仔细阅读并遵循本文及与本产品相关的所有安全与合规操作指引。 简介 图传高亮监视器采用 DJI O3 Pro 图传技术,通过 Ronin 4D 图传发射器或 DJI 图传发射器 与相应设备无线连接,可远程观看相机拍摄画面及控制相机。监视器可安装拓展板拓展 DC、 CAN 输入及 HDMI、SDI 输出,拓展保护框配备控制手柄接口用于安装控制手柄方便远程控制。 监视器可通过 DJI WB37 智能电池进行供电;若配合 NP-F 电池转接板,可支持 NP-F 系列电池 供电。 部件名称 1. 可拆卸天线 2. 散热孔 3. 3.5 mm 音频输出接口 插入监听设备,可监听发射端录制的音频。 4. microSD 卡槽... -
Page 19: 安装 / 拆卸电池
7. 电源指示灯 开机后指示灯常亮,关机后熄灭。 8. 电源按键 短按开机,长按关机。开机状态下,单击电源按键可熄屏,再次单击可亮屏。双击电源按键 可锁定触屏,此时触屏的任何操作均无法响应,再次双击电源按键可解锁。 9. 电池插槽 默认使用 WB37 智能电池为监视器供电。若安装 NP-F 电池转接板,则可使用 NP-F 系列电 池为监视器供电。 10. WB37 电池移除按键 11. 拓展板接口保护盖 内部的拓展板接口用于安装图传监视器拓展板, 拓展 DC、 CAN 输入及 HDMI、 SDI 输出接口。 12. 拓展保护框 拓展保护框上配有 1/4 英寸螺纹孔、1/8 英寸螺纹孔及控制手柄接口(图中序号 13)等,用 于安装相应的配件。 安装 / 拆卸电池 首次使用需通过... - Page 20 2. 若使用 NP-F 系列电池,则首先移除图传高亮监视器背部 4 颗 M2×5 沉头螺丝,安装 NP-F 电池转接板至电池插槽并拧紧 4 颗 M2×6 圆柱头螺丝,然后置入电池并向供电接口方向推到 底。确保 NP-F 电池移除按键为弹起状态,则表示电池安装到位。 M2×5 M2×6 按住电池转接板上的电池移除按键,沿安装反方向用力推电池,即可取出电池。 © 2022 大疆创新 版权所有...
- Page 21 激活 全新的监视器需要激活方可使用。开启监视器,并连接至计算机,运行 DJI Assistant 2 (Ronin 系列 ) 调参软件,点击设备图标按照提示进行激活。调参软件下载地址: https://www.dji.com/downloads/softwares/dji-assistant-2-ronin-series 若设备使用时所在的国家 / 地区与设备激活时不同,则必须连接 DJI Assistant 2 调参软件并登录 DJI 账户以正确识别设备。 对频 监视器需与图传发射器对频后方可使用,对频前确保图传发射器已安装至与其配合使用的设备。 监视器图传分为控制模式和广播模式,其对频方式略有不同。 控制模式 1. 开启图传高亮监视器,点击 进入系统菜单 > 连接设置。在控制模式下选择当前监视器为 控制屏 A 或控制屏 B,然后点击对频控制屏 A/B,进入对频状态。 连接设置 控制模式 广播模式 未连接 控制屏 A 控制屏 B 对频控制屏...
- Page 22 广播模式 1. 使用 Ronin 4D:在 Ronin 4D 机身高亮监视器的图传设置中,开启广播模式。开启广播模式 前请先确保至少有一台图传高亮监视器已开机并连接至 Ronin 4D。 使用 DJI 图传发射器:在图传发射器的菜单中,开启广播模式。 2. 开启图传高亮监视器,点击 进入系统菜单 > 连接设置。点击广播模式,监视器将自动搜 索附近已开启广播模式的设备。点击需要监看的设备,将显示对应设备的图传画面。通过图 传画面右侧的摄像机编号按键可刷新图传显示或切换监看的设备。 连接设置 控制模式 广播模式 正在扫描 A-1000 B-1001 C-1002 © 2022 大疆创新 版权所有...
-
Page 23: 监看界面
监看界面 24.5M 5600 Clear SS 1/50 IRIS F2.8 112G 60’ 30’ 60’ 20’ 30’ 15‘ 20’ 12’ 15‘ 12’ 10‘ 10‘ 8’ 7‘ 8’ 6’ 7‘ 5‘6 6’ 5’ 5‘6 4‘6 5’ 4’ 4‘6 4’ 3‘6 3‘6 3‘ 3‘ 2‘9 2‘9 2‘6 A001C016... - Page 24 112G 24.5M 5600 Clear SS 1/50 IRIS F2.8 08:02:16:06 08:02:16:06 广播模式 控制模式和广播模式下的界面显示略有不同, 以下内容为控制模式下的界面介绍。 在广播模式下, 无法进行拍摄参数调节、LUT 切换等与控制相关的操作。 1. 电池电量及外接电源电压 使用电池供电时时显示电池电量百分比,使用外接直流电源供电时显示当前电压。当电池 电量低至 10% 时,电池图标显示为红色 。当电池为严重低电量,电池图标显示为 ,此时请立即充电。 2. 发射端电池电量及外接电源电压 显示与图传高亮监视器连接的发射端设备的电池电量及外接电源电压。使用电池供电时显示 电池电量百分比,使用外接直流电源供电时显示当前电压。 3. 存储空间 显示监视器 microSD 卡的可用空间或对应的可录制时长。 4. 遥控设备 显示当前已连接的遥控设备,各设备对应显示图标如下。 :三通道跟焦器 :大师摇轮 :左控制手柄 :右控制手柄 5.
- Page 25 宽,此时画面传输距离较远,抗干扰能力较强。 若配合 DJI 图传发射器使用,当以控制模式连接,且同时开启图传发射器的广播模式时,可 设置连接模式优先级。 连接模式优先:点击选择控制优先或广播优先。 控制优先时,传输会优先保证控制模式的设备信号质量。用户可选择信道模式。此时可能出 现距离较近的广播模式设备图传信号较差的情况。 广播优先时,传输会优先保证广播模式的设备信号质量。用户可手动选择信道,无法选择信 道模式及下行带宽。 7. 拍摄参数 配合 Ronin 4D 使用时显示拍摄参数,包括色温、ND、镜头开角度 / 快门速度(跟随 Ronin 4D 中的设置显示其一)、光圈、EI 显示。点击可调节相应参数。 8. 体感控制 点击进入设置菜单,可开启或关闭体感控制。开启体感控制后,可设置平移、俯仰、横滚轴 的跟随速度,回中云台。进入高级设置,可设置平移、俯仰、横滚轴的死区及平滑度,校准 指南针,恢复出厂状态。 体感控制开启时,按住此图标可暂停体感控制,云台将保持当前姿态,松开后恢复控制;双 击此图标可回中云台。 • 若在系统菜单中关闭体感控制,则此处不会显示体感控制图标。 • 开启体感控制后,界面右侧区域将不再显示 LiDAR 示波器。 9. 安全框 安全框可以辅助进行构图,还能为画面所需要添加的如台标、节目图标等叠加信息提前预留 好空间。可在通用设置中开启或关闭安全框、设置安全框比例。注意安全框大小并不会影响 最终素材录制,仅用于监看画面参考。...
- Page 26 中将 LOOK 设置为已导入的自定义 LUT,具体设置方法请参考《Ronin 4D 用户手册》。 16. 曝光辅助 / 对焦辅助设置 对焦标尺:开启后,界面右侧显示对焦标尺。配合 Ronin 4D 控制手柄或 DJI 三通道跟焦器 使用时,用于辅助对焦。当读取到焦点信息及光圈值时,对焦标尺和 LiDAR 示波器上可显 示对焦平面的距离(黄色箭头)及景深范围(黄色虚线范围)。(仅适用于 Ronn 4D) LiDAR 示波器:开启后,LiDAR 测距器对焦区域内所有测距点信息将以俯视图的形式显示 在界面右侧区域。(仅适用于 Ronn 4D) 24.5M 5600 Clear IRIS F2.8 112G SS 1/50 60’ 30’ 60’ 20’...
- Page 27 示波器:开启后,界面下方将以波形显示当前画面中的明暗关系与程度。 24.5M 5600 Clear SS 1/50 IRIS F2.8 A001C0018 08:02:16:06 08:02:16:06 示波器效果示意图 假色:开启后,可在图像上叠加不同的色彩,以代表图像中不同物体的曝光值。开启假色参 考开关,界面下方将显示假色表。 24.5M IRIS F2.8 5600 Clear SS 1/50 A001C0018 08:02:16:06 08:02:16:06 假色效果示意图 峰值对焦:开启峰值显示,并设置颜色峰值的显示颜色及百分比或光圈峰值的百分比。 © 2022 大疆创新 版权所有...
- Page 28 若在 Ronin 4D 机身高亮监视器中开启镜像控制模式,则在图传高亮监视器中可查看 Ronin 4D 机身高亮监视器的全部界面显示,并可进行设置。界面上的触屏操作与 Ronin 4D 机身高亮监视 器相同。以下图标分别对应 Ronin 4D 机身高亮监视器上相应的实体按键,用户可通过点击图标 实现同样的功能。 17. 机身菜单 HOME 键 点击进入 Ronin 4D 机身菜单界面。 18. PEAK 焦点辅助开关 点击开启 / 关闭对焦辅助。 可在菜单 “监看” - “对焦辅助” 中设置 PEAK 按键功能为峰值对焦 (默 认)、放大以及 LiDAR 示波器,图传高亮监视器界面上此图标的功能亦将随之改变。 19.
-
Page 29: 系统菜单
连接设置 进行控制模式和广播模式的切换及对频。 通用设置 输入输出设置 HDMI/SDI OSD:开启或关闭 HDMI/SDI 输出端的屏幕信息显示。 HDMI/SDI 输出比例:正常或中央裁切(16:9)。 HDMI/SDI 输出帧率:自动或 24/25/30/50/60。当接入 HDMI/SDI 输出设备时,监视器界面亦将 弹出帧率选择窗口,默认为低延迟,即对应此处的帧率 60,自动则对应此处的自动。 HDMI/SDI 输出相关功能均需配合 DJI 图传监视器拓展板使用。 信号输入源:使用发射端作为输入源时, 选择 OcuSync。 使用监视器的 HDMI 接口作为输入源时, 选择 HDMI。 录制触发:若发射端连接的相机具有录制触发功能,可在此选择开启或关闭。 USB-C 功能:使用 USB-C 接口进行固件升级时,选择固件升级。若选择网络摄像头,则将监 视器的视频源作为网络摄像头的输入使用,可上传图传画面至 USB-C 接口所连接的计算机。 录制控制 选择控制视频录制的设备。 TX+SD:配合 Ronin 4D 使用时,使用监视器监看界面或 Ronin 4D 机身的录制按键,可控制... - Page 30 手柄拨轮功能 仅在配合 DJI 图传发射器使用时,显示此设置。若监视器已安装 Ronin 4D 控制手柄,可设置右 手柄拨轮的功能。 屏幕设置 设置遮幅比例及透明度、是否显示安全框及安全框比例、屏幕亮度、是否显示靶心。 若发射端使用变形宽荧幕镜头, 在此设置相应的变形反挤压比例, 可将监看画面还原为正常效果。 若发射端使用特定相机,在此开启虚拟控件,可通过监视器屏幕上的虚拟按键设置相机参数。 语言 在语言列表中选择界面语言。 本地回放 在回放页面可查看及播放 microSD 卡中本地录制的视频。 进入页面后,将自动播放最后录制的视频。点击 查看视频列表,点击 返回监看界面。 关于和帮助 查看版本号、序列号等信息,获取教学视频帮助。 © 2022 大疆创新 版权所有...
- Page 31 附录 固件升级 使用 DJI Assistant 2 (Ronin 系列 ) 调参软件可对监视器进行升级。 1. 开启设备。使用 USB-C 连接线连接设备至计算机。 2. 启动 DJI Assistant 2 (Ronin 系列 ),使用 DJI 账号登陆并进入主界面。 3. 点击设备图标,然后点击左侧的固件升级选项。 4. 选择并确认需要升级的固件版本。 5. 调参软件将自行下载并升级固件。 6. 升级完成后,设备将自动重启。 规格参数 RXD2 型号 含拓展保护框:768 g 重量 不含拓展保护框:496 g 含拓展保护框:214×52×166 mm(长...
- Page 32 安装遮光罩 展开遮光罩,按照图示将遮光罩上的 6 个魔术贴分别穿过图传监视器拓展保护框上的安装孔, 然后将魔术贴粘贴牢固。 使用其他控制设备 将 DJI 大师摇轮或体感控制器专业版连接至监视器,可远程控制发射端设备。 连接方法:将图传监视器拓展板安装至监视器,然后使用 DJI 图传高亮监视器控制器连接线连 接大师摇轮或体感控制器的 DC-OUT 接口至拓展板的 DC-IN 接口。 © 2022 大疆创新 版权所有...
- Page 33 ※ This content is subject to change without prior notice. If you have any questions about this document, please contact DJI by sending a message to DocSupport@dji.com. is a trademark of DJI. Copyright © 2022 DJI All Rights Reserved.
Need help?
Do you have a question about the O3 Pro and is the answer not in the manual?
Questions and answers