Table of Contents
Advertisement
Advertisement
Table of Contents

Related Manuals for GL-INET GL-AXT1800


Summary of Contents for GL-INET GL-AXT1800
- Page 1 Slate AX (GL-AXT1800) USER MANUAL...
-
Page 2: Table Of Contents
Table of Contents Hardware info ..........................1 1.1. Specification ......................... 2 1.2. PCB Pinout ..........................3 First time setup ..........................4 2.1 Connect to the Internet via an ethernet cable ..............8 Protocol ............................. 8 2.2 Connect to the Internet via an existing Wi-Fi by Repeater ........11 Basic steps ........................... - Page 3 VPN Client ............................41 Proxy mode ..........................42 Global Options ..........................43 VPN Server ............................44 OpenVPN Server Options ....................... 44 OpenVPN Server Route Rule ....................45 WireGuard Server Options ...................... 45 WireGuard Server Route Rule....................46 OpenVPN ............................47 7.2 How to Setup OpenVPN Client on GL.iNet router ...........
- Page 4 APPLICATIONS ........................... 83 8.1 Plug-ins ............................83 8.2 Dynamic DNS ..........................84 Enable DDNS ..........................84 Check if DDNS is in effect ...................... 85 HTTP Remote Access ......................86 HTTPS Remote Access ......................87 SSH Remote Access ......................... 92 8.3 GL.iNet GoodCloud ......................... 93 Contents ............................
- Page 5 Private Network ........................151 Reserve an IP for a client ...................... 153 Guest Network .......................... 153 9.3 Time Zone ..........................156 9.4 DNS ............................. 157 DNS Server Settings........................ 157 Edit Hosts ............................ 160 9.5 Network Mode ........................161 9.6 IPv6 ............................. 163 9.7 Toggle Button Settings ......................
-
Page 6: Hardware Info
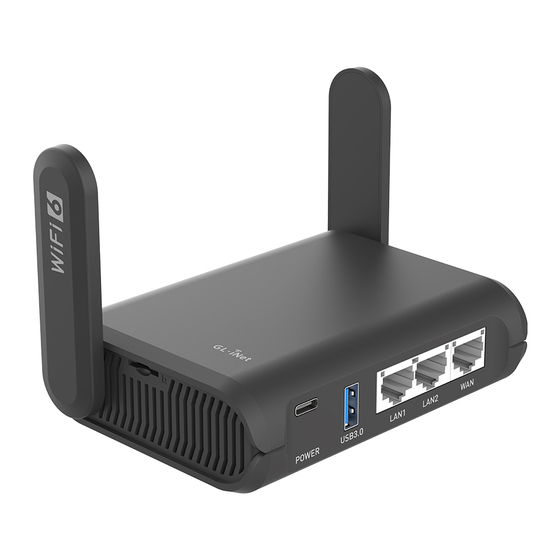
1. Hardware info GL-AXT1800 (Slate AX) is the first Wi-Fi 6 travel router designed by GL.iNet. It comes with an IPQ6000 1.2GHz quad-core processor and runs on OpenWrt 21.02. With the latest Wi-Fi 6 technology, you can enjoy more capacity for connected devices and faster wireless speed on the road or at home. -
Page 7: Specification
1.1. Specification Page 2 | 167... -
Page 8: Pcb Pinout
1.2. PCB Pinout Page 3 | 167... -
Page 9: First Time Setup
The first setup of the GL.iNet router is very similar, here is the example of GL- AXT1800(Slate AX). Please prepare the following items that included in the package. GL-AXT1800, power adapter, ethernet cable. There is a video guide: https://youtu.be/f7DYULL6ZSI Power on If you want to use TF card, please insert before powering on the router. - Page 10 Note: At this time, you cannot access the Internet after connecting to the WiFi, you need to set up the admin password in the next step before you can access the Internet. Access the web Admin Panel Open a web browser (we recommend Chrome, Edge, Safari) and visit http://192.168.8.1.
- Page 11 Note: Wi-Fi may turn off during the initialization, please make sure to reconnect to the router. Page 6 | 167...
- Page 12 After the initial setup, you will enter the web Admin Panel of the router. Page 7 | 167...
-
Page 13: Connect To The Internet Via An Ethernet Cable
Connect to the Internet 2.1 Connect to the Internet via an ethernet cable To access the Internet, it can connect the WAN port of router to the modem or the LAN port of other router via an ethernet cable. On the left side of web Admin Panel -> INTERNET, Ethernet sector. Note: Before plugging the Ethernet cable into the WAN port of the router, you can click Change to LAN to set the WAN port as a LAN... - Page 14 network information such as IP address, Gateway, Netmask manually. PPPoE • PPPoE is required by many Internet Service Providers (ISP). Generally, your ISP will give you a modem and provide you a username & password that you needed when you are creating the Internet connection.
- Page 15 Page 10 | 167...
-
Page 16: Connect To The Internet Via An Existing Wi-Fi By Repeater
2.2 Connect to the Internet via an existing Wi-Fi by Repeater Using Repeater means connecting the router to another existing wireless network, e.g. when you are using free Wi-Fi in a hotel or cafe. It works in WISP (Wireless Internet Service Provider) mode by default, which means that the router will create its own subnet and act as a firewall to protect you from the public network. - Page 17 Choose a SSID from the drop-down list and enter its password. If the SSID you want to connect to is not in the list, click Join Other Network in the image above. Page 12 | 167...
- Page 18 Advanced Settings. Wait a moment, if the password is correct, the connection will be successful. Page 13 | 167...
-
Page 19: Join Network Advanced Setting
Join network advanced setting When joining the network, there are two additional options. Page 14 | 167... -
Page 20: Repeater Options
Lock BSSID. If this option is enabled, the router will only connect • to the AP corresponding to the BSSID you selected when switching to a network using this SSID. Manually set static IP. • Repeater options Click the cog icon for Repeater options. Page 15 | 167... -
Page 21: Manage Known Network
Allow Switching To Other Saved Network. If the option is • enabled, the router will automatically connect to other saved networks when it is unable to connect to the current Wi-Fi network. Band Selection. If you manually select a band, the router will not •... - Page 22 On the Known Network sector, click trash icon to delete a known network, click cog icon to config the network. Page 17 | 167...
-
Page 23: Join Other Network
Join other network Reconnection In the following cases, the router's Repeater will try to connect to WiFi every once in a while. You can turn off the reconnection manually, and for ssid/password errors, please delete it in Known Network. 1. The wrong SSID/password was entered during the process of Repeater, after the first failed connection. - Page 24 3. After connecting to the WiFi of the upstream router, the upstream router changed the SSID/password, or restricted the connection. It can be divided into three phases, the waiting phase, the scanning phase, and the connecting phase. Note: There are some problems during the scanning phase and the connection phase.
-
Page 25: Connect To The Internet Via Usb Tethering
2.3 Connect to the Internet via usb tethering Using a USB cable to share network from your smartphone to the router is called Tethering. Host-less modem works in Tethering during the setup of the modem as well. Note: Some mobile carriers limit or charge extra for tethering. We recommend checking with your carrier. - Page 26 3. Go to web Admin Panel, on the left side bar, choose "INTERNET" and click "Connect" in the middle of the page. 4. It will show connected information on the top of your phone screen and the web Admin Panel once you connect successfully. Page 21 | 167...
- Page 27 Tethering connected. If the connection fails, please turn off and turn on Allow Others to Join for a few times. Page 22 | 167...
-
Page 28: Connect To The Internet Via Cellular
3G/4G model; some models have a usb port and can be plugged into a usb 3G/4G modem. The operation steps are similar, here is GL-AXT1800 as an example. On the left side of web Admin Panel -> INTERNET, Cellular sector. - Page 29 4. After a while, it will be connected. Otherwise, try Manual Setup. When the usb modem is plugged into the router the second time it is powered on, it is usually automatically recognized and a connection is established. It may not get the information of signal, modem name and IMEI.
- Page 30 Compatible Modems Here is a list of supported modems that we had tested before. Model 3G/4G Tested Tested by Comments* Quectel EC20-E, GL.iNet EC20-A, EC20-C Page 25 | 167...
- Page 31 Model 3G/4G Tested Tested by Comments* Quectel EC25-E, GL.iNet EC25-A, EC25-V, EC25-C Quectel UC20-E GL.iNet ZTE ME909s-821 GL.iNet Huawei E1550 GL.iNet Huawei E3276 GL.iNet TP-Link MA260 GL.iNet ZTE M823 Arnas Risqianto ZTE MF190 Arnas Risqianto Huawei E3372 anonymous Pantech GL.iNet/steven UML290VW (Verizon) Pantech UML295...
- Page 32 Model 3G/4G Tested Tested by Comments* Novatel USB551L GL.iNet/steven (Verizon) Verizon U620L (Verizon) QMI: This modem supports QMI mode. Please choose /dev/cdc-wdm0 in the Device* list. *Host-less: This modem supports tethering mode, please set up by using Tethering but not 3G/4G modem. You can also refer to http://ofmodemsandmen.com/modems.html for a...
-
Page 33: Wireless
3. Wireless The wireless interface may vary a bit from model to model, here is an example of GL-AXT1800. On the left side of web Admin Panel -> WIRELESS Main WiFi Note: The Channel can't be modified when repeater is enabled. - Page 34 Page 29 | 167...
-
Page 35: Guest Wifi
Guest WiFi Page 30 | 167... -
Page 36: Clients
4. CLIENTS On the left side of web Admin Panel -> CLIENTS You can manage all connected devices in CLIENTS page. Blocking client Enable Block WAN so that it cannot access the WAN, only LAN. To put it simple, it will cannot access the Internet. Limiting speed Click Action to limit speed a client. -
Page 37: Remove Offline Clients
If a client has applied speed limitation, its up arrow and down arrow of speed will turn yellow. Click Action to disable limiting. Remove offline clients For offline clients, click Action can remove this client as well. Page 32 | 167... -
Page 38: Firmware Upgrade
5. Firmware Upgrade On the left side of web Admin Panel -> UPGRADE Online Upgrade You can find the current firmware version here. If your router is connected to the Internet, it will check for the newer firmware version available for download. - Page 39 After uploaded, it will verify the firmware. Keep Setting: Current settings will be retained. User installed packages will be prompted to re-install after upgrade. Click Install to upgrade. Note: Please do not disconnect the power during the upgrade. Page 34 | 167...
- Page 40 Page 35 | 167...
-
Page 41: Firewall
6. FIREWALL GL.iNet's routers include multiple firewall features to ensure a secure connection and complete oversight by users. It lets users configure firewall rules including Port Forwarding, Open Ports, and DMZ. The firewall interface is accessible by clicking [FIREWALL] on the side menu of the router’s web Admin Panel On the left side of web Admin Panel ->... - Page 42 Name: The name of the rule. Protocol: The protocol used, you can choose TCP, UDP, or both TCP and UDP. External Zone: The options for external zone wgclient wgserver ovpnclient ovpnserver External Port: The numbers of external ports. You can enter a specific port number or a range of service ports (E.g 100-300).
-
Page 43: Open Ports On Router
Internal IP: The IP address assigned by the router to the device which needs to be accessed remotely. Internal Port: The internal port number of the device. You can enter a specific port number. Leave it blank if it is same as the external port. Enable: Enable of disable of the rule. -
Page 44: Dmz
Name: The name of the rule which can be specified by the user. Protocol: The protocol used, you can choose TCP, UDP, or both TCP and UDP. Port: The port number that you want to open. Enable: Enable of disable of the rule. DMZ lets you to expose one computer to the Internet, so all inbound packets will be redirected to this computer. - Page 45 Page 40 | 167...
-
Page 46: Vpn
7. VPN GL.iNet routers are pre-installed with OpenVPN and WireGuard® supporting 30+ VPN services. It automatically encrypts all network traffic within the connected network, including guest devices and client devices that are not capable of running VPN encryption. Our routers can also act as VPN servers, redirecting traffic from client devices in remote locations to the VPN server via a VPN tunnel before accessing the public internet. -
Page 47: Proxy Mode
Proxy mode 1. Global proxy All traffic will go through VPN. Only one VPN client instance can be activated. 2. Policy mode Based on the target domain or IP. • In this mode, only the traffic of certain websites defined by IP address or domain name will go through VPN. -
Page 48: Global Options
Auto detect • The routing rules defined in each VPN client configuration file or issued by the VPN server will be used. Customize routing rules • You can manually configure routing rules for each VPN client instance. Global Options Click Global Options will popup a global options dialog. 1. -
Page 49: Vpn Server
If this option is enabled, services on routers that usually require the use of a real IP will not use VPN. Including GoodCloud, DDNS, rtty. VPN Server OpenVPN Server Options Click the cog icon of OpenVPN server. Allow Remote Access LAN: If this option is enabled, resources •... -
Page 50: Openvpn Server Route Rule
MTU: The MTU you set for the instance will overwrite the MTU • item in the configuration file. OpenVPN Server Route Rule Click the network icon of OpenVPN server. In customize routes mode, the VPN client will ignore the configuration file and the routing configuration issued by the server. -
Page 51: Wireguard Server Route Rule
address with its own address and then forwards it to the VPN tunnel. MTU: The MTU you set for the instance will overwrite the MTU • item in the configuration file. WireGuard Server Route Rule Click the network icon of WireGuard server. In customize routes mode, the VPN client will ignore the configuration file and the routing configuration issued by the server. -
Page 52: Openvpn
OpenVPN Please refer to the following links for a step to step setup guide: 7.2 How to Setup OpenVPN Client on GL.iNet router OpenVPN is an open-source VPN protocol that makes use of virtual private network (VPN) techniques to establish safe site-to-site or point-to-point connections. - Page 53 2. Select protocol, max server count of each location, locations, then click Apply. Page 48 | 167...
- Page 54 It will download configuration files. 3. Go to VPN Dashboard to enable the connection. Page 49 | 167...
- Page 55 Toggle the switch to enable the connection. 4. Update servers NordVPN may maintain or shutdown some servers, it will make the connection failed, you can Update Servers to get the latest available servers. Page 50 | 167...
-
Page 56: Setup Openvpn Client
5. Edit credential Click the cog icon to edit the credential. Setup OpenVPN client As of frimware 4.0, it brings grouping to manage OpenVPN profiles. Please make sure all the profiles in the same group with the same credentials. For example, if you are ExpressVPN user, you can add a group named expressvpn, then upload all the ExpressVPN OpenVPN profiles you wanted to this group. - Page 57 3. Give the group a descriptive name, e.g. expressvpn. 4. Upload your OpenVPN configuration file, then input the credential, click Apply. Page 52 | 167...
- Page 58 5. Go to VPN Dashboard to enable the connection. Page 53 | 167...
-
Page 59: Setup Openvpn Server On Gl.inet Router
If you have any problem in the setup of OpenVPN, please contact support@glinet.biz or report in this forum post. Please check the list from our Docs: https://docs.gl-inet.com/en/4/tutorials/openvpn_client/#get-configuration-files- from-openvpn-service-providers Page 54 | 167... -
Page 60: Setup Openvpn Server On Gl.inet Router
7.3 Setup OpenVPN Server on GL.iNet router OpenVPN is an open-source VPN protocol that makes use of virtual private network (VPN) techniques to establish safe site-to-site or point-to-point connections. GL.iNet routers have pre-installed OpenVPN Client and Server. We recommend WireGuard over OpenVPN because it is much faster. For setup a WireGuard Server, please check out here. - Page 61 2. Apply the configuration. Page 56 | 167...
- Page 62 If you do not need to modify the configuration, please click directly the Export Client Configuration at the bottom of page. If you have modified the configuration, please click the Apply button to continue. Protocol: UDP or TCP. To find out what the difference •...
- Page 63 For Username/Password and Username/Password and Certificate options, they need add user(s). Then, if a OpenVPN client connect to this server, it need to input the username and password. Created a user. For Only Certificate and Username/Password and Certificate, the router will automatically generate a server and client certificate-key, and write into the configuration file when generating the client configuration file.
-
Page 64: To Check If Openvpn Server Is Working Properly
4. Start OpenVPN server Click the Start button in the upper right corner on OpenVPN Server page to start the server. Then go to VPN Dashboard page to check its status and other settings. To check if OpenVPN Server is working properly To check if OpenVPN Server is working properly, we can use another device connected to another network and use the OpenVPN configuration we exported earlier, to connect and see whether it connects properly and... - Page 65 When importing the configuration file to the OpenVPN app, it may has a reminder as below, please click CONTINUE as the certificate is already included in the configuration file. There are several common reasons cause failed: The Internet Service Provider doesn't assign you a public IP •...
-
Page 66: Advanced Configuration
Advanced Configuration Page 61 | 167... -
Page 67: Openvpn Client App
OpenVPN Client App We can use another GL.iNet router as OpenVPN Client, or use their official app on other devices with various OS. Please refer to OpenVPN Official • Website: https://openvpn.net/vpn-client/ WireGuard 7.4 How to Setup WireGaurd Client on GL.iNet router WireGuard®... - Page 68 1. Input Username and Password, then click Save Credentials & Get Servers. It will generate configuration files for each servers. 2. Go to VPN Dashboard to enable the connection. Page 63 | 167...
- Page 69 Once connected, you should see your user IP address and the number of Bytes send/received. 3. Update servers AzireVPN may maintain or shutdown some servers, it will make the connection failed, you can Update Servers to get the latest available servers. 4.
-
Page 70: Setup Mullvad
Click the cog icon to edit the credential. Setup Mullvad Mullvad is a VPN service that helps keep your online activity, identity, and location private. Firmware 4.x has integrated Mullvad WireGaurd service. 1. Input Account, then click Save Credentials & Get Servers. Mullvad account number is a 16-digit decimal in the "1000 0000 0000 0000"... - Page 71 Then it will generate the configuration files of the selected location server. The Public Key is the WireGuard public key to send to Mullvad server, you can have up to five keys at the same time, you can manage WireGuard keys on Mullvad's page.
- Page 72 2. Go to VPN Dashboard to enable the connection. Once connected, you should see your user IP address and the number of Bytes send/received. Page 67 | 167...
-
Page 73: Setup Wireguard Client
3. Update servers Mullvad may maintain or shutdown some servers, it will make the connection failed, you can Update Servers to get the latest available servers. 4. Edit credential Setup WireGuard client As of frimware 4.0, it brings grouping to manage WireGuard profiles. Page 68 | 167... - Page 74 1. Add a new group 2. Give the group a descriptive name, e.g. azirevpn. 3. Upload your WireGuard configuration file, then input the credential, click Apply. Page 69 | 167...
- Page 75 Manually Add Configuration is for if you want to paste the WireGuard configuration or fill in each item. Page 70 | 167...
- Page 76 Give a descriptive name and paste the configuration, click Apply to continue. Page 71 | 167...
- Page 77 Or you can add configuration by fill in each item, click Item Mode. Page 72 | 167...
- Page 78 Page 73 | 167...
- Page 79 4. Go to VPN Dashboard to enable the connection. Page 74 | 167...
-
Page 80: Setup Wireguard Server On Gl.inet Router
You can get a GL.iNet router to set as WireGuard server, and get another GL.iNet router to set as WireGuard client. For setup WireGaurd server, please check out here. Get configuration files from WireGuard service providers Please check our Docs: https://docs.gl-inet.com/en/4/tutorials/wireguard_client/#get- configuration-files-from-wireguard-service-providers Page 75 | 167... -
Page 81: Setup Wireguard Server On Gl.inet Router
7.5 Setup WireGuard Server on GL.iNet router WireGuard® is an extremely simple yet fast and modern VPN that utilizes state-of-the-art cryptography. It aims to be faster, simpler, leaner, and more useful than IPSec, while avoiding the massive headache. It intends to be considerably more performant than OpenVPN. GL.iNet routers have pre-installed WireGuard Server and Client. - Page 82 2. Apply the configuration The default configuration works for most cases. Also modify it according to your network situation, click the Apply button after modification. For Set Key Manually. Page 77 | 167...
- Page 83 3. Add a profile Switch to Profiles tab, generate a profile for your device by click the Add button. Enter a descriptive name. Page 78 | 167...
- Page 84 Set More is for advanced settings. Page 79 | 167...
- Page 85 Click Apply to continue. It will generate a profile. Page 80 | 167...
- Page 86 If your network's public IP changes from time to time, you can enable DDNS, then using DDNS domain in the configuration. Click Download to save the profile. 4. Start WireGuard server Click the Start button in the upper right corner to start WireGuard server.
-
Page 87: Wireguard Client App
To check if WireGuard Server is working properly To check if WireGaurd Server is working properly, we can use another device connected to another network and use the WireGuard configuration we exported earlier to connect and see whether it connects properly and whether the IP address is the IP of WireGuard Server. -
Page 88: Applications
On the left side of web Admin Panel -> APPLICATIONS -> Plug-ins Plug-ins allows you to manage OpenWrt packages. You can install or remove any package. It is recommended to click the Update button before use. The following figure shows the Plug-ins page of GL-AXT1800. Page 83 | 167... -
Page 89: Dynamic Dns
8.2 Dynamic DNS Dynamic Domain Name Service (Dynamic DNS or DDNS) is a service used to map a domain name to the dynamic IP address of a network device. On the left side of web Admin Panel -> APPLICATIONS -> Dynamic DNS Enable DDNS Toggle on Enabled DDNS, option in Terms of Services &... -
Page 90: Check If Ddns Is In Effect
Check if DDNS is in effect Using the DDNS Test tool Click the DDNS Test If it says Your DDNS is resolved as x.x.x.x as show below, it means the DDNS is worked. In other words, this Host Name has maped to the final exit IP of the router for Internet access. -
Page 91: Http Remote Access
Or check it manually HTTP Remote Access This function requires a public IP address. To check if your Internet Provider Service assign your a public IP address, please check here. If your router is behind NAT, you may need to set up port forwarding in higher level router. -
Page 92: Https Remote Access
Follow the steps above, to enable HTTP Remote Access. HTTP is not encrypted, use at your own risk. After you enable HTTP Remote Access, you can access Admin Panel anywhere by your DDNS Host Name of http, e.g. . If you use port forwarding, you should be http://xxxxxxx.glddns.com access like http://xxxxxxx.glddns.com:YourExternalPort... - Page 93 After you enable HTTPS Remote Access, you can access Admin Panel anywhere by your DDNS Host Name of https, e.g. . If you use port forwarding, you should be https://xxxxxxx.glddns.com access like https://xxxxxxx.glddns.com:YourExternalPort This function use self-signed certificates, so the browers will indicate that Your connection is not private.
- Page 94 Click Processed to xxxxxxx.glddns.com (unsafe) to continue. Page 89 | 167...
- Page 95 Then, it will access the web Admin Panel. Page 90 | 167...
- Page 96 Page 91 | 167...
-
Page 97: Ssh Remote Access
SSH Remote Access This function requires a public IP address. To check if your Internet Provider Service assign your a public IP address, please check here. If your router is behind NAT, you may need to set up port forwarding in higher level router. -
Page 98: Gl.inet Goodcloud
8.3 GL.iNet GoodCloud Contents Introduction • Setup • Enable GoodCloud on router • Sign up GoodCloud account • Select server region • Add a new group • Add device • Bound info on router web Admin Panel • Unbind router •... -
Page 99: Introduction
Add a Template • Upgrade • Apply a template to a router • Apply a template to multiple routers • Task List • GoodCloud and VPN • Turn off cloud • Introduction GL.iNet GoodCloud cloud management service provide an easy and simple way to remotely access and manage routers. -
Page 100: Setup
Set up config templates and configure routers in batch • Reboot or upgrade routers in batch • Manage routers in groups • Divide devices in different groups • Manage devices in one page • Site to Site • Virtual Office: extend your office network to other •... - Page 101 Follow the steps above, to enable the cloud function, which will allow the router to connect to the GoodCloud server. Remote SSH is for remote access router's terminal via • GoodCloud. Check out here. Remote Web Access is for remote access router's web Admin •...
- Page 102 Sign up GoodCloud account Visit https://www.goodcloud.xyz, sign up then sign in. If you don't find the verify email, look in spam or check email later. If you have any difficulty with sign up, please send email to support@glinet.biz for help. Select server region At the first time when you sign in, it will pop up a dialog to let you select the region, please select the region same as your device selected Data...
- Page 103 Set the group name, company, description and location. Each device must belong to a group. Add device On the left side -> Devices List -> Add Device. There are three methods to bind device to your GoodCloud account, Auto discover, Manually add and Bulk import.
- Page 104 Check out here to find the Device ID. Note: Input "DDNS/Device ID" here just to verify that the router is really original/valid. If you haven't added a group before, it will automatically create a default group. Click to force auto discover devices again. Refresh Page 99 | 167...
- Page 105 Manually add Bulk import Bound info on router web Admin Panel After you seccessfully add router to GoodCloud, go back to router web Admin Panel, on the left side, APPLICATION -> GoodCloud, refresh this page, It will display the bound GoodCloud username and date. Page 100 | 167...
- Page 106 Unbind router If you want to unbind the router, go to router web Admin Panel, on the left side, APPLICATION -> GoodCloud, click Unbind button. Page 101 | 167...
-
Page 107: Manage Your Devices
Manage your devices Devices info and status Sign in Goodcloud, check at left side -> Device List Page 102 | 167... - Page 108 there is icon at the first column of this table, means this device is online. means this device is offline. means this device is deactivated, it has never connected to GoodCloud before. Page 103 | 167...
- Page 109 Select the column you want to display. is the latest time when device connected GoodCloud. Online time is the latest time when device disconnected GoodCloud. Offline time is the latest time when device connected or disconnected Update time GoodCloud. , if your router run VPN client, this IP will be your VPN IP by default. Learn More LTE Signal...
- Page 110 It will show Signal strength, Type, and relavant parameters. Device detail info At left side -> Device List, click the name of an online device, it will open a page to manage this device of WiFi, Clients and view router info, memory usage, up time, load average and log.
- Page 111 Device info¶ WiFi¶ Modify all WiFi settings. Router status¶ Page 106 | 167...
- Page 112 Client list¶ Timeline¶ Timeline tab display the activities of router, and messages uploaded by the router's associated IoT device. Tools¶ There are two tools, Ping Traceroute Page 107 | 167...
- Page 113 Remote access web Admin Panel Note: Please upgrade to 3.211 to use this feature. If you can't find these icons, please make sure you have enable it, check out here. If this feature not work, please try the incognito mode of browser. Remote access router's terminal Note: Please upgrade to 3.211 to use this feature.
- Page 114 Then set the email you want to receive notification. To ensure you get email successful, please add admin@goodcloud.xyz to your email address book. Page 109 | 167...
-
Page 115: Site To Site
Site to Site Introduction Site to Site allows offices in multiple locations to establish secure connections with each other over internet. It extends the company's network, making computers resources from one location available to employees at other locations. Senerio 1: A company has dozens of branch offices that they wish to join in a single private network to share resources. - Page 116 Steps to build a Site to Site network 1. Bind your routers to GoodCloud. (how?) 2. Follow the steps below to create a Site to Site network. Default port is 51830, if you want to use another port, find option at the lower left corner. Advanced Due to the device's performance, each Site to Site network can have up to 10 devices.
- Page 117 Then, it will test each device if it can be set as the Main Node of Site to Site. We suggest that the router with strong performance and best network speed to be the Main Node. Page 112 | 167...
- Page 118 If none of the devices can be used as the Main Node, make sure that: One of routers has a public IP, either static public IP or • dynamic public IP. Port is open, default is 51830. • If the router is behind NAT, you may need to set up •...
- Page 119 If there is only one device can be set as the Main Node, it will go to the Site to Site detail page directly. The network is stopped by default, check the LAN IP, if it is OK then you need to click Start button, otherwise click Setting to change LAN IP.
- Page 120 Wait a few minutes, the node's connect status will display as lines. Solid line means connected, dashed line means disconnected. Page 115 | 167...
- Page 121 Testing the Site to Site connection Now the Site to Site network is created and started, let's test the connection. Use your PC or Phone to connect to one of the Node of this Site to Site, and use browser to access another Node's LAN ip, if you see the login page, the connection between these two nodes is worked.
- Page 122 By default, each node can access other's LAN, based on security, we recommend only open the corresponding service IPs. E.g. There is a Server A(172.30.97.100) in Node 1's subnet, if you want other Site to Site nodes only can access Node 1's Service A, you can set it like below: Page 117 | 167...
- Page 123 You can add node's parent routes too. Each sub Node build an encrypted tunnel netwrok to Main Node, if you want to change the IP of tunnel subnet. Click 'IP Address Range'. Page 118 | 167...
-
Page 124: Batch Setting
Batch Setting You can use this feature to configure multiple parameters for a single device, or you can configure multiple parameters for multiple devices. Note: This feature is only available to business users. Batch Setting of Single Device To configure single device, as show below. Page 119 | 167... - Page 125 The left side of image below is correct. If your interface is like the right side of image below, please upgrade to latest testing firmware. Check the configuration that needs to be modified and input value. The checked configuration is required, and only the configuration that conforms to the rule can be filled out.
- Page 126 lower right corner of the above figure. After the configuration is completed, the device will restart immediately. Preview the configuration and confirm the delivery. Unchecked Restart now option will prompt. Batch Setting of Mutiple Devices Select the devices you want to configure. Page 121 | 167...
-
Page 127: Template Management
Other operations are the same as when operating a single device. Other Batch Operations Other Batch Operations: Move to other group, upgrade, restart, delete. Template Management Save frequently used configurations as templates and quickly apply them when you modify configurations in batches. Note: This feature is only available to business users. - Page 128 Upgrade Path is for upgrading custom firmware. Put the firmware and a text file on a web server, then put the url path on the Upgrade Path. For example, https://fw.gl-inet.com/firmware/ar750/v1/ is a Upgrade Path, it has a list-sha256.txt file https://fw.gl-inet.com/firmware/ar750/v1/list- sha256.txt...
- Page 129 The content of the text file is like this, its name should be list-sha256.txt. It has 4 columns, the first column is firmware version, the second column is the name of firmware file, the thrid column is the sha256 of firmware file, the forth column is the size of firmware file.
- Page 130 Apply a template to a router If you have created a template, then want to apply this template to a router. On the Device List page, find the router that you want to apply the template, make sure it is online, on the Actions column, click the cog icon, click Modify Configuration item.
-
Page 131: Task List
Apply a template to multiple routers If you have created a template, then want to apply this template to multiple routers. This procedure is similar to that applied to a single router. On the Device List page, multiple select routers, then click Bulk Action, click Modify Configuration item. -
Page 132: Goodcloud And Vpn
GoodCloud and VPN If you enable GoodCloud function and running VPN client at the same time on router, by default, the connection between the router and the GoodCloud server will also go through the VPN, but sometimes the VPN connection is unstable, or the VPN provider mistakenly filters the GoodCloud connection, you can make the GoodCloud connection not go through the VPN by using the following settings. -
Page 133: Turn Off Cloud
Turn off cloud To stop GoodCloud service, turn it off on router web Admin Panel. Please follow the steps below. No action needed on the GoodCloud website. After disable Cloud, the interface is like below. Page 128 | 167... - Page 134 Page 129 | 167...
-
Page 135: Adguard Home
8.4 AdGuard Home AdGuard Home is a network-wide software for blocking ads & tracking. Click Start button to continue. When it starts, click Setting Page for advanced configuration. It will go to the AdGuard Home's own settings page. If you have any questions, please visit Adguard Home Support Center for help. - Page 136 Page 131 | 167...
-
Page 137: Network Storage
8.5 Network Storage Contents Introduction • Insert storage device • Set up Samba • Set up WebDAV • Set up DLNA • Samba Client • WebDAV Client • Introduction Some GL.iNet models support TF card, some models have USB port and support USB flash drive and portable external hard drive, you can set up Samba, WebDAV, DLNA on this page for the disk. -
Page 138: Set Up Samba
When a disk is found. Set up Samba Toggle to enable Samba, click Apply. Page 133 | 167... - Page 139 Go to Shared Folder tab. Click + Add button to add a shared folder. Choose a folder to share, then click Next. Page 134 | 167...
- Page 140 For security reasons, we do not recommend enabling Anonymous Access. If you leave the Anonymous Access off, you need to create a user by clicking the + Add User button or choose an existing user, and then check the user in the option Writable User or Read-Only User. The User is for the connection to the Samba Server.
- Page 141 That is it. The access link can be found in Shared Link. Page 136 | 167...
-
Page 142: Set Up Webdav
Click Shared Link, it will show the access link for each system. The Unix- like system include Android, iOS, macOS, Ubuntu etc. Note: If you enabled Allow Access Samba from WAN and access from WAN, you need to replace the Router IP (default 192.168.8.1) in the figure below with WAN IP which can be found in the INTERNET page. - Page 143 Go to Shared Folder tab. Click + Add button to add a shared folder. Choose a folder to share, then click Next. Page 138 | 167...
- Page 144 Select the Share Protocol as WebDAV. For security reasons, we do not recommend enabling Anonymous Access. If you leave the Anonymous Access off, you need to create a user by clicking the + Add User button or choose an existing user, and then check the user in the option Writable User or Read-Only User.
- Page 145 That is it. The access link can be found in Shared Link. Page 140 | 167...
-
Page 146: Set Up Dlna
Click Shared Link, it will show the access link for each system. The Unix- like system include Android, iOS, macOS, Ubuntu etc. Note: If you enabled Allow Access Samba from WAN and access from WAN, you need to replace the Router IP (default 192.168.8.1) in the figure below with WAN IP which can be found in the INTERNET page. -
Page 147: Samba Client
Connect your smart TV to the router, it will find the DLNA Server. Samba Client Windows Here is an example of Windows 11, Windows 10 is similar. Open up File Explorer and then right-click on This PC (in the left pane). From the resulting context menu, select Show more options ->... - Page 148 Enter the Samba access link. Then click Next. Page 143 | 167...
- Page 149 Give a name of this location. Click Next. Page 144 | 167...
- Page 150 Click Finish. Page 145 | 167...
- Page 151 If it need username and password, it will ask to enter the credential. Then click OK. Page 146 | 167...
-
Page 152: Webdav Client
Mac OS Android WebDAV Client Windows There is a lot of software that supports WebDAV, for example RaiDrive, Cyberduck, WinSCP. Here is an example of RaiDrive. Click Add. In the Storage area, click NAS -> WebDAV. Page 147 | 167... - Page 153 In the Address area, check/uncheck the checkbox near Address to switch https/http, enter the address. In the Account area, enter username and password, or check the Anonymous. Finally, click Connect, it will add a X drive in the File Explorer. Page 148 | 167...
-
Page 154: Log
8.6 Log On the left side of web Admin Panel -> APPLICATIONS -> Log. The Log page allows you to view logs of System, Kernel, Crash, Cloud for analysis and troubleshooting. Click Refresh to get the latest log information. Click Export Log to export log information of System, Kernel, Crash and Cloud. -
Page 155: More Settings
9. MORE SETTINGS 9.1 Admin Password On the left side of web Admin Panel -> MORE SETTINGS -> Admin Password Change the password of login the web Admin Panel. You have to input your current password to change it. For security reasons, we recommend that you turn on Prevent Weak Password. -
Page 156: Lan
9.2 LAN On the left side of web Admin Panel -> MORE SETTINGS -> LAN Private Network The Private Network is the network if your devices connect to the Main WiFi or connect via an ethernet cable. The Router IP Address is 192.168.8.1 by default. You can change it if it conflicts with your network. - Page 157 You can just simply change the Maximum Number of Users to fit your need. Or click Advanced for more manually settings. Page 152 | 167...
-
Page 158: Reserve An Ip For A Client
Reserve an IP for a client When you specify a reserved IP address for a client within the LAN, the client always receives the same IP address each time it accesses the router’s DHCP server. You can assign reserved IP addresses to computers or servers that require permanent IP settings. - Page 159 You can just simply change the Maximum Number of Users to fit your need. Or click Advanced for more manually settings. Page 154 | 167...
- Page 160 Page 155 | 167...
-
Page 161: Time Zone
9.3 Time Zone On the left side of web Admin Panel -> MORE SETTINGS -> Time Zone The time of the router's activities will be recorded according to the router time. So, make sure you have sync/select the right time zone. It does not automatically synchronize the time zone and requires a click on the Sync button. -
Page 162: Dns
9.4 DNS On the left side of web Admin Panel -> MORE SETTINGS -> DNS If you set custom DNS servers, any dns name will be resolved through the DNS servers set here instead of the one obtained from wan, repeater, cellular, hotspot sharing or VPN configuration DNS server. - Page 163 Encrypted DNS • Encrypted Type has four type, DNS over TLS, DNSCrypt-Proxy, DNS over HTTPS, Oblivious DNS over HTTPS. For DNS over TLS, the DNS Provider has two options, • NextDNS and Cloudflare. For DNSCrypt-Proxy, DNS over HTTPS and Oblivious •...
- Page 164 Manual DNS • DNS Proxy • Page 159 | 167...
-
Page 165: Edit Hosts
Edit Hosts Requests from clients will be resolved preferentially using the static DNS rules you write in Hosts. Page 160 | 167... -
Page 166: Network Mode
Or you can Press and hold the reset button for 4 seconds to revert to Router mode. Here is an example of GL-AXT1800. Note: some models do not support WDS mode. Page 161 | 167... - Page 167 Router. Create your own private network. The router will act as • NAT, firewall and DHCP server. This is the default mode. Access Point. Connect to a wired network and broadcast a • wireless network. Extender. Extend the Wi-Fi coverage of an existing wireless •...
-
Page 168: Ipv6
9.6 IPv6 On the left side of web Admin Panel -> MORE SETTINGS -> IPv6 The IPv6 function allows you to enable and configure IPv6 on router. The current version of the firewall, VPN, terminal list, cloud service, etc., may not support IPv6 for the time being. Therefore, the IPv6 function can only be used for configuration within this interface. - Page 169 Mode. There are three modes, NAT6, Native and Static IPv6. • DNS acquisition method. It has two • options. Automic and Manual. Page 164 | 167...
-
Page 170: Toggle Button Settings
9.7 Toggle Button Settings Some models have a toggle button, and you can customize what this button does in this page. On the left side of web Admin Panel -> MORE SETTINGS -> Toggle Button Settings There are four options. No Function. -
Page 171: Reset Firmware
9.8 Reset Firmware On the left side of web Admin Panel -> MORE SETTINGS -> Reset Firmware In case of malfunction, you can reset router. Note: All your current settings, applications and data will be lost. The process will take about 3 minutes. DO NOT power off the router during this process. -
Page 172: Advanced Settings
9.9 Advanced Settings On the left side of web Admin Panel -> MORE SETTINGS -> Advanced Settings You can modify advanced settings with LuCI, the default web user interface of OpenWrt. LuCI is an open and independent project maintained by OpenWrt. It is provided as is.
Need help?
Do you have a question about the GL-AXT1800 and is the answer not in the manual?
Questions and answers