Table of Contents

Related Manuals for GoodHome 5059340213811


Summary of Contents for GoodHome 5059340213811
- Page 1 Bamia 5059340213811 GHCOM50a V10821 BX220IM 213170_s2_s8_5059340213811_GoodHome_A5_IM_Multi_V02.indd 1 213170_s2_s8_5059340213811_GoodHome_A5_IM_Multi_V02.indd 1 18-08-2021 12:23:32 18-08-2021 12:23:32...
- Page 2 Contents Contenu Zawartość RO Cuprins Installation Installation Instalacja Instalare Utilisation Użytkowanie Utilizare Care and maintenance Entretien et maintenance Czyszczenie i konserwacja Îngrijire şi întreţinere 213170_s2_s8_5059340213811_GoodHome_A5_IM_Multi_V02.indd 2 213170_s2_s8_5059340213811_GoodHome_A5_IM_Multi_V02.indd 2 18-08-2021 12:23:32 18-08-2021 12:23:32...
- Page 3 IMPORTANT - Please read carefully the separate safety guide before use. IMPORTANT - Lire attentivement le guide de sécurité séparé avant utilisation. WAŻNE - Przed użyciem proszę dokładnie zapoznać się z instrukcją bezpieczeństwa. IMPORTANT - Vă rugăm să citiţi cu atenţie ghidul de siguranţă separat înainte de utilizare. [01] x 1 [02] x 1 [03] x 2...
-
Page 4: Before You Start
Installation Installation Instalacja Before you start This appliance must be installed correctly by a qualified person, strictly following the manufacturer’s instructions. Warning: Danger of electric shock! The power supply must be cut off before the appliance is installed completely. Only a qualified person in compliance with the instructions provided can install the appliance. The manufacturer declines all responsibility for improper installation, which may harm persons and animals and cause damage. - Page 5 RO Instalare Înainte de a începe Acest aparat trebuie instalat corespunzător de o persoană calificată, urmând cu strictețe instrucțiunile producătorului. Avertisment: Pericol de electrocutare! Alimentarea trebuie întreruptă înainte de montarea completă a aparatului. Aparatul trebuie instalat numai o persoană calificată, în conformitate cu instrucțiunile furnizate. Producătorul nu își asumă...
- Page 6 Installation Installation Instalacja RO Instalare 45 mm 45 mm 125 mm 125 mm Installation of Built-in Ovens For correct installation, this appliance can be fitted in a tall appliance housing unit only. Caution! The panels of the adjacent cabinets must be made of heat-resistant material. In particular, the adhesive that bonds the plastic laminate to the furniture must be able to withstand temperatures of not less than 120 ºC to avoid delamination.
- Page 7 Installation Installation Instalacja RO Instalare Instalarea cuptoarelor încorporate Pentru instalare corectă, aparatul poate fi montat doar într-o carcasă de cuptor înaltă. Atenție! Panourile dulapurilor adiacente trebuie să fie fabricate din material termorezistent. În mod special, pentru a evita exfolierea, adezivul care fixează folia laminată de mobilier trebuie să poată suporta temperaturi ce depășesc 120 ºC.
- Page 8 Installation Installation Instalacja RO Instalare [12] [10] [10] x 2 [11] x 2 [12] x 2 Once the oven has been lifted into place inside the appliance housing, locate the two holes in the casing of the oven and fix it into place using [10], [11] and [12]. Caution: Do not over tighten the screws [10] to avoid damage to the oven or appliance housing - use a screwdriver only! Une fois le four placé...
- Page 9 Installation Installation Instalacja RO Instalare Installation of the ceramic clips and side rails Installation des clips en céramique et des rails latéraux Montaż i zacisków ceramicznych prowadnic bocznych Instalarea clemelor ceramice și a șinelor laterale [03] [03] x 2 [04] [04] x 2 [05] [06]...
- Page 10 Installation Installation Instalacja RO Instalare Left side rail installation [05] Installation du rail latéral gauche [05] Montaż lewej prowadnicy [05] Instalarea șinei laterale stângi [05] [03] [05] x 1 [04] [05] [04] [03] [05] 213170_s2_s8_5059340213811_GoodHome_A5_IM_Multi_V02.indd 10 213170_s2_s8_5059340213811_GoodHome_A5_IM_Multi_V02.indd 10 18-08-2021 12:23:35 18-08-2021 12:23:35...
- Page 11 Installation Installation Instalacja RO Instalare [04] [03] [05] Right side rail installation [06] Installation du rail latéral droit [06] Montaż prawej prowadnicy [06] Instalarea șinei laterale drepte [06] [03] [04] [06] 213170_s2_s8_5059340213811_GoodHome_A5_IM_Multi_V02.indd 11 213170_s2_s8_5059340213811_GoodHome_A5_IM_Multi_V02.indd 11 18-08-2021 12:23:35 18-08-2021 12:23:35...
- Page 12 Installation Installation Instalacja RO Instalare [03] [04] [06] [06] [03] [04] 213170_s2_s8_5059340213811_GoodHome_A5_IM_Multi_V02.indd 12 213170_s2_s8_5059340213811_GoodHome_A5_IM_Multi_V02.indd 12 18-08-2021 12:23:35 18-08-2021 12:23:35...
-
Page 13: Installation Électrique
Installation Installation Installation All installation must be carried out by a competent person or qualified electrician. Before connecting the mains supply ensure that the mains voltage corresponds to the voltage on the rating plate. Direct Connection The appliance must be connected directly to the mains using an omnipolar circuit breaker with a minimum opening of 3 mm between the contacts. -
Page 14: Instalacja Elektryczna
Installation Instalacja Afin de prévenir les risques toujours présents lors de l’utilisation d’un appareil électrique, il est important d’installer correctement cet appareil et de lire les instructions de sécurité soigneusement en vue d’empêcher tout danger ou mauvaise utilisation. Veiller à conserver ce manuel d’instructions pour référence ultérieure et à le transmettre à... - Page 15 RO Instalare Conectarea la alimentarea electrică Instalarea trebuie să fie realizată în totalitate de o persoană competentă sau de un electrician calificat. Înainte de conectarea la rețeaua electrică, asigurați-vă că tensiunea rețelei corespunde cu tensiunea de pe plăcuța de identificare. Conexiune directă...
-
Page 16: Function And Setting
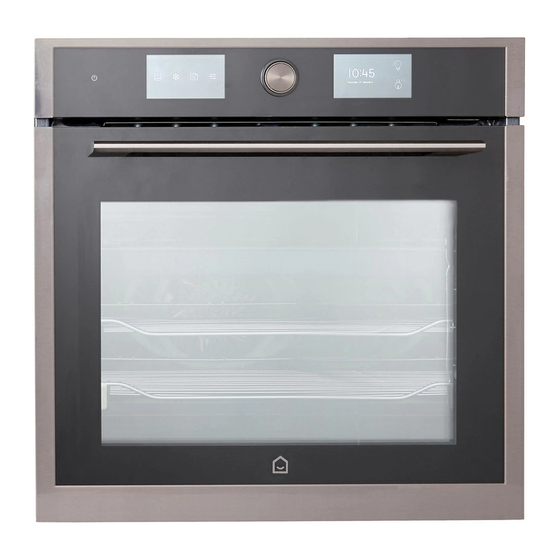
Before you start WARNING: Read the instructions before using the appliance. Switch on the appliance at the switched fused connection unit. The appliance will beep once and is ready for use. Function and setting Control panel Fixing holes (x 2) Oven lamp Door Carrying handles (x 2) -
Page 17: Turning The Oven On And Off
Master On/Off Key Cooking Mode Key Master Settings Key Left Touch Screen Defrost Mode Key Oven Light Key 360º Control Knob (Push to eject or hide) Microwave Mode Key Child Lock Key Right Touch Screen Presets Mode Key Time and Date Display Turning the oven on and off Touch the Master On/Off Key once to turn on the oven, and once more to turn it off. -
Page 18: Using Your Oven
Setting the display brightness 1. Touch the Display Brightness Key and the control appears on the Right Touch Screen. 2. Rotate the 360º Control Knob to select the brightness from 0-9. Default brightness is 8. 3. Touch the Tick twice to store the brightness. Setting the alert volume 1. - Page 19 Temperature Range Microwave Power Icon Mode Description (default) (default) Traditional static heat from upper and lower heating elements ensures that 100-235 ºC in 5 ºC Standard Not applicable the foods remain moist when cooked increments (180 ºC) for longer periods of time. Ideal for slow baked cakes and soufflés.
- Page 20 Temperature Range Microwave Power Icon Mode Description (default) (default) The inner heating element and the upper 100-235 ºC in 5 ºC heating element are both working. Ideal Double grill Not applicable increments (180 ºC) for grilling flat items and for browning foods. Only the lower heating element is working. 100-235 ºC in 5 ºC Ideal for pies or pastries where a crispy Bottom...
- Page 21 GRILL Recommended shelf Food Temperature setting (ºC) Cooking time in minutes position from the bottom Toast 240 ºC Beef steak 240 ºC GRILL & FAN Recommended shelf Food Temperature setting (ºC) Cooking time in minutes position from the bottom Chicken 210 ºC 55 - 65 Goose 210 ºC 75 - 88...
- Page 22 Exit Key Current time Current Cooking Mode Timer Dial Boost Key (if applicable) Child Lock Key Main Menu Key Stop Cooking Key Oven Light Key (orange when on) Start Cooking Key Temperature Dial Microwave Key (where applicable) Microwave Power Options Adjusting the temperature Eject the 360 º...
-
Page 23: Using Defrost
Oven Light Key (orange when on) Current time Timer When set: Shows remaining time When not set: Shows current cooking time Child Lock Key Stop Cooking Key Internal oven temperature Pause Cooking Key The large Pause icon will show in the centre of the display and both screens will be locked; touch the icon again to resume cooking. - Page 24 Frozen Weight (g) Defrost Time (minutes:seconds) Meat Chicken Fish Vegetables 5:00 10:50 9:00 6:00 6:00 7:00 14:10 12:00 8:00 8:00 9:00 17:30 15:00 10:00 20:50 18:00 12:00 24:10 21:00 14:00 27:30 24:00 16:00 30:50 27:00 1000 34:10 30:00 1100 37:30 33:00 1200 40:50...
-
Page 25: Using Microwave Mode
3. Rotate the 360º Master Control Knob to set the required defrosting time from 1 second to 90 minutes. The default time is 1 minute. 4. Touch the Start Key to instantly commence defrosting. If you touch the Stop Cooking Key once this will reset the time to 1 minute;... - Page 26 Exit Key Timer Dial Oven Light Key (orange when on) Child Lock Key Power Dial (100/300/500/700/900 W) Stop Cooking Key Current time Start Cooking Key Adjusting the microwave power Eject the 360º Control knob (if necessary) and rotate it to set the desired microwave power on the Right Touch Screen.
- Page 27 Presets Save a preset 3. On the Left Touch Screen select the Cooking Mode Key , Defrost Mode Key or Microwave Mode Key and then select the mode required, for example, Standard Mode. Presets Presets 4. On the Right Touch Screen select the Temperature and Time required, for example: Standard Mode, 180 ºC, 01:45.
-
Page 28: Child Lock
Deleting a Preset 1. From the Preset menu, locate the stored item by swiping from right to left as necessary. 2. Touch the Delete Key to remove the Preset. 3. Finally touch the Tick or Cancel to confirm the change. Child Lock Wherever the padlock is shown on screen, the Child Lock can be applied. - Page 29 Accessories IMPORTANT: Glass shelf - for microwave use. Remove the metal rack [02], grill tray [09] and trivet [08] during microwave use. [07] x 1 [07] [08] [08] x 1 [09] x 1 [09] 213170_s2_s8_5059340213811_GoodHome_A5_IM_Multi_V02.indd 29 213170_s2_s8_5059340213811_GoodHome_A5_IM_Multi_V02.indd 29 18-08-2021 12:23:39 18-08-2021 12:23:39...
- Page 30 [02] x 1 [02] 213170_s2_s8_5059340213811_GoodHome_A5_IM_Multi_V02.indd 30 213170_s2_s8_5059340213811_GoodHome_A5_IM_Multi_V02.indd 30 18-08-2021 12:23:39 18-08-2021 12:23:39...
-
Page 31: Panneau De Commande
Utilisation Avant de commencer AVERTISSEMENT : Lire les instructions avant d’utiliser l’appareil. Mettre l’appareil en marche sur l’unité de raccordement avec fusibles et interrupteur. L’appareil émet un signal sonore. Il est alors prêt à l’emploi. Fonction et réglage Panneau de commande Trous de fixation (x 2) Lampe du four Ventilateur... - Page 32 Utilisation Touche principale Touche principale de marche/arrêt Touche de mode de cuisson de réglages Touche de mode Touche d’éclairage Écran tactile gauche décongélation du four Bouton de commande 360º (appuyer Touche de mode Touche de sécurité pour le faire sortir ou le masquer) micro-ondes enfant Touche de mode...
-
Page 33: Utilisation Du Four
Utilisation Réglage de la langue 1. Appuyer sur la touche de langue pour que les options de pays s’affichent sur l’écran tactile droit. 2. Balayer vers le haut ou vers le bas pour choisir la langue correcte. 3. Appuyer deux fois sur la coche pour enregistrer la langue. - Page 34 Utilisation • Appuyer sur l’icône du mode de cuisson requis à partir du tableau ci-dessous pour que les deux écrans affichent les commandes individuelles disponibles pour ce mode. TOURNER ET APPUYER Conseil rapide : à partir du menu principal, il suffit de tourner le bouton de commande 360º dans le sens horaire ou antihoraire pour accéder instantanément au mode de cuisson Standard à...
- Page 35 Utilisation Temperature Range Microwave Power Icon Mode Description (default) (default) L’élément chauffant interne et l’élément chauffant supérieur fonctionnent en même temps que le ventilateur. Les meilleurs résultats sont obtenus en utilisant la grille supérieure pour les plus petits aliments et une grille inférieure 100 à...
- Page 36 Utilisation CONVECTION Réglage de la Position de la grille Aliments Temps de cuisson en minutes température (ºC) recommandée à partir du bas Petits gâteaux 165 - 170 ºC 20 - 23 (un seul étage) Génoise 160 - 165 ºC 30 - 40 Pizza 170 - 175 ºC 19 - 25...
- Page 37 Utilisation Commandes du mode de cuisson Écran tactile gauche Écran tactile droit Commande boost (le cas échéant) Cadran de température Cadran de minuterie Standard Renforcer Température Minuteur Température Minuteur Convection Renforcer Touche de sortie Heure actuelle Mode de cuisson en cours Cadran de minuterie Touche boost (le cas échéant) Touche de sécurité...
- Page 38 Utilisation Démarrage de la cuisson Appuyer sur la touche de démarrage de cuisson pour commencer la cuisson. L’écran tactile droit passe à l’affichage suivant, et la minuterie lance son compte à rebours si elle a été sélectionnée. La touche d’éclairage du four est orange lorsque le four est allumé. Pour modifier la température lorsque la cuisson a commencé, il suffit d’appuyer sur le cadran de température et de la régler.
- Page 39 Utilisation Décongeler Jeudi, 21 Juin Viande Légumes Poulet Temps de décongélation (paramétrable par l’utilisateur) Poisson 3. Appuyer sur l’icône du mode décongélation requis du tableau ci-dessus. Les modes de décongélation (1 à 4) et les temps de décongélation préréglés en fonction du poids sont indiqués dans le tableau ci-dessous : Poids des aliments Temps de décongélation (minutes:secondes) congelés (g)
- Page 40 Utilisation 4. Temps de décongélation (plage : 00:01 - 90:00) Plage de temps Palier (minutes: secondes) 07:15 Décongeler 00:01 – 1:00 1 seconde Poids 01:10 – 5:00 10 secondes 1500 05:30 – 15:00 30 ssecondes 16:00 – 60:00 1 minute 65:00 – 90:00 5 minutes 5. Tourner le bouton de commande 360º pour définir le poids des aliments que vous souhaitez décongeler. 6.
- Page 41 Utilisation Utilisation du mode micro-ondes IMPORTANT: Ne pas utiliser d’accessoires ou d’ustensiles de cuisine en métal lors de l’utilisation d’un mode comprenant le chauffage au micro-ondes et si la fonction MWO (« Microwaves only », micro-ondes uniquement) est activée sur le panneau de commande des modes de cuisson (voir la section Commandes du mode de cuisson ci-dessous).
- Page 42 Utilisation Micro-onde Puissance Minuteur Mise en pause de la cuisson • Utiliser la touche Pause pour arrêter temporairement la cuisson sans rétablir les paramètres par défaut du micro-ondes, par exemple lorsqu’il est nécessaire de remuer les aliments en cours de cuisson. Appuyer à...
-
Page 43: Sécurité Enfant
Utilisation 4. Sur l’écran tactile droit, sélectionner la température et le temps requis, par exemple : Mode Standard, 180 ºC, 01:45. Préréglages Minuteur Température 5. Appuyer sur « Enregistrer un préréglage » pour le mémoriser. 6. Le numéro de préréglage créé s’affiche sur l’écran. Appuyer sur la coche pour quitter et le préréglage s’affichera sur l’écran tactile gauche. - Page 44 Utilisation Pour verrouiller Appuyer sur le cadenas ; un gros cadenas s’affiche alors au centre de l’écran tactile droit. Jeudi, 21 Juin Jeudi, 21 Juin Pour déverrouiller Appuyer et maintenir enfoncé le gros cadenas sur l’écran. Un compte à rebours de trois secondes s’affiche jusqu’à ce qu’il soit relâché.
- Page 45 Utilisation Accessoires IMPORTANT: Tablette en verre - pour micro-ondes. Retirer la grille en métal [02], la plaque [09] et la grille de cuisson [08] pendant l’utilisation du micro-ondes. [07] x 1 [07] [08] [08] x 1 [09] x 1 [09] 213170_s2_s8_5059340213811_GoodHome_A5_IM_Multi_V02.indd 45 213170_s2_s8_5059340213811_GoodHome_A5_IM_Multi_V02.indd 45 18-08-2021 12:23:42...
- Page 46 Utilisation [02] x 1 [02] 213170_s2_s8_5059340213811_GoodHome_A5_IM_Multi_V02.indd 46 213170_s2_s8_5059340213811_GoodHome_A5_IM_Multi_V02.indd 46 18-08-2021 12:23:42 18-08-2021 12:23:42...
-
Page 47: Panel Sterowania
Użytkowanie Przed rozpoczęciem użytkowania OSTRZEŻENIE: Przed rozpoczęciem korzystania z urządzenia zapoznać się z instrukcją obsługi. Włączyć urządzenie za pomocą zestawu wyłącznika z bezpiecznikiem. Urządzenie wyemituje pojedynczy sygnał dźwiękowy i będzie gotowe do użycia. Funkcje i ustawienia Panel sterowania Otwory montażowe (x 2) Oświetlenie piekarnika Wentylator Drzwi... - Page 48 Użytkowanie Główny przycisk wł./wył. Przycisk trybu pieczenia Przycisk ustawień głównych Przycisk oświetlenia Lewy ekran dotykowy Przycisk trybu rozmrażania piekarnika Pokrętło sterujące 360º (nacisnąć, Przycisk trybu kuchenki Przycisk blokady przed aby wysunąć lub wsunąć) mikrofalowej dziećmi Prawy ekran dotykowy Przycisk trybu nastaw Wyświetlacz godziny i daty Włączanie i wyłączanie piekarnika Dotknąć...
-
Page 49: Korzystanie Z Piekarnika
Użytkowanie Ustawianie jasności wyświetlacza 1. Dotknąć przycisku jasności wyświetlacza — na prawym ekranie dotykowym pojawi się element sterujący. 2. Obrócić pokrętło sterujące 360º, aby wybrać jasność w zakresie od 0 do 9. Jasność domyślna wynosi 8. 3. Dotknąć dwukrotnie pola wyboru , aby zapisać... - Page 50 Użytkowanie OBRÓT I DOTKNIĘCIE Praktyczna wskazówka: W menu głównym wystarczy obrócić pokrętło 360º w prawo lub w lewo, aby uzyskać natychmiastowy dostęp do standardowego trybu pieczenia przy domyślnej temperaturze 180 ºC. Dotknąć przycisku „Rozpocznij pieczenie”, aby natychmiast uruchomić piekarnik. Temperatura Moc mikrofal Ikona Tryb Zakres (ustawienie...
- Page 51 Użytkowanie Temperature Range Microwave Power Icon Mode Description (default) (default) Wewnętrzny i górny element grzejny działają łącznie z wentylatorem. Najlepsze rezultaty uzyskuje się, stosując górną półkę do mniejszych potraw i dolną do większych. Wentylator 100–250 ºC Grill 100/300/500 W osłabia intensywność grzania górnego z przyrostem co 5 ºC i wentylator (300 W)
- Page 52 Użytkowanie KONWEKCYJNY Ustawienie Produkt Zalecana półka od dołu Czas pieczenia w minutach temperatury (ºC) Ciastka 165 - 170 ºC 20 - 23 (jedna warstwa) Biszkopt 160 - 165 ºC 30 - 40 Pizza 170 - 175 ºC 19 - 25 Szarlotka 170 - 175 ºC 60 - 70 (jedna warstwa) 2 (głęboka taca)
- Page 53 Użytkowanie Elementy sterujące trybu pieczenia Lewy ekran dotykowy Prawy ekran dotykowy Pokrętło timera Element sterujący wzmocnieniem Pokrętło regulacji (jeśli dotyczy) temperatury Standard Boost Programator Temperatura Programator czasowy Temperature czasowy Konwekcja Boost MWO - włącz mikrofale Przycisk wyjścia Bieżąca godzina Bieżący tryb pieczenia Pokrętło timera Przycisk podwyższenia mocy (jeśli dotyczy) Przycisk blokady przed dziećmi...
- Page 54 Użytkowanie Rozpoczynanie pieczenia Dotknąć przycisku rozpoczęcia pieczenia, aby rozpocząć pieczenie. Prawy ekran dotykowy zmieni się na poniższy, a timer rozpocznie odliczanie, jeśli został wybrany. Kiedy piekarnik jest podświetlony, przycisk oświetlenia piekarnika ma kolor pomarańczowy. Aby zmienić temperaturę po rozpoczęciu pieczenia, wystarczy dotknąć pokrętła regulacji temperatury i ustawić odpowiednią temperaturę.
- Page 55 Użytkowanie Rozmrażanie Czwartek, 21 Czerwiec Mięso Warzywa Kurczak Rozmrażanie wg czasu (do wyboru) Ryba 3. Dotknąć ikony żądanego trybu rozmrażania z tabeli powyżej. Tryby rozmrażania (1–4) i wstępnie ustawione czasy rozmrażania w zależności od wagi przedstawiono w poniższej tabeli: Zamrożone Waga (g) Czas rozmrażania (minuty:sekundy) Mięso Kurczak...
- Page 56 Użytkowanie 4. Rozmrażanie wg czasu (przedział: 00:01–90:00) Przedział czasu Krok (minuty : sekundy) regulacji 07:15 Rozmrażanie 00:01 – 1:00 1 sekunda Waga 01:10 – 5:00 10 sekund 1500 05:30 – 15:00 30 sekund 16:00 – 60:00 1 minuta 65:00 – 90:00 5 minut 5. Obrócić pokrętło sterujące 360º, aby ustawić wagę potrawy, która ma zostać rozmrożona. 6.
- Page 57 Użytkowanie Używanie trybu kuchenki mikrofalowej WAŻNE: Podczas korzystania z trybu kuchenki mikrofalowej (na panelu sterowania trybami pieczenia jest uruchomiony tryb MWO) nie należy korzystać z metalowych akcesoriów i naczyń kuchennych (patrz „Elementy sterujące trybu pieczenia” poniżej). Należy korzystać z dołączonej do zestawu szklanej półki umieszczonej w najniższej pozycji kratki bocznej oraz z akcesoriów przeznaczonych do kuchenek mikrofalowych.
- Page 58 Użytkowanie Rozpoczynanie pieczenia • Zamknąć drzwi. • Dotknąć przycisku rozpoczęcia pieczenia, aby rozpocząć pieczenie. Timer rozpocznie odliczanie czasu. • Kiedy piekarnik jest podświetlony, przycisk oświetlenia piekarnika ma kolor pomarańczowy. Mikrofale Programator czasowy Wstrzymanie pieczenia • Użyć przyciskuy Pauza, aby tymczasowo przerwać pieczenie bez resetowania domyślnych ustawień kuchenki, na przykład w celu wymieszania potrawy.
- Page 59 Użytkowanie Ustawienia Ustawienia 4. Na prawym ekranie dotykowym wybrać żądaną temperaturę i czas, na przykład: Tryb standardowy, 180 ºC, 01:45. Ustawienia Programator czasowy Temperatura 5. Dotknąć przycisku „Save a preset” (Zapisz nastawę), aby zapisać nastawę w pamięci. 6. Numer utworzonej nastawy zostanie wyświetlony na ekranie. Aby zakończyć, dotknąć pola wyboru.
- Page 60 Użytkowanie Blokada rodzicielska / zabezpieczenie przed uruchomieniem urządzenia przez dzieci Jeśli na ekranie jest wyświetlana kłódka, można włączyć blokadę rodzicielską. Spowoduje to wyłączenie obu ekranów i pokrętła sterującego 360º. UWAGA: Blokada rodzicielska pozostanie aktywna również wtedy, gdy piekarnik zostanie wyłączony za pomocą głównego przycisku wł./wył.
- Page 61 Użytkowanie Akcesoria WAŻNE: Szklana półka – do użytku w trybie kuchenki mikrofalowej. Wyjąć metalową kratkę boczną [02], tacę grillową [09] i blachę [08] w trakcie korzystania z trybu kuchenki mikrofalowej.. [07] x 1 [07] [08] [08] x 1 [09] x 1 [09] 213170_s2_s8_5059340213811_GoodHome_A5_IM_Multi_V02.indd 61 213170_s2_s8_5059340213811_GoodHome_A5_IM_Multi_V02.indd 61...
- Page 62 Użytkowanie [02] x 1 [02] 213170_s2_s8_5059340213811_GoodHome_A5_IM_Multi_V02.indd 62 213170_s2_s8_5059340213811_GoodHome_A5_IM_Multi_V02.indd 62 18-08-2021 12:23:47 18-08-2021 12:23:47...
-
Page 63: Panou De Control
RO Utilizare Înainte de a începe AVERTISMENT: Citiți instrucțiunile înainte de utilizarea aparatului. Porniți aparatul de la unitatea de conectare cu comutator de siguranță. Aparatul va emite un semnal sonor o dată și este pregătit pentru utilizare. Funcție și setare Panou de control Orificii de fixare (x 2) Lampă... - Page 64 RO Utilizare Buton principal Pornire/Oprire Buton mod gătire Buton principal de configurare Ecran tactil stânga Buton mod decongelare Buton lumină cuptor Buton rotativ de control 360º Buton mod Microunde Buton de blocare pentru copii (apăsați pentru a ejecta sau a ascunde) Ecran tactil dreapta Buton mod presetare Afișaj oră...
-
Page 65: Utilizarea Cuptorului
RO Utilizare Configurarea luminozității afișajului 1. Atingeți butonul Luminozitate afișaj iar pe Ecranul tactil dreapta apare comanda. 2. Rotiți Butonul rotativ de control 360º pentru a selecta luminozitatea de la 0-9. Luminozitatea implicită este 8. 3. Atingeți de două ori Bifa pentru a salva luminozitatea. - Page 66 RO Utilizare Puterea Temperatură Pictogramă microundelor Descriere Interval (implicit) (implicită) Căldura statică tradițională de la elementele de încălzire superioare și 100-235 ºC în inferioare asigură păstrarea frăgezimii Standard trepte de 5 ºC Nu se aplică preparatelor atunci când sunt gătite (180 ºC) perioade mai lungi de timp. Ideal pentru prăjituri și sufleuri gătite la foc mic.
- Page 67 RO Utilizare Puterea Temperatură Pictogramă microundelor Descriere Interval (implicit) (implicită) Elementul interior de încălzire și elementul superior de încălzire funcționează împreună cu ventilatorul. Cele mai bune rezultate sunt obținute folosind raftul de sus pentru preparate mai 100-250 ºC în mici și raftul de jos pentru preparate mai Grătar și 100/300/500 W trepte de 5 ºC...
- Page 68 RO Utilizare CONVECTION Poziție pe raft recomandată Preparat Setarea temperaturii (ºC) Timp de gătire, în minute față de partea inferioară Prăjituri mici 165 - 170 ºC 20 - 23 (cu un singur strat) Pandișpan 160 - 165 ºC 30 - 40 Pizza 170 - 175 ºC 19 - 25 Tartă...
- Page 69 RO Utilizare Comenzile modului de gătire Ecran tactil stânga Ecran tactil dreapta Comandă amplificare Disc de selectare Disc de selectare (dacă se aplică) temperatură temporizator Standard Boost Temperatură Cronometru Temperatură Cronometru Convecție Boost Buton de ieșire Timp curent Mod de gătire curent Disc de selectare temporizator Buton de amplificare (dacă...
- Page 70 RO Utilizare Pornire gătire Atingeți butonul de pornire gătire pentru a începe să gătiți. Ecranul tactil dreapta va trece la afișajul următor, iar temporizatorul va începe cronometrarea, dacă a fost selectat. Butonul de lumină cuptor va deveni portocaliu când cuptorul este luminat. Dacă doriți să modificați temperatura după...
- Page 71 RO Utilizare Dezghețare Joi, 21 Iunie Carne Legume Decongelare în funcție de durată (selectabilă de către utilizator) Pește 3. Atingeți pictograma Modului de decongelare necesar din tabelul de mai sus. Modul de decongelare (1-4) și timpii de decongelare prestabiliți în funcție de greutate sunt prezentați în tabelul de mai jos: Congelat Greutate (g) Timp de decongelare (minute: secunde) Carne...
- Page 72 RO Utilizare 4. Decongelare în funcție de durată (interval: 00:01 - 90:00) Interval de timp Treaptă (minute: secunde) 07:15 Dezghețare 00:01 – 1:00 1 secundă Greutate 01:10 – 5:00 10 secunde 1500 05:30 – 15:00 30 secunde 16:00 – 60:00 1 minut 65:00 – 90:00 5 minute 5.
- Page 73 RO Utilizare Utilizarea modului cu microunde IMPORTANT: Nu utilizați accesorii sau ustensile de gătit metalice atunci când utilizați un mod care include încălzirea la microunde și cuptorul cu microunde este pornit pe Panoul de control al modului de gătire (consultați Comenzile modului de gătire de mai jos).
- Page 74 RO Utilizare Întrerupere gătire • Utilizați butonul de Întrerupere pentru a opri temporar gătitul fără a reseta cuptorul cu microunde la setările implicite, de exemplu atunci când trebuie să amestecați alimentele. Atingeți din nou pictograma mare Întrerupere de pe ecran pentru a relua cronometrarea de unde ați întrerupt. Notă: Gătitul va fi oprit imediat dacă...
- Page 75 RO Utilizare 4. Pe ecranul tactil dreapta, selectați temperatura și timpul dorit, de exemplu: Mod standard, 180 ºC, 01:45. Setări prestabilite Cronometru Temperatură 5. Atingeți butonul „Salvare presetare” pentru a salva în memorie. 6. Numărul de presetare creat va fi afișat pe ecran; atingeți bifa pentru a ieși iar pe ecranul tactil stânga este afișată...
-
Page 76: Blocare Pentru Copii
RO Utilizare Blocare pentru copii Atunci când pe ecran este afișat lacătul, se poate folosi Blocarea pentru copii. Aceasta va dezactiva ambele ecrane și butonul rotativ de control 360º. NOTĂ: Butonul de blocare pentru copii va rămâne, de asemenea, activ dacă cuptorul este oprit utilizând butonul principal de Pornire/Oprire. - Page 77 RO Utilizare Accesorii IMPORTANT: Raft din sticlă - pentru utilizare cu microunde. Scoateți suportul metalic [02], tava grătarului [09] și suportul [08] în timpul utilizării cuptorului cu microunde. [07] x 1 [07] [08] [08] x 1 [09] x 1 [09] 213170_s2_s8_5059340213811_GoodHome_A5_IM_Multi_V02.indd 77 213170_s2_s8_5059340213811_GoodHome_A5_IM_Multi_V02.indd 77 18-08-2021 12:23:54...
- Page 78 RO Utilizare [02] x 1 [02] 213170_s2_s8_5059340213811_GoodHome_A5_IM_Multi_V02.indd 78 213170_s2_s8_5059340213811_GoodHome_A5_IM_Multi_V02.indd 78 18-08-2021 12:23:54 18-08-2021 12:23:54...
-
Page 79: Cleaning The Accessories
Care and maintenance Care and maintenance WARNING! Always switch the appliance off and unplug the power plug before cleaning and maintenance. • Clean the appliance regularly to ensure its safe use and reliability. • It is recommended to clean the appliance when it is still slightly warm. Do not clean when hot. •... -
Page 80: Cooling Fan Operation
Care and maintenance 5. After cleaning, replace the door in reverse order. Cooling fan operation When cooking is finished, the cooling fan still operates for a short while until the oven has cooled below 75 ºC. Oven Light NOTE: The LED bulbs are not replaceable by the consumer. In the event of a bulb failure, please contact the Customer helpline at the end of this manual. -
Page 81: Entretien Et Maintenance
Entretien et maintenance Entretien et maintenance AVERTISSEMENT ! Toujours éteindre l’appareil et débrancher la fiche d’alimentation avant le nettoyage et l’entretien. • Nettoyer régulièrement l’appareil pour assurer sa fiabilité et une utilisation en toute sécurité. • Il est recommandé de nettoyer l’appareil lorsqu’il est encore légèrement chaud. Ne pas le nettoyer à chaud. •... -
Page 82: Dépannage
Entretien et maintenance 5. Après nettoyage, remonter la porte dans l’ordre inverse. Fonctionnement du ventilateur de refroidissement Lorsque la cuisson est terminée, le ventilateur de refroidissement continue de fonctionner pendant quelques instants jusqu’à ce que la température du four passe en dessous de 75 ºC. Éclairage du four REMARQUE: Les ampoules LED de cet appareil ne peuvent pas être remplacées par le client. -
Page 83: Czyszczenie I Konserwacja
Czyszczenie i konserwacja Czyszczenie i konserwacja OSTRZEŻENIE! Przed przystąpieniem do czyszczenia i konserwacji należy zawsze wyłączyć urządzenie i wyjąć wtyczkę z gniazda elektrycznego. • Regularnie czyścić urządzenie, aby zapewnić jego bezpieczne użytkowanie i niezawodność. • Zaleca się czyszczenie urządzenia, gdy jest jeszcze lekko ciepłe. Nie czyścić, gdy jest gorące. •... -
Page 84: Rozwiązywanie Problemów
Czyszczenie i konserwacja 5. Po czyszczeniu zamontować drzwi, wykonując czynności w odwrotnej kolejności. Działanie wentylatora chłodzącego Po zakończeniu pieczenia wentylator chłodzący nadal działa przez krótki czas, aż piekarnik ostygnie do temperatury poniżej 75 ºC. Oświetlenie piekarnika UWAGA: Żarówki LED nie są przeznaczone do samodzielnej wymiany. W przypadku awarii żarówki należy skontaktować... - Page 85 RO Îngrijire și întreținere Îngrijire și întreținere AVERTISMENT! Opriți întotdeauna aparatul și scoateți cablul de alimentare din priză înainte de curățare și întreținere. • Curățați periodic aparatul, pentru a asigura utilizarea în siguranță și fiabilitatea acestuia. • Se recomandă să curățați aparatul atunci când acesta încă este puțin cald. Nu curățați atunci când este fierbinte. •...
- Page 86 RO Îngrijire și întreținere 5. După curățare, montați la loc ușa, urmând pașii de mai sus în ordine inversă. Funcționarea ventilatorului de răcire Când gătitul s-a încheiat, ventilatorul de răcire funcționează în continuare o perioadă scurtă de timp, până când cuptorul se răcește sub 75 ºC.
- Page 87 Addresses Manufacturer • Fabricant • Producent • FR www.castorama.fr Producător: www.bricodepot.fr UK Manufacturer: Assistance téléphonique (sans frais) : Kingfisher International Products Limited, 0805 114 951 france@kingfisherservice.com 3 Sheldon Square, London, W2 6PX, Pour consulter les manuels d’instructions United Kingdom en ligne, rendez-vous sur le site www.kingfisher.com/products EU Manufacturer: Kingfisher International Products B.
Need help?
Do you have a question about the 5059340213811 and is the answer not in the manual?
Questions and answers