Table of Contents
Advertisement
Available languages
Available languages
Advertisement
Table of Contents

Related Manuals for GoodHome bamia GHPY71


Summary of Contents for GoodHome bamia GHPY71
- Page 1 bamia GHPY71 3663602434405 V10419...
-
Page 2: Installation
EN Contents FR Contenu PL Zawartość RO Cuprins Preparation Préparation Przygotowanie Pregătire Installation Installation Montaż Instalare Utilisation Użytkowanie Utilizare Care and Maintenance Entretien et maintenance Czyszczenie i konserwacja Îngrijire și întreținere... - Page 3 EN IMPORTANT - Please read FR IMPORTANT : veuillez lire PL WAŻNE — przed użyciem RO IMPORTANT - Citiți cu carefully the separate attentivement le guide de należy się uważnie zapoznać atenție ghidul separat safety guide before use. sécurité avant utilisation. z dołączonymi oddzielnie privind siguranța înainte de informacjami dotyczącymi...
- Page 4 EN Installation FR Installation PL Montaż RO Instalare Installation Montaż • This appliance must be installed correctly by a • WAŻNE — przed użyciem należy się uważnie zapoznać qualified person, strictly following the manufacturer’s z dołączonymi oddzielnie informacjami dotyczącymi instructions. bezpieczeństwa.
-
Page 5: Installation Of Built-In Ovens
EN Installation FR Installation PL Montaż RO Instalare 35 mm 35 mm 35 mm Installation of Built-in Ovens Montaż piekarników do zabudowy • For correct installation, this appliance can be fitted • Opisywane urządzenie można zamontować pod under the work surface in a built under housing unit or blatem w zabudowie kuchennej lub w wysokiej in a tall oven housing unit. - Page 6 EN Installation FR Installation PL Montaż RO Instalare 35 mm 35 mm The diagram above shows the air circulation requirements including a slot that should be cut into the plinth if fitted. It is essential when installing your oven there is adequate air circulation around the appliance to ensure the correct operation of the appliance.
- Page 7 EN Installation FR Installation PL Montaż RO Instalare Important: Do not lift the appliance by the door handle to avoid potential damage to the glass and hinges. Caution! If the supply cord is damaged, it must be replaced by the manufacturer, its service agent or similarly qualified persons in order to avoid a hazard.
- Page 8 EN Installation FR Installation PL Montaż RO Instalare [09] [07] x 2 [07] [08] [08] x 2 [09] x 2 Once the oven has been lifted into place inside the appliance housing, locate the two holes in the casing of the oven and fix it into place using [07], [08] and [09].
-
Page 9: Electrical Installation
EN Installation FR Installation PL Montaż RO Instalare Electrical Installation All installation must be carried out by a competent person or qualified electrician. Before connecting the mains supply ensure that the mains voltage corresponds to the voltage on the rating plate. Direct Connection The appliance must be connected directly to the mains using an omnipolar circuit breaker with a minimum opening of 3 mm between the contacts. -
Page 10: Installation Électrique
EN Installation FR Installation PL Montaż RO Instalare Installation électrique Toute l’installation doit être effectuée par une personne compétente ou un électricien qualifié. Avant de raccorder le câble d’alimentation, s’assurer que la tension de secteur correspond à la tension indiquée sur la plaque signalétique. Raccordement direct L’appareil doit être raccordé... -
Page 11: Instalacja Elektryczna
EN Installation FR Installation PL Montaż RO Instalare Instalacja elektryczna Montaż musi zostać wykonany przez osobę kompetentną lub wykwalifikowanego elektryka. Przed podłączeniem zasilania upewnić się, czy napięcie zasilania odpowiada napięciu na tabliczce znamionowej. Podłączenie bezpośrednie Urządzenie należy podłączyć bezpośrednio do sieci zasilającej, korzystając z wyłącznika wielobiegunowego o minimalnym odstępie między stykami wynoszącym 3 mm. - Page 12 EN Installation FR Installation PL Montaż RO Instalare Instalarea electrică Toate operațiunile de instalare trebuie să fie realizate de o persoană competentă sau un electrician calificat. Înainte de conectarea la rețeaua electrică, asigurați-vă că tensiunea rețelei corespunde cu tensiunea de pe plăcuța de identificare.
-
Page 13: Before You Start
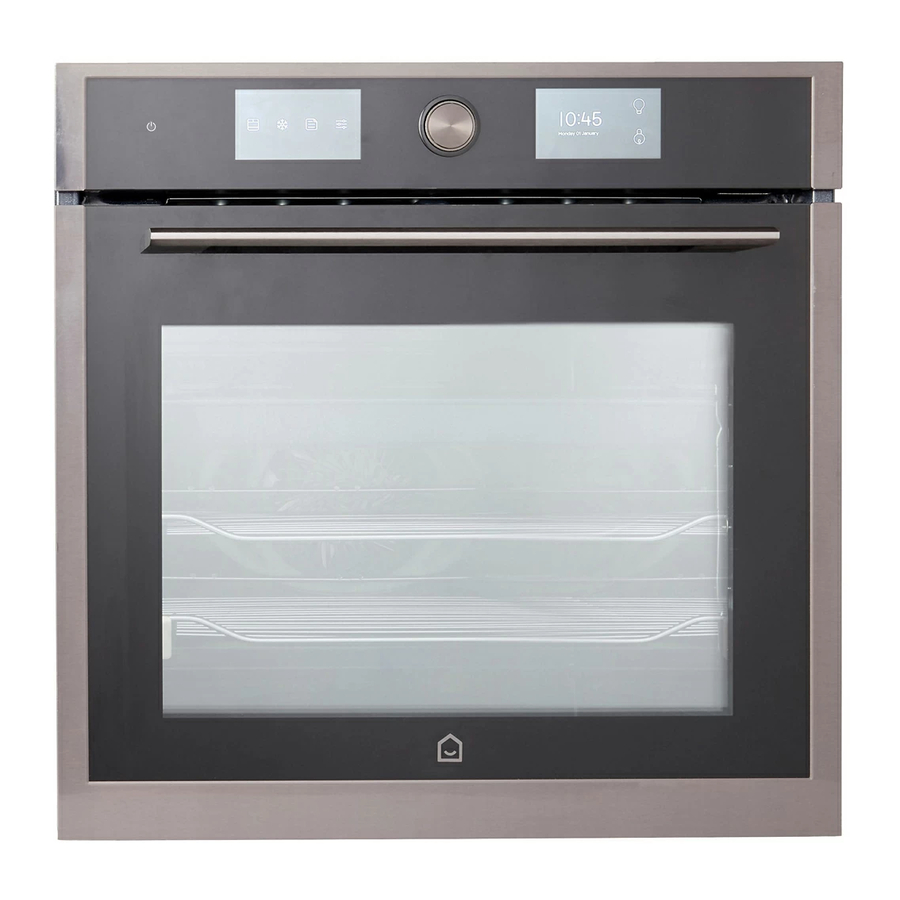
EN Use FR Utilisation PL Użytkowanie RO Utilizare Before you start WARNING: Read the instructions before using the appliance. Switch on the appliance at the switched fused connection unit. The appliance will beep once and is ready for use. Oven Description Control panel Mains cable (at rear, not shown) Carrying handles (x 2) -
Page 14: Turning The Oven On And Off
EN Use FR Utilisation PL Użytkowanie RO Utilizare Master On/Off Key Pyrolytic Function Key Left Touch Screen Presets Mode Key 360° Control Knob (Push to eject or hide) Master Settings Key Right Touch Screen Oven Light Key Cooking Mode Key Child Lock Key Defrost Mode Key Time and Date Display... -
Page 15: Using Your Oven
EN Use FR Utilisation PL Użytkowanie RO Utilizare Setting the display brightness 1. Touch the Display Brightness Key and the control appears on the Right Touch Screen. 2. Rotate the 360° Control Knob to select the brightness from 0-9. Default brightness is 8. 3. -
Page 16: Practical Cooking Advice
EN Use FR Utilisation PL Użytkowanie RO Utilizare Combination of the fan and both heating elements provides more even 50-250°C heat penetration, saving up to 30-40% of energy. Dishes are lightly Fanned browned on the outside and still moist on the inside. Ideal for grilling or (160°C) roasting large pieces of meat at a higher temperature. - Page 17 EN Use FR Utilisation PL Użytkowanie RO Utilizare CONVECTION Small cakes (single layer) 165-170 16-19 Sponge cake 160-165 20-25 Pizza 170-175 18-23 Apple yeast cake 170-175 25-50 (single layer) Small cakes 2 (deep tray) 165-170 20-23 (double layer) 4 (shallow tray) Apple yeast cake 2 (deep tray) 170-175...
- Page 18 EN Use FR Utilisation PL Użytkowanie RO Utilizare Cooking Mode Controls Left Touch Screen Right Touch Screen Boost Control (if applicable) Temperature Dial Timer Dial Timer ºC ºC Exit Key Temperature Dial Current Cooking Mode Current time Boost Key (if applicable) Timer Dial Child Lock Key Main Menu Key...
- Page 19 EN Use FR Utilisation PL Użytkowanie RO Utilizare Oven Light Key (orange when on) Internal oven temperature (does not show when selected temperature has been reached) Current time Pause Cooking Key The large Pause icon will show in the centre of the display and both screens will be locked;...
- Page 20 EN Use FR Utilisation PL Użytkowanie RO Utilizare Creating a Preset 1. From the Main Menu touch the Presets Key 2. Touch the “Save a preset” Key Save a preset 3. On the Left Touch Screen select the Cooking Mode Key or Defrost Mode Key Note: If the Cooking Mode Key is chosen, select the required Cooking Mode from the two screens in the usual way.
-
Page 21: Child Lock
EN Use FR Utilisation PL Użytkowanie RO Utilizare Standard Boost Temperature Timer 3. Touch the Preset on the left screen to select it. You can select the Boost function if the Preset includes this option and then touch the Start Key on the right screen to commence cooking. -
Page 22: Avant De Commencer
EN Use FR Utilisation PL Użytkowanie RO Utilizare Avant de commencer AVERTISSEMENT : lire les instructions avant d’utiliser l’appareil. Mettre l’appareil en marche sur l’unité de raccordement avec fusibles et interrupteur. L’appareil émet un signal sonore. Il est alors prêt à l’emploi. Description du four Panneau de commande Câble secteur (à... -
Page 23: Allumage Et Arrêt Du Four
EN Use FR Utilisation PL Użytkowanie RO Utilizare Allumage et arrêt du four 1. Appuyer sur la touche principale de marche/arrêt une fois pour allumer le four, et une fois de plus pour l’éteindre. Le four émet un signal sonore pour confirmer dans chaque cas. 2. -
Page 24: Utilisation Du Four
EN Use FR Utilisation PL Użytkowanie RO Utilizare Réinitialisation des options par défaut 1. Appuyer sur la touche principale de réinitialisation et le message de réinitialisation apparaît sur l’écran tactile droit. 2. Appuyer sur la coche ou la croix pour réinitialiser ou annuler et retourner au menu de réglage. Utilisation du four Avant la première utilisation •... - Page 25 EN Use FR Utilisation PL Użytkowanie RO Utilizare Seul l’élément chauffant supérieur fonctionne. Les meilleurs résultats sont obtenus en utilisant la grille supérieure 150-250°C Grill pour les plus petits aliments et une grille inférieure pour des aliments (180°C) plus grands. Idéal pour une cuisson rapide et pour dorer les aliments rapidement.
- Page 26 EN Use FR Utilisation PL Użytkowanie RO Utilizare CONVECTION Petits gâteaux (un seul étage) 165-170 16-19 Génoise 160-165 20-25 Pizza 170-175 18-23 Petits gâteaux (double étage) 170-175 25-50 Gâteau aux pommes et à la 2 (plaque profonde) 165-170 20-23 levure (un seul étage) 4 (plaque peu profonde) Apple yeast cake 2 (plaque profonde)
- Page 27 EN Use FR Utilisation PL Użytkowanie RO Utilizare Renforcer Température Minuteur Température Minuteur ºC ºC Touche pour quitter Cadran de température Mode de cuisson en cours Temps actuel Touche boost (le cas échéant) Cadran de minuterie Touche de verrouillage enfant Touche de menu principal Touche d'arrêt de cuisson Touche d'éclairage du four (orange s'il...
- Page 28 EN Use FR Utilisation PL Użytkowanie RO Utilizare Touche d'éclairage du four (orange s'il Température interne du four (ne s'affiche pas quand la fonctionne) température sélectionnée est atteinte) Temps actuel Touche de pause de cuisson La grande icône Pause s’affiche au centre de l’affichage et les deux écrans se verrouillent.
- Page 29 EN Use FR Utilisation PL Użytkowanie RO Utilizare Création d’un préréglage 1. À partir du menu principal, appuyer sur la touche Préréglages. 2. Appuyer sur « Enregistrer un préréglage ». Préréglages Enregistrer un préréglage 3. Sur l’écran tactile gauche, sélectionner la touche de mode de cuisson ou la touche de mode de décongélation.
- Page 30 EN Use FR Utilisation PL Użytkowanie RO Utilizare 2. Balayer l’écran de droite à gauche pour accéder à ces pages et localiser le préréglage requis. Standard Renforcer Température Minuteur 3. Appuyer sur le préréglage sur l’écran de gauche pour le sélectionner. Il est possible de sélectionner la fonction boost si le préréglage comprend cette option.
-
Page 31: Przed Rozpoczęciem Użytkowania
EN Use FR Utilisation PL Użytkowanie RO Utilizare Przed rozpoczęciem użytkowania OSTRZEŻENIE: Przed rozpoczęciem korzystania z urządzenia zapoznać się z instrukcją obsługi. Włączyć urządzenie za pomocą zestawu wyłącznika z bezpiecznikiem. Urządzenie wyemituje pojedynczy sygnał dźwiękowy i będzie gotowe do użytku. Opis piekarnika Panel sterowania Przewód zasilający (z tyłu, nie przedstawiono) - Page 32 EN Use FR Utilisation PL Użytkowanie RO Utilizare Główny przycisk wł./wył. Przycisk Funkcja pirolityczna Lewy ekran dotykowy Przycisk Tryb ustawień wstępnych Pokrętło sterujące 360° (nacisnąć, aby Przycisk Ustawienia główne wysunąć lub wsunąć) Prawy ekran dotykowy Przycisk oświetlenia piekarnika Przycisk Tryb gotowania Przycisk Blokada rodzicielska Przycisk Tryb rozmrażania Wyświetlanie godziny i daty...
-
Page 33: Korzystanie Z Piekarnika
EN Use FR Utilisation PL Użytkowanie RO Utilizare Ustawianie jasności wyświetlacza 1. Dotknąć przycisku Jasność wyświetlacza. Na prawym ekranie dotykowym pojawi się pokrętło sterujące. 2. Obrócić pokrętło sterujące 360°, aby wybrać jasność w zakresie od 0 do 9. Jasność domyślna wynosi 8. - Page 34 EN Use FR Utilisation PL Użytkowanie RO Utilizare STRONA MENU 1 Ikona Tryb Zakres Opis temperatur (domyślnie) Standardowe, statyczne ciepło emitowane przez górne i dolne elementy 30-250°C Standard grzejne sprawia, że potrawy pozostają wilgotne podczas pieczenia przez (180°C) dłuższy czas. Idealne do powolnego pieczenia ciast i sufletów. Element grzejny wokół...
- Page 35 EN Use FR Utilisation PL Użytkowanie RO Utilizare Praktyczna porada kulinarna • Spośród wielu dostępnych opcji urządzenie pozwala wybrać optymalny sposób przygotowywania potraw. Z biegiem czasu użytkownik powinien wypracować najlepsze sposoby korzystania z tego uniwersalnego urządzenia, a poniższe wskazówki powinien traktować jako poglądowe, możliwe do zmiany stosownie do własnych potrzeb.
-
Page 36: Ustawianie Temperatury
EN Use FR Utilisation PL Użytkowanie RO Utilizare Nagrzewanie OBRÓT I DOTKNIĘCIE Porada: W menu głównym wystarczy obrócić pokrętło 360° w prawo lub w lewo, aby uzyskać natychmiastowy dostęp do standardowego trybu gotowania przy domyślnej temperaturze 180°C. Dotknąć przycisku Rozpocznij gotowanie, aby natychmiast uruchomić piekarnik. Elementy sterujące Trybu gotowania Lewy ekran dotykowy Prawy ekran dotykowy... - Page 37 EN Use FR Utilisation PL Użytkowanie RO Utilizare Uwaga: Ta funkcja nie jest dostępna w każdym trybie gotowania. Rozpoczęcie gotowania Dotknąć przycisku Rozpocznij gotowanie, aby rozpocząć gotowanie. Na prawym ekranie dotykowym pojawi się poniższy komunikat, a zegar rozpocznie odliczanie, jeśli zostało wybrane. Kiedy piekarnik jest podświetlony, przycisk oświetlenia piekarnika zmieni kolor na pomarańczowy.
- Page 38 EN Use FR Utilisation PL Użytkowanie RO Utilizare 2. Dotknąć przycisku Start, aby natychmiast rozpocząć rozmrażanie, a następnie dotknąć przycisku Stop, aby zakończyć. Czas rozmrażania jest wyświetlany na prawym ekranie. 3. Podczas rozmrażania można dotknąć przycisku Pauza, aby tymczasowo wyłączyć urządzenie, a następnie dotknąć...
-
Page 39: Blokada Rodzicielska
EN Use FR Utilisation PL Użytkowanie RO Utilizare 4. Na prawym ekranie dotykowym wybrać żądaną temperaturę i czas, na przykład: Tryb standardowy, 180°C, 01:30. Ustawienia Programator Temperatura czasowy 5. Dotknąć przycisku „Zapisz ustawienie wstępne”, aby zapisać ustawienie w pamięci. 6. Utworzony numer ustawienia wstępnego zostanie wyświetlony na ekranie. Aby zakończyć, należy dotknąć... - Page 40 EN Use FR Utilisation PL Użytkowanie RO Utilizare 19:45 Czwartek, 21 Czerwiec Czwartek, 21 Czerwiec Zwalnianie blokady Dotknąć i przytrzymać dużą kłódkę na ekranie. Do momentu zwolnienia będzie wyświetlane odliczanie trzech sekund. Czwartek, 21 Czerwiec UWAGA: Nadal można wyłączyć piekarnik za pomocą przycisku głównego włączania/wyłączania, gdy włączona jest blokada rodzicielska.
-
Page 41: Înainte De A Începe
EN Use FR Utilisation PL Użytkowanie RO Utilizare Înainte de a începe AVERTISMENT: Citiți instrucțiunile înainte de utilizarea aparatului. Porniți aparatul de la unitatea de conectare cu comutator de siguranță. Aparatul va emite un semnal sonor și e gata pentru utilizare. Descrierea cuptorului Panou de control Cablu de alimentare (în spate, nu este vizibil) - Page 42 EN Use FR Utilisation PL Użytkowanie RO Utilizare Buton principal pornire/oprire Tastă pentru funcția de piroliză Ecran tactil stânga Tastă moduri prestabilite Buton de control 360 ° (Apăsați pentru a-l Tastă setări principale scoate în afară sau pentru a-l ascunde) Ecran tactil dreapta Tastă...
-
Page 43: Utilizarea Cuptorului
EN Use FR Utilisation PL Użytkowanie RO Utilizare Configurarea luminozității ecranului 1. Atingeți tasta de afișare a luminozității și se vor afișa comenzile pe ecranul tactil din dreapta. 2. Rotiți butonul de control 360° pentru a selecta luminozitatea, de la 0 la 9. Luminozitatea implicită este 8. - Page 44 EN Use FR Utilisation PL Użytkowanie RO Utilizare Pentru economie de energie în timpul gătitului. Intervalul de temperatură al termostatului este mai mare și scade la o temperatură mai mică pentru 140-240°C a economisi energie. Cuptorul se încălzește la o temperatură mai mare, (140°C) apoi se oprește și repornește la temperaturi mai scăzute.
- Page 45 EN Use FR Utilisation PL Użytkowanie RO Utilizare STANDARD Mâncare Setare de temperatură (°C) Poziția recomandată a Durata de preparare în raftului, începând de jos minute Prăjituri mici 175-185 16-19 Pandișpan 180-185 20-25 Pizza 205-210 18-23 Prăjitură de mere cu drojdie 185-195 25-50 CONVECȚIE...
- Page 46 EN Use FR Utilisation PL Użytkowanie RO Utilizare Comenzi mod de preparare Ecran tactil stânga Ecran tactil dreapta Comandă amplificare (dacă se aplică) Cadran temperatură Cadran temporizator Temperatură Cronometru Temperatură Cronometru ºC ºC Tastă ieșire Cadran temperatură Modul actual de preparare Ora actuală...
- Page 47 EN Use FR Utilisation PL Użytkowanie RO Utilizare 07:15 Temperatură Timp de gătit 1800 0:01 ºC Current 180 ºC Tastă lumină cuptor (portocalie când este Temperatura internă a cuptorului (nu este pornită) afișată atunci când a fost atinsă temperatura selectată) Ora actuală...
- Page 48 EN Use FR Utilisation PL Użytkowanie RO Utilizare 3. Atingeți tasta de pornire pentru a începe decongelarea, iar temporizatorul va începe numărătoarea inversă. Atingeți tasta Oprire pentru a încheia mai devreme. 4. În timpul decongelării, puteți atinge tasta de pauză pentru a opri temporar și pictograma mare Pauză...
- Page 49 EN Use FR Utilisation PL Użytkowanie RO Utilizare Utilizarea unui mod prestabilit Setări prestabilite Salvarea unui mod prestabilit 1. Toate modurile prestabilite sunt salvate pe patru pagini ale meniului. 2. Glisați de la dreapta la stânga pentru a accesa aceste pagini și găsiți modul prestabilit dorit. Standard Boost Cronometru...
- Page 50 EN Use FR Utilisation PL Użytkowanie RO Utilizare Accessories Akcesoria Always ensure all accessories are safely fixed to the side Przed użyciem należy zawsze upewnić się, że wszystkie rails and level before use. akcesoria są bezpiecznie przymocowane do szyn bocznych i wypoziomowane. To attach the side rails to the internal racks, follow these steps and ensure they are fully secure before attaching Aby przymocować...
- Page 51 EN Use FR Utilisation PL Użytkowanie RO Utilizare [06] x 1 [05] x 1 [06] x 1 [02] x 2...
-
Page 52: Care And Maintenance
EN Care & maintenance Entretien et maintenance PL Czyszczenie i konserwacja RO Îngrijire și întreținere Care & Maintenance Warning! Always switch the appliance off and unplug the power plug before cleaning and maintenance. • Clean the appliance regularly to ensure its safe use and reliability. •... -
Page 53: Pyrolytic Cleaning
EN Care & maintenance Entretien et maintenance PL Czyszczenie i konserwacja RO Îngrijire și întreținere Pyrolytic Cleaning Pyrolytic cleaning is a very high temperature cleaning process that burns off all residues from the oven cavity, leaving an ash residue that can be easily wiped away. WARNING: REMOVE ALL ACCESSORIES INCLUDING TRAYS, RACKS AND SIDE RAILS BEFORE USING PYROLYTIC CLEANING! Using Pyrolytic Cleaning... -
Page 54: Replacing Bulbs
EN Care & maintenance Entretien et maintenance PL Czyszczenie i konserwacja RO Îngrijire și întreținere Removing the inner glass for cleaning Press the notches on both sides of the door and pull upwards away from the frame. 2. Remove the glass from the door. 3. -
Page 55: Entretien Et Maintenance
EN Care & maintenance Entretien et maintenance PL Czyszczenie i konserwacja RO Îngrijire și întreținere Troubleshooting: E01 error Once a broken circuit or short circuit of the temperature sensor is detected, the error code E01 is shown on the display. If this happens, proceed as follows: Disconnect the power, and check if the cable, its connection and electrical socket is not damaged. -
Page 56: Nettoyage De La Porte Du Four
EN Care & maintenance Entretien et maintenance PL Czyszczenie i konserwacja RO Îngrijire și întreținere Nettoyage à pyrolyse Le nettoyage à pyrolyse est un processus de nettoyage à très haute température qui brûle tous les résidus à l’intérieur du four, ce qui laisse un résidu de cendres qui peut être facilement nettoyé. AVERTISSEMENT : RETIRER TOUS LES ACCESSOIRES Y COMPRIS LES PLATEAUX, LES GRILLES ET LES RAILS LATÉRAUX AVANT D’UTILISER LE NETTOYAGE À... -
Page 57: Remplacement Des Ampoules
EN Care & maintenance Entretien et maintenance PL Czyszczenie i konserwacja RO Îngrijire și întreținere 5. Après nettoyage, remonter la porte dans l’ordre inverse. Démontage de la vitre intérieure en vue du nettoyage Appuyer sur les encoches des deux côtés de la porte et tirer vers le haut. 2. -
Page 58: Czyszczenie I Konserwacja
EN Care & maintenance Entretien et maintenance PL Czyszczenie i konserwacja RO Îngrijire și întreținere 4. Replacer le cache. Fonctionnement du ventilateur de refroidissement Lorsque la cuisson est terminée, le ventilateur de refroidissement continue de fonctionner pendant un court instant jusqu’à... -
Page 59: Czyszczenie Pirolityczne
EN Care & maintenance Entretien et maintenance PL Czyszczenie i konserwacja RO Îngrijire și întreținere 3. Zdjąć osłony boczne znajdujące się wewnątrz piekarnika. 4. Oczyścić szyny i osłony za pomocą gorącej wody z mydłem i gąbki. Wytrzeć wilgotną szmatką. 5. Przed ponownym włożeniem akcesoriów zamocować osłony boczne i szyny boczne. Czyszczenie pirolityczne Czyszczenie pirolityczne to proces czyszczenia w bardzo wysokiej temperaturze, który powoduje wypalenie wszystkich pozostałości z komory piekarnika, zostawiając resztki popiołu, które można łatwo usunąć. - Page 60 EN Care & maintenance Entretien et maintenance PL Czyszczenie i konserwacja RO Îngrijire și întreținere UWAGA: Funkcja czyszczenia będzie działać przez dwie godziny i do czasu zakończenia tego procesu i schłodzenia piekarnika do temperatury poniżej 75°C NIE będzie można otworzyć drzwi. 3.
- Page 61 EN Care & maintenance Entretien et maintenance PL Czyszczenie i konserwacja RO Îngrijire și întreținere Odkręcić klosz, obracając go w lewo. 2. Wymienić żarówkę na nową tego samego typu. Trzymać nową żarówkę przez tkaninę, aby uniknąć jej przedwczesnego zużycia. 3. Przykręcić klosz na miejsce. Wymiana bocznej żarówki: Wymontować...
- Page 62 EN Care & maintenance Entretien et maintenance PL Czyszczenie i konserwacja RO Îngrijire și întreținere Îngrijire și întreținere Avertisment! Opriți întotdeauna aparatul și deconectați-l de la priză înainte de curățare și întreținere. • Curățați periodic cuptorul pentru utilizare sigură și fiabilitate. •...
-
Page 63: Curățarea Ușii Cuptorului
EN Care & maintenance Entretien et maintenance PL Czyszczenie i konserwacja RO Îngrijire și întreținere Curățare pirolitică Curățarea pirolitică reprezintă un proces de curățare la o temperatură foarte ridicată, care arde toate reziduurile din interiorul cuptorului, lăsând în urmă cenușă, care poate fi îndepărtată cu ușurință. AVERTISMENT: SCOATEȚI TOATE ACCESORIILE, INCLUSIV TĂVI, GRILAJE ȘI ȘINE LATERALE ÎNAINTE DE CURĂȚAREA PIROLITICĂ! Utilizarea curățării pirolitice... - Page 64 EN Care & maintenance Entretien et maintenance PL Czyszczenie i konserwacja RO Îngrijire și întreținere 5. După curățare, montați la loc ușa, urmând aceiași pași, dar în ordine inversă. Demontarea sticlei interioare pentru curățare Apăsați fantele de pe ambele laturi ale ușii și ridicați-o din cadru. 2.
- Page 65 EN Care & maintenance Entretien et maintenance PL Czyszczenie i konserwacja RO Îngrijire și întreținere Funcționarea ventilatorului După finalizarea preparării, ventilatorul va mai funcționa pentru scurt timp, până când cuptorul se răcește sub 75 °C. Depanare: Eroare E01 Atunci când este detectat un circuit defect sau un scurtcircuit la senzorul de temperatură, pe ecran este afișat codul de eroare E01.
- Page 66 Addresses Manufacturer • Fabricant • Producent • Producător: RO Distribuitor: Kingfisher International Products Limited, SC Bricostore România SA 3 Sheldon Square, London, W2 6PX, Calea Giulești 1-3, Sector 6, United Kingdom București , România www.kingfisher.com/products www.bricodepot.ro Kingfisher International Products B. V . Praktiker Romania S.A.
Need help?
Do you have a question about the bamia GHPY71 and is the answer not in the manual?
Questions and answers
My oven won’t heat up. It’s brand new. **** also isn’t working.
The GoodHome Bamia GHPY71 oven may not be heating up due to several possible reasons:
1. Power Supply Issues – Ensure the oven is properly connected to a working power source and that the supply cord is not damaged or improperly installed.
2. Heating Element Fault – The heating elements inside the oven may be faulty or not functioning correctly.
3. Incorrect Mode or Temperature Setting – Check that the appropriate cooking mode and temperature have been selected.
4. Installation Problems – Ensure the oven was installed correctly by a qualified person following local regulations.
5. Electrical Connection Problems – Verify that the electrical connection is correctly made and follows the wiring diagram.
6. Safety Features Activation – If the oven is in a damp area or has been exposed to a water leak, allow it to dry before use.
If the issue persists, professional inspection may be needed.
This answer is automatically generated