Table of Contents
Advertisement
Quick Links
Advertisement
Table of Contents

Related Manuals for STATESMAN SBS177X


Summary of Contents for STATESMAN SBS177X
- Page 1 SBS177X AMERICAN SIDE-BY-SIDE TOTAL NO FROST FRIDGE FREEZER Instruction Manual Please read these instructions carefully before use and retain for future reference. Before switching on your appliance – Always check for any damage that may have been caused in transit.
-
Page 2: Table Of Contents
CONTENTS Important Safety Instructions ........ 3-6 Product Overview ............7 Installation .............. 8-11 Operating Instructions ........12-16 - Using the Control Panel ........12-13 - First Use ..............14 - Daily Use ..............14 - Accessories .............15 - Temperature Setting Recommendation ....15 - Helpful Hints and Tips ..........16 Cleaning and Maintenance ........17 Troubleshooting Guide ..........18 Disposal Information ..........19... -
Page 3: Important Safety Instructions
SAFETY INSTRUCTIONS • In the interest of your safety and to ensure the correct use, before installing and first using the appliance, read this user manual carefully, including its hints and warnings. To avoid unnecessary mistakes and accidents, it is important to ensure that all people using the appliance are thoroughly familiar with its operation and safety features. Save these instructions and make sure that they remain with the appliance if it is moved or sold, so that everyone using it through its life will be properly informed on appliance use and safety. - Page 4 circuit of the appliance, a natural gas with a high level of environmental compatibility, which is nevertheless flammable. • During transportation and installation of the appliance, be certain that none of the components of the refrigerant circuit become damaged - avoid open flames and sources of ignition - thoroughly ventilate the room in which the appliance is situated • It is dangerous to alter the specifications or modify this product in any way. Any damage to the cord may cause a short circuit, fire and/or electric shock. This appliance is intended to be used in household and similar applications such as:...
- Page 5 - Store raw meat and fish in suitable containers in the refrigerator, so that it is not in contact with or drips onto other food. - Two-star frozen-food compartments (if they are presented in the appliance) are suitable for storing pre-frozen food, storing or making ice cream and making ice cubes. - One-, two- and three-star compartments (if they are presented in the appliance) are not suitable for the freezing of fresh food.
- Page 6 • Don’t set the thermostat on exceeding cold temperatures; • All accessories, such as drawers, shelf balconies, should be kept there for lower energy consumption. Environment Protection This appliance does not contain gasses which could damage the ozone layer, in either its refrigerant circuit or insulation materials.
-
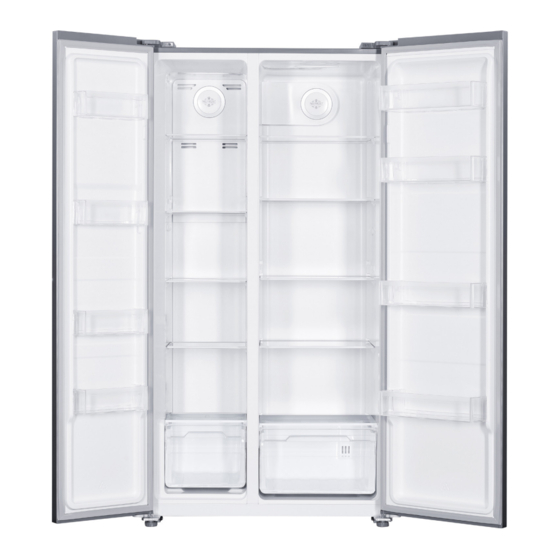
Page 7: Product Overview
PRODUCT OVERVIEW Freezer Shelves Fridge Shelves Fridge Door Shelves Freezer Door Shelves Covers for Fridge Vegetable Freezer Drawer Containers Covers Fridge Freezer Drawers Vegetable Containers Levelling Feet... -
Page 8: Installation
INSTALLATION Remove the Doors Tool required: Philips screwdriver, flat headed screwdriver. • Ensure the unit is unplugged and empty. • To take the door off, it is necessary to tilt the unit backwards. You should rest the unit on something solid so that it will not slip during the door removing process. • All parts removed must be saved to do the reinstallation of the door. - Page 9 4. Lift the door and place it on a soft pad. Then remove the other door using the same process. 5. Unscrew bottom hinges. 6. After the appliance is positioned in the desired location, reinstall the doors using the removal instructions in reverse...
- Page 10 Space Requirement • Keep enough space for the doors to open. • Keep at least 50mm gap around the two sides and back of the appliance. Leveling the Refrigerator • Clockwise rotate feet to heighten them by hand • Anti-clockwise rotate feet to lower them by hand Doors...
- Page 11 Positioning Install this appliance in a location where the ambient temperature corresponds to the climate class indicated on the rating plate of the appliance. the relevant refrigerating appliance climate classes are as follows: - Subnormal (SN): this refrigerating appliance is intended to be used at ambient temperatures ranging from 10 °C to 32 °C;...
-
Page 12: Operating Instructions
OPERATING INSTRUCTIONS Using the Control Panel Buttons A - Press to adjust temperature of freezer compartment (left side) from -14°C to -22°C B - Press to adjust temperature of fridge compartment (right side) from 2°C to 8°C and switch off the refrigerator compartment. - Page 13 Mode Indicator Light Freezer Temperature Display Fridge Temperature Display The temperature display for freezer and fridge will change based Smart on ambient temperature. -15°C +8°C Super Cooling No Change +2°C Super Freezing -25°C No Change NOTES: ECO mode: Select this mode when you want to save power. Super Cooling mode: This mode allows you to cool foods quickly and will be automatically deactivated after 2.5 hours of operation.
-
Page 14: First Use
First Use Cleaning the Interior Before using the appliance for the first time, wash the interior and all internal accessories with lukewarm water and some neutral soap so as to remove the typical smell of a brand new product, then dry thoroughly. -
Page 15: Accessories
Accessories Movable Shelves The walls of the refrigerator compartment are equipped with a series of runners so that the shelves can be positioned as desired. Positioning the Door Balconies To permit storage of food packages of various sizes, the door balconies can be placed at different heights. -
Page 16: Helpful Hints And Tips
Helpful Hints and Tips Hints for Freezing To help you make the most of the freezing process, here are some important hints: • The maximum quantity of food which can be frozen in 24 hrs. is shown on the rating plate; •... -
Page 17: Cleaning And Maintenance
CLEANING AND MAINTENANCE For hygiene reasons the appliance interior, including interior accessories, should be cleaned regularly. CAUTION! The appliance may not be connected to the mains during cleaning. Danger of electrical shock! Before cleaning switch the appliance off and remove the plug from the mains, or switch off or turn out the circuit breaker or fuse. Never clean the appliance with a steam cleaner. Moisture could accumulate in electrical components, danger of electrical shock! Hot vapors can lead to the damage of plastic parts. -
Page 18: Troubleshooting Guide
TROUBLESHOOTING GUIDE If you are having problems with your appliance, please use our troubleshooting guide below. If you are unable to resolve the issue using this guide, please ring our Customer Service Department on 0844 848 5861. Please have the model code and purchase information available. Important! There are some sounds during normal use (compressor, refrigerant circulation) PROBLEM POSSIBLE CAUSE... -
Page 19: Disposal Information
Disposal of Old Electrical Appliances The European Directive 2002/96/EC on Waste Electrical and Electronic Equipment (WEEE), requires that old household electrical appliances must not be disposed of in normal unsorted municipal waste. Old appliances must be collected separately in order to optimise the recovery and recycling of the materials they contain and reduce the impact on human health and the environment. - Page 20 38 Bluestem Road, Ransomes Europark Ipswich, IP3 9RR 0844 848 5861 C KSTM-K01...
Need help?
Do you have a question about the SBS177X and is the answer not in the manual?
Questions and answers