Table of Contents
Advertisement
Advertisement
Table of Contents

Related Manuals for Gigaset A450


Summary of Contents for Gigaset A450
- Page 1 A450...
-
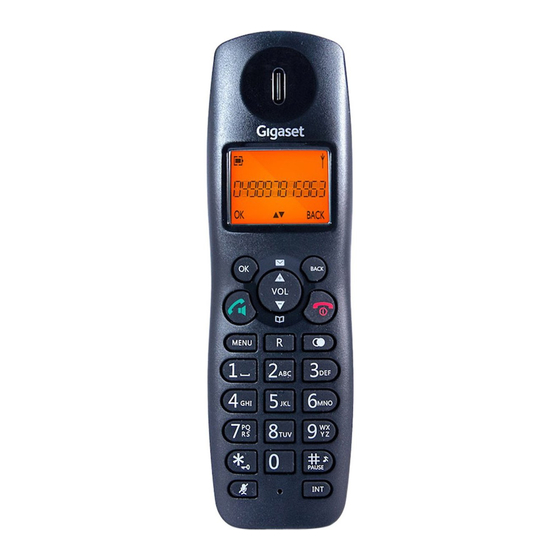
Page 2: Handset Overview
Handset Overview Gigaset A450 Handset Overview Earpiece Display (Up) / Calls Button • Press to increase volume and view CID. • (Down) / (Phonebook) Button • Press to decrease volume and access Phonebook. OK Button • Press to confirm your operation (Talk) / (Speakerphone) Button •... - Page 3 Handset Overview *(Key Lock) Button • Press to insert a * when dialing • Long press to activate or deactivate the key lock. Mute Button • Press to mute the microphone and press again to unmute. Back Button • Press to cancel a menu entry. •...
-
Page 4: Base Unit Overview
Base Unit Overview Base Unit Overview... -
Page 5: Safety Precautions
Do not use your phone in environments with a potential explosion hazard (e.g. paint shops). If you give your Gigaset to someone else, make sure you also give them the user guide. Please remove faulty bases from use or have them repaired by our Service depart-... -
Page 6: First Steps
First steps First steps Checking the pack contents Handset x 1 Power supply x 1 Base Unit x 1 Instruction Manual x 1 AAA Batteries x 2 Telephone Linecord x 1 Installing Your Phone Connecting the Base Unit 1. Plug the Power supply & telephone line cable into the base unit. 2. - Page 7 First steps Place the charging cradle within reach of a mains power socket. (For Duo and Trio handset version) 1. Plug the charging cradle into the mains power socket. 2. Insert 2 x AAA rechargeable batteries (supplied), taking note of the ‘+’ and ‘-’ markings inside the battery compartment, then slide the battery compartment back on.
-
Page 8: Setting Up The Handset For Use
Inserting the batteries and closing the battery cover Warning Only use the rechargeable batteries recommended by Gigaset Communications GmbH, i.e. never use conventional (non-rechargeable) batteries, as this could result in could be damaged or the batteries could explode. The phone could also malfunction or be damaged as a result of using batteries that are not of the recommended type. -
Page 9: Placing The Handset In The Charging Cradle
First steps Placing the handset in the charging cradle ¤ Place the handset in the charging cradle with its display facing forward. The supplied handset is registered with the base at the factory. You do not need to register it. If you wish to use your handset with a di erent base or use further handsets with your base, you will have to register them manually, To charge the batteries, leave the handset in the charging cradle. -
Page 10: Display Icons And Symbols
Display Icons and Symbols Display Icons and Symbols Icon Name Behaviour Description 1. Steady on 1. Displayed steady for capacity indication (Full = more than 1 hour talk time remains); Battery Animating when battery is being charged or when it remains less than 1 hour talk time 2. -
Page 11: Menu Structure
Menu Structure Menu Structure In idle mode, press the Menu button to access the main menu. Refer below for the menu structure. Menu PHONEBOOK • NEW ENTRY • LIST • EDIT ENTRY • DELETE • DELETE ALL • DIRECT MEM. PERSONAL SET •... -
Page 12: Switching On/Off
Operations Operations Switching ON/OFF Press and hold the button for more than 2 seconds to switch on/off the handset in idle mode. To Lock/Unlock the Keypad Press and hold the button for 1 second to lock/unlock the keypad in idle mode. Set Time and Date Press the Menu button to enter menu selection. -
Page 13: Change The Display Language
Operations Operations Change the Display Language 1. Press the Menu button to enter menu selection. 2. Press the buttons to select PERSONAL SET and then press the OK button to select. 3. Press the buttons to select LANGUAGE and then press the OK button to select. -
Page 14: Adjust The Earpiece Volume
Operations Operations Answer and End a Call 1. When the phone rings, press the button. 2. To end a conversation press the button. You need to subscribe to Caller Line Identification service to be able to see the caller’s number or name in the call log. -
Page 15: Enter Characters
Phonebook Phonebook Your phone can store up to 50 phonebook memories. Each phonebook entry can have a maximum of 24 digits for the phone number and 12 characters for the name. Enter Characters When you select a field in which you can enter text, you can enter the letters that are printed on the keys by pressing the relevant key once or several times. -
Page 16: Modify A Phonebook Entry
Phonebook Phonebook Modify a Phonebook Entry 1. Press the Menu button to enter menu selection. 2. Press the buttons to select PHONEBOOK and then press the OK button to select. 3. Press the buttons to select EDIT ENTRY and then press the OK button to select. -
Page 17: Add/Edit Direct Access Memory
Access Memory Access Memory Direct Access Memory There are 2 direct access memories (Keys 1 & 2) in addition to the phonebook memory. A long press on the keys in idle mode will automatically dial the stored phone number. Add/Edit Direct Access Memory 1. -
Page 18: Access Redial List
Access Call Log Access Call Log Access Redial List 1. Press the Redial button in idle mode and press the buttons to browse the redial list. The last number dialed will appear first in the redial list. 2. Press the OK button to view the details of the selected entry. Save a Redial Number into the Phonebook 1. - Page 19 Access Call Log Access Call Log Access Call Log Press the Calls button in idle mode and press the key buttons to browse the call list. The calls are displayed in chronological order with the most recent call at the top of the list. 1.
-
Page 20: Answer An External Call During Intercom
Access Call Log Access Call Log 4. Press the Talk button on the called handset to answer the internal call, where both internal callers can talk. Intercom is established. 5. Press the button on the first handset to transfer the external call to the called handset. The external call is transferred. -
Page 21: Phone Settings
Phone Settings Phone Settings Phone Settings (Handset Tone) Set the Ring Volume There are 5 ringer volume options (LEVEL 1, LEVEL 2, LEVEL 3, LEVEL 4 and Level 5). The default level is LEVEL 5. 1. Press the Menu button to enter menu selection. 2. -
Page 22: Activate/Deactivate Auto Hang-Up
Phone Settings Phone Settings Activate/Deactivate Auto Hang-up This function enables you to end a call automatically by simply placing the handset on the base unit. By default, the Auto Hang up feature is ON. 1. Press the Menu button to enter menu selection. 2. -
Page 23: Date/Time Settings
Date / Time Settings Date / Time Settings Set Date/Time Format You can set your preferred date/time format for your phone. The default format is DD/MM and 24 HOURS. Set Time Format 1. Press the Menu button to enter menu selection. 2. -
Page 24: Set Alarm Tone
Date / Time Settings Date / Time Settings 1. Press the Menu button to enter menu selection. 2. Press the buttons to select CLOCK&ALARM and then press the OK button to select. 3. Press the buttons to select ALARM and then press the OK button to select. 4. -
Page 25: Advanced Set
Advanced Set Advanced Set Change Master PIN The Master PIN is used for registration/un-registration of handsets and for accessing the answering machine remotely. The default Master PIN number is 0000. The maximum length of the Master PIN is 4 digits. If you forget your PIN code, you can reset it to its default 0000 using a handset Reset. - Page 26 Advanced Set Advanced Set When you purchase a telephone, all handsets are already registered to the base unit, so you do not need to register them. Handset registration is only necessary when you buy extra handsets or if a handset has become faulty. They may be different if you want to register another handset model, in which case you should refer to its user guide.
-
Page 27: Reset Unit
Advanced Set Advanced Set Reset Unit You can reset your phone to its default settings with this feature. 1. Press the Menu button to enter menu selection. 2. Press the buttons to select ADVANCED SET and then press the OK button to select. -
Page 28: Change Recall Time
Advanced Set Advanced Set If no detect string (blank) is entered, the prefix number will be automatically added to the pre-dial number after the Talk button is pressed. For numbers starting with * /#, or P, the prefix number will not be added to the Pre-dial number after the Talk button is pressed. Change recall time You may need the R (Flash) button to send a Recall signal (also called Timed Break Recall) if you are connected to a PBX. -
Page 29: Set First Ring
Advanced Set Advanced Set Set First Ring When this function is set to off, the first ring from an incoming call will not sound. This is useful on exchanges where calling line identity is sent after the first ring. 1. Press the Menu button to enter menu selection. 2. - Page 30 Advanced Set Advanced Set English Character Set...
-
Page 31: Hints And Tips
Hints and Tips Hints and Tips ALWAYS check first that: • You have followed all the steps listed in the user manual to install and set up your telephone. • All connectors are firmly inserted in their sockets. • Mains power to the base unit and charging cradle are switched on at the mains socket. •... - Page 32 Hints and Tips Hints and Tips When I key in a number, it appears on the display, but I cannot make an outside call Try a different position for the base unit – somewhere higher if possible, or further from other electrical equipment.
-
Page 33: Intercom And Transfer
Hints and Tips Hints and Tips When I try to make a call, I hear a busy tone If you’re using a multi-handset system, check whether another handset is already on a call. The volume in the earpiece is low when I’m on a call •... -
Page 34: Specification
Specification Specification Operating range Up to 300m outdoors; up to 50m indoors Operating time Standby : 180 hours Talking : 8 hours Battery charge time: 16 hours Temperature range Operating 0 °C to 40 °C Storage -20 °C to 60 °C Electrical power HANDSET –... -
Page 35: Manufacturer Warranty
Manufacturer warranty Manufacturer Warranty On the purchase of your new Gigaset product, we guarantee that this equipment is a genuie manufacturer’s product and extend the following warranty: We guarantee this product against manufacturing defects for 1 year from the date of purchase, unless otherwise. -
Page 36: Service Centres (Midde East)
Service Centres (Midde East) Service Centres (Midde East) Oman Customer Service Hotline UAE National Telephone Services Co. LLC P.O. Box 2786 PC:112, Sultanate of Oman TEL: 00971-4-4458255 / 00971-4-4458254 Tel: +968-709281 Ext. 45/21/75 Service Collection Point Fax: +968-791013 www.technocare-prodigy.com E-mail: isonts@omentel.net.om KARAMA Qatar Sea Shell Electronics... -
Page 37: Khamis Mushyat
Switzerland) depending on national type approval. Country-speci c requirements have been taken into consideration. We, Gigaset Communications GmbH, declare that this device meets the essential requirements and other relevant regulations laid down in Directive 1999/5/EC. A copy of the Declaration of Conformity is available at this Internet address:... -
Page 38: Service Centres (India)
Service Centres (India) Service Centres (India) Ahmedabad (Gujarat) Mumbai - Vikhroli (West) inTarvo Technologies Ltd inTarvo Technologies Ltd Tel No. : +9179-65495391 /+9179-40373514 Tel No. : +91 22 - 40334210 A-6,World Bussiness House, Gala No.03, Samrat Silk Mills Compound, Parimal Cross Road, Near Indus Ind Bank, LBS Marg, Vikhroli (West), Eliss Bridge, Ahmedabad Mumbai - 400079... - Page 39 This device is intended for analogue phone lines outside the European Economic Area (with the exception of Switzerland) depending on national type approval. We, Gigaset Communications GmbH, declare that this device meets the essential requirements and other relevant regulations laid down in Directive 1999/5/EC.
- Page 40 Issued by Gigaset Communications GmbH Frankenstr. 2a, D-46395 Bocholt © Gigaset Communications GmbH 2013 Subject to availability. All rights reserved. Rights of modification reserved. www.gigaset.com 480-30010-000103...
Need help?
Do you have a question about the A450 and is the answer not in the manual?
Questions and answers