
Subscribe to Our Youtube Channel
Related Manuals for Matrix MPS-H-1 Series


Summary of Contents for Matrix MPS-H-1 Series
- Page 1 MPS-H-1 series DC Power Supply User Manual PSIV3600系列可编程直五路 MATRIX TECHNOLOGY INC.
- Page 2 Preface Respected users: Hello! Thank you for purchasing a brand-new MATRIX instrument. In order to use this instrument correctly, please read the full text of this manual carefully before using this instrument, especially the "safety precautions" part. If you have read the full text of this manual, it is recommended that you keep this manual properly and place it with the instrument or put it in a place where you can read it at any time for future use.
- Page 3 Products are protected by patents in China or other countries, including patents that have been obtained or are applying for ● MATRIX TECHNOLOGY INC. reserves the right to change product specifications and prices. ● is a registered trademark of MATRIX TECHNOLOGY INC.
- Page 4 www.szmatrix.com Calibration and calibration statement The company specifically declares that the equipment listed in this manual fully complies with the specifications and characteristics stated in the company's technical specifications. This instrument has been verified by our company before leaving the factory. The verification procedures and steps are in compliance with the specifications and standards of the Electronic Inspection Center.
-
Page 5: Table Of Contents
www.szmatrix.com Contents Chapter 1 Product Introduction ........................ 01 Chapter 2 Technical Specifications ......................02 2.1 Main technical specifications ......................02 2.2 Supplementary features ........................03 Chapter 3 Quick Start 3 ..........................03 3.1 Introduction to the front and rear panels .................. 03 3.2 Pre-check ............................ -
Page 6: Chapter 1 Product Introduction
Chapter 1 Product Introduction MPS-H-1 series DC power supply is a new generation of high-quality linear DC power supply, with remote voltage compensation function, automatic conversion of voltage stabilization and current, high stability, high reliability, high precision, and display output voltage and current at the same time. -
Page 7: Chapter 2 Technical Specifications
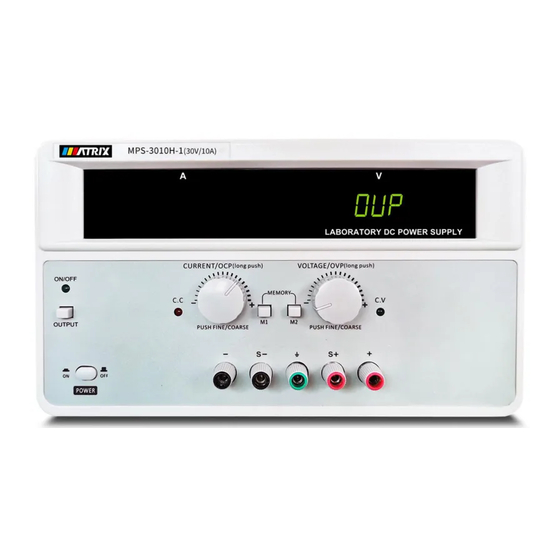
This chapter will briefly introduce the appearance and basic functions of the MPS-H-1 series DC power supply, so that you can quickly get to know the MPS-H-1 series DC power supply. At the same time, it will tell you the basic inspections to be done after getting the power supply to ensure the normal operation of the product. - Page 8 www.szmatrix.com Figure ① Current display window, ② Voltage display window ③ Store/call button 1 ④ Voltage adjustment knob/OVP setting knob ⑤ Constant pressure indicator ⑥ Store/call button 2 ⑦ Positive end of output terminal ⑧ Positive end of remote compensation terminal ⑨...
- Page 9 The rear panel of MPS-H-1 series DC power supply is as shown in the figure below: Figure 3.2 Rear panel of MPS-H-1 series DC power suppl ① Instrument power input socket ② Instrument power input switch ③ Heat dissipation hole USB interface(optional) ④...
-
Page 10: Pre-Check
www.szmatrix.com Pre-check Please follow the steps below to check the power supply to ensure that the power supply can be used normally. 1. Inspection Please check if you have received the following accessories when you receive the power supply. If any are missing, please contact your nearest dealer. -
Page 11: Voltage/Current Setting
www.szmatrix.com Chapter 4 Operation Instructions This chapter will introduce the operation of the front panel of the power supply in detail, divided into the following parts: Voltage/current setting Output on/off operation Introduction to storage/call function Menu setting operation ... - Page 12 www.szmatrix.com ON/OFF state, lightly press "Output switch/menu function button" to exit the menu.) 2. Output status setting at power-on: P-UP ON/OFF (ON means power-on keeps the last output status when power-off, OFF means power-on keeps off, current knob switches menu steps, voltage knob switches ON/OFF status , Tap the "output switch/menu function button"...
- Page 13 www.szmatrix.com 4. Remote compensation function: SENSE ON/OFF (ON means remote compensation is turned on, OFF means remote compensation is turned off, the current knob is used to switch the menu steps, the voltage knob is used to switch the ON/OFF state, and lightly press the "output switch/menu function button" "Exit the menu.) 5.
- Page 14 www.szmatrix.com 7.Current lower limit setting: CUR-L 0.000 (The voltage display window is the lower current limit. Use the current knob to switch the menu steps. Press the voltage knob and the voltage window value flashes. At this time, you can turn the knob left and right to change the lower limit of current, press Turn the knob to change the setting position, and lightly press the "output switch/menu function button"...
- Page 15 www.szmatrix.com 9. Communication address setting: SE8 ADDR 001 (the communication address can be selected from 1-254, use the CH2 voltage knob to turn left and right to modify) 10. Communication baud rate setting: SE9 BAUD 9600 (Baud rate is 4800, 9600, 19200, 38400, 57600, 115200 to choose from, use the CH2 voltage knob to turn left and right to modify)
- Page 16 www.szmatrix.com 11. Communication protocol selection: SE10 PLC SCPI (the communication protocol has two options, SCPI and MODBUS, use the CH2 voltage knob to turn left and right to modify). 12. Communication protocol end character selection: SE11 CEND LF (Communication protocol end character has CR, LF, CRLF, LFCR to choose from, use the CH2 voltage knob to turn left and right to modify).
- Page 17 www.szmatrix.com Long press the current adjustment knob to enter the OCP function setting (as shown in the figure below), at this time, if you want to change the OCP setting value, you can lightly press the current adjustment knob. The current window number corresponding to the current adjustment knob will flash.
- Page 18 www.szmatrix.com OCP protection tips 4. OVP protection: When the output voltage exceeds the OVP setting value, the voltage window will prompt "OVP" and turn off the output (as shown in the figure below). OVP protection tips...
-
Page 19: Introduction To Initialization Function
www.szmatrix.com Introduction to Initialization Function Long press the "output switch/menu function button" to turn on, the power supply will perform factory initialization of the "function menu", the power supply will beep after the initialization is successful, the settings after initialization are as follows: 1. - Page 20 www.szmatrix.com Safety Do not install substitute parts on the instrument by yourself or perform any unauthorized modification. Please send the instrument to our company's maintenance department for repair to ensure that it can be used safely. Please refer to the specific warning or caution information in this manual to avoid personal injury or damage to the instrument.
Need help?
Do you have a question about the MPS-H-1 Series and is the answer not in the manual?
Questions and answers