Table of Contents
Advertisement
Quick Links
Advertisement
Table of Contents

Related Manuals for Alarko OPTIMA


Summary of Contents for Alarko OPTIMA
- Page 1 OPTIMA CIRCULATION PUMP INSTALLATION OPERATING INSTRUCTIONS...
- Page 2 Kod No: A.7.1.7i Publishment Date: 280317 Revision Date: 280317 Bulletin No: 17-1004...
- Page 3 CIRCULATION PUMP INSTALLATION AND OPERATING INSTRUCTIONS...
- Page 5 INDEX 1. CAUTION .....................7 2. WARNINGS AND SYMBOLS ..............7 2.1 Types of Symbols and Warnings ............7 3. GENERAL ....................8 3.1 Description of the Pump ..............8 3.2 Applications (Intended Use) ............9 3.3 Pumped Liquids ................9 3.4 Operating Conditions ..............9 3.5 Insulation Shells ................10 4. CONTENTS OF THE PACKAGE, LIFTING, TRANSPORTATION AND STORAGE ..10 4.1 Contents of the Package ..............10 4.2 Lifting ...................10 4.3 Transportation and Storage ............11 5. PUMP DETAILS ..................11 5.1 Nameplate Data ................11 5.2 Technical Data ................12 5.3 Parallel/Back-up Operation ............13 6.
- Page 6 7.2 Service Info ..................24 7.3 Language ..................25 8. FIRST START-UP, CONTINUOUS OPERATION AND SHUTDOWN ..25 9. OPERATING MODES AND SELECTION CRITERIA .........27 9.1 Manual Operating Mode ...............28 9.2 Constant Pressure Operating Mode ..........28 9.3 Variable Pressure Operating Mode ..........29 9.4 Operating Mode Selection Criteria ..........31 10. WARRANTY, MAINTENANCE AND SERVICE ........32 11. FAULTS, CAUSES AND REMEDIES ............32 12. DISMANTLING ..................35 13. DISPOSAL ....................36 14. APPENDIX ....................37...
-
Page 7: Warnings And Symbols
Read this manual carefully. The information given here comprises essential issues which is required for the pump operators or users. CAUTION! If you need any information later on, please refer to this manual The manufacturer of the Optima pumps, Alarko-Carrier, provides customer service and retailing operations on the fields of heating, cooling, ventilation, water treatment and pressurization nationwide with its 60 years of experience. Please contact your authorized Alarko-Carrier customer service if you need any information or encounter a problem. -
Page 8: Description Of The Pump
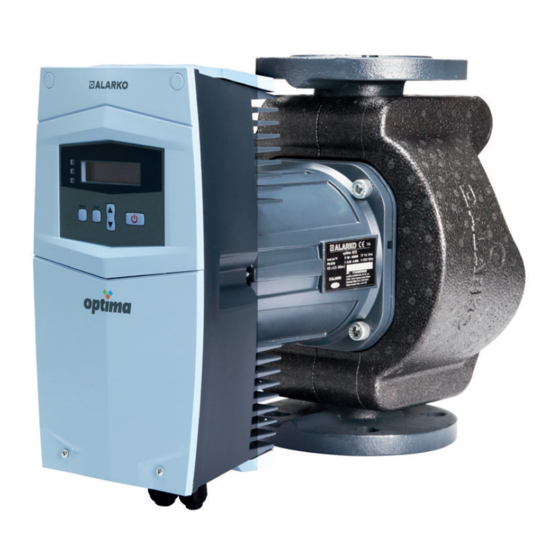
3. GENERAL 3.1 Description of the Pump Alarko Optima is a brand new type of circulation pump which regulates its speed according to the system needs by the ECM (Electronic Commutated Motor) technology and the controller on it, as well as saves energy with its various types of operating mode choices. The operating modes are manual, constant pressure and variable pressure. See section 7.1 and 9. The pump operates according to the operating mode and head settings which are set from the controller. -
Page 9: Pumped Liquids
3.2 Applications (Intended Use) Alarko Optima pumps are developed for the circulation and pressurization of the water flowing in the heating and air conditioning systems located in the residential, commercial and industrial establishments CAUTION! Optima pumps can be used only for the purposes that are stated in this manual. The manufacturer and the dealer are not responsible for the results of the misuse. 3.3 Pumped Liquids As the liquid, only water should be used. It should be free from solid particles and is not mixed with any additives, e.g. anti-freeze. To avoid any kind of scaling... -
Page 10: Insulation Shells
3.5 Insulation Shells The insulation shell is designed to mitigate the thermal losses in heating systems and delivered with the pump. It is made of polypropylene foam and thoroughly mounted on the pump by its perfectly fitting design. Remove the insulation shells from the housing before the pump installation. See Figure 3.2. Figure 3.2: Insulation shells 4. CONTENTS OF THE PACKAGE, LIFTING, TRANSPORTATI- ON AND STORAGE 4.1 Contents of the Package The package contains the following: • Pump • Insulation shells • Manual • Certificate of Warranty • 2 pieces of gasket • 1 pieces of O-ring CAUTION! Do not throw away the insulation shells. 4.2 Lifting Ambient Temperature during the Transportation and Storage: -25°C to +40°C. -
Page 11: Transportation And Storage
4.3 Transportation and Storage Ambient Temperature during the Transportation and Storage: -25°C to +40°C. The pump should be protected from moisture, impacts and frost during the transport and storage. CAUTION! Improper transportation or storage may lead to damage to the product. It is advised to check and examine the product whether it is the ordered type and delivered undamaged. If the pump is damaged or deformed, it should not be used without an approval of the Alarko-Carrier customer services. 5. PUMP DETAILS 5.1 Nameplate Data The information given in the nameplate is shown below: Figure 5.1: Sample of a Nameplate... -
Page 12: Technical Data
Table 5.1: Description of the Nameplate Data 5.2 Technical Data < 56 dB (A) (depending on the type) There are different pumps for each pressure values. The pump is suitable for both pressure values. (2) These values are declared by Alarko-Carrier for heating systems. Table 5.2: Technical Data... -
Page 13: Pump Installation
In order to avoid the noise and damage due to the cavitation, the minimum inlet pressure values are given on the table below. Table 5.3: Minimum Inlet Water Pressure Values 5.3 Parallel/Back-up Operation When installing more than one pump for back-up or parallel operation, a check valve must be connected for each pump. 6. PUMP INSTALLATION Mechanical and electrical installation must be carried out by qualified personnel and in accordance with the instructions on this manual and also with applicable regulations. CAUTION! Before any installation, the pipework should be checked for contamination and flushed if there is any. 6.1 Positioning The pump should be installed into the pipework without any strain or bearing the weight of the pipework. The figures given below are to be taken into consideration during the installa- tion. - Page 14 The motor shaft must be parallel to the ground. Figure 6.1: Correct Pump Positions While Vertically and Horizontally Installed to the Pipework The pump must be not perpendicular to the ground. Figure 6.2: Incorrect Pump Positions...
-
Page 15: Mechanical Installation
The position of the control box can be changed in order to see and use the display easier. To adjust the position, the 4 bolts, which hook the motor housing and pump housing together, are removed and the motor housing is adjusted by rotating it to the appropriate one from the allowed positions and reconnected to the pump housing with bolts. Do not separate the motor housing from pump housing. Rotation process should be done carefully and slowly. Seal damage causes leakage. Figure 5.3: Control Box Position Adjustment 6.2 Mechanical Installation 1. Make sure that all the piping of the system must be done before beginning the installation. - Page 16 7. Check the Figure 6.4 for washer, bolt and nut order. See Table 6.1 for the recommended tightening torques for the bolts used in the pump fixing. Figure 6.4: The Order of the Washer, Bolt and Nuts Table 6.1: Recommended Tightening Torque Values 8. After completing the connection, open the isolating valves of inlet and outlet sides and check if there is any leaking. 9. Make sure that the four condensate drain grooves around the pump are open. See Figure 6.5.
- Page 17 Figure 6.5: Condensate Drain Grooves 10. After the installation is completed, place the insulation shells as shown in Figure 6.6. Figure 6.6: Placing the Insulation Shells...
-
Page 18: Filling And Venting
6.3 Filling and Venting In order to ensure the pump to operate efficiently also without any damage and noise, the air in the system must be vented and the system pressure must be between the values given in Table 5.2 and Table 5.3. To fully vent the air from the system, the pump can be run for a while. Air venting should not be done by loosening any bolts of motor or pump housing. 6.4 Cable/Fuse Selection and Electrical Installation Electrical installation must be carried out by qualified person- nel and in accordance with the instructions on this manual and also with applicable regulations. Before working on the pump, all poles of the power supply must be disconnected. The mains connection must have an earthing system. If not, the pump should not be run. - Page 19 Electrical connection diagram is given at Figure 6.7: Figure 6.7: Electrical Connection Diagram 1. Check the phase and neutral outlets of the mains. 2. Attach cable ferrules to the cable tips appropriate to the cable diameter. 3. Take out the cover of the cable gland. 4. Remove the screws of the bottom cover. See Figure 6.8. Figure 6.8: Removal of the Bottom Cover...
- Page 20 5. Pull the power supply cable through the no.1 cable gland shown in Figure 6.9. Figure 6.9: Cable Gland View 6. Connect the power supply cables to the socket named as “A” in Figure 6.9 appropriately, as shown in Figure 6.7. 7. Tighten the cable gland and make sure that the connection side of the cable is loose enough. 8. Refit the cover. See Figure 6.10. Figure 6.10: Refitting the Bottom Cover...
-
Page 21: Display And Settings
The power cable should not be in contact with the pump or pipeline. The voltage value of the mains must be in between the limits given in Table 5.2. It is recommended to use a residual-current device (RCD) to protect the user and the pump. The RCD should be chosen according to the nominal voltage and current of the pump and it should be able to trip on high frequency leakages (type B) (The tripping current should be lower than 3.5mA according to the EN 60335). 7. DISPLAY AND SETTINGS The display of the Optima pumps has two text rows, three LEDs and five control buttons. See Figure 7.1. Figure 7.1: Control Display Layout... - Page 22 The control display shows the information about the pump status and allows the user to set the desired mode to operation. The layout of the buttons and display: Two row OLED Display Remote Control LED (YELLOW) Fault LED (RED): It is on when there is a fault. Power LED (GREEN): It is on as long as the power is on. “MENU” Button: To navigate through the menu and save the settings. “Back” Button “Down” Button “Up” Button “POWER” Button: To start and stop the pump. The main menu is shown below: It is navigated through the submenus with “MENU” button. Submenus are: • Operating Mode • Service Info • Language To go to the submenus, navigate through the menu with the “>” sign by “Up” and “Down” buttons and press “MENU” button.
-
Page 23: Manual Operating Mode
7.1 Operating Modes After selecting the “Operating Mode”, the display is shown below. In this submenu, there are three different operating modes. To select an operating mode, the “MENU” button is pressed. The detailed performance curves of different operating modes are given in Appendix. See Section 9 for explanation and selection criteria for the operating modes. 7.1.1 Manual Operating Mode After selecting the “Operating Mode”, the display is shown below. The desired speed is modified by “Up” and “Down” buttons with 50 rpm intervals. The speed is saved with pressing “MENU” button for two seconds. The image above is shown when the selected speed is saved. Pressing “Back” button navigates the user to the upper menu. The image below is shown when manual mode is selected: 7.1.2 Constant Pressure Operating Mode The desired head is modified by “Up” and “Down” buttons with 0.5m intervals. -
Page 24: Service Info
The image above is shown when the selected head is saved. Pressing “Back” button navigates the user to the upper menu. The image below is shown when constant pressure mode is selected: 7.1.3 Variable Pressure Operating Mode The desired head is modified by “Up” and “Down” buttons with 0.5m intervals. The head is saved with pressing “MENU” button for two seconds. The image above is shown when the selected head is saved. Pressing “Back” button navigates the user to the upper menu. The image below is shown when constant pressure mode is selected: 7.2 Service Info... - Page 25 In this submenu, the errors and warnings which occur in the pump are shown. Refer to the Section 11 for fault handling. The symbol in front of the fault shows the description of the fault: • “ ! “ exclamation point indicates that the pump is still in error state. In this state pump does not run. • “A” letter indicates that a fault was occurred and the pump resumed automatically after 5 minutes standby. An example for an error is given below: 7.3 Language In this option, there are languages choices which are used in the pump. The desired language is modified by “Up” and “Down” buttons. To save the language, “MENU” button is pressed for two seconds.
- Page 26 • Fill the system with water in minimum pressure and vent the air. For minimum pressure values see Table 5.3. • Check the voltage values of the mains and compare with Table 5.2. • Switch on the power to the pump. • At first start-up the display is shown below: • After one second: • After one second minimum speed at manual mode is set for commissioning. • Press “POWER” button to start the pump. To change the operating mode or speed / head, see Section 7. • The display goes into the sleep mode after 15 minutes if the buttons are not pressed. Meanwhile, the pump continues to operate. The main menu is shown by pressing any button. • In case of a power outage, the pump saves its last operating mode settings and resumes operating with those settings.
- Page 27 9. OPERATING MODES AND SELECTION CRITERIA Optima circulation pumps save energy with its various types of operating mode choices, which they track the curves of system needs by the ECM technology. Flow Q (m³/h) Figure 9.1: Optima Operating Modes When the flow decreases (the operating point shifts to the left); - the head increases in manual mode. - the speed decreases and the head remains stable in constant pressure mode. - the speed decreases and the head declines linearly until the half value of the selected head.
- Page 28 9.1 Manual Operating Mode H H H H H H Figure 9.2: The curve of the Manual Mode In this operating mode, the pump sets its speed fixed on the selected rpm. The speed is set by 50 rpm intervals. Flow Q (m³/h) Q Q Q Q Q Q 9.2 Constant Pressure Operating Mode H H H H H H H H H H Flow Q (m³/h)
- Page 29 7.5m B noktası C noktası D noktası Figure 9.4: Example of the Constant Pressure Mode Şekil 9.4: Sabit Basınç Çalışma Modu Örneği 9.3 Variable Pressure Operating Mode 9.3 Değişken Basınç Çalışma Modu H H H H H H H H H H ayar ayar Flow Q (m³/h) Q Q Q Q Q Q Figure 9.5: The curve of the Variable Pressure Mode...
- Page 30 • If the head is not a multiple of 0.5, the closest value is selected as H In the following graph, the curves of the operating modes are drawn with 1 meter intervals. The head can be set by 0.5m intervals on the display. According to the rule given above: • A is set at 8.5m • B is set at 8.5m • C is set at 9m • D is set at 9m The figure below is given as an example: Figure 9.6: Example of the Variable Pressure Mode...
- Page 31 9.4 Operating Mode Selection Criteria The selection of the operating modes is based on the criteria which are given below: H H H H H H H H H H Flow Q (m³/h) Flow Q (m³/h) Q Q Q Q Q Q Table 9.1: Operating Mode Selection Criteria...
-
Page 32: Warranty, Maintenance And Service
10. Warranty, Maintenance and Service Providing that the warnings, mounting and usage principals stated in this manual are applied, Alarko Optima Pumps are warranted to be free from defects in materials and manufacturing workmanship under normal use and service for a period of 2 (two) years. The malfunctions due to the imbalances in the electrical supply are outside of the scope of warranty. Warranty document will be filled by Alarko Carrier Authorized Seller where the user purchased the product and one sheet of the document will be given to the user. In warranty period, the warranty document must be saved and must be shown to the Alarko Carrier Authorized Service if necessary. The lifespan specified by the Ministry of Science, Industry and Technology for those products is 10 (ten) years. According to the related rules, manufacturing and seller companies commit to serve and supply spare parts for the product in this warranty period. Optima pumps do not need any special maintenance since the shaft and bearings rotate in water. - Page 33 Bulletin # 13-0919 Error or Warning Code&No Cause Remedy The software and hardware are not Error: 01 Request customer service. compatible Error: 02 Hardware error Request customer service. Error: 03 The motor is not connected Request customer service. Error: 04 Motor temperature sensor error Request customer service.
- Page 34 The fault flowchart of the pump is given below: Figure 11.1: Fault Flowchart...
- Page 35 12. DISMANTLING Dismantling of the pump must be carried out by qualified personnel and in accordance with the instructions on this manual and also with applicable regulations. Before dismantling, switch off the power supply. All dismantling process must be done while the power is OFF. Wait until the display is completely turned off. If the temperature of the system water is high, wait until the water is cooled off or drain the water cautiously. Take the warnings and instructions in Section 4.2 and 6 into consideration while dismantling. In the pump dismantling process, in cases where the motor body is separated from the pump body, the O-ring between the motor body and the pump body should be replaced with a new one. There is one spare O-ring in the packaging box. Dismantling of the rotor from the pump motor must only be done by technical staff, since the rotor has very powerful magnets mounted on it. Otherwise, it may cause injuries.
- Page 36 13. DISPOSAL For the disposal of the pump, authorized technical services or related recycling facilities can be used. Warnings and cautions in Section 11 must be taken into consideration while dismantling the pump. Disposal of the pump or pump parts must be performed considering the environmental impact and in accordance with the related regulations.
- Page 37 14. APPENDIX Dimension Table...
- Page 38 Pump Selection Curves...
-
Page 39: Performance Curves
Performance Curves Variable Pressure Operating Mode Constant Pressure Operating Mode Manual Operating Mode... - Page 40 4/12 Variable Pressure Operating Mode Constant Pressure Operating Mode Manual Operating Mode...
- Page 41 Variable Pressure Operating Mode Constant Pressure Operating Mode Manual Operating Mode...
- Page 42 Variable Pressure Operating Mode Constant Pressure Operating Mode Manual Operating Mode...
- Page 43 5/12 Variable Pressure Operating Mode Constant Pressure Operating Mode Manual Operating Mode...
- Page 44 6/12 Variable Pressure Operating Mode Constant Pressure Operating Mode Manual Operating Mode...
- Page 45 8/12 Variable Pressure Operating Mode Constant Pressure Operating Mode Manual Operating Mode...
- Page 48 İSTANBUL : Gebze Org. San. Bölgesi, Ş. Bilgisu Cad. 41480 Gebze-KOCAELİ TÜRKİYE Phone: (0262) 648 60 00 - Fax: (0262) 648 60 08 ANKARA : Sedat Simavi Sok. No: 48, 06550 Çankaya - ANKARA TÜRKİYE Phone: (0312) 409 52 00 - Fax: (0312) 440 79 30 İZMİR : Şehit Fethibey Cad. No:55, Kat:13, 35210 Pasaport - İZMİR TÜRKİYE Phone: (0232) 483 25 60 - Fax: (0232) 441 55 13 ADANA : Ziyapaşa Bulvarı Çelik Ap. No : 25/5-6, 01130 ADANA TÜRKİYE Phone (0322) 457 62 23 - Fax: (0322) 453 05 84 ANTALYA : Mehmetçik Mahallesi Aspendos Bulvarı No: 79/5 - ANTALYA TÜRKİYE web: www.alarko-carrier.com.tr Phone: (0242) 322 00 29 - Fax: (0242) 322 87 66 e-mail: info@alarko-carrier.com.tr : 444 0 128...
Need help?
Do you have a question about the OPTIMA and is the answer not in the manual?
Questions and answers