Table of Contents
Advertisement
Available languages
Available languages
Quick Links
Advertisement
Table of Contents

Related Manuals for YORKVILLE PARALINE Series


Summary of Contents for YORKVILLE PARALINE Series
- Page 1 Cover PSA1RIGKIT Installation Manual Manuel d’Installation PSA1RIGKIT Pre-2012...
-
Page 2: Table Of Contents
Table of Contents Cover ....................a Table of Contents ................i PSA1RIGKIT Installation ..............ii 1. Removing Amp Module ............. ii 2. Disconnecting Amplifier Module ..........ii 3. Preparing Enclosures for Brackets ........... 1 4. The Array ................... 1 5. Positioning and Aligning the Brackets ........1 6. -
Page 3: Psa1Rigkit Installation
PSA1RIGKIT Installation This is a step-by-step guide describing how to assemble your PSA1 rig for fixed installations. A Philips screwdriver and a C-wrench (or a right- angle impact-driver) will be needed to complete this assembly. The PSA1RIGKIT includes all the hardware required to install the kit on one PSA1. -
Page 4: Preparing Enclosures For Brackets
3. Preparing Enclosures for Brackets To make it easier to remove the handle, position the PSA1 on its side. Insert the screwdriver on each screw while holding the corresponding hex nut (found inside the PSA1) with your C-Wrench. The hex nuts can be accessed without removing the foam on the inside of the enclosure. -
Page 5: Installing The Brackets
6. Installing the Brackets Start from the upper-most enclosure and loosely position the brackets in place of the handles*, use the bolts to help alignment - do not tighten until positioned correctly. Work from highest to the lowest in the array. The installed brackets protrude on the TOP SIDE of the enclosures and mount onto the enclosure ‘above.’... -
Page 6: Flying The Array
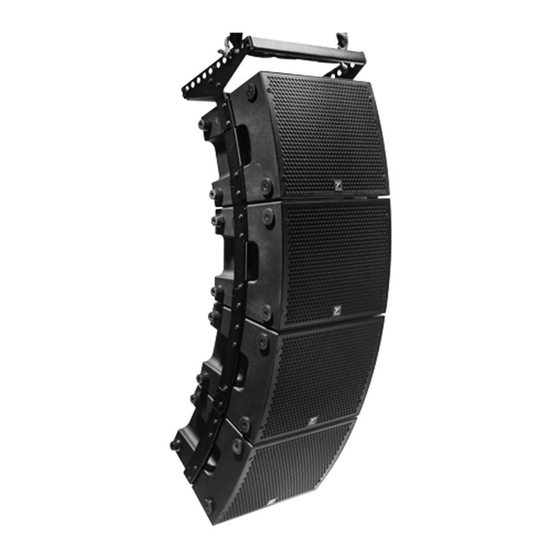
Here’s an example of four PSA1 cabinets safely integrated together with four PSA1RIGKITS and one PSA1FRAMEKIT2. The 10 pickup point was chosen to represent the most extreme down-tilt you can get with this system If you have any questions please contact Yorkville Support directly at support@yorkville.com... -
Page 7: Psa1Rigkit Installation
PSA1RIGKIT Installation Ceci est un guide étape par étape décrivant comment assembler votre ensemble PSA1 pour les installations fixes. Un tournevis cruciforme et une clé en C (ou un tournevis à percussion à angle droit) seront nécessaires pour compléter cet ensemble. Le PSA1RIGKIT comprend tout le matériel nécessaire pour installer le kit sur une PSA1. -
Page 8: Préparation Des Enceintes Pour Les Supports
3. Préparation des Enceintes pour les Supports Pour démonter plus facilement la poignée, positionner la PSA1 sur son côté. Insérez le tournevis dans cha- cune des vis tout en maintenant l’écrou hexagonal correspondant (qui se trouve à l’intérieur du PSA1) avec votre Clé... -
Page 9: Installation Des Supports
6. Installation des Supports Débutez avec l’enceinte supérieure et monter en place, sans trop serrer, les supports à la place des poignées. Utiliser les boulons pour bien aligner - ne pas serrer jusqu’à ce que positionnée correctement. Procédez de l’enceinte supérieure vers l’enceinte inferieure de l’ensemble. Les supports installés dépassent sur le côté su- périeur des enceintes et sont fixés à... -
Page 10: Réinstallez Les Module Amplificateurs
Voici un exemple de quatre enceintes PSA1 intégrées en toute sécurité avec quatre PSA1RIGKITS et un PSA1FRAMEKIT2. Le 10e point de suspension a été choisi pour représenter l’inclinaison vers les bas la plus ex- trême que vous pouvez obtenir avec ce système. Si vous avez des questions, veuillez contacter Assistance Yorkville directement à support@yorkville.com... -
Page 11: Warranty - English / Français
Unlimited Warranty Yorkville's two and ten-year unlimited warranty on this product is transferable and does not require registration with Yorkville Sound or your dealer. If this product should fail for any reason within two years of the original purchase date (ten years for the wooden enclosure), simply return it to your Yorkville dealer with original proof of purchase and it will be repaired free of charge. -
Page 12: Rear Page
WORLD HEADQUARTERS CANADA U.S.A. Yorkville Sound Limited Yorkville Sound Inc. 550 Granite Court 4625 Witmer Industrial Estate Pickering, Ontario Niagara Falls, New York L1W 3Y8 CANADA 14305, USA Voice: 905-837-8481 Voice: 716-297-2920 Fax: 905-837-8746 Fax: 716-297-3689 Manual-Owners-PSA1RIGKIT-pre-2012-00-1v3 • September 13, 2022...
Need help?
Do you have a question about the PARALINE Series and is the answer not in the manual?
Questions and answers