Table of Contents
Advertisement
Quick Links
Advertisement
Table of Contents

Related Manuals for TESTO 316i


Summary of Contents for TESTO 316i
- Page 1 316i gas leak detector 0560 3161 Instruction manual...
-
Page 3: Table Of Contents
® Establishing a Bluetooth connection ............. 8 ® 6.3.1 Establishing a Bluetooth connection to the testo Smart App ....9 Using the product ................. 9 Controls ....................9 7.1.1 Implementing settings ................11 Carrying out a function test ..............13 Carrying out gas detection .............. -
Page 5: About This Document
Only perform maintenance and repair work on this instrument that is described in this documentation. Follow the prescribed steps exactly when doing the work. Use only original spare parts from Testo. Batteries Improper use of batteries may cause the batteries to be destroyed, or lead to injury due to current surges, fire or escaping chemicals. -
Page 6: Disposal
At the end of its useful life, deliver the product to the separate collection point for electric and electronic devices (observe local regulations) or return the product to Testo for disposal. WEEE Reg. No. DE 75334352... -
Page 7: Product-Specific Information
Do not allow the sensor to come into contact with moisture or acids, as it will react cross-sensitively. 4 Intended use The testo 316i is a gas leak detector for the short-term detection of leaks in gas systems. The following substances can be detected: ... -
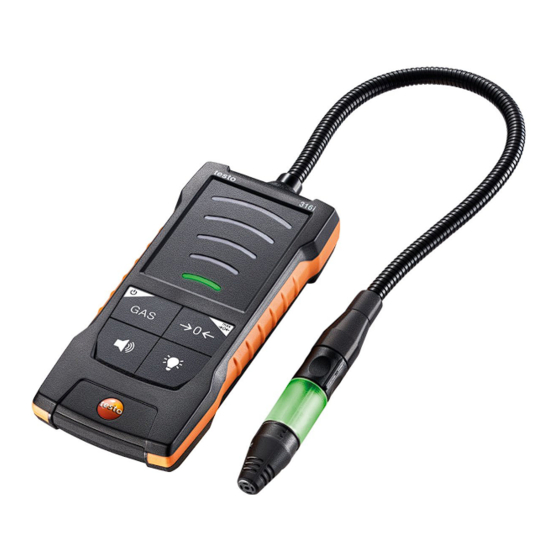
Page 8: Product Description
5 Product description 5 Product description Instrument overview 1 Sensor head with gas sensor 2 Sensor LED Visualization of gas 3 Flexible sensor tube concentration 5 Control keys 6 Battery compartment (on rear) Symbol explanation Do not allow children under 6 years of age to play with batteries. Do not throw batteries in the trash. -
Page 9: First Steps
6 First steps 6 First steps Inserting/changing batteries The instrument is switched off. Open the battery compartment (on the back of the instrument) via the snap lock. Insert batteries/rechargeable batteries (pay attention to the polarity!). Close the battery compartment. When not in use for a long period: Take out the (rechargeable) batteries. -
Page 10: Establishing A Bluetooth Connection
1st red LED on the bar display light up, sensor LED is off. ® Establishing a Bluetooth connection The instrument can be connected to the testo Smart App via ® Bluetooth connection. The gas leak detector is switched on. -
Page 11: Establishing A Bluetooth Connection To The Testo Smart App
If necessary, switch the instrument to be connected off and on again to restart the connection mode. 7 Using the product The gas leak detector can be used in conjunction with the testo Smart App. Controls The instrument is switched on. - Page 12 7 Using the product Sound On/Off LED bar for visualizing the gas concentration ->0<- / max ->0<- Illumination Additional symbols on the user interface of the app (not numbered) One level back Exit view Share measurement data/report Searching Favourite Deleting Further information Display report Multiple selection...
-
Page 13: Implementing Settings
7 Using the product Sensors Settings Help and Information Other applications 7.1.1 Implementing settings Selecting, opening and setting functions Press the relevant key to select the functions Secondary assignment (long press) All keys with a white corner have a secondary assignment, which can be selected by pressing and holding the key (1 sec). - Page 14 7 Using the product Function Setting options/comments On/Off (long press) Switches the instrument on or off Measurement parameter Cycle through CH (methane), C (propane), C (butane) or H (hydrogen) Sensor LED Switch the LED on the sensor head off or on Alarm sound ON (acoustic alarm on) or OFF (acoustic alarm off).
-
Page 15: Carrying Out A Function Test
7 Using the product Function Setting options/comments Zeroing Zero current reading, up to 250 ppm can be suppressed. Carrying out a function test Apply low-concentration gas to the sensor (max. 10 sec). If the sensor does not respond (no alarm), the instrument is defective and must no longer be used. - Page 16 After switching on the instrument, the process of cycling through starts with methane (CH The testo Smart App shows which gas is currently selected. The gas type can be changed both via the instrument and the app. Carrying out the measurement Move the sensor head as close as possible and at low speed (approx.
-
Page 17: Maintaining The Product
Cleaning the sensor. Regular inspection Testo recommends having the gas leak detector inspected by an authorized service centre every year. Cleaning the sensor Tobacco smoke, dirty air, oils, greases, silicones and evaporating liquids or gases can leave deposits on the sensor surface. -
Page 18: Technical Data For Testo 316I
If the instrument is used infrequently, deposits may build up on the sensor. Switching the instrument on prevents these deposits from building up on the sensor. Testo recommends switching the instrument on regularly to avoid deposits building up on the sensor. -
Page 19: Tips And Assistance
You can find up-to-date information on products, downloads and links to contact addresses for support queries on the Testo website at: www.testo.com. If you have any questions please contact your local dealer or the Testo Customer Service. You can find contact details on the back of this document or... - Page 20 Testo SE & Co. KGaA Celsiusstr. 1 79822 Titisee-Neustadt Germany Phone: +49 (0)7653 681-0 Email: info@testo.de www.testo.com 0970 3261 en 01 - 08.2022...
Need help?
Do you have a question about the 316i and is the answer not in the manual?
Questions and answers