TESTO 316-1 Instruction Manual
Gas leak detector
Hide thumbs
Also See for 316-1:
- Instruction manual (2 pages) ,
- Instruction manual (2 pages) ,
- Instruction manual (2 pages)
Table of Contents
Advertisement
Quick Links
Advertisement
Table of Contents

Subscribe to Our Youtube Channel
Related Manuals for TESTO 316-1


Summary of Contents for TESTO 316-1
- Page 1 316-1 gas leak detector 0560 3162 Instruction manual...
-
Page 3: Table Of Contents
Carrying out gas detection ..............11 Maintaining the product ..............13 Changing batteries ................13 Cleaning the instrument ............... 13 Cleaning the sensor ................14 Technical data testo 316-1 ..............14 Tips and assistance ................15 10.1 Questions and answers ................ 15 10.2 Error codes ................... -
Page 5: About This Document
Only perform maintenance and repair work on this instrument that is described in this documentation. Follow the prescribed steps exactly when doing the work. Use only original spare parts from Testo. Batteries Improper use of batteries may cause the batteries to be destroyed, or lead to injury due to current surges, fire or escaping chemicals. -
Page 6: Disposal
At the end of its useful life, deliver the product to the separate collection point for electric and electronic devices (observe local regulations) or return the product to Testo for disposal. WEEE Reg. No. DE 75334352 3 Product-specific information ... -
Page 7: Intended Use
Do not allow the sensor to come into contact with moisture or acids, as it will react cross-sensitively. 4 Intended use The testo 316-1 is a gas leak detector for the short-term detection of leaks in gas systems. The following substances can be detected: ... -
Page 8: Product Description
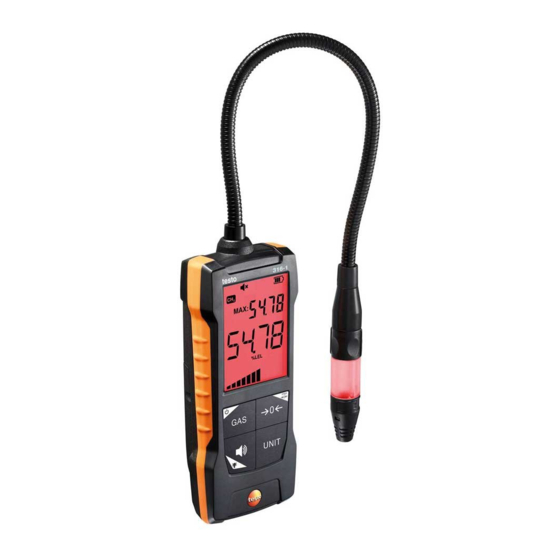
5 Product description 5 Product description Instrument overview 1 Sensor head with gas sensor 2 Sensor LED 3 Flexible sensor tube 4 Display 5 Control keys 6 Battery compartment (on rear) Symbol explanation Do not allow children under 6 years of age to play with batteries. Do not throw batteries in the trash. -
Page 9: First Steps
6 First steps 6 First steps Inserting/changing batteries The instrument is switched off. Open the battery compartment (on the back of the instrument) via the snap lock. Insert batteries/rechargeable batteries (pay attention to the polarity!). Close the battery compartment. When not in use for a long period: Take out the (rechargeable) batteries. -
Page 10: Using The Product
7 Using the product Following the warm-up period, the measurement view is displayed. Self-cleaning (CLN) If the sensor is dirty, the warm-up phase is followed by the sensor cleaning phase. This usually happens when the instrument has not been used for several days. -
Page 11: Implementing Settings
7 Using the product Sound Illumination On/Off Bar display Measurement parameter Display for alarm signal, battery Maximum measured value Current measured value Unit of value ->0<- / max ->0<- unit 7.1.1 Implementing settings Selecting, opening and setting functions Press the relevant key to select the functions Secondary assignment (long press) All keys with a white corner have a secondary assignment, which can be selected by pressing and holding the key (1 sec). - Page 12 7 Using the product Function Setting options/comments On/Off (long press) Switches the instrument on or off Measurement parameter Cycle through CH (methane), C (propane), C (butane) or H (hydrogen) Display illumination (long press) OFF (display illumination not active) or ON (display illumination active) Alarm sound ON (acoustic alarm on) or OFF (acoustic alarm off).
-
Page 13: Carrying Out A Function Test
7 Using the product Function Setting options/comments Max. zeroing (long press) Zero maximum reading Zeroing Zero current reading, up to 250 ppm can be suppressed. Symbolized by an arrow pointing downwards on the display. Carrying out a function test Apply low-concentration gas to the sensor (max. 10 sec). ... - Page 14 7 Using the product Methane (main component of natural gas) or hydrogen are lighter than air, detection should be carried out above the pipe / suspected leak. Testing propane and butane gas lines: Propane and butane are heavier than air, detection should be carried out below the pipe / suspected leak, starting from the bottom and working upwards.
-
Page 15: Maintaining The Product
8 Maintaining the product Carrying out manual zeroing The zero point can only be set manually if the currently detected gas concentration is below the max. 250 ppm (max. 250 ppm can be suppressed). For example: 150 ppm (≤ 250 ppm): are completely suppressed (display: 0 ppm) ... -
Page 16: Cleaning The Sensor
Cleaning the sensor. Regular inspection Testo recommends having the gas leak detector inspected by an authorized service centre every year. Cleaning the sensor Tobacco smoke, dirty air, oils, greases, silicones and evaporating liquids or gases can leave deposits on the sensor surface. -
Page 17: Tips And Assistance
10 Tips and assistance Feature Value Leak alarm 3-color LED on sensor head 3-color display backlighting Acoustic -4 to 122 °F (-20 to +50 °C) Operating temperature Operating humidity 0 to 80 %RH ≤ 6,562 ft (2,000 m) Operating altitude -4 to 122 °F (-20 to +50 °C) Storage temperature Battery type... -
Page 18: Hard Reset
You can find up-to-date information on products, downloads and links to contact addresses for support queries on the Testo website at: www.testo.com. If you have any questions please contact your local dealer or the Testo Customer Service. You can find contact details on the back of this document or... - Page 20 Testo North America 40 White Lake Road Sparta, NJ 07871 United States Phone: 1-800-227-0729 Email: info@testo.com www.testo.com 0970 3262 en 01 - 08.2022...
Need help?
Do you have a question about the 316-1 and is the answer not in the manual?
Questions and answers