Table of Contents
Advertisement
Quick Links
Advertisement
Table of Contents

Related Manuals for Modsel Contour Multi-X Electric


Summary of Contents for Modsel Contour Multi-X Electric
- Page 1 Contour Multi-X Electric User Guide...
- Page 2 Contour Multi-X Electric User Guide Thank you for placing your confidence in our Stretchers. They have been engineered from quality materials and hand-made with care to fulfil the requirements of the healthcare industry. Your stretcher will give years of trouble-free service if used and cared for in accordance with our directions.
-
Page 3: Product Overview
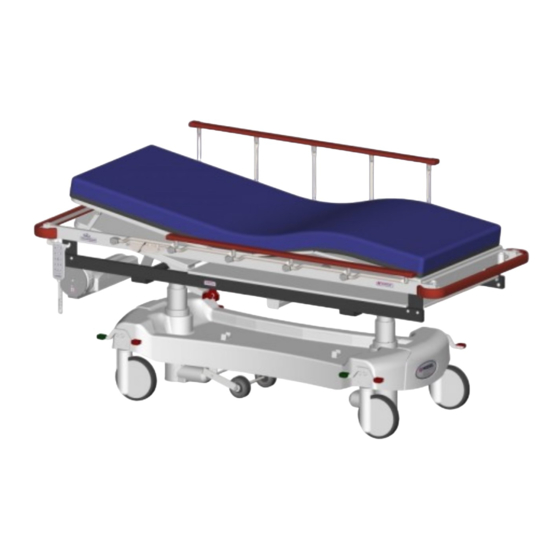
Product Overview Overall Size: 2135 x 815mm overall size (705mm narrow or 965mm wide top options) Height Range: 545 - 915mm SWL: 300kg v-14092022 - Page 3 "Trusted products made for trusted professionals"... -
Page 4: Product Warnings
Product Warnings Patient/Staff Safety Patients, especially children must not be left unattended on or with a stretcher at any time. Care must be taken in the operation of all moving parts and accessories to minimise risk of injury to staff or patients. This stretcher is not suitable for use as a ward bed. - Page 5 Mattress This stretcher is specifically designed for use in conjunction with a Modsel Protran, Premia or Premia Forte mattress. This stretcher mattress provides only a low level of cushioning and insulation, elderly, frail and other individuals may be particularly susceptible to temperature and/or pressure related injury in some healthcare environments;...
-
Page 6: Safe Operation
PATIENT SAFETY REQUIRES THAT YOU ALWAYS CHECK THE MATTRESS BEFORE USE. A Modsel Protran, Premia or Premia Forte mattress is specifically designed for use in conjunction with Modsel Contour stretcher models. The edges should align well with the sides of the stretcher, with no more than a 1cm gap between the edges in any direction. - Page 7 Steer / Brake System To steer the stretcher Press one of the corner GREEN pedals on the base down fully to activate steering. Press the opposite RED pedal back to the horizontal (neutral) position to disengage steering. There are variety of ways stretcher steering is controlled while moving. These may include the option of a corner castor locked into a straight position or as standard a 5th (center) steer wheel pressured onto the floor.
- Page 8 Dropsides To operate the dropsides There are varying styles of dropside, the most common being 5 vertical risers and custom options of 7 or 16 risers. To release, lift the dropside lock tab and then lower the dropside. Ensure the dropside is supported to control speed of lowering.
- Page 9 Power Assisted Electric Operation To operate the backrest Press the UPWARD facing arrow labeled 'BACK' on the handset to raise. Press the DOWNWARD facing arrow to lower. Always check that all fingers, hands, limbs or x-ray cassette components are clear before lowering backrest.
- Page 10 Emergency Backrest Release (CPR) To lower the backrest Pull the red knob on either side of the stretcher outwards to release. Ensure that the backrest is supported by a staff member each side before using the quick release. Always check that all fingers, hands, limbs or x-ray cassette components are clear before lowering backrest.
-
Page 11: Battery Care
Battery Care To remove / install the battery To remove the battery, squeeze the lever under the end of the battery to release the lock and then pull away from the control box interface connection, allowing the battery to continue resting on its slide support. -
Page 12: Main Power Cable
Main Power Cable To use the power cable It is recommended that the stretcher should be operated while powered via a standard 240V outlet. There is a battery backup to allow stretcher operation whilst unplugged. ALWAYS ENSURE THE POWER LEAD IS UNPLUGGED AND STOWED CORRECTLY BEFORE MOVING THE STRETCHER. -
Page 13: Accessory Sockets
Accessory Sockets A pair of sockets are provided on the foot end of the stretcher top for a range of accessories such as end rails, monitor boards and folding foot boards. There is a 'head end' accessory socket option also available. Installing an accessory Loosely insert the accessory into both sockets and then either one at a time or with both hands upside down and using your forefingers, depress the lock buttons and allow the accessory to drop in. - Page 14 Allow fluid to contact electrical fittings, fixtures or connectors. If you suspect significant contamination, consider fogging and/or UVC exposure in conjunction with advice from Modsel and your contamination control representative. DAMAGE CAUSED BY THESE PROCESSES ARE IDENTIFIABLE AND MAY VOID WARRANTY.
-
Page 15: Mattress Care
Mattress Care SURFACE CLEANING RECOMMENDED FOR ROUTINE CIRCUMSTANCES. Do not breach the fabric surface with sharps or other abrasive materials. Disinfect using your institution approved procedure; ensuring the surfaces are decontaminated, free from residues and dry before covering with a sheet. Clean with alcohol based sanitisers or consider quaternary ammonium compounds* or Aldehydes* or Peroxides* Wipe with a clean cloth dampened with a mild detergent solution (or) approved sanitiser. -
Page 16: Routine Maintenance
Contact Modsel or authorised agent for advice. Disposal Contact Modsel or your institution expert for advice on disposal of this device. DO NOT repurpose this device. Modsel as the legal manufacturer of this medical device can advise if it can be reconditioned. v-14092022 - Page 16... -
Page 17: Year Warranty
Lack of maintenance as per minimum requirements. Vandalism, negligence, abuse, accidents, improper installation or normal wear and tear. Products tampered with or altered, modified or repaired by anyone when not approved by Modsel. Conditions such as close proximity to salt, extreme hot or cold temperatures. - Page 18 Manufacturing Records Manufactured by Modsel Pty Ltd, 54 - 56 Industrial Ave, Maryborough, QLD, 4650, Australia. Contact +61 1300 785 790 Class I Medical Device ARTG Included Product Model/Serial Number; Mattress Model/Batch Number; Date of Manufacture; v-14092022 - Page 18...
- Page 19 Notes v-14092022 - Page 19 "Trusted products made for trusted professionals" "Trusted products made for trusted professionals"...
Need help?
Do you have a question about the Contour Multi-X Electric and is the answer not in the manual?
Questions and answers