Table of Contents
Advertisement
................................................................................................................................................ 1
..................................................................................................................................... 9
................................................................................................................................... 13
......................................................................................................................... 16
............................................................................................................................... 26
.......................................................................................................................... 27
7.1 Troubleshooting
...................................................................................................................... 27
9.1 Electric schematic diagram
Contents
................................................................................................................... 2
.................................................................................................................... 2
....................................................................................................................... 2
................................................................................................................. 2
................................................................................................ 3
............................................................................................................ 3
.................................................................................................. 4
....................................................................................... 8
................................................................................................................... 8
............................................................................................................... 8
......................................................................................................... 9
..................................................................................... 9
.......................................................................................................... 9
....................................................................................................................... 9
...................................................................................................... 13
................................................................................... 13
.............................................................................. 24
.................................................................................................................... 25
.................................................................................................... 26
........................................................................................................... 27
................................................................................................................ 29
............................................................................................................. 30
........................................................................................... 30
.............................................................................................................. 30
................................................................................................................ 30
...................................................................................................... 31
.................................................................................................... 31
.............................................. 25
.......................................................................... 30
Advertisement
Table of Contents

Subscribe to Our Youtube Channel
Related Manuals for HUALIAN FRM-980I


Summary of Contents for HUALIAN FRM-980I
-
Page 1: Table Of Contents
Contents Preface ..............................1 1 Product Introduction ........................2 1.1 Products’ application ........................2 1.2 Products’ feature ........................2 1.3 Operation principles ......................... 2 1.4 Principles of products’ naming ....................3 1.5 Parameters of products ......................3 1.6 Products’ external structures .................... -
Page 2: Preface
Preface Thank you for buying the Continuous Band Sealer. The Manual is suitable for the model FRM-980I、 FRM-980II、FRM-980III、FRMQ-980III、FRQ-980III、FRMC-980III. This instruction manual has following content: Product introduction Precautions on safety Movements and storages Installation Operation and commissioning ... -
Page 3: Product Introduction
1 Product Introduction 1.1 Products’ application This sealer is suitable for sealing all kinds of plastic films, which is widely used in fields of food, medicine, chemicals, commodities and agriculture, etc. It is ideal sealing equipment for packing batch products in factories and shops. -
Page 4: Principles Of Products' Naming
III floor type Sealing belt girth(mm) With gas-filling device Solid-ink colored printing Continuous band sealer 1.5 Parameters of products Model Parameter FRM-980I FRM-980II FRM-980III FRMQ-980III FRQ-980III FRMC-980III Item Voltage(V/Hz) AC 220/50 110/60 Driving power(W) Sealing power(W) 300×2... - Page 5 Net weight (Kg)
-
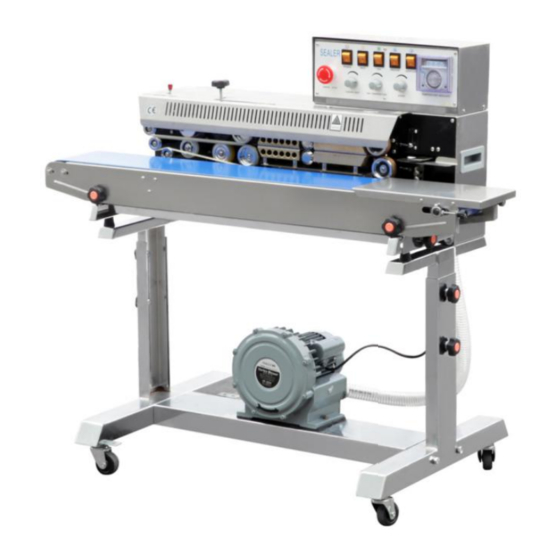
Page 6: Products' External Structures
1.6 Products’ external structures FRM-980I FRM-980II FRM-980III 5... - Page 7 FRMQ-980III FRQ-980III 6...
- Page 8 FRMC-980III 7...
-
Page 9: Safety, Preparation And Examination
2 Safety, Preparation and Examination 2.1 Preparation for use This instruction is a detailed description of the Movement, Storage, Installation, Startup, Operation condition, Maintenance, troubles & solutions and Repairing. The installation of machine is suggested to be operated by trained person. Pls follow the maintenance instructions Before operating the machine, pls be sure to read the operation manual carefully and fully ... -
Page 10: Operational Environment
Assure enough space to replace the easy worn spare parts. 3.3 Installation steps FRM-980 Installation steps of electrical box Take out the FRM-980I machine and electrical box, connect the terminal on the electrical box to the ... - Page 11 terminal on the hull, and install the electrical box on the hull. FRM-980II Installation steps Take out the FRM-980II and dual axis assembly, and install one side in conveyor table (refer to the red circle part in below picture) and insert the other side into connecting shaft to finish installation.
- Page 12 FRM-980III Installation steps Take out floor type fixed support, casters, rung, fastening accessory. Install the rung on floor type fixed support, and then install four casters in the bottom. Take out floor type fixed support, casters, rung, fastening accessory. Install the rung on floor ...
- Page 13 Take out the machine FRM-980III and take out the blot in its 6 rubber feet in the bottom (refer to the red circle part in below picture). Put the machine FRBM-810III on the ready support. Then screw back those blot according to its previous position. Remark: If find the installation hole of the stand has deviation, user need to loosen the knobs in the middle of stand.
-
Page 14: Startup And Commissioning
4 Startup and Commissioning 4.1 Introduction to the controlling panel Name Description Emergency Used to stop the running of machine. Press it to stop the machine at any Stop time. After pressing, the machine will stop all the operation. Power Used to turn on or off the machine power supply. - Page 15 Please abide by safety operating regulations. Via rotating the Power Switch to start the machine. After the connection with the power supply, the indicator light will be on. And the touch display will show the home page, which means the machine is now in the state of standby, and the machine is ready to be operated.
- Page 16 Adjust mark position to regulate the printing position on the bag film. Flatten and align sealing opening, then feed the bag by aligning the bag opening with the feed opening. When the bag opening is gripped by the sealing belts, which makes the bag moving forward automatically, at that moment, please do not push it in or pull it out by force, otherwise there will be irregular sealing or breakdown.
-
Page 17: Commissioning
4.3 Commissioning 4.3.1 Replacement and adjustment of the sealing belt Remove the safety cover, after the heating block cooling, rotate retaining washer by 90° on both upper heating block and upper cooling block to lift both two blocks, then loosen the springs on both embossing roller and pinch roller, meanwhile, remove the guiding belt, so as to make it ready for removing sealing belts (as below figure). - Page 18 4.3.3 Adjustment of sealing belt deviation If the sealing belt deviates, the sealing belt can be adjusted by adjusting the screws in the driven wheel seat (adjusting block) (as below figure). 4.3.4 Adjustment of conveyor table height According to different materials, if it is needed to adjust the height of the conveying table, adjust the conveying table height by the adjusting knob in front of the conveyor table (as below figure), and tighten it after adjustment.
- Page 20 4.3.5 Adjustment of conveyor belt running deviation If the conveyor belt run deviation, the conveyor belt can be adjusted by adjusting knob on the right side of conveyor table (as below photo). Keep the conveyor belt under tension state when adjusting, and it is not allowed to adjust when the conveyor belt under relaxed state.
- Page 21 The example of character’s alignment on the printing wheel (as shown below) Printing example of R-type Character replacement (see below). ...
- Page 22 Name Remark Printing Wheel Pin Printing Wheel Shaft Cover Lateral Pin Character Kit Silicone Rubber Locating Pin Printing Wheel Printing Wheel Set Screw Rotate the pin on the printing wheel cover to let the lateral pin come out of the groove, then the ...
- Page 23 Adjustment Screw Pressure Adjustment of Printing Wheel and Silicone Wheel: There is no contact between the characters on the printing wheel and the silicone wheel when it is not working. Loosen the screw (4) on the front of the silicone wheel and rotate hexagonal nut of the eccentric wheel (3) so that the character kit in rotation can contact with the silicone wheel(2).
- Page 24 Low temperature series Φ36 Φ36 120-150℃ Φ36 (code 935) Mid-temperature series Φ36 Φ36 135-165℃ Φ36 (code 932) High temperature Φ36 series150-175℃ Φ36 Φ36 (code 930) This machine is suitable for the following types of ink roller specifications, including white, yellow, red, blue, green, brown, black and other colors.
-
Page 25: Standard Operation & Parameter Setting
4.3.8 Control panel removal method First, remove the back cover of the chassis; Second step, remove the emergency stop switch (by turning out the red knob on the emergency stop switch counterclockwise, and then turning out the silver clasp under the red knob counterclockwise), and remove the pins on the front and rear sides of the temperature controller;... -
Page 26: Preparation, Adjustment And Inspection Before Operation
If any question about operation and function of the machine, when related information is not included in this manual, please contact manufacturer or distributor. If machine is not running in normal situation or produces strange noise, please turn off power ... -
Page 27: Maintenance
sealing effect, please adjust the belt-pressing wheel to make pressure change from low to high slowly so that to get the expected sealing effect. Common material heat-sealing temperature reference table Thickness Recommended Heat-sealing Material Name (um) temperature setting (℃) speed (m/min) LDPE 30~160... -
Page 28: Maintenance Schedule
6.2 Maintenance schedule Schedule Contents of Maintenance 1.Use the brush to remove the substance attached to the appearance of the sealing belt and guiding belt. Daily 2.Use wet cloth to clean the appearance of the conveyor belt. 3. There is no noise or abnormal noise during motor operation. 1.Check whether the sealing belt is worn or not 2.Check whether the guiding belt is worn or not Monthly... - Page 29 5. Sealing belt is easy to be 4. Clean the surface of sealing belt in time 5. Clearance between two heating blocks scorched. is too small or temperature is too high. 1. Embossing wheel is worn out. 1. Replace embossing wheel. 2.
-
Page 30: Motor Maintenance
dust. 4.Repair the round pin. 3.The main control circuit board is 5.Repair the clutch. damaged. 4.The clutch pin is off or damaged. 5.Electromagnetic clutch wire is broken. 1.Replace or install the positive sensor 1.The sensor ( groove optical (groove optical coupling) or remove dirt coupling)damaged, displaced, or Printing wheel cannot from the surface of the photocoupler. -
Page 31: Movement And Storage
motor is to be used in bad condition (such as exposure to Corrosive atmosphere, temperature higher than 30℃ or lower than 5℃). 8 Movement and Storage 8.1 Equipped with carton packaging The product is tightly packed by filler in the carton. ... -
Page 32: Electric Schematic Diagram
9 Electric Schematic Diagram 9.1 Electric schematic diagram...
Need help?
Do you have a question about the FRM-980I and is the answer not in the manual?
Questions and answers